The New York Mysteries 5: Power of Art adventure ends with chapter 3. Our intrepid journalist continues to search for answers in this intriguing mystery. Find all the answers you need as we guide you through each puzzle and mystery you encounter. Read on for our New York Mysteries 5 Chapter 3 walkthrough guide.
Recommended Videos
Complete New York Mysteries 5: Power of Art Walkthrough
Find a complete walkthrough for each of other chapters of New York Mysteries 5: Power of Art right here:
Table of Contents
New York Mysteries 5 Chapter 3 Walkthrough
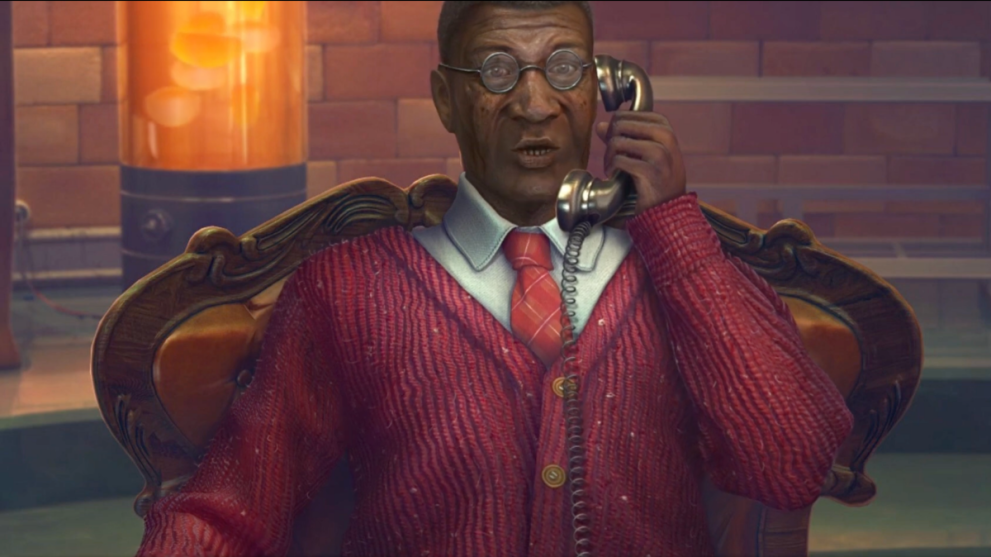
Our hero, Laura, continues her investigation and tries to find Noah, the artist. We now journey to find the art investor who is somehow involved…
- Find a collectable by the abandoned car;
- There is a morphing object near the treestump;
- Look closer at the suitcase and find the key in the pocket of the jacket;
- Head right over the bridge;
- Pick up the bell clapper on the left;
- There is a morphing object on the wall nearby;
- A collectable can be found on the wall to the right;
- Use the key to open the green door;
- Start the first puzzle of this chapter.
Hidden Object Puzzle 1
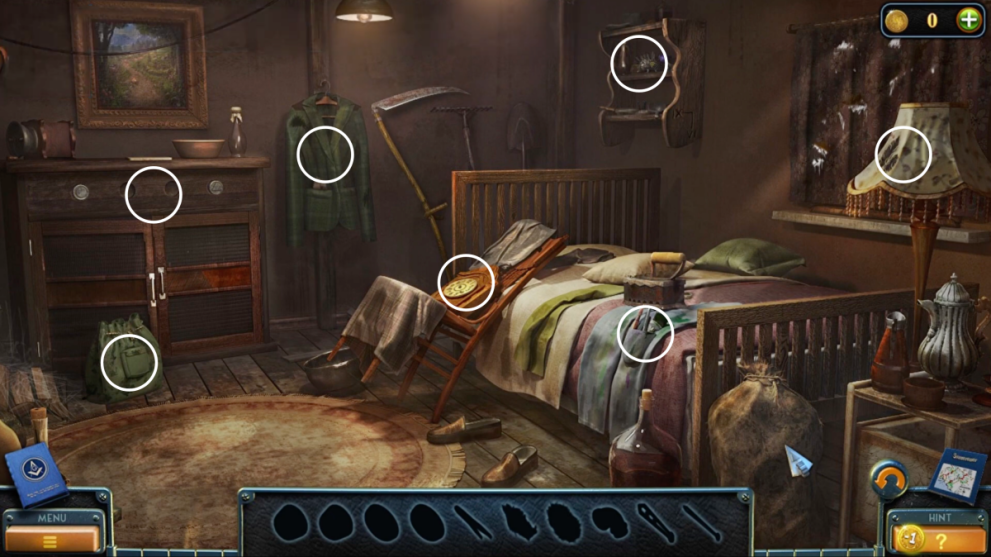
- Solve the New York Mysteries 5 Chapter 3 hidden object puzzle:
- Open the green bag;
- Take the tube;
- Click the scythe;
- Take the fabric from the jacket pocket;
- Look at the lamp and find a clock hand;
- Check out the artist things on the bed;
- Take the knob and tweezers;
- Add the tube to the iron and take the button;
- Take another piece of fabric from the shelf to the right;
- Use the tweezers to take the button from the hedgehog;
- Use the fabric pieces to repair the lampshade;
- Open the cupboard and look inside;
- Add the buttons to the box;
- Press the buttons in order: Cherry, Blackberry, Strawberry, Pear;
- Take the clock hand;
- Add the hands to the clock and set the time seen on the shelf: 9:30;
- Take the knob;
- Look at the cupboard and add the knobs to the shelf;
- Click the knobs in the right order: circle, triangle, square, hexagon;
- Take the adjustable wrench.
- Use the wrench on the ladder and take it;
- Get the glass cutter from the cart in the center-back;
- Go back to the area with the abandoned car;
- Use the glass cutter on the car window and open the door;
- Start the next puzzle.
Hidden Object Puzzle 2
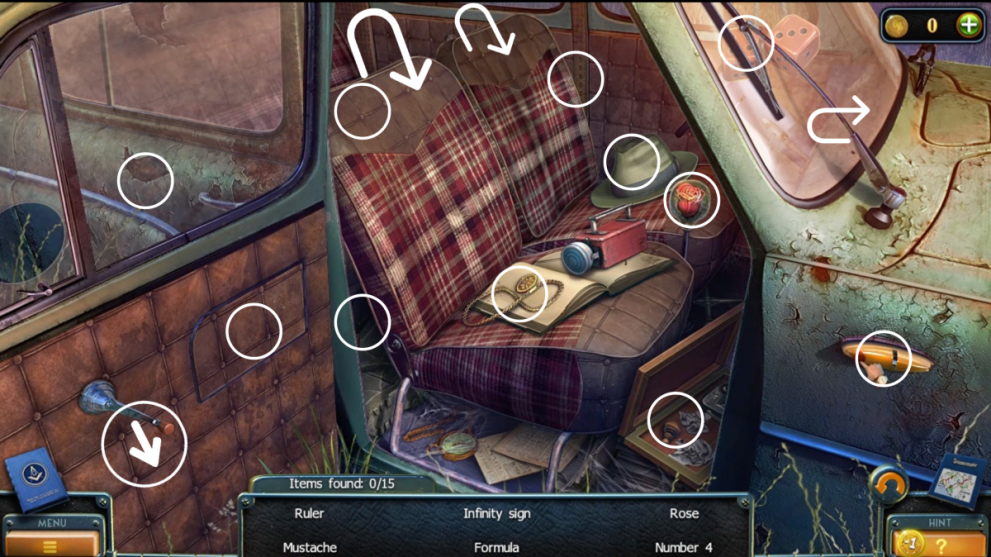
- Solve the New York Mysteries 5 Chapter 3 hidden puzzle:
- The list will show more objects as you progress;
- Move the seats to find objects behind;
- Roll the window down to discover the mustache shape behind;
- Move the window wiper to see the number 4 on the dice;
- Open the compartment in the door to find a feather;
- Not all objects can be collected until they appear in the list so you may have to go back to them.
- Take the matches;
- Use the detail to open the suitcase;
- Take the bandage;
- Go to the village again;
- Look at the bell tower;
- Add the ladder and climb up;
- Add the bell clapper to the bell;
- Place the bandage and light it using the matches;
- Check out the front of the van;
- Take the key;
- Go back so you can unlock the boot;
- Put the keys back in the front of the van;
- Climb into the back.
In the Hanger
- Find the morphing object by the tires;
- Get the collectable from atop the van;
- Click the cloth on the toolbox to move it;
- Get the clue;
- Look close at the doors and add the clue to start the puzzle.
Hanger Puzzle
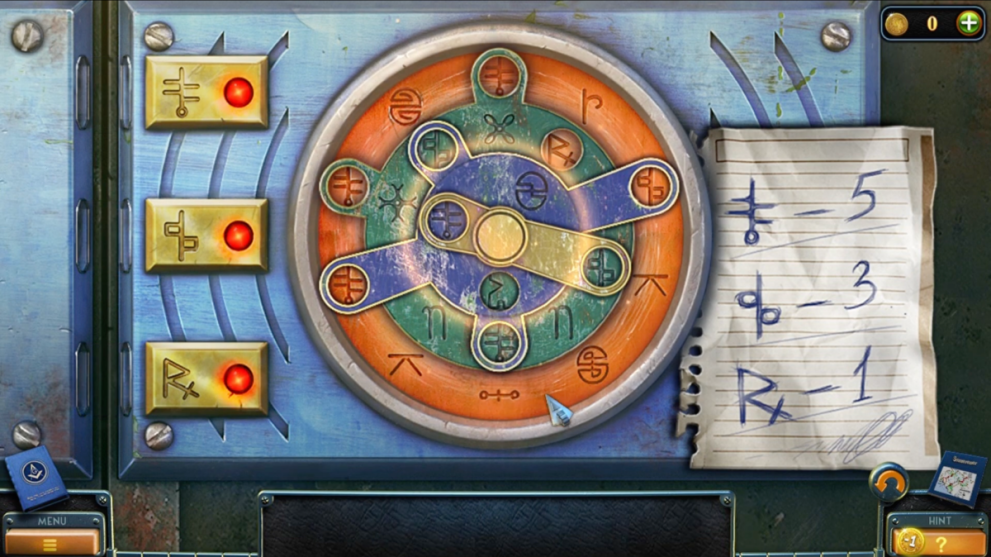
- Rotate the dials until they match the symbols in the clue as shown in the above solution;
- Collect the morphing object from the roof;
- Find the collectable from the boxes to the left;
- Look closer at the trailer;
- Move the cloth and find the handle beneath;
- Head back to the hanger and use the handle to open the toolbox;
- Take the screwdriver and the wire;
- Go outside again and use the wire in the drain to grab the keys;
- Head into the hanger and go to the truck;
- Use the keys to open the truck;
- Pick up the key card from the seat;
- Open the glove box and get the ball;
- Head outside and use the keycard on the shed;
- Pick up the magnet;
- Get the handle from the drawer;
- Click the screens twice to start the next puzzle.
Moving Tile Puzzle
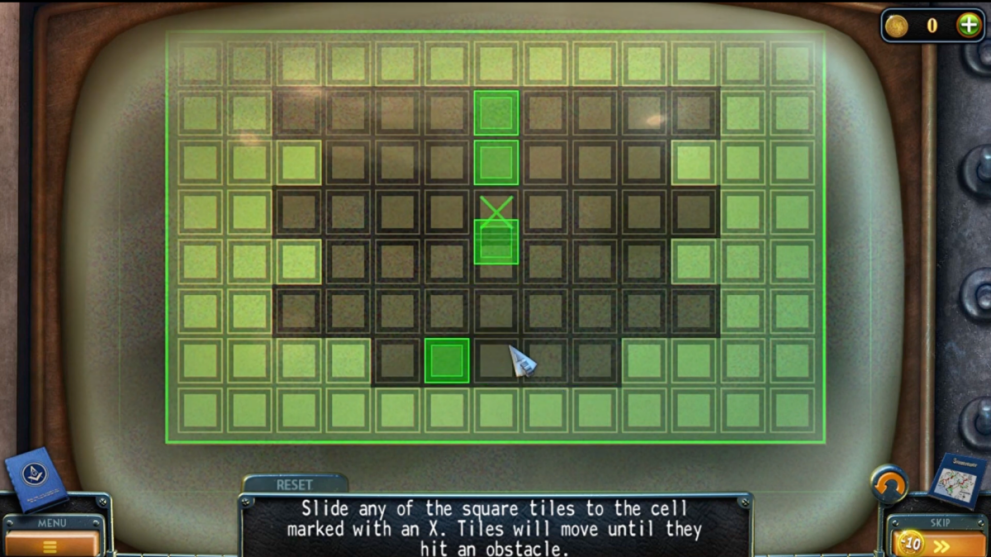
- Unfortunately, this puzzle appears to be random. The tiles won’t start in the same position each time you play.
- Think strategically and a few moves ahead each time;
- Press reset if you are lost;
- The goal is to have one tile touch the X;
- This means you need to stack other tiles so your final tile can hit the X;
- Tiles will slide until they hit an obstacle- use this to your advantage when sliding tiles into place;
- We found it easiest to move the tiles to the bottom and then shifting them around until you can stack them in the right column.
- Click the winch and add the handle;
- Click the wire to attach it to the trailer;
- Look at the winch closer and click the handle to move the trailer;
- Click the balcony;
- Use the screwdriver on the window;
- Enter.
The Base
- Pick up the collectable from the table to the right;
- Find the morphing object on the headboard;
- Use the magnet on the fishtank;
- Get the engraved detail;
- Click the door and exit;
- Find a morphing object on the wall;
- Pick up the collectable from the floor;
- Get the knife from the hostess trolley;
- Pick up the engraved detail from the dish on the trolley;
- Go to the bedroom again;
- Add the details to the trunk;
- Take the flower and the slides;
- Use the knife on the side of the trunk and take the detail;
- Add the wooden detail to the portrait;
- Take the hexagon tile and the golden element in the secret compartment;
- Go into the hall again and click the red box;
- Add the golden element and solve the puzzle.
Sliding Symbol Puzzle
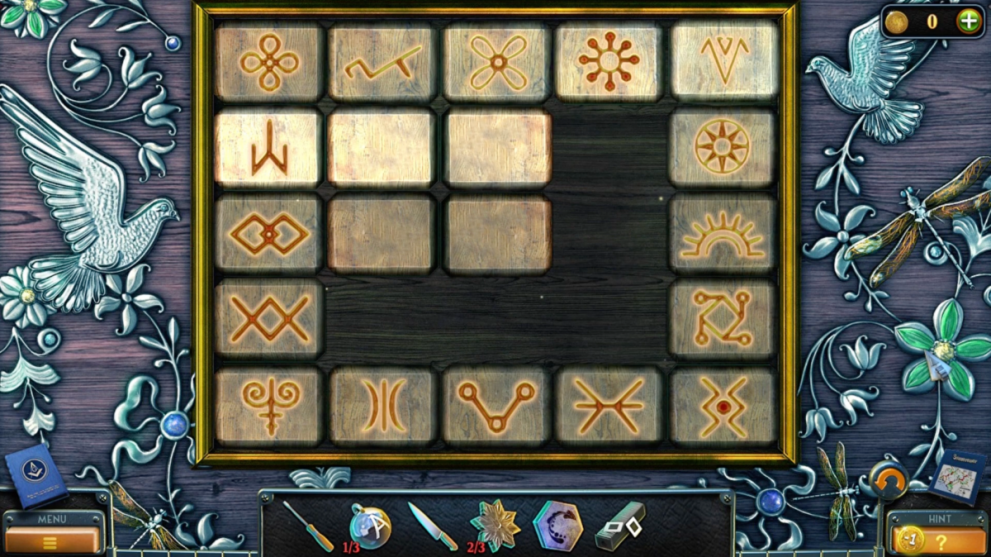
- Solve the sliding symbol puzzle by moving each tile until it covers the corresponding symbols underneath. Start with the corner pieces and keep track of where the symbols are as you move each piece. The tiles glow when they are in the right space. The solution is as shown above;
- Get the key and the second ball;
- Leave through the arched doorway.
The Library
- Find a collectable in the vase;
- There is a morphing object on the chandelier;
- Click the mechanism on the right;
- Click the curtain to pull it back;
- Look closer at the room;
- Get the flower from the projector;
- Add the slides to the projector and switch it on;
- Look through the slides until you get a task update;
- Click the ornate floor and add the hexagon tile to start a puzzle.
Hexagon Rotation Puzzle
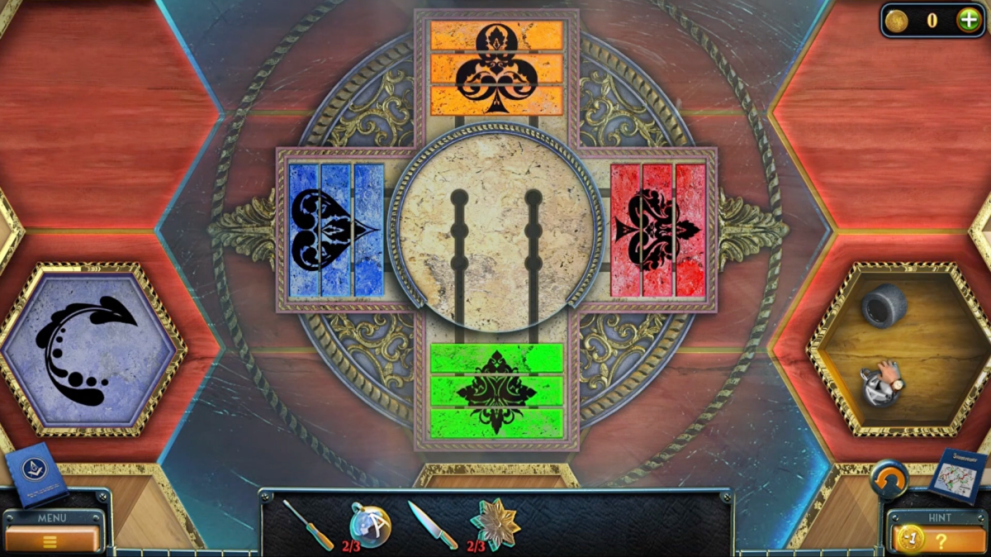
- To get to the end result as shown in the image above, just follow these steps:
- Rotate anticlockwise;
- Pick up the blue and green tiles from the top;
- Rotate anticlockwise;
- Pick up the orange tile from the left;
- Rotate clockwise;
- Place the orange tile in the top;
- Rotate anticlockwise;
- Place the green tile in the left side;
- Rotate anticlockwise x 2;
- Pick up the red and orange tiles from the right;
- Rotate anticlockwise;
- Place the orange tile in the top to complete the orange symbol;
- Rotate clockwise;
- Place the red tile in the right space;
- Rotate anticlockwise x 3;
- Pick up the green and red tiles from the bottom;
- Rotate clockwise x 3;
- Place the red tile in the right space;
- Rotate anticlockwise x 2;
- Pick up the green tile;
- Rotate anticlockwise;
- Place the green tile;
- Rotate anticlockwise x 3;
- Place the blue tile in the left space;
- Rotate clockwise x 3;
- Pick up a green tile;
- Rotate anticlockwise x 3;
- Pick up two blue tiles;
- Rotate anticlockwise;
- Place the blue tile on the bottom;
- Rotate anticlockwise x 3;
- Place the blue tile on the left;
- Rotate anticlockwise;
- Take the blue tile from the bottom;
- Rotate anticlockwise x 3;
- Place the blue tile in the left;
- Rotate back to the bottom;
- Place the green tile in the bottom space again.
- Take the ball and lens;
- Add the lens to the telescope on the balcony;
- Look at the pattern on the roof opposite;
- Click the wall on the left;
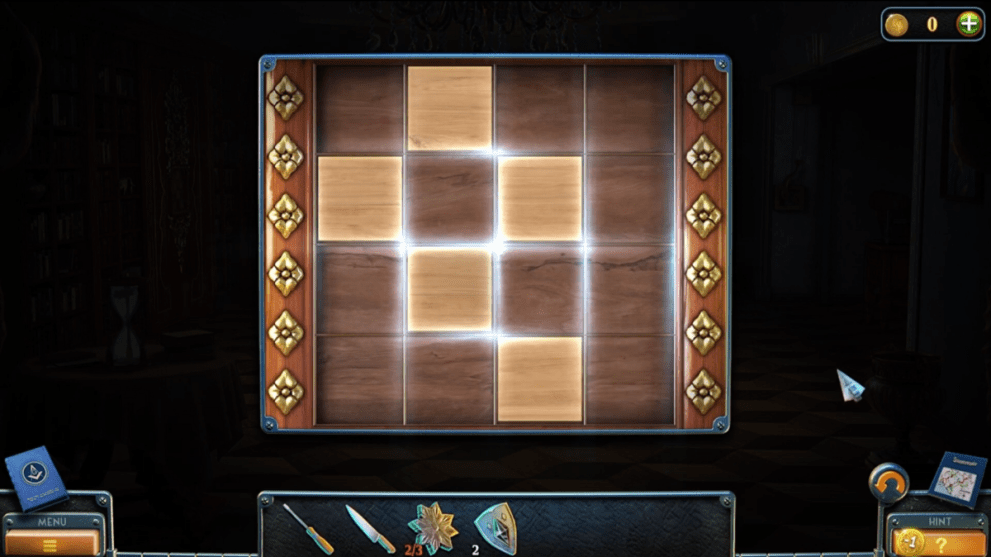
- Copy the pattern in the wall (see below).
Cabinet
- Use the key on the door to the right in the hall;
- Find the morphing object and also the collectable on the table;
- Click the telephone;
- Use the screwdriver so you can open the box behind the phone;
- Take the miniature shield;
- Reconnect the red wire;
- Click the map on the wall;
- Take the miniature shield;
- Go to the library and click the table;
- Add the shields to the display case;
- Take the figurine;
- Go to the cabinet again;
- Add the figurine to the display on the chair;
- Look at it closer to start the next puzzle.
Hidden Object Puzzle 3
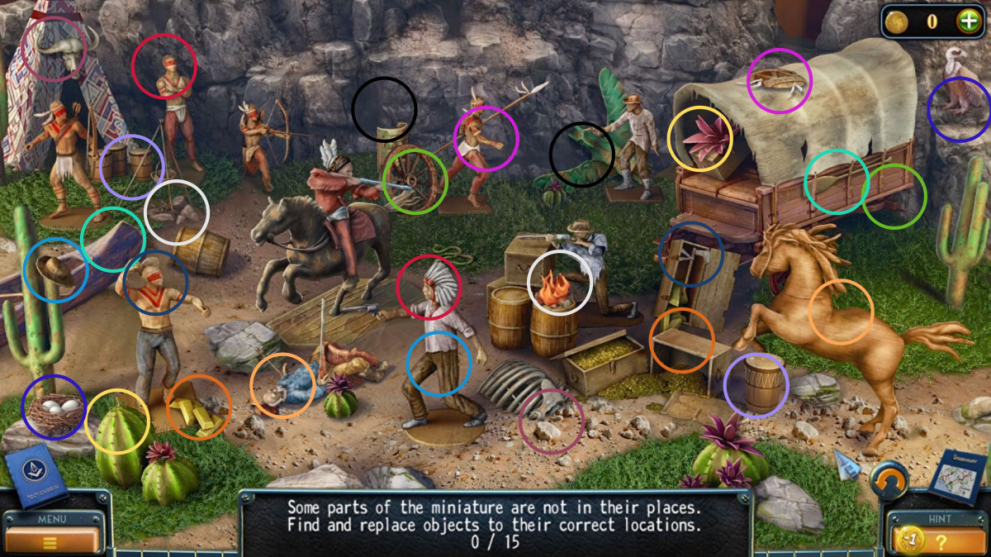
- Solve the New York Mysteries 5 Chapter 3 hidden object puzzle by using the color-coded solution above;
- Take the lens;
- Add the lens to the viewer on the map;
- It will show the word NIAGRA;
- Look at the Newton’s Cradle toy;
- Add the balls to it;
- Change the balls until they spell NIAGRA;
- Take the graphite and hourglass symbol;
- Click the pad on the desk;
- Turn the pages and use the graphite to show up a clue;
- In the library, click the table;
- Turn the hourglass;
- Add the hourglass symbol;
- Take the flower;
- Go to the hall;
- Add the flowers to the door;
- Open to start the next puzzle.
Hidden Object Puzzle 4
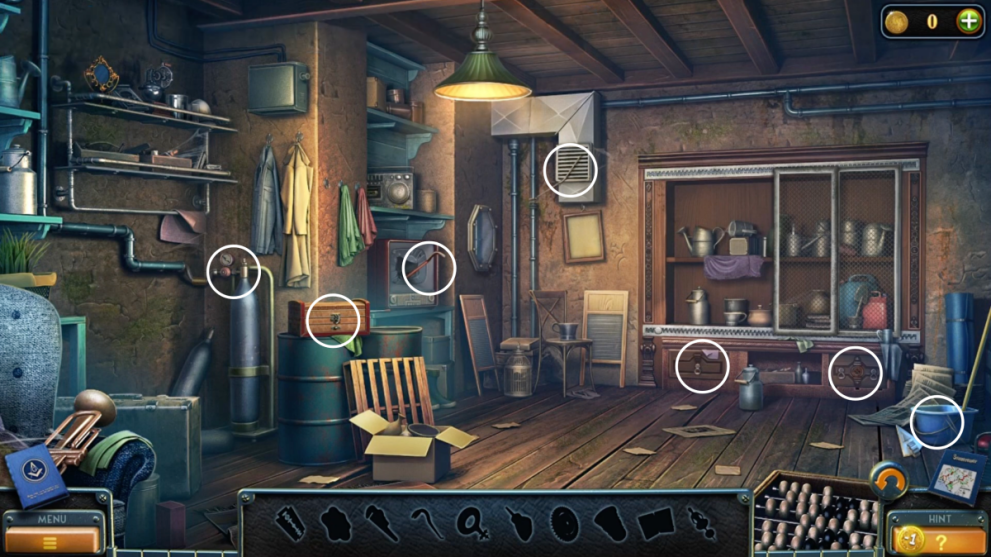
- Solve the New York Mysteries 5 Chapter 3 hidden object puzzle:
- Look in the blue bucket to find the razor blade and pipe wrench;
- Pull the crowbar from the TV;
- Open the left side drawer;
- Move the cloth aside to find the jeweler’s tools;
- Use the crowbar to remove the nails in the drawer;
- Take the gear;
- Take out the false bottom and take the key;
- Click the canister on the left;
- Add the valve and turn it;
- Use the wrench on the pipe;
- Get the drum for the music box;
- Use the razor blade on the rope;
- Get the ballet figurine;
- Add the ballet figurine to the music box;
- Open it;
- Add the drum and click to secure;
- Add the screws and use the jewelry tools;
- Get the oiler;
- Use the key to open the box;
- Add the gear;
- Oil the mechanism;
- Click the grate above;
- Take the spade.
- Head to the bedroom;
- Use the spade on the plant;
- Take the amulet;
- Head to the library;
- Use the amulet on the device by the doors.
The Dungeon
- Find a collectable on the fire extinguisher;
- The morphing object is on the back wall;
- Look at the hatch on the floor and use the screwdriver to unlock;
- Take the handle;
- Use the knife on the box;
- Take the battery;
- Press the red button;
- Go through;
- In the dungeon, find the collectable on the green cloth;
- find the morphing object on the wall;
- Look closer at the forklift;
- Click the panel on the floor;
- Add the battery;
- Connect the wires;
- Pull the lever to raise the pallet;
- Pick up the bolt cutters;
- Head to the elevator and use the bolt cutters on the chain link;
- Pick up the detail from the box by the gate;
- Add the detail to the mechanism at the door.
Back at the House
- Pick up the collectable by the tree stump;
- Find the morphing object from the fence to the left;
- Get the pattern part and the fire iron from the BBQ;
- Use the fire iron on the wood on the door;
- Go inside;
- Find a collectable and morphing object on the floor on the center-right;
- Take the wax from by the radio;
- Use the fire iron to move the wooden beams;
- Take the bucket;
- Get the matches from the stove;
- Open the oven and get the oil;
- Go out to the BBQ;
- Use the matches to light the BBQ;
- Add the wax;
- Take the pattern part from the melted wax;
- Use the bucket at the puddle to gather water;
- Add the water to the drain to flush out the stone tile;
- Use the stone tile on the statue to start the next puzzle.
Stone Tile Puzzle
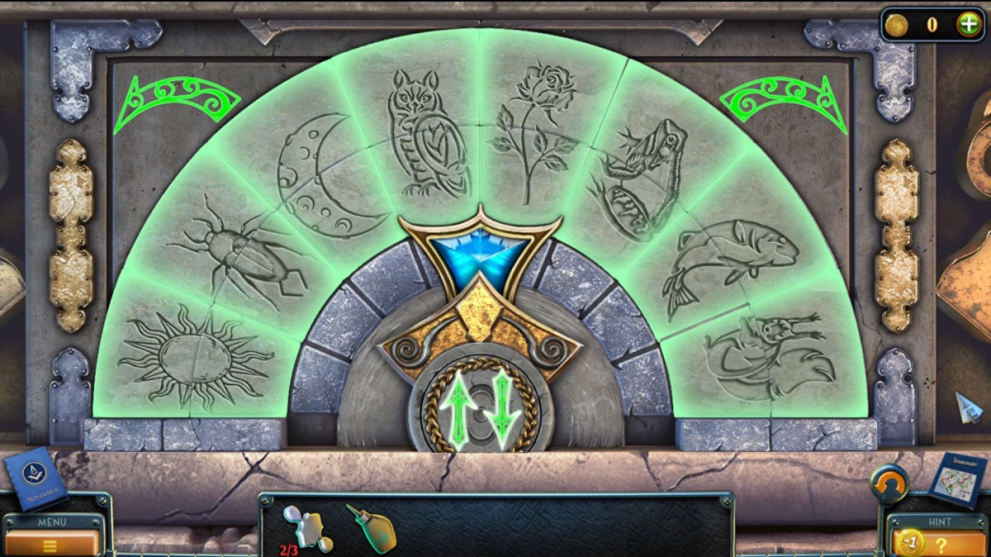
- Solve the stone tile puzzle by moving the stone tiles in pairs. There is no set solution, unfortunately, it takes patience and time. Go slowly and methodically. Click reset if you get stuck.
- Take the radio receiver knob and a clue;
- Add the knob to the radio;
- Take the pattern part and the key;
- Add all pattern parts to the wooden box to start the next puzzle.
Flask Puzzle
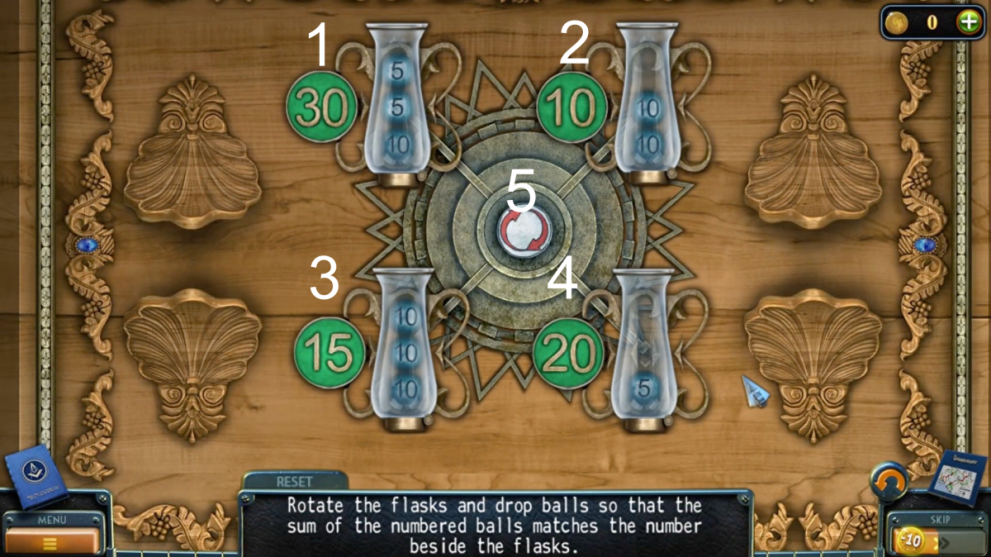
- Solve the flask puzzle so the numbers in the flask add up to the numbers in the green circles:
- Click the buttons in order: 1, 5, 1, 1, 5, 1, 5, 2, 5, 5, 5, 2.
- Take the handle and tweezers;
- Use the key on the white door;
- Go downstairs;
- Take the collectable from near the wardrobe;
- Find a morphing object on the cloth on the floor;
- Use the handle on the fireplace;
- Add oil;
- Open the grate and take the corkscrew;
- Use the corkscrew to open the wine bottle in the rack on the wall;
- Use the tweezers to get the clue;
- Look closer at the wardrobe to move it;
- Click the safe and add the clues to start the puzzle.
Safe Decyrption Puzzle
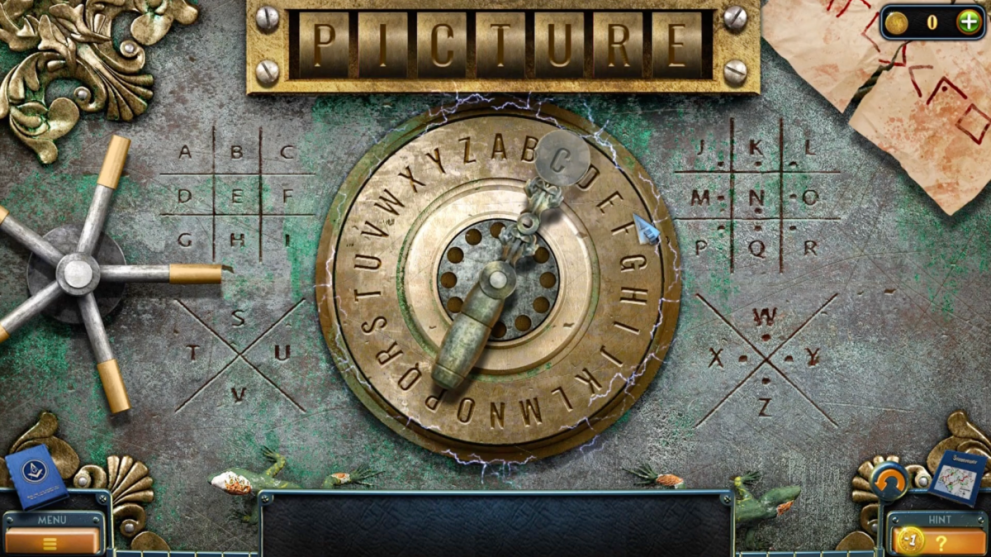
- The safe can be cracked by entering the word: PICTURE;
- Take the varnish;
- Find a collectable from the left side trolley;
- The morphing object is on the pipes to the left;
- Click the machine;
- Take the button;
- Use the handle on the storage locker on the top right;
- Take the hose;
- Go to the dungeon;
- Head down the corridor;
- Find your last collectable on the barrels to the right;
- Your last morphing object is beside the box to the center;
- Click the boat on the left;
- Pick up the button and the canister;
- Take the crystal from the boxes to the right;
- Use the knife to cut the ropes;
- Take the painting;
- Click the office to the right;
- Look closer at the suitcase;
- Take the key;
- In the dungeon, place the canister by the fuel barrel;
- Fill it with gas;
- Head to the pier;
- Fill the boat with gas;
- Go to the office;
- Add buttons to the suitcase;
- Open and get the fuse;
- Click the grate mechanism;
- Click the silver door and replace the fuse;
- Switch the machine on;
- Open the gate and escape;
- Go to the monster cave and put the painting on the trolley;
- Use the key in the machine;
- Add the varnish to the painting.
That concludes the New York Mysteries 5: Power of Art Chapter 3 walkthrough! For more hidden object fun why not check out Enigmatis The Mists of Ravenwood next?
Twinfinite is supported by our audience. When you purchase through links on our site, we may earn a small affiliate commission. Learn more about our Affiliate Policy







Updated: Aug 23, 2024 06:16 am