All Zombies Easter Eggs We’ve Found So Far in Black Ops 4 Zombies
Treyarch’s Call of Duty: Black Ops 4 is chock full of Easter Eggs. With four Black Ops 4 Zombies maps available at launch, featuring two different crews and storylines, the game can easily overwhelm casuals and newcomers. To help you easily get acquainted with the various maps, we’ve created a detailed guide on all zombies Easter Eggs in Black Ops 4.
Generally speaking, Easter Eggs are normally secrets or fun references. However, for the uninitiated, Easter Eggs in Call of Duty Zombies also comprise of elaborate and complex puzzles that will test your wits, skills, and patience. Because of that, there are a lot of Easter Eggs to unpack in Black Ops 4 Zombies.
The main Black Ops 4 Zombies Easter Eggs are also quite elaborate, requiring you to accomplish multiple tasks. It normally concludes with a final boss and rewards you with an ending cutscene for your hard efforts. Completing the main Easter Egg is the only way a match will end without your party getting wiped out by the hordes of zombies.
IX
Main Easter Egg
Several of the Easter Egg steps are tackled below in our guide, so these sections will only be mentioned in brief.
Completing the main Easter Egg in IX requires players to complete multiple tasks and acquire several items. Basically, you can work on these activities in any order that you like:
- Unlock the Pack-a-Punch
- Re-Pack your weapons with the Pack-a-Punch machine until you get a weapon with the Firebomb effect.
- Complete three challenges
- Acquire the Brazen Bull Shield
- Get the Death of Orion
- Obtain a dung by getting a terribly bad crowd affinity
- Get a skull with a blue symbol on its forehead. This can be acquired within the vicinity of the Pack-a-Punch area, specifically the Temple. Once you’ve seen the skull, activate your specialist weapon to make it pop out of the wall. Simply pick up the skull to put it in your inventory.
- Obtain a pyre by having a Gladiator Zombie hit one of the braziers with his throwing axe attack. Doing this will allow you to pick up a broken pyre part. Place this piece on an arm shackle in the Odin Tower: Cauldron and return after two to three rounds to get the charcoaled pyre.
After you have accomplished the aforementioned tasks, you need to work on a few precise Easter Egg steps in order to proceed. Start first by inserting the Skull inside the Skull Grinder found in the Flooded Crypt. Afterwards, use several charged shots with the Death of Orion to power the grinder. Pick up the bone meal once the grinder has finished breaking down the skull.
Now that you have the charcoaled pyre, dung and bone meal, proceed to the Zeus Tower: Bath House and insert all these items in one of the bowls. It takes two to three zombie waves before the mixing process completes. Once that’s done, pick up the new item from the bowl.
Danu Tower Trial
Head to Danu Tower’s Arboretum and place the mixture on the floor in the center of the room. Once the mixture emanates a green smoke, kill a few zombies that are on top of the mixture with the firebomb gun effect. Doing this successfully will cause some blue cracks to appear on the floor.
Have everyone in the party stand on the cracked floor and stay there while killing multiple zombies. Once successful, everyone will be transported to a darker-looking version of the Danu Tower.
Your main goal in this bleak version of the Danu Tower is to shoot the red-colored pods in the room. Everyone in your team will want to unload their bullets at the pod as much as they can, as it takes a significant amount of damage before the pods break. You shouldn’t worry about running out of ammo, as you can pick up a Max Ammo power-up once you’ve destroyed a pod. There’s a total of three different pods in this area, and you need to destroy all of these before you can get transported back to the main map.
Bull symbol locations and Ra Tower Trial
The next step of the main Easter Egg involves using the Brazen Bull shield to shoot fireballs at four bull symbols located across the map. The bull symbols have different spawn points per playthrough. These are mainly located in the Arena, Flooded Crypt, Draw Bridge, Danu Tunnel, Odin-Zeus Temple Entrance, Temple, The Pit, Ra Tower: Burial Chamber, Arena, Danu Altar Room.
Successfully shooting each bull symbol will spawn a Champion zombie. Slaying this brute will cause the zombie to float in the air and have its soul absorbed by the Ra Danu Statue.
After all four zombie Champions are slain, proceed to the Ra Altar Room. Inspect the blue symbols left by the statue’s laser beam markings to get transported to an alternate version of the Ra Altar Room. But before heading in, make sure that someone from your party has a pen and paper to jot down some notes.
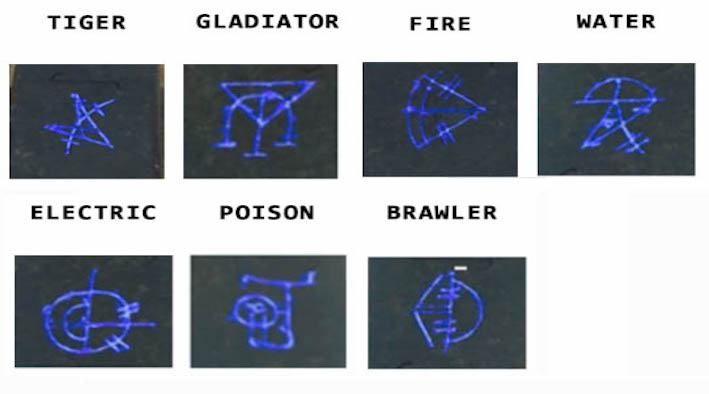
Once you are transported to the alternate room, various symbols will be shown on the pillar. Each symbol corresponds to a certain zombie type that you need to kill. Basically, you need to kill specific zombies based on the zombie symbol in the order they were displayed on the pillar, from bottom to top. If you accidentally kill a wrong special zombie, you need to completely redo the whole process. Don’t worry, regular zombie kills don’t count towards the order.
You will need to complete this challenge twice.
Here are all the symbols and their corresponding zombies, courtesy of the Easter Egg hunters on Reddit:
After completing the Danu Ra trial, you need to raise four different poles in the map. These are located in the Collapsed Tunnel, Danu Tunnel, Odin Tunnel, and The Cursed Room.
Raising each pole is easily done by doing what gamers do best: unloading lead until the item evaporates from existence. Shoot the tip of each pole to complete this challenge.
Lightning pole locations and Arena Trial
After you have raised all poles, you need to get a gun with the Kill-O-Watt electric effect. This can be acquired by chance by re-packing a gun. It also comes as a standard with the Death of Orion or Serket’s Kiss.
Head back to the Arena and have your entire team interact with the stone pillar. After you have been transported, walk back to the Arena.
The objective in this new trial is to shock zombies with the Kill-O-Watt ability and kill them to power up the poles. After all poles are fully lit, blue orbs will appear in the podium. Have everyone in your team interact with the orbs.
After interacting with the orbs, you will face an onslaught of zombies. Thankfully, everyone in your team will have a fast recharging specialist ability. Simply survive the round to finish this trial.
Glowing symbols with the Death of Orion
After you finish the trial, you will need to find three different symbols across the map. Basically, you need to use the Death of Orion and shoot the symbols at a certain angle. The symbols can be found in The Pit, Danu Tunnel, and The Crypts. You know you have correctly shot the symbols when they emit a blue light.
Once all symbols emit a blue light, have everyone in your team stand on the large grate in The Pit and press the interact button. This will be a lengthy three-wave battle with tough foes.
After you have completed all trials, you can now prepare yourself for the final boss. When you are ready to start the final battle, head to the Arena and enter the red portal.
Zombie elephant boss
The final boss fight is definitely tough. Basically, you need to fight against a large zombie elephant alongside multiple other zombies. The zombie elephant is also wearing armor, so you should focus on destroying its plates first to make it vulnerable.
After you kill the boss, a much bigger and badder zombified elephant will enter the arena. Overcome this fight to complete the main Easter Egg in IX and watch the ending cutscene for yourself.
Side Easter Eggs
IX Pack a Punch station
Go to one of the four god temples in the four corners of the map. Specifically, these are the Ra Altar Room, Danu Altar Room, Odin Altar Room, and Zeus Altar Room. Interacting with the Gong in each room will summon a few champions, which are extremely tanky zombies. Sometimes, the game will opt to spawn zombified tigers.
A bright-glowing blue-hued head will drop on the floor once you’ve eliminated the champions. Walking towards it will automatically place the head in your inventory. Do this for the rest of the temples in any order.
With all four heads in your inventory, head to the Temple. You will see four spikes in the center of this area. Place a head on each stick to unlock the Pack-a-Punch station for your playthrough in this map.
Crowd Affinity
Being an arena-themed map, IX has a crowd that is eagerly watching your every zombie-slaying manoeuvre. Perform well in the map and the crowd will audibly cheer for you, and will provide you some good loot and power-ups. Do badly and they won’t sound too pleased. Get on their bad side and they will literally throw a poop at the arena.
Reviving teammates, killing zombies with traps and special weapons, and slaying champions are some of the ways you can maintain a positive affinity with the crowd. Meanwhile, taking zombie damage, getting burned in the zombie arena, getting downed, and throwing grenades at the crowd will lower your affinity.
Affinity is displayed by the green-colored thumbs up or red-colored thumbs down icon in the bottom left area of the screen. Having a positive affinity at all times actually sounds ideal. However, if you’re trying to complete the main Easter Egg, you will actually need to achieve a positive and negative affinity in a single playthrough.
Challenges
Reaching tens or hundreds of waves of zombies is a feat in itself. But for the bloodthirsty crowd in IX, they want to see you spark things up in the arena.
By knifing the ropes in the Arena and unfolding banners, you can work on various types of challenges to earn various rewards and power-ups. Completing challenges is actually one of the easiest ways to earn a Pack-a-Punch’d gun early on in the game. Specifically, you can acquire the Z-Harmony pistol by completing three challenges.
Mad Hatter song from Avenged Sevenfold
Avenged Sevenfold’s Mad Hatter was used in a promotional music video for Black Ops 4 Zombies, and you can rock to this beat in your fight against the undead in-game. Shooting four medallions scattered across the map will instantly start the Matter Hatter song.
The coins for the Mad Hatter Easter Egg can be found in four areas:
- Danu Tower: Entrance – Peek through the window and check underneath the wooden staircase.
- Odin Tower: Entrance – The medallion is located inside a metal grating. Crouch and look inside the metal grating to see the medallion.
- Ra Tower: Burial Chamber – The medallion is located at the right side of the Mystery Box, in-between two chests.
- Zeus: Altar Room – The medallion can be found on the statue to the right of the mystery box.
Death of Orion and Serket’s Kiss
The Death of Orion is one of the most unique and ridiculous Wonder Weapons in the Black Ops series. This Wonder Weapon literally takes the form of a scorpion that can fire deadly bolts at enemies. Its secondary fire can shoot capture beams that stuns multiple enemies that are huddled together.
Once upgraded via the Pack-a-Punch machine, the weapon will transform into the Serket’s Kiss.
To get the Death of Orion, you first need to build the Acid trap. This can be done by obtaining three parts. The chain and cog part can both be obtained in the Temple. Meanwhile, the metal part can be procured by completing three challenges in the Arena.
Another requirement is a Statue Head. To start, head to Danu-Ra Temple Entrance and approach the metal fence in the area. Shooting at the fire brazier at the far end of the hall will cause the Statue Head to appear in one of the four different temples.
Head to the Stone Bridge and look at the ground to see a flaming pointer symbol, which actually points to the location of the Statue Head. Basically, it can appear in Ra Tower: Burial Chamber, Danu Tower Arboretum, Odin Tower: Cauldron, or Zeus Tower: Bath House.
With all the requirements on hand, you can now build the acid trap. Place the Statue Head under the acid trap. Activate the acid trap to melt the Statue Head, which reveals a Scorpion Key inside.
Next, you need to acquire a golden jar. This can be obtained by finishing two rounds with a maximum crowd affinity. You know you’re successful when the announcer makes a special announcement that they’ve given you a special gift.
Go to Danu Tower: Arboretum and look for one of the trees that has a small hole. Interact with the hole to place your Skeleton Key in the hole and start filling the golden jar with the tree sap. Once the jar is full, go to a Mystery Box and select the option to poison the box. Doing this will provide you a guaranteed roll for the Death of Orion.
Craft Brazen Bull / Iron Bull shield
Aside from allowing you to block a few attacks and shoot a gun while having the shield raised up, the Brazen Bull shield provides you with a sword to slash down enemies and shoot devastating fireballs. It can be repaired and restocked with ammo for a measly 250 points, making it a must-have for players who are looking to last more zombie waves in IX.
To craft the Brazen Bull shield, you simply need to procure three weapon parts across the map. Each crafting item is generally located at the tower or temple dedicated to Ra, Zeus, and Odin. However, each crafting item has varying predetermined spawn locations per playthrough.
One of the crafting parts can be found in the Ra Altar Room. These can spawn in two locations: near the gong or on the far end of the Mystery Box.
Another crafting part can spawn in three different locations around the areas dedicated to Zeus. It can appear near the feet of one of the statues in the Altar Room, one of the statues in the Tower Entrance that is extending his hands, or the Tower Bathhouse in front of a mural.
The last crafting part can be spawn in three different rooms dedicated to Odin. It can appear on a shield rack at the Tower Entrance, beside a wooden barrel in the Altar Room, or inside the Tower Cauldron area.
With all crafting parts acquired, simply proceed to the workbench and craft your Brazen Bull shield.
Voyage of Despair
Main Easter Egg
The Voyage of Despair Easter Egg in Black Ops 4 Zombies is difficult due to its complex puzzles that require a lot of note taking. This means a lot of coordination is required from your team if you want to complete any of its Easter Egg steps.
To start the Easter Egg, you need to get the Sentinel Artifact and unlock the Pack-a-Punch machine. These two are the most straightforward Easter Egg steps in Voyage of Despair, so brace yourselves for what’s to come.
Acquiring the Kraken and upgrading it is also essential to this Easter Egg. Make sure to work on this as you go about your playthrough.
Clocks and elemental symbols
After completing the aforementioned requirements, you now need to look for clocks and elemental symbols. Both the clock and symbol are simply near one another, though some of the symbols are sneakily hidden. Take note of the location of the clock, the time displayed on the clock, and the appearance of the symbol.
The clocks and symbols spawn at a fixed location in the map, though their contents largely differ per playthrough. The clock and elemental symbols can be found in the Mailrooms, Captains Bridge, Gallery Kitchen, Grand Staircase, 1st Class Lounge, and 3rd Class.
Once you’ve jotted down the necessary information, head to the Bridge towards the captain’s wheel and look for the four dials that you can interact with. Basically, you will need to match the dials with the respective clock time and symbol.
The minute time for the clocks can be changed in the Captain’s Bridge, while you can change the hour hand in the Poop Deck and Engine Room. The minute hand is adjusted by five minute increments, while the hour hand is adjusted by the hour. Once successful, the dials will audibly lock in place.
Electrical outlets and ritual symbols
The next step of the Easter Egg involves finding four socket outlets that visibly spark blue, green, red, and yellow. What you need to do is kill the ice, acid, fire, and electric elemental zombie near the respective-colored sparking outlet.
There are a total of six possible spawn locations for the electrical outlets: Aft Decks Window, Gallery, Grand Staircase, State Room, 3rd Class, and near the Zeus statue. Make sure to take note of the color and location of each outlet, as you will need to enter these ritual symbols in a certain order.
Once you’ve opened all the ritual symbols, interact with the ritual symbols in this order: acid -> water -> electric -> fire
Make sure to prepare yourself whenever you enter each ritual symbol, as your team will have to face a tough horde of zombies. Some areas are also cramped, making it easy for the zombies to crowd and surround you.
Pipes and the real Sentinel Artifact.
Using the Decay Kraken, shoot at the leaking pipes in the Boiler Room with your acid ammo. There are a total of nine leaking pipes in this area. Once done, Pack-a-Punch the Sentinel Artifact.
Solar system and hologram planets
Find and interact with a total of nine planet symbols in the map. Here’s a quick rundown of the planet locations in Voyage of Despair:
- Mars – Boiler Room
- Mercury – Mail Rooms
- Moon – Lower Grand Staircase
- Netpune – Aft Decks
- Jupiter – Engine Room
- Saturn – Bridge
- Sun – Forecastle
- Uranus – State Room
- Venus – Millionaire Suite
Proceed to the Cargo Hold and interact with the planetary model. Doing this will prompt the planets to flash on the planetary model. Take note of the sequence.
Holograms of the planets will now appear in the sky, and you need to shoot these in the order they flashed on the planetary model. An exemption to this is Neptune, as it will appear from time to time in the water.
Whenever you shoot each planet, a blue orb will appear on the location of the symbol. Once this happens, you have a 30-second countdown to collect the orb.
After you shoot the Sun, blue orbs will appear at the Forecastle, or where you initially spawn in the game. Have everyone in your team interact with the orb to start the next task.
Ice blocks
Blocks of ice will now appear on the ship, and you need to reach the end of the ship as fast as you can. There’s a timer for this task, so you need to double time. Your end destination will be the Poop Deck, or where you first found the Sentinel Artifact.
If you want to destroy this ice block as fast as you can, have someone from your team use the Staff of Ra to melt the ice blocks. Once you have destroyed the final ice block at the Poop Deck, you can now access the ritual symbol portal at the Poop Deck. Entering this portal will lead you to the final boss fight.
Final Boss
This is one of the longest and toughest boss fights in the whole Zombies series, so make sure to prepare yourselves. You should also consider equipping the Water elemental effect for the Kraken, as this can deal a substantial amount of damage to the boss.
There are a total of five phases for the boss fight, each taking on various locations in the ship. Simply survive the onslaught of zombies and deal enough damage to the giant blue eye enemy to complete each phase. The only exception is phase two, as you will be unable to damage the boss
Once you’ve defeated the boss, enjoy and celebrate the ending cutscene for Voyage of Despair.
Side Easter Eggs
Flying Car
This is one of the more amusing Easter Eggs, where a skeleton drives a car around the sky and plays music. It also benefits you in-game, as it drops some random loot drops from time to time.
To start the Easter Egg, you first need to have the Ballistic Shield and get the Sentinel Artifact. Next, head to the Mail Rooms and melee a safe to pick up the lock code.
Now, you need to find a total of four bones and jot down the codes near it. The three codes are found in the Mail Room. The last one can be seen in the Cargo Hold.
Afterwards, you need to open various safes in the ship with the help of your nifty code cracker. After opening each safe, a four-digit number will appear on your code cracker. Essentially, you need to pick up and insert the bone part for those that corresponds with the code. Don’t forget to pick up the code cracker by using the Ballistic Shield to detach it from the safe.
The safes can be found in the Bridge, 1st Class Lounge, Millionaire Suites, and 3rd Class Berths.
After you have inserted the bone parts in each safe, go to the Cargo Hold and witness the car fade away. Once done, you can now see the flying car in the sky.
Drowning Easter Egg song
You can listen to the tune of Drowning by shooting four coins in the Voyage of Despair map. Similar to the secret song in IX, you can shoot all coins in any order:
- Forecastle – The coin is located on the right flight of steps blocked by a points-unlockable door. Check underneath the stairs to find the coin on a wooden box.
- Lower Grand Staircase – Head to the very bottom of the grand staircase and head towards the Pack-a-Punch pedestal. Turn back from the pedestal and check the ceiling to find the coin.
- Sun Deck – Head towards the lifeboat and try to peek in-between the chests to find the coin.
- Poop Deck – Facing the Pack-a-Punch pedestal, head to the far end of the ship. From here, check in-between the crate and spool of rope to find the coin.
Free Kraken Wonder Weapon
Slay a Stoker by shooting it’s bright glowing weak spots to have it drop a key. Afterwards, you need to acquire the Sentinel Artifact to gain access to one of the five possible spawn locations of a large wooden crate. Its spawn point varies per playthrough, and can be found in either the Mail Room, Turbine Room, Provisions, Gallery, or State Room.
Use your key to open the wooden crate and slay a few zombies to fill it with souls. It will move in any of the five chest spawn locations, and you need to fill it again with zombie souls. After filling the chest three times with zombie souls, you can acquire an item from the chest.
Afterwards, you need to match the item with the randomly spawned mystery item in the Forecastle, Boat Deck, Mid Deck, Aft Decks, or Poop Deck. After matching the item, a kraken will jump out of the water and drop a free Kraken weapon for your perusal. It’s worth noting that you can also acquire the Kraken from a Mystery Box.
Elemental Kraken weapon upgrade
There are a total of four different elemental upgrades for the Kraken: Acid, Electric, Fire, and Ice. First things’ first, you need to collect the Sentinel Artifact to unlock more areas of the map and Pack-a-Punch your Kraken. Afterwards, you need to collect a total of three weapon parts: Chamber, Barrel, and Metal Tubing. These parts can be found in the Gallery, Cargo Hold, and 1st Class Lounge. The fourth requirement is an elemental concentrated item dropped by zombies, specifically the concentrated purity, decay, plasma, or radiance. You only need one of the four elemental items to upgrade your Kraken, but the item used will determine its elemental capabilities.
Also worth noting that the concentrated element dropped will depend on the elemental zombie killed, and the drop rates are purely dependent on luck. With all four parts acquired, proceed to the Engine Room and craft your preferred elemental Kraken upgrade for 6,000 points. You can change the element of the Kraken anytime you want, but be prepared to spend 6,000 points each time.
Blood of the Dead
Side Easter Eggs
Where Are We Going Easter Egg song
Blood of the Dead is chock full of nostalgia for gamers who played the original Mob of the Dead Zombies map in Black Ops 2. The song titled Where Are We Going also returns for the reworked map and you can listen to the tune in-game. To do this Easter Egg, you need to have the Spectral Shield and a Warden’s Key. You can get the key by simply killing a Warden zombie.
Once you have all the Spectral Shield and Warden’s key, proceed to the Citadel Tunnels and use the Warden’s key to unlock a cage. Use your shield’s Sphere Blast to power the numbers. Doing this will allow you to interact with the numbers. Simply input 1-1-5 in order to play the song.
Free Monkey Bombs
You can acquire a free Cymbal Monkey Bomb by accomplishing a simple task. Travel to C-D Street and walk underneath the stairs to find a stone statue of a monkey. With a specialist weapon level 2 or above, start killing zombies to collect souls for the statue. Once the stone monkey statue glows red, shoot it to send it floating into the sky. Proceed to Richtofen’s Laboratory to collect your free Monkey Bomb.
Classified
Side Easter Eggs
Shockwave Easter Egg song
If you want to listen to the Easter Egg song in Classified, you need to interact with a total of three vodka battles. Upon interacting with all three bottles, the song titled Shockwave will play in the background.
- War Room: Lower Level – The bottle can be found underneath one of the terminals in this area. Specifically, it’s the terminal to the right of the large monitor.
- Porcine Research – Check one of the open cabinets to the far left of the perk machine to find the bottle.
- Central Filing – The bottle is located on top of the filing cabinets.
Classified intro song
If you loved the the jazz intro song of Classified, you can listen to it as slay hordes of the undead. To play the song, you need to activate five terminals in a specific order:
-
- War Room: Lower Level – Check the eagle emblem to the left of the large minor. Interact with the terminal there to complete the first requirement for the Easter Egg.
- War Room: Lower Level – After activating the first terminal, turn around and interact with the terminal around eight meters away from you.
- Server Room – Interact with the terminal on the opposite of the Death-Com switch.
- Wall Room: Lower Level – Interact with the terminal right beside the purchasable gun.
- Server Room – The terminal you’re looking for is located near the purchasable weapon on the wall. From the corridor of the purchasable gun, walk straight ahead for around eight meters, then turn around. Interact with the terminal to active the intro song.
Project Skadi Prototype
You can check out our detailed guide on how to get the Project Skadi Prototype here, but here’s an overview of the Easter Egg.
Collect and input four access codes for the terminal found in the War Room: Lower Level. Travel to the Pack-a-Punch location and complete three zombie waves to clear a debris blocking access to a crate that has a free Winter’s Howl, a Pack-a-Punch discount, and a max ammo power-up.
So, that’s all the notable Black Ops 4 Zombies Easter Eggs we’ve found so far. You can also check our Black Ops 4 wiki if you’re looking for more tips and resources regarding the other game modes.







Updated: Oct 19, 2018 11:59 am