There are many things to keep in mind during any given day in Stardew Valley. Of all the most time-consuming and exhausting, watering your crops is something that has to be done regardless of how much work it is. Once you’ve made sprinklers, you can spend less and less of that precious time watering and more time managing the rest of your farm. There are multiple types of sprinklers and endless ways you can set them up. However, we’ve compiled the best sprinkler layouts in Stardew Valley to maximize the space you’re farming and the sprinklers you have at your disposal.
Table of contents
All Stardew Valley Sprinkler Types Explained
There are three different types of sprinklers that you can make in Stardew Valley: the regular Sprinkler, the Quality Sprinkler, and the Iridium Sprinkler. Each iteration waters significantly more than the last; however, each upgrade also requires considerably more resources than the last.
| Sprinkler Type | Crafting Requirements | Number of Tiles Watered |
| Sprinkler | Farming Level 2 (1 Copper Bar, 1 Iron Bar) | Waters 4 adjacent tiles |
| Quality Sprinkler | Farming Level 6 (1 Iron Bar, 1 Gold Bar, 1 Refined Quartz) | Waters 8 adjacent tiles |
| Iridium Sprinkler | Farming Level 9 (1 Gold Bar, 1 Iridium Bar, 1 Battery Pack) | Waters 24 adjacent tiles |
Many players find it useful to skip the initial sprinklers and save their resources for the Quality Sprinklers because the standard ones don’t water many crops at a time. You’d have to set up your farm with significantly more space for crops than you would if you waited until you could make Quality Sprinklers because you can plant and water your crops so much closer together.
How to Unlock Sprinklers in Stardew Valley
Getting your hands on your first sprinkler is an exciting moment for any farmer because they don’t have to spend so much time watering in the morning. You’ll have to reach Farming level 2 to unlock the basic Sprinkler. To get the other ones, you’ll need more experience.
You’ll unlock the Quality Sprinkler at Farming level 6, which should give you plenty of time to gather enough Iron, Gold, and Refined Quartz to get your hands on it. However, even though you’ll unlock the Iridium Sprinklers at Farming level 9, it’s more difficult to gather the resources for them unless you’ve been doing as much mining as you have been farming.
Once you’ve unlocked them, head into your crafting menu and scroll down to where you see the different types of sprinklers. If you’ve got enough resources in your inventory, you can craft as many as you’ve got the materials for, and the game will tell you how many you can make before you run yourself dry.
Best Early-Game Sprinkler Layouts in Stardew Valley
When you’re early in a game of Stardew Valley, you may be tight on resources and want to spend more time in the caves as soon as possible. It’s worth investing in a sprinkler system early on to ensure you make the most of your days. While it may not be the most resource-efficient, using basic Sprinklers can save you time to gather more resources to upgrade as soon as possible.
Staggered Basic Sprinkler Layout
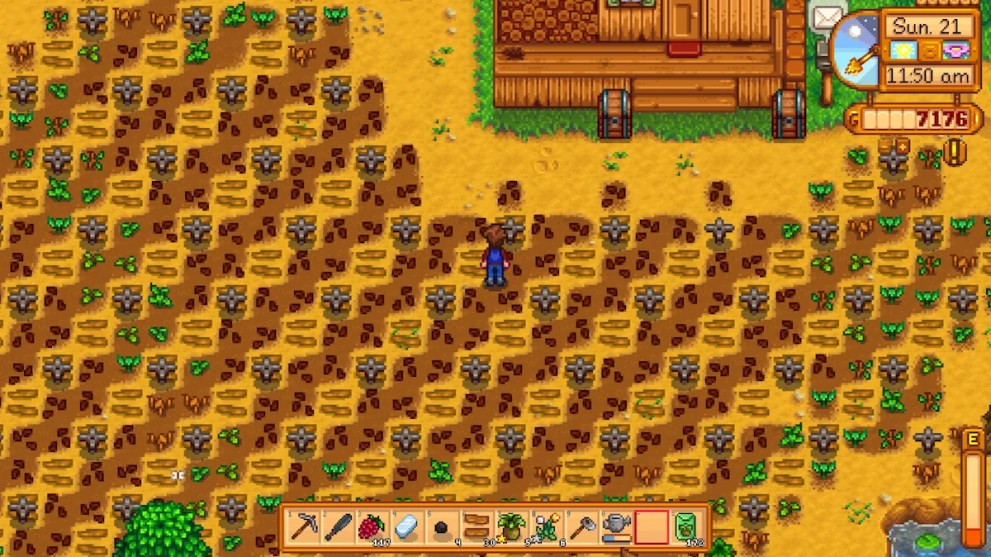
Your first sprinklers on the farm will always be your most memorable even if they aren’t the most effective. The base Sprinklers only water the four tiles directly above, below, and to the sides of them, so you can only water four crops per day using them. This alone isn’t ideal, but you can set up your farm in ways that maximize the effect of your sprinklers.
Make sure you’re stratifying your sprinklers so they’re placed on a diagonal. That way, you can maximize the space you use on your farm without worrying about too many tiles of land not getting watered or not growing crops. If you choose to have a plot as large as the one in this example above, throw a couple of scarecrows on the blank spots of land so crows won’t come by and destroy your hard work.
Small-Scale Staggered Sprinklers

Even though the basic Sprinklers aren’t the most efficient, you can still make the most of them in a small space. Using the technique above, you can scale the plot of land you use for your crops as large or small as you want. After you place the first Sprinkler, place the next one either two tiles down and one to the right, or two tiles to the left and one down.
This layout is great for a growing farm where you may not know exactly how many seeds you want to plant. Simply set up the Sprinklers as you need them and you can add more as you get more seeds. This doesn’t work as well for more detailed crop layouts, but when you’re in the early game the details matter less than the profit at the end of the season.
Basic Sprinkler Scarecrow Layout

If you’re still focused on farming with basic Sprinklers, then you want to make sure you maximize the number of crops that you’re able to grow and protect them. That means it’s important to make room for a scarecrow and ensure your crops are within its radius so they don’t get eaten during the night. The example above shows how to use the Sprinklers the most efficiently if you aren’t planning on upgrading any time soon.
While using basic Sprinklers isn’t the most resource-efficient strategy when you can make Quality or Iridium ones, if you’ve got a bunch of them lying around, you may as well use them for a plot. Even if you’re saving them for some upgrades, they can always be put to better use in a field than in a chest or until you can use them to fill out a different plot. If you’re set on using basic sprinklers, this style of layout will be the best you can choose, but the real efficiency comes in with the bigger ones.
Best Mid-Game Sprinkler Layouts in Stardew Valley
Once you’ve surpassed the point of simply using basic sprinklers and have moved on to quality ones, you can start making the most of the space on your farm. Quality Sprinklers work best in an even grid system where you can maximize the number of crops you can fit into a smaller area, but they’re also good for getting creative.
Quality Sprinkler Scarecrow Layout
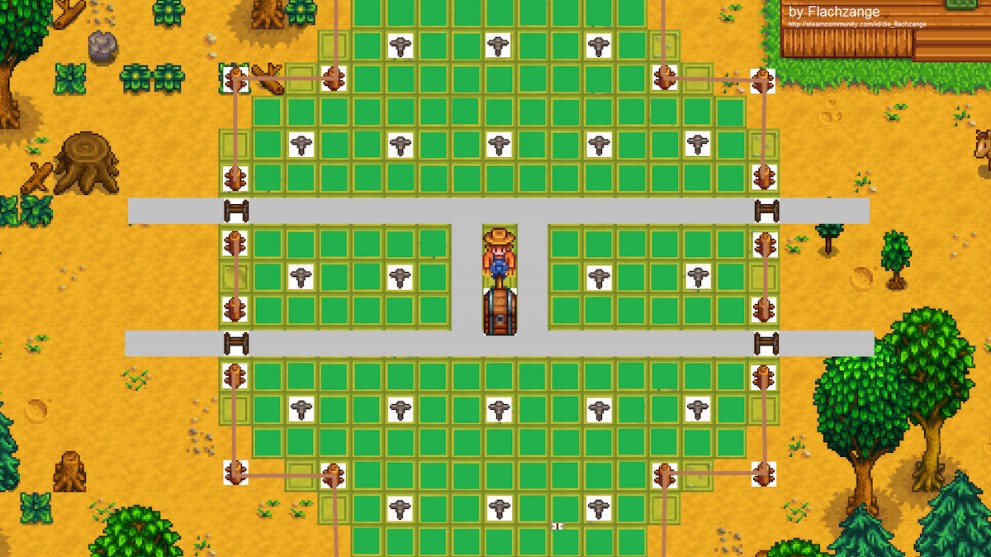
Upgrading to Quality Sprinklers from the base Sprinkler will double the amount of crops you can automatically water a day. However, just because you’ve got better sprinklers now doesn’t mean you know the best ways to use them. It’s still just as important to have a Scarecrow covering your crops, whether you’ve got them around the outside of the field or right in the middle.
Given that Quality Sprinklers water in a 3×3 square pattern, you can place them two spaces apart from each other on the same line to maximize how much coverage you get. The above example shows a great layout that ensures all your crops are within the radius of the scarecrow in the middle, while not wasting any unnecessary space other than the Scarecrow itself.
Clean Patchwork Quality Sprinkler Layout
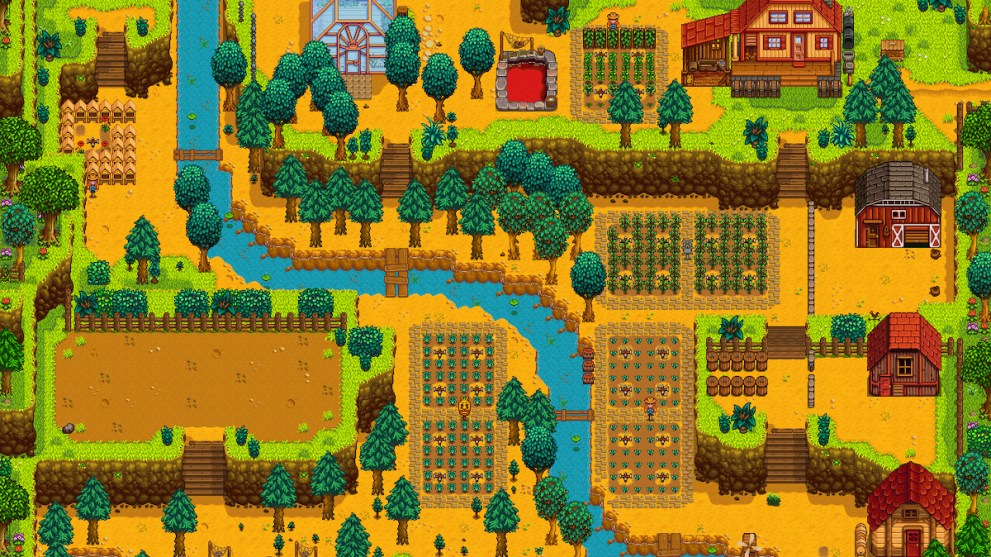
Why switch to those expensive Iridium Sprinklers when you’ve got plenty of quality ones doing a great job? Especially for farmers who settle down on the Hilltop Farm where there isn’t a ton of space for large plots of crops, you don’t need to use sprinklers with a ton of coverage if you aren’t going to be able to fit them all in a plot anyway.
Laying out your Quality Sprinklers in modular 2×2 squares allows you to spread out on your farm and makes it easier to keep track of what crops are being grown where and to keep those crops separated. The plots are all a great size for planting individual products, so you don’t have to worry about harvesting half a plot of potatoes one day and having to wait a couple more days to be able to harvest the other half a plot of cauliflower.
Simple Grid Sprinkler Layout
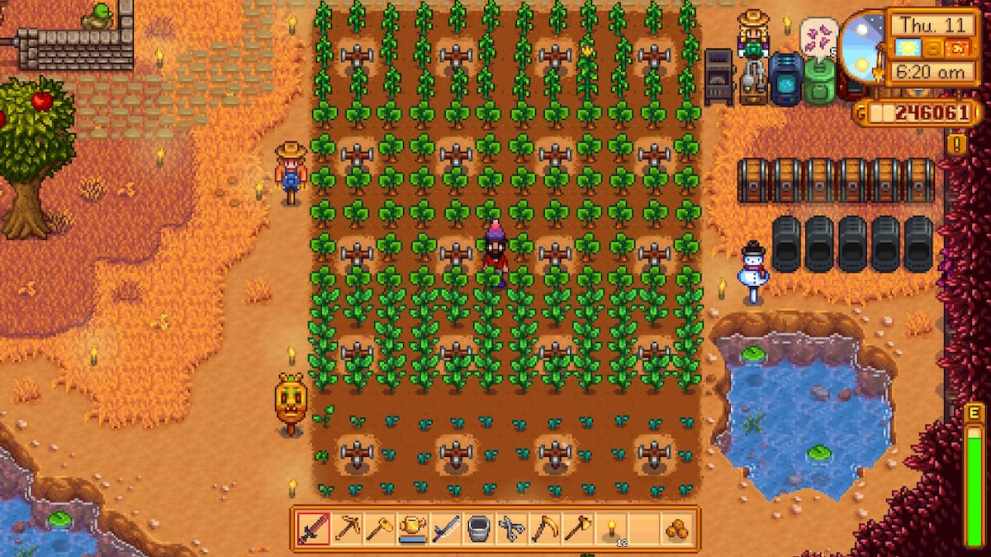
If you’re looking for something basic, efficient, and orderly, look no further than a simple grid system. This method doesn’t work as well for the base sprinkler because it would leave too many spaces in between each watered section of land. The Quality Sprinklers cover twice as much space in a nice and even spread, so you don’t have to worry about feeling like you’re wasting space.
You can align scarecrows along the outside rather than build the plot around one, which also serves as a good way to show off your unique scarecrows from all the different events. There’s something brutal about the grid system, but the fact it can also be scaled to fit the exact number of seeds you’ve got makes it irresistibly effective.
Best Late-Game Sprinkler Layouts in Stardew Valley
Once you’ve reached the late-game in Stardew Valley, you’ll need more than just some Quality Sprinklers. Iridium Sprinklers are great to use, but they’re not easy to come by. While you can hop down to level 40 in the mines and grind out iron, getting a good, consistent supply of Iridium can be a bit more of a challenge. Still, it’s worth the extra work to maximize the space on your farm.
Iridium Sprinkler Scarecrow Layout
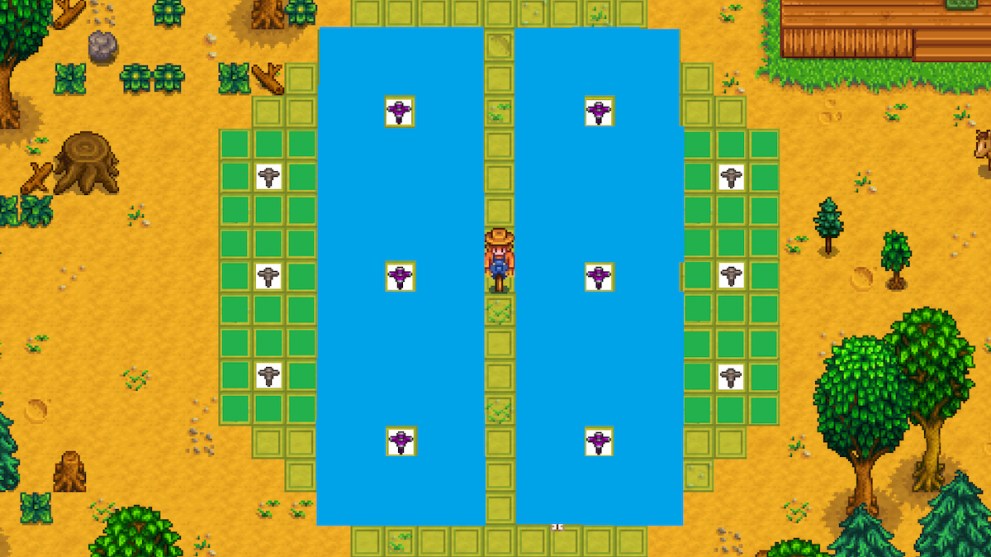
You thought you were pretty well set with your Quality Sprinklers, eh? Let me welcome you to the world of Iridium farming, where you can water 24 tiles of crops at once, per day, per sprinkler. Iridium Sprinklers water in a 5×5 grid pattern so they can be laid out side by side like the Quality Sprinklers, but with four spaces between them instead of two. That way, you can have fewer sprinklers and more crops.
The example above shows that you can fit six Iridium Sprinklers within the radius of a scarecrow without wasting any tiles, but you’ll have to cover some of the extra space with Quality Sprinklers to fill the entire radius. That way you can make the most profit out of your space with significantly less effort.
Symmetrical Iridium & Quality Sprinkler Layout
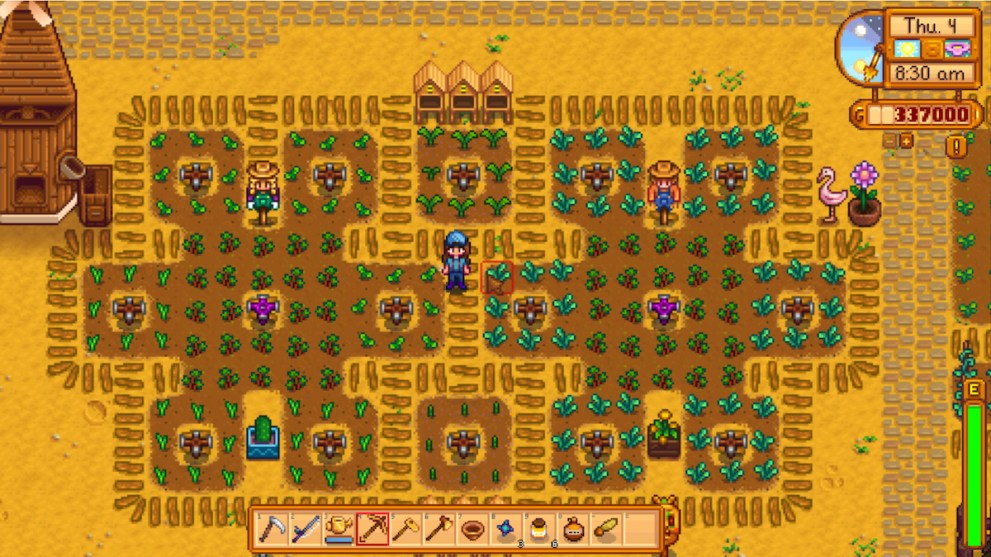
Say you’re looking to lay out your sprinklers while trying to avoid any unattractive, wasted space between plots. This sprinkler layout is exactly what you’d be looking for because it utilizes two Iridium Sprinklers and 14 Quality Sprinklers to water 162 tiles in total. On top of that, it looks great and leaves you with plenty of opportunity to decorate and incorporate your aesthetic into your farm.
This layout is great for farms that are just starting out using the Iridium Sprinklers, because you can build it out further as you get more. As you get more Iridium ones, you can reshape the sprinkler layout and stretch it further to add more crops, or you can keep padding it with Quality Sprinklers if you don’t have the resources yet. This layout provides a great use for your old Quality Sprinklers as your farm grows, and that way you don’t have to sell them at a loss once you get Iridium ones.
Efficient Iridium & Quality Sprinkler Greenhouse Layout
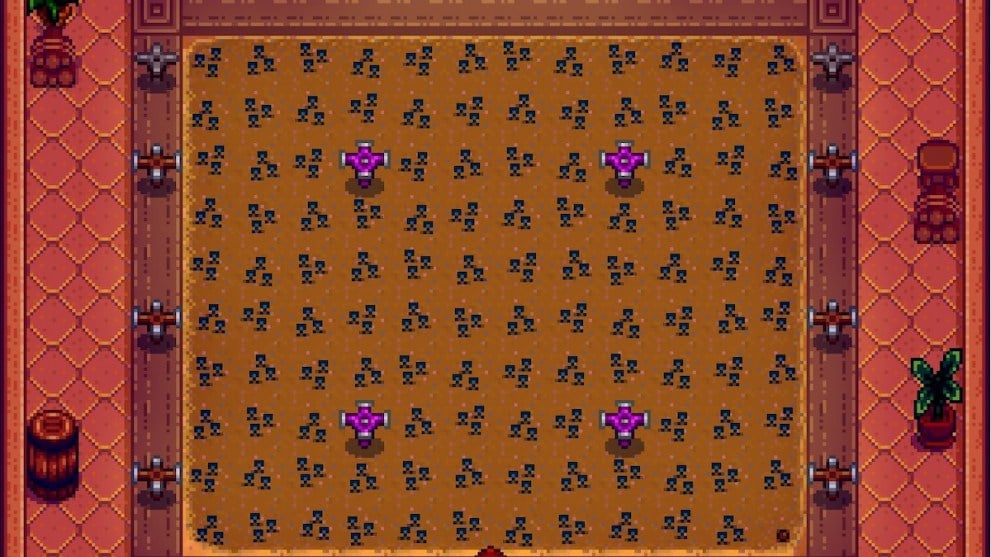
So you’ve got yourself a Greenhouse. It can be challenging to ensure you’re maximizing your profits by making the most of your space inside, but this example does a great job at saving space by only taking up four plots of tillable land with Sprinklers. The extra spaces on the outside of what the Iridium Sprinklers can reach are watered by some Quality and Basic Sprinklers, giving another perfect opportunity to use up some of the old resources you’ve got instead of just selling them or letting them sit in storage.
If you have more than just those four Iridium Sprinklers, you can use them on the outside of the border instead of the Quality and Basic ones. That way, you only need four more sprinklers to line the outside and water the entire plot of crops. You can also use this layout outside of the Greenhouse for your other crops as well, being that it’s still an efficient way to water most of your crops.
When you’ve gotten yourself far enough in the game to reach Ginger Island, you can go to Qi’s Walnut Room to buy sprinkler upgrades. The Pressure Nozzle is valuable because it allows you to increase the range on your Sprinklers, which you can then apply to any of these farm layouts to significantly scale up your production. You can also tack on an Enricher to fertilize your soil automatically as your plants get watered.
Those are some of the top Sprinkler layouts in Stardew Valley, although everyone does their farms differently depending on the landscape they choose and the crops they grow. You can switch these up to fit your play style. No matter which ones you choose, they’ll certainly make life on the farm just a little bit easier. After all, once the Blackberries bloom, you’ll have a lot of foraging to do.







Updated: Mar 10, 2025 05:49 am