Launched as part of the 30th Bungie Anniversary Pack, the Grasp of Avarice Dungeon tells the story of Guardians tainted by greed. Players are taken to the infamous loot cave in the Cosmodrome and must complete tasks to emerge victorious from the dungeon. If you haven’t taken a part in this activity yet, here’s what you need to know on how to complete the Grasp of Avarice Dungeon in Destiny 2.
Destiny 2 Grasp of Avarice Dungeon Guide
Opening Encounter
The first part of the dungeon is relatively easy. You’ll load into a familiar spot, at least if you were part of the Loot Cave madness during Destiny 1. Waves of enemies will spawn at you, and killing them drops what look like exotic engrams. Picking up the fake exotic engrams will hit you with a “Burden of the Riches” debuff, and inside the Loot Cave, you’ll find a crystal.
You’ll need to kill enemies, collect the engrams, proceed into the Loot Cave and deposit the engrams into the crystal. Standing next to the crystal will deposit the engrams for you; make sure you move with haste, as you will die if the debuff timer hits zero. Once your team deposits 50 stacks, the segment will be complete, a hole in the floor will open, and you will be able to proceed.
Rusted Gangplank

The next part is tricky and, ultimately, is a game of trial and error. After dropping into the hole, continue fighting through some Hive enemies and progress your way through the dungeon.
You’ll reach a point where you enter a giant room with one door on the right side and a sealed-off tunnel entrance in front of you. Barreling through the doors will activate a booby trap that will kill you, so before you rush in, look down at the floor and jump over the pressure plate in front of you. You’ll avoid the trap, flip the switch, and the sealed tunnel entrance will open. Proceed through the tunnel entrance.
Proceeding through the tunnel will lead you to a platform above an abyss with a chain fence attached to it. Jumping onto the platform will trigger it to collapse and kill you, so you’ll realize you can’t stand on it for too long. In this segment, you’ll need to land on the platform, wait for it to collapse, and land on a platform directly underneath the right side of the trap floor.
This hidden doorway will have a console with a switch that you need to flip, turn around, and directly to the right, you’ll see a platform to jump onto with another switch you need to hit. After flipping both switches, head back through the tunnel entrance to the starting point of this segment.
Back in the first one that introduced the booby traps, you’ll need to climb up the side of the wall to reach the top portion of this room. With your back facing the first tunnel entrance, jump on top of the AC unit to the right, jump onto the platform above the entrance to the room, turn around and jump into the furthest tunnel entrance from you. Hit the pressure plate and jump up into the next area of the dungeon.
What Is the Grasp of Avarice Dungeon Map Puzzle Order? Answered
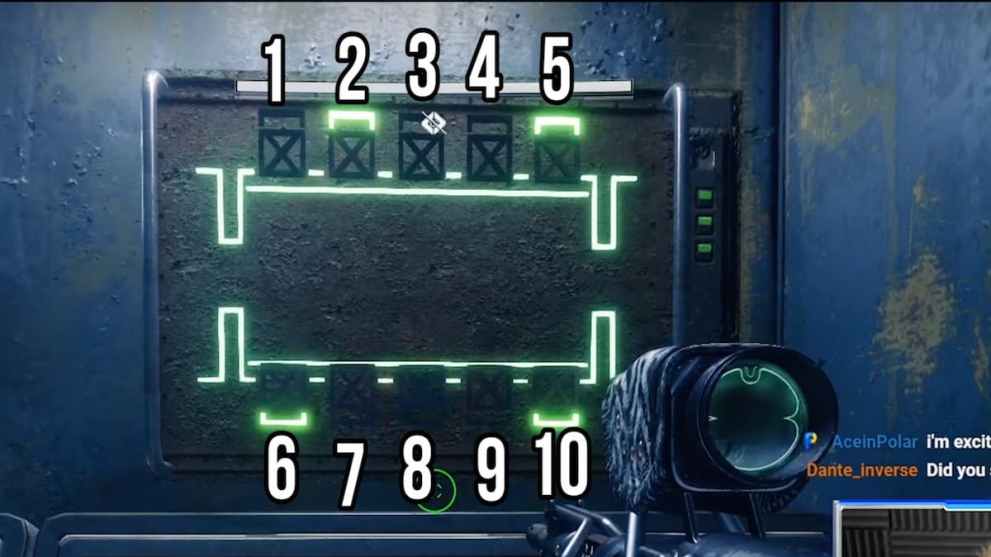
Following the previous segment, the next part is going to be tricky. You’ll find yourself in an open area with ten closed doorways. The objective of this area is to reach door number five; once you reach it, look up, and in the ceiling, you’ll find a console with a switch.
Provided you make it to door number 5, a Hive Shrieker will spawn alongside a few Hive on a distant platform. Kill the Hive, and head to the platform the Hive was guarding. You’ll find a switch, flip the switch, and then it’ll open up the door that lets you proceed to the next area.
Scorch Cannon Room
Completing the previous segment will lead you to an open space with a giant cylinder in the middle. You’ll see a console with the four labeled doorways on the screen, with your objective being to flip all the switches in this room while fighting the waves of Fallen that spawn in.
Once you complete this segment, a Fallen will drop a Scorch Cannon that you’ll need to pick up. Pick it up, and shoot the Fallen energy reactor in front of door number 4 with a charged shot. This will clear this section, and you’ll be on to fighting your first boss of the dungeon.
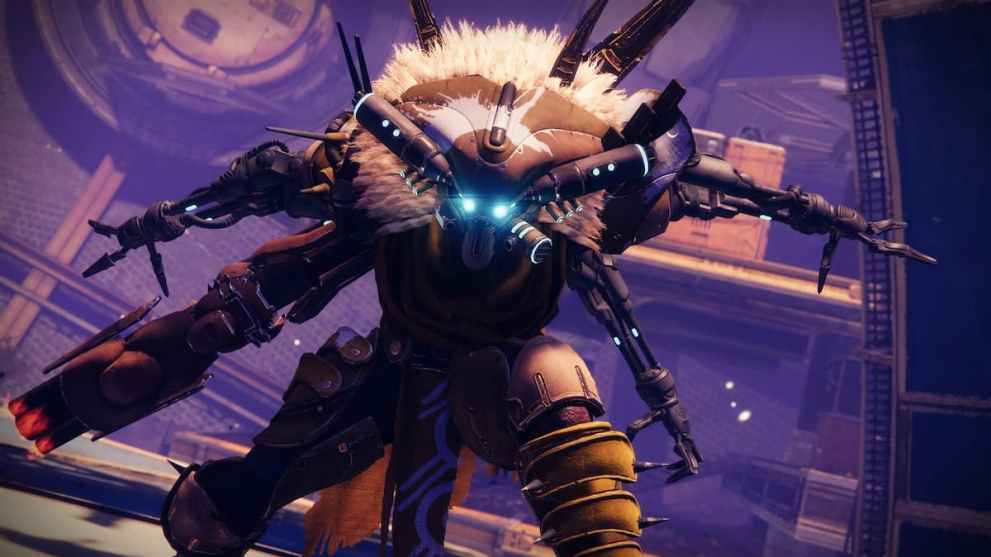
How to Defeat Phyr’zhia the Insatiable in Destiny 2
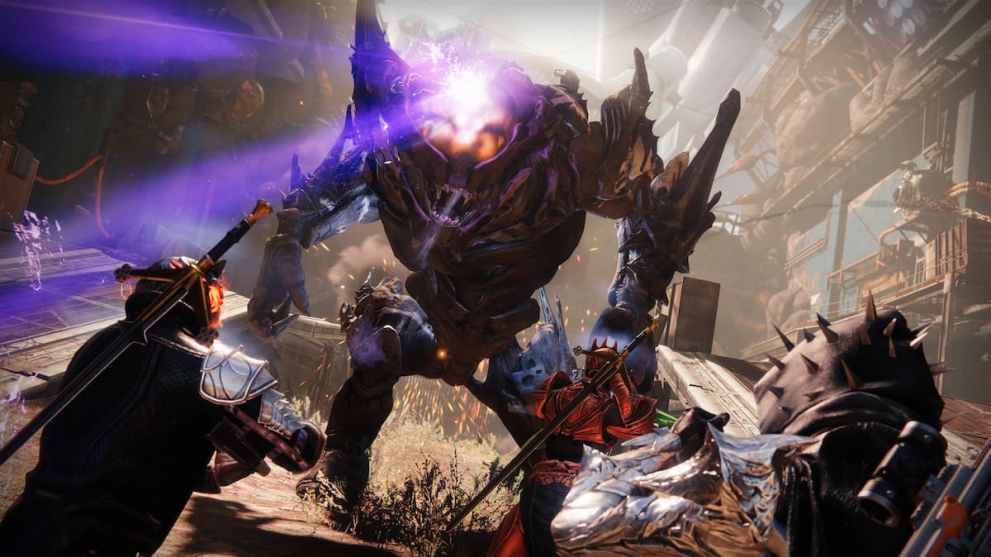
This boss is simple, as it combines the mechanics of the opening encounter and of the room you cleared using the Scorch Cannon. Where you spawn in, you’ll see a crystal that you’ll need to deposit the fake engrams. Once you deposit enough, you’ll be able to damage the boss. Rinse and repeat, and you’ll complete the fight. However, let’s talk about the steps you’ll need to take to get there.
Upon entering the fight, behind the boss, you’ll see a Fallen enemy with a Scorch Cannon. Kill the Fallen, pick up the cannon, and look to either side of the room for what appears to be garage doors. Above the door, you’ll see the Fallen energy converter from the previous event.
Shoot a fully charged cannon shot, enter the room and clear the Hive that spawn in. Pick up the engrams, and rush back to the crystal to deposit the engrams. Depositing enough will drop the boss’ shield, which will let you defeat it. Fun fact, collecting ten engrams will fully charge your super.
Sparrow Racing
This part can be fun and obnoxious at the same time, so make sure you have your best Sparrow driver with you. Following the completion of the boss fight, proceed forward until you reach a garage with two consoles on the left and right. Do not touch the right console, as it will kill you. However, it might be a funny prank to pull on your friends.
Once you hit the left switch, immediately jump on your Sparrow and begin the race. Your objective is to follow the path and defuse the mines along the way by briefly stopping underneath them. It sounds easy, yet the bombs are timed, and if you don’t reach them before the countdown ends, you will wipe. Speed is your friend, but what makes this a bit easier is there are switches you’ll encounter on the side paths. Driving past them will extend the timer for a few seconds so try to hit as many as you can.
Fallen Shield Encounter
This encounter requires a combo of all the previous mechanics and a bit of repetition. You’ll find yourself in a very open space with man cannons that launch you to different islands. You’ll need to launch yourself to the islands that house a shielded Servitor, wipe adds, and launch said Servitor into the structure in the middle island, which is the “boss” of this section. Let’s break down how to do that.
To complete this segment, you’ll need to find and kill the Fallen with a Scorch Cannon, and shoot the energy reactor with a fully charged shot. Head to the island with the shielded Servitor, kill the add-ons surrounding it, pick up the engrams they drop, and deposit them into the nearest crystal. Once the Servitor’s shield drops, you’ll need to kill it and push its husk into a man cannon that launches to the dead center of the map. The man cannon will launch the Servitor husk into the central structure, the “boss” causing damage to it.
Repeat the above process a few times, and you’ll be onto the final fight of the Grasp of Avarice Dungeon.
How to Defeat Captain Avarokk The Covetous in Destiny 2
Last but not least, the final foe standing between your team and a successful run of this dungeon is Captain Avarokk the Covetous.
This segment combines the tried and true mechanics of this dungeon, find the Fallen with a Scorch Cannon, kill it, and shoot a fully charged cannon shot into the reactor. Engram debuffs will spawn around the map, pick them up and deposit them behind the boss. Once his shield drops, damage him as much as you can. Rinse and repeat, and you’ll have cleared this dungeon.
That’s all you need to know on how to complete the Grasp of Avarice Dungeon in Destiny 2. Below, you’ll find plenty of related content to help you in your journey through everything new. Check out if there is any new exotic armor in the latest season, how to get the Manticore Exotic SMG, or how to complete the Heist Battlegrounds events.


Updated: Dec 7, 2022 02:38 pm