Each character in Stella Sora has a variety of possible potential builds, allowing you to tailor their effects for maximum DPS or utility. The builds depend largely on what position the character is in and what other characters you’re using. Below, we will take a dive into how to make builds in Stella Sora, what the best builds are for each character, and more!
Table of Contents
How Builds Work in Stella Sora

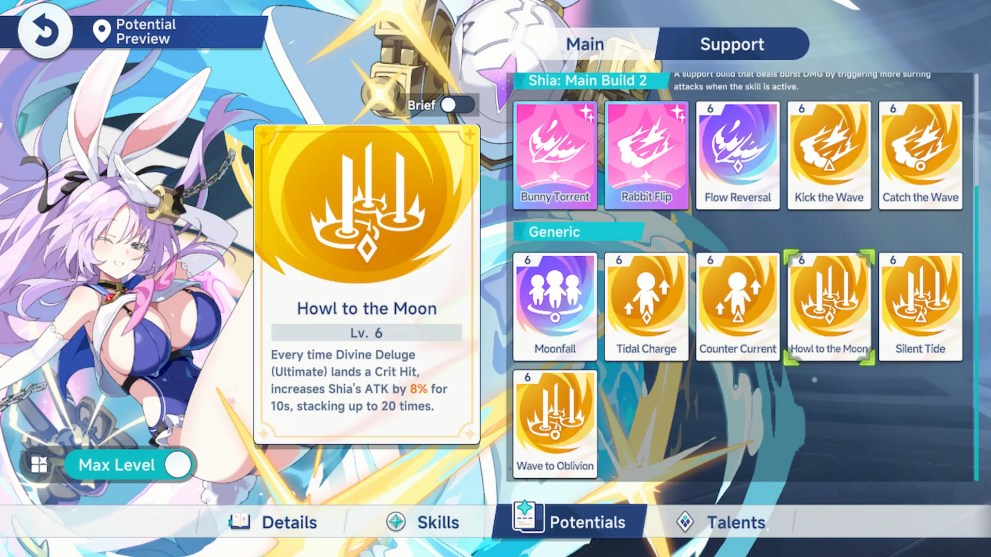
Builds in Stella Sora represent the potentials you pick out during character Ascension. These builds are saved as records and available to you when you challenge other game modes. Here are the basic principles of creating builds:
- You gain potentials during Ascension runs by leveling up, drinking Potential Drinks, and completing events.
- Orange and chromatic potentials can be stacked, and each duplicate increases the base potential’s stats and level, up to level 6.
- You can pick only two out of four pink potentials. You can’t stack pink potentials.
- You should not always follow the potential builds from the in-game guide. Those are often suboptimal.
- Potential cards are different based on whether the character is placed in the Main or the Support slots.
- You usually want to get potentials that buff the character and ally DMG and synergize well with other potentials you already have for that character.
Best Builds for Every Character in Stella Sora
In the tables below, you’ll find the overall best builds for every character in Stella Sora, categorized by element. Check out our best teams guide and tier list for more info on which teams and characters to use.
Best Builds for Ignis Characters
| Trekker | Best Pink Potentials | Best Chromatic Potentials | Best Orange Potentials |
|---|---|---|---|
Chixia (Main) | Sleepless Flame Flame-Stained Ink | Flame-Ink Matrix Ink Brilliance | Flame Resonance Scorching Ink Finishing Touch Dragon Blaze |
Chixia (Supp) | Sigil Unleashed: Tiger of the East Tiger of the East: Blazing Scales | Ink Sigil: Trail Seeker | Ink Sigil: Blood Fed Ink Sigil: Raid Dragon Blaze |
Amber (Main) | Precise Temperature Control Echo of Hospitality | Keen Accent Grand Finale | Weakness Mark Overloaded Spark |
Flora (Supp) | Ember of Tomorrow Ashes of the Past | Reinforced Impression Perfect Acting | Foreshadowing Verification Visual Impact Guest Performer |
Kasimira (Supp) | Heated Battle Area Bombardment | Meltdown Threshold | Army Breaker |
Best Builds for Ventus Characters
| Trekker | Best Pink Potentials | Best Chromatic Potentials | Best Orange Potentials |
|---|---|---|---|
Nanoha (Main) | Whirling Blade Bloom Dance | Blossom Shower Sky Piercer | Distant Prayer Splendid Vortex |
Noya (Main) | Slash: Windfury Slash: Blade Storm! | Pebble Storm Hero’s Instinct | Flurry Stance Wind Slash |
Canace (Supp) | Grants Speedup Notion Grants Blooming Esthetics | Cyclone Acceleration | Structure Analysis High Pressure Reflux Storm Eye Expansion Conundrum Solving |
Ann (Supp) | Wind Banish Downwind Journey | Wind Erosion Havoc Windgate Barrier | Turbulent Flow Violent Current |
Best Builds for Aqua Characters
| Trekker | Best Pink Potentials | Best Chromatic Potentials | Best Orange Potentials |
|---|---|---|---|
Chitose (Main) | Mirror Blade Serpent’s Glide | Aqueous Phantasm Azure Embrace | Tremble and Fall Dance of Elegance |
Freesia (Supp) | Chill Forecast Frost Warning | Temporal Revival Penetrating Chill | Winter’s Grip Crackling Zero |
Shimiao (Main) | Stream Embrace Wave Swirl | Towering Waves | Roaring Ocean Wave Stream Mirror |
Iris (Supp) | Blizzard: Spread Blizzard: Vortex | Forced Liquidation | Raging Blizzard Prolonged Winter Sneaky Finisher |
Teresa (Supp) | Surge: Infinite Surge: Immortality | Let Me Help! Isn’t it Awesome! | I’ll Protect You! How About This! |
Best Builds for Terra Characters
| Trekker | Best Pink Potentials | Best Chromatic Potentials | Best Orange Potentials |
|---|---|---|---|
Gerie (Main) | Beyond All Control Avalanche of Stone | Lingering Hunger Shared Sensation | Delight in Ruin Slanderous Strike No Safeword |
Nazuna (Supp) | Arrow of Affection Sweetheart Bloom | Rain of Passion Lucky Drop | Love’s True Strike Honeyed Arrow Balloonado |
Ridge (Supp) | Reblossom Sense the Stir | N/A | Root Grasp Corosive Vines |
Best Builds for Lux Characters
| Trekker | Best Pink Potentials | Best Chromatic Potentials | Best Orange Potentials |
|---|---|---|---|
 Shia (Supp) | Kindred Bound Twin Moons | Dance of the Riptide Moonfall | Snowfall’s Heartbeat Eclipse Blast Counter Current |
Minova (Main) | Board Tricks Ultimatum | Ashwind Rhythm Light Burn | Unyielding Strength More Than Just Pretty |
Minova (Supp) | Four-Star Wanted Level Star Core Crumbled | Radiant Synergy Perfect Arc | Three Base Hit Optimal Hit Zone |
Tilia (Supp) | Perfect Spiral Holy Inscription | Brilliant Relay | Blinding Beam Trick Boost |
Tilia (Main) | Unity of Offense and Defense Holy Domain | Light Curtain Bright Counter | Wild Spirit Strike Back Aegis Blessing |
Jinglin (Supp) | Thunderbolt: Character Thunderbolt: Dragon | Complete Sequence Self-drawn Concealed Hand | Effortless Mastery No Ones No Nines |
Laru (Main) | Lance Sweep Lightning Lance Dance | Electric Chain Sky Rend | Cracking Thunderbolt Lance’s Song |
Best Builds for Umbra Characters
| Trekker | Best Pink Potentials | Best Chromatic Potentials | Best Orange Potentials |
|---|---|---|---|
Mistique (Main) | Super Long Exposure Multi-Shot | Cursed Screech Abominable Fester | Night Dash Quick Nightfall Spotlight Craving Decisive Movement |
Mistique (Supp) | Stay Happy Lucky Constitution | The Conjuring Malice | Wraith Haunting Solar Absorption Shadow Shackle |
Cosette (Supp) | Eclipse Imprint Abyssal Mark | Dark: Mirage Dark: Hallucination Gift of Darkness | Dark: Vitality Dark: Demon Mark |
Caramel (Main) | Sonic Boom Rhythm Pulse | Tempo Shift | Earcatch Rift Hype Trigger |
Coronis (Main) | Shadow Invasion Phantom Blade | Night Cruise Roaming Spectre | Shadow Dash Dark Veil |
Coronis (Supp) | Skeleton Frenzy Skeleton Sculpture | Spiritual Tome Underground Healer | Tag of Fate |
Stella Sora Best Builds FAQ
A: No, every character actually has more than one best build, depending on what kind of effect you want, which position you’re playing it in, etc. The main thing to remember is that if you don’t experiment, you won’t find the next OP build.
Q: How often should you Ascend each character?
A: It’s best to Ascend a character until you make it usable. Most characters with suboptimal builds will feel far worse than those with proper builds, even if they are considered higher-tier.
Q: When should you stop Ascending?
A: One thing you’ll realize is that creating the perfect build is almost impossible in Stella Sora because of the RNG embedded into it. So, it’s often best to stop whenever you feel like you’ve already reached >80% of the build’s maximum potential.
And that does it for our Stella Sora builds guide. If you want to learn more about the game, including which characters are the best, which teams work well, and how to reroll your account, visit the Guides section here on Twinfinite!


Updated: Oct 29, 2025 11:15 am