Minecraft is a game where your imagination can take hold. You can craft just about anything, which will inevitably help you craft or obtain something else. It’s a major rabbit hole to fall down. One of the simple, but equally useful items you can craft is a Loom. Here’s how to make a Loom in Minecraft and how to use it.
Crafting a Loom in Minecraft
A Loom’s crafting recipe in Minecraft is incredibly easy. All you need is two wooden planks and two pieces of string.
It’s worth pointing out that the wooden planks can be any type of wood. They do not have to be a specific type, so go and hack down the closest tree in sight and then turn them into wooden planks.
String on the other hand can be obtained in a ton of different ways. Defeating spiders or cave spiders will often see them drop string, as will hitting cobwebs.
Once you’ve got the required ingredients to craft a Loom in Minecraft, simply open up the 3×3 crafting grid and place the two pieces of string in the top row of the first two columns, and then the wooden planks directly below them in the second row.
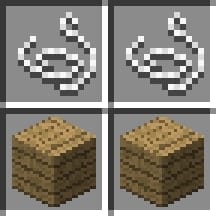
Congratulations, you’ve just made a Loom in Minecraft.
Using a Loom in Minecraft
To use a Loom in Minecraft, you’ll need to have an existing Banner, and some Dye at the very least.
Place your Loom and open it up. Put your banner in the top left-hand slot, and the dye in the slot next to it.
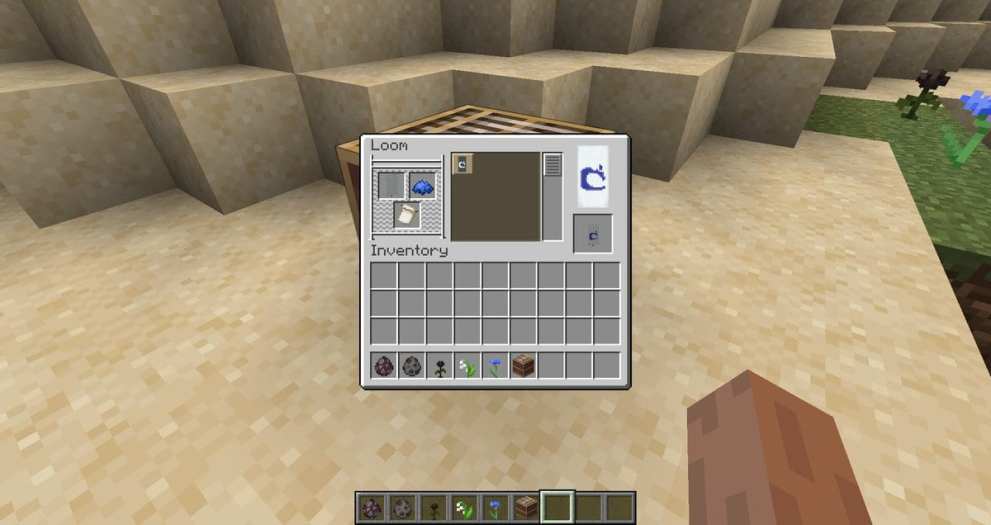
This should now bring up a number of different banner designs you can choose from. Alternatively, you can use a Banner Pattern you’ve found elsewhere by placing it in the slot just beneath your banner and the dye.
Your banner pattern can be reused at any time, so don’t forget to take it back when you’re done.
Select the design you want to choose and voila, you’ve made a nice fancy banner with your Loom in Minecraft.
For more tips, tricks, and guides, be sure to search for Twinfinite. You can also check out more of our handy Minecraft guides below.










Updated: Mar 3, 2020 12:06 pm