
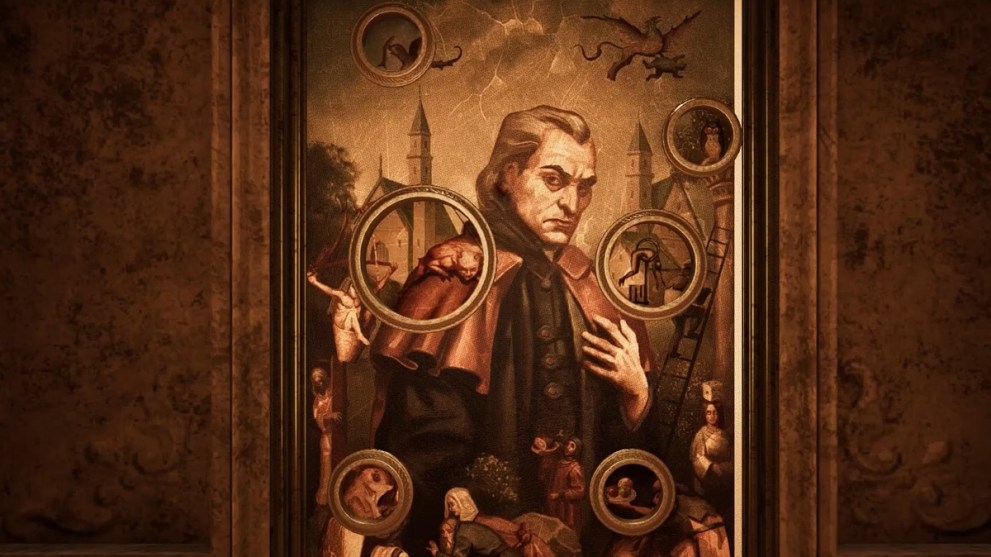
Dracula’s Castle in Escape Simulator 2 consists of four rooms that are chock-full of puzzles to solve. The deeper you move into the castle, the harder they get. But our guide will provide you with all the solutions, which will allow you to complete the game in under one hour.
The Lobby
The first thing that you need to do in the Lobby is to look in the mirror, where you can change your character’s appearance. Then, follow these steps:
- Take a seat in one of the chairs next to a coffee table with chess on top.
- Get up and interact with the round mirror on the wall to choose rooms.
- Pick up a Tutorial if you need to learn the basics, or immediately start with the Courtyard of the Dracula’s Castle.
Room 1: Courtyard
Explore the small courtyard, pick up some items, which you can even drop and break, but ultimately, you need to do this:
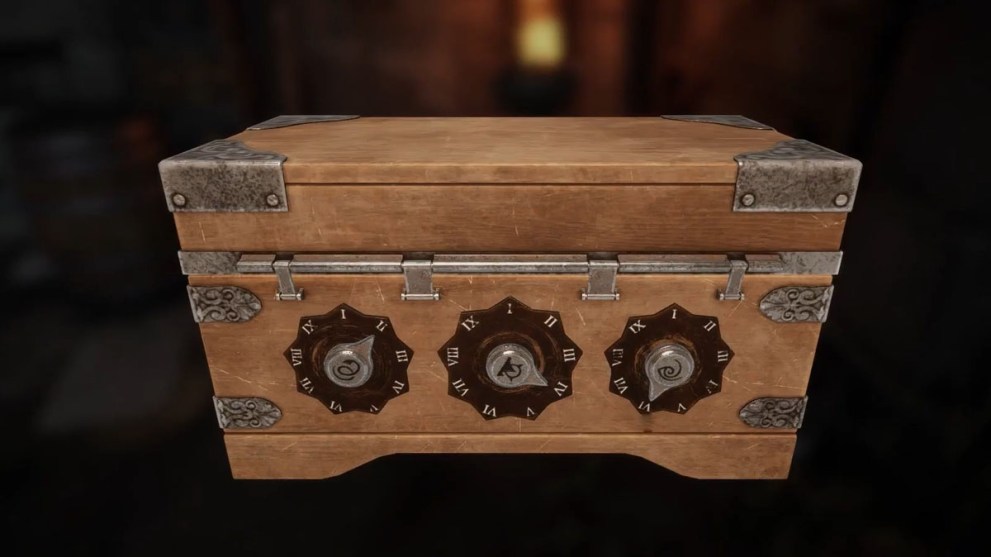
- Pick up a small locked chest in the right corner with three locks.
- The correct numbers from left to right are: 2 (II) – 4 (IV) – 6 (VI)
- Pick up two mechanical keys from the chest.
- Pick up a small hammer from the bench nearby and a leather bag from the well.
- Open the bag and pick up the book.
Approach the statue of a woman to your right and zoom in on the lower part of it for examination:
- Place one of the keys, with two ears, into the center of the mechanism in the lower part of the statue.
- Turn the mechanism so that one arrow stays at 1 hour and the other at 7 hours.
- Pick up a door key from the niche, and repeat the same action for the second statue to your left using the second mechanical key.
- Now turn the mechanism so that one arrow stays at 2 hours and the other at 8 hours.
- Pick up two statuettes from the niche.
Use the door key to open the door lock in the left area of the courtyard. Enter the room and place the two statuettes as shown in the screenshot above, and pick up the Moon Key from the niche. Then do the following:
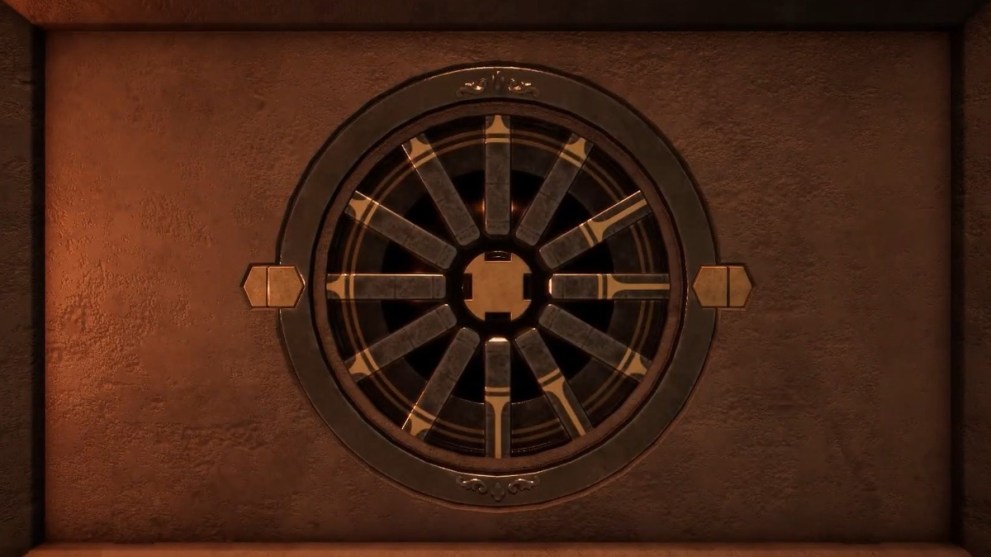
- Leave the room and zoom in on the locker right across to you with an inscription “Mendacium Veritas.”
- Toggle the central button in the following sequence: Left – Left – Right – Left – Left – Right
- Pick up the second Moon Key from the niche.
- The password to the chest below the locker with the vampire stake is “H-E-L-P”

Approach the wagon nearby and place the symbols on its door as shown in the screenshot above. Then, follow these steps:
- Pick up a key, a bottle, and a hat from the wagon.
- Use the key to unlock the chest in the back of the wagon.
- Place the small hammer that you picked up earlier, the bottle, and the vampire stake in the chest.
- Pick up the mirror from the niche once it opens.
Approach the well and select the four symbols on its four corners accordingly to this:
- The two lower symbols should be selected from your starting position in the courtyard.
- The two upper symbols should be chosen from the side of the castle doors.
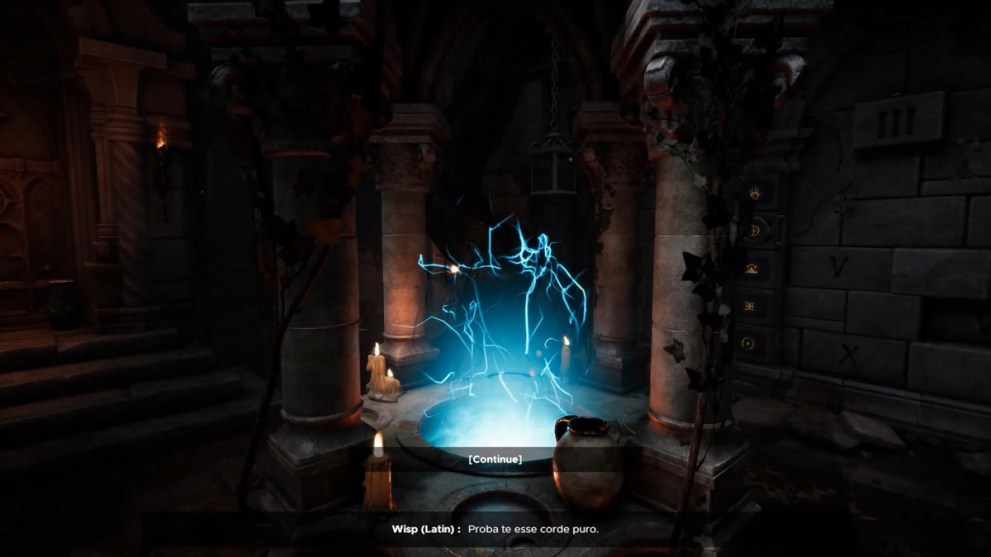
This will activate the Wisp in the well, who will ask you questions. Here are the answers in order:
- Caelum
- Aqua
- Sol
- Mors
This will grant you the third Moon Key. Then, pick up a shovel and start digging in the area between the well and the castle door. Once you pick up another chest, do this:
- Open the mechanical key and place it into the chest.
- Keep rotating the key clockwise and pick up another fourth Moon Key from the chest’s niche.
- Finally, insert all four Moon Keys into the four slots of the castle’s main gate and enter it.
Courtyard Darkest Puzzle
As soon as you enter the Dracula’s Castle, you’ll get the chance to return to the Lobby. Here, you can enter the Darkest Room obelisk and solve the first Darkest Puzzle:
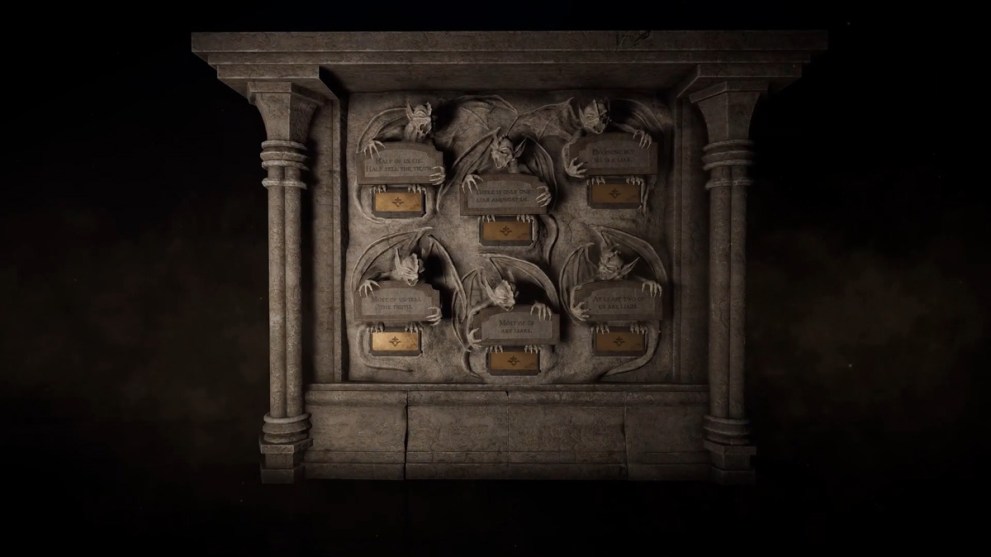
- Read the six statements on the wall and choose either “Truth” or “Lie” options under each one.
- Here are all the correct answers if you go from left to right in the top row: Lie – Lie – Lie
- Now from left to right in the bottom row: Lie – Truth – Truth
- Now you can enter the second room of the Dracula’s Castle.
Room 2: Feast

Once you’re at the feasting table, you need to solve the following puzzle:
- Pick up an Ornate Box and three tiles.
- Place the tiles in the chest as shown in the screenshot above.
- Pick up a goblet from the box.
- Remove the top piece of the chocolate cake and pick up another goblet from inside.
- Pick up three more goblets from the table.
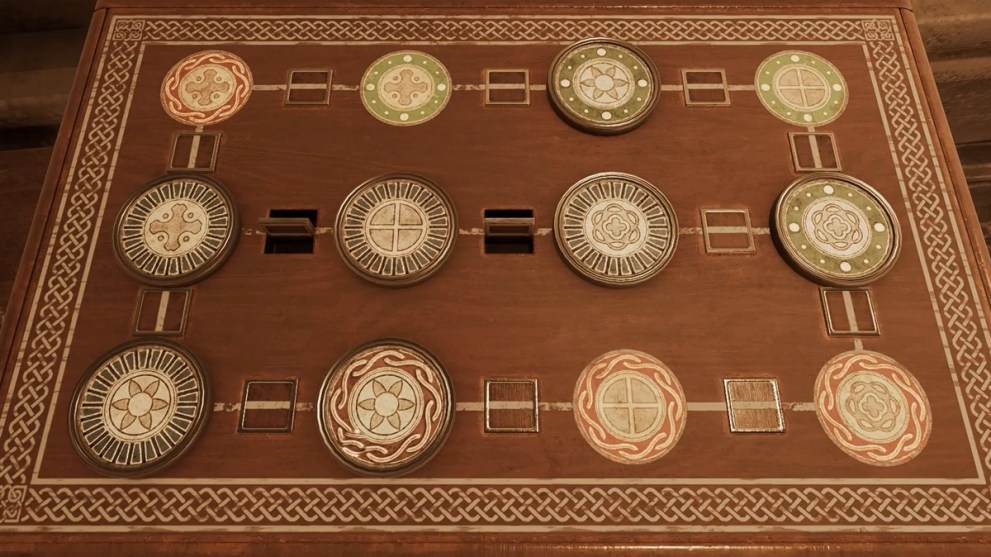
Now you need to place the five goblets in front of you on the table on the five numbered spots in the order of their symbols, beginning with I, then II, then a clover symbol for 3, then a cross for 4, and finally the pentagram for 5.
Once you’re able to walk around the room, pick up four Engraved Seals from the drawers and a bookshelf. Then, do this:
- Approach the table with the box full of missing seals next to a bookshelf.
- Replace the seals as shown in the screenshot above.
- Pick up a statuette from the niche and step back to see the five animal heads on the wall.
- If you count them from 1 to 5 from left to right, you need to pull their chains in the following order: 5 – 1 – 2 – 3 – 4
- Pick up another statuette from the niche in the wall.
After that, open a drawer under the bookshelf and pick up a key and another statuette. Then, follow these steps:
- Use the key on the small coffee table next to the hearth.
- Solve the puzzle under the table by placing the images as shown in the screenshot above.
- Pick up another statuette from the niche.

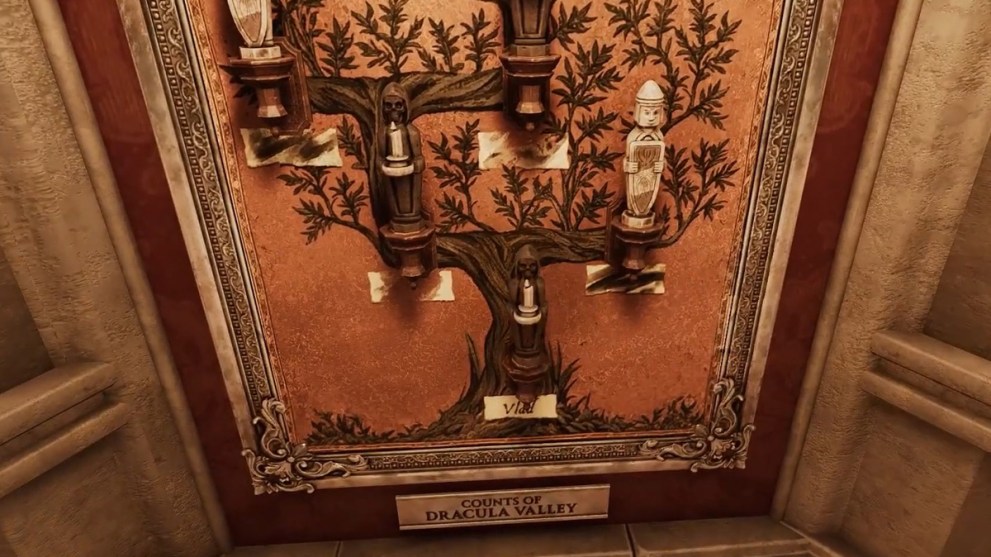
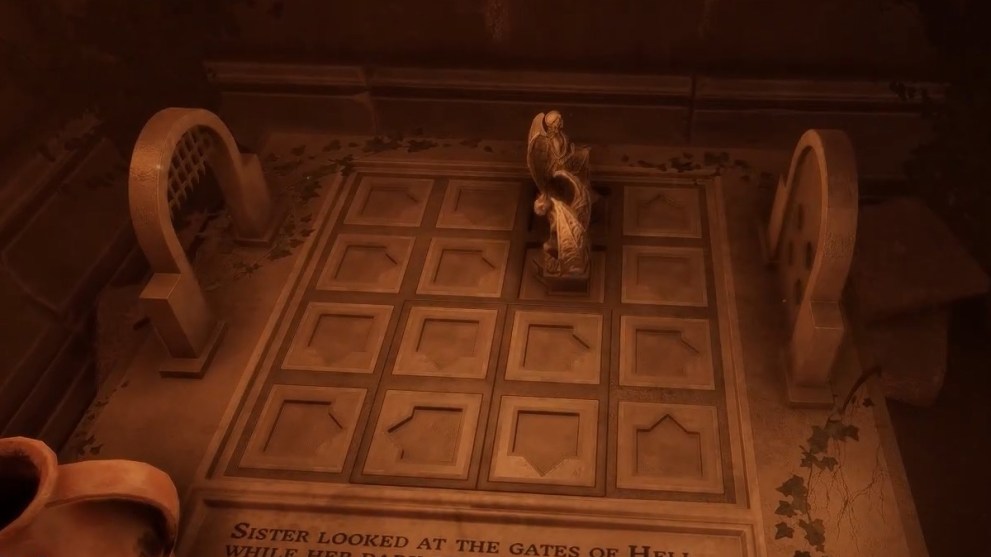
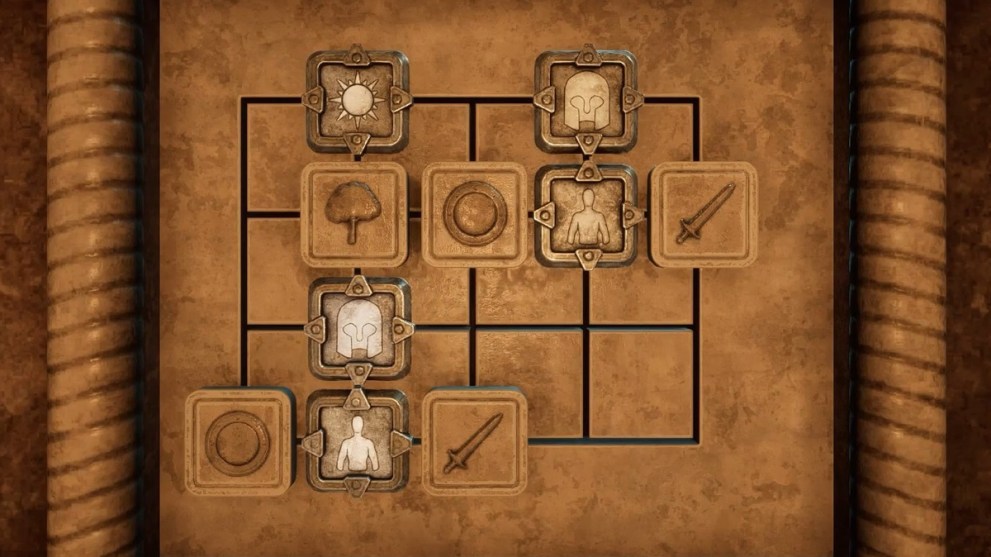
Now you need to approach the family tree of the Counts of Dracula Valley behind the table and place the statuettes as shown in the two images above: one for the top two rows and the other one for the two bottom rows. Then, do the following:
- Approach the main table again and unlock the tray by adjusting the parts of the symbols inscribed on it.
- After this easy puzzle, pick up an axe, a double axe, a sword, a sceptre, and a mace from the chairs.
- Place them in the hands of knights that stand in the three corners of the room, as shown on a plate under the tray.
- Once that’s done, the fire in the hearth will subside, letting you crawl through the chimney upwards.
Once you’re inside the chimney, you’ll see a picture of the count right above the entrance. Switch the pieces of the image so that they look as shown in the image above, and pick up a key from the niche. After that, do this:
- Use the key on the chest located right under the family tree.
- To unlock the chest, use the following pass word on the key: D – E – U – S
- Pick up the Master Key from the chest and use it on the main door.
Before opening the main door, adjust the pieces of the Master Key as shown in the image above. This will allow you to escape the room back into the Lobby.
Feast Darkest Puzzle
As usual, you can now interact with the Obelisk in the Lobby to solve the second darkest puzzle related to the second room of the Dracula’s Castle. Simply move the parts of the puzzle as shown in the screenshot above to solve it.
Room 3: Sweet Dreams

Now you can enter the third room, and as soon as you appear in the Count Dracula’s bedroom, do the following:
- Take a nap on his bed and look at the ceiling, which contains hints on how to unlock the chest at his bed.
- Stand up and approach the chest with a lock, which can be solved as shown in the image above.
- Pick up a statue and a metal plate from the chest.
- Approach the table with a mirror and pick up two more metal plates from the drawers.
- Shift towards the bookshelf and enter the following password on the numbered codes from left to right: 6 – 7 – 8 – 9
- Pick up two more metal plates from the niche in the bookshelf.
- Pick up another metal plate from the table with a birdcage.
- Interact with the birdcage and solve a simple puzzle by guiding the small ball towards the bottom exit.
- Pick up another statuette once the birdcage opens.
Finally, you can place all the missing metal plates into their positions in another birdcage in the bedroom and pick up a bird statue once it unlocks. Then, follow these steps:
- Switch the sliders on the three big portraits in the bedroom.
- Then, approach a section with three smaller portraits, but switch the slider of only the top painting this time.
- Approach a cupboard and enter the following password to unlock it: B – VI – Star – 4
- Pick up a large key and a book once the cupboard unlocks.
- Use this key to unlock the door onto the balcony from the bedroom.
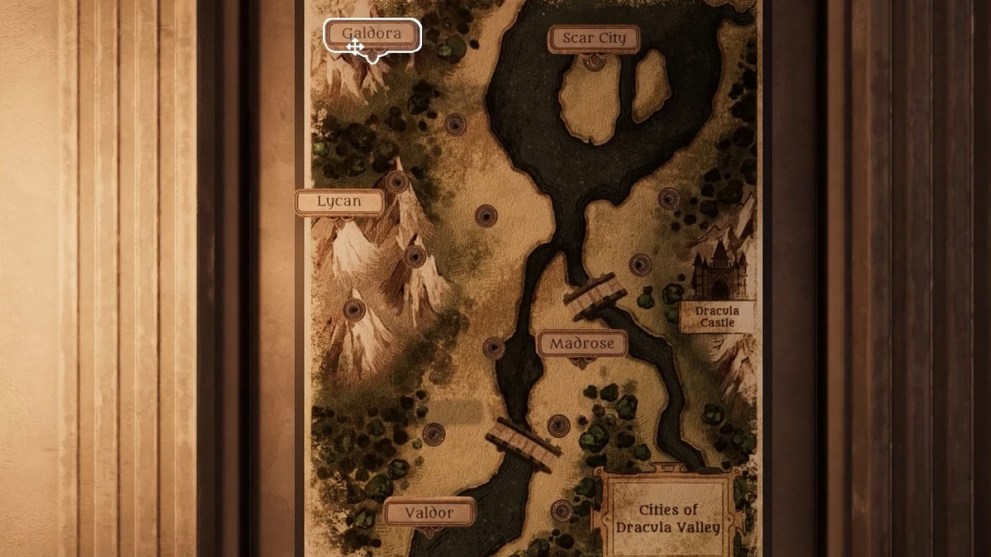
Look out for the map on the wall next to the door of the balcony and place the tiles with location names as they’re shown in the image above. After that, do this:
- Pick up another statue of the bird from the niche in the wall.
- Now insert all the bird statues that you’ve collected into the slots on the balcony rails.
- Pick up a large key from the niche in the floor of the balcony.
- Use this key to unlock the door to the bathroom.
- Pick up a winding key from the stool and insert it into the winding box on another stool.
- Rotate the keys until the box opens up and pick up another key.
- Use this key to unlock a jewelry box behind the bathtub.
- Pick up a heart-shaped pendant from the box and turn it around.
- Use the following password to activate the pendant: D – R – O – W – N – M – E
Once that’s done, approach the bathtub and pull the three levers hanging over it, in the following order if you count them from 1 to 3 (left to right): 3 – 1 – 2 – 2 – 1 – 3. After that, do this:
- Remove the four floor pipes in the four corners of the bathroom.
- Place them back again, but correctly, so that their shapes actually fit the pipe holes.
- This will activate the water tap, which you need to trigger and let the bathtub fill up with hot water.
- Once the bath tub is filled up, drop the active heart-shaped pendant into the water.
- The water will turn black and serve as the portal into the parallel dimension.
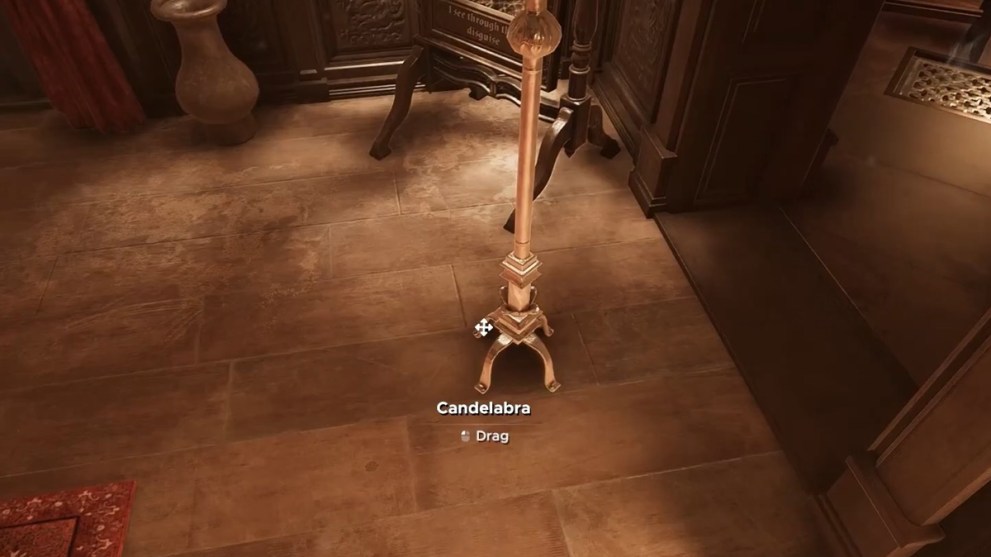
- Use this portal to solve another puzzle by placing the two candelabras in the bathroom and another one in the bedroom, as shown in the image above.
- Once that’s done, go back to the normal dimension and pick up a key that’s hovering over the bathtub.
- Use this key to unlock the door of the bedroom and exit it into the Lobby.
Sweet Dreams Darkest Puzzle
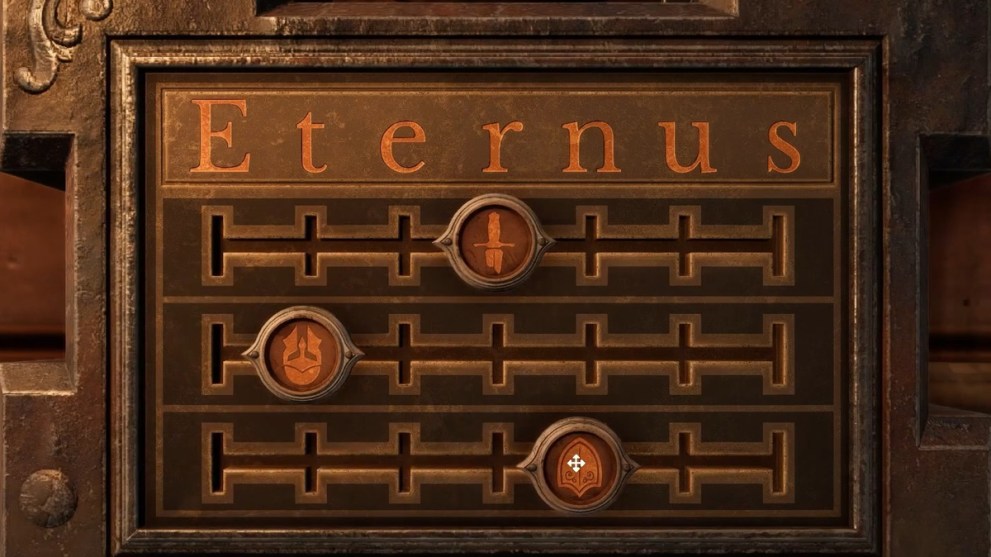
The third darkest puzzle at the Obelisk is quite simple, and all you need to do is rotate the four pillars, using the rotating passcodes beginning from left to right. The correct sequence is 2 – 3 – 5 – 6.
Once this puzzle is done, you can start the fourth and the final room of the Dracula’s Castle, which is also the hardest one to solve.
Room 4: Crypt
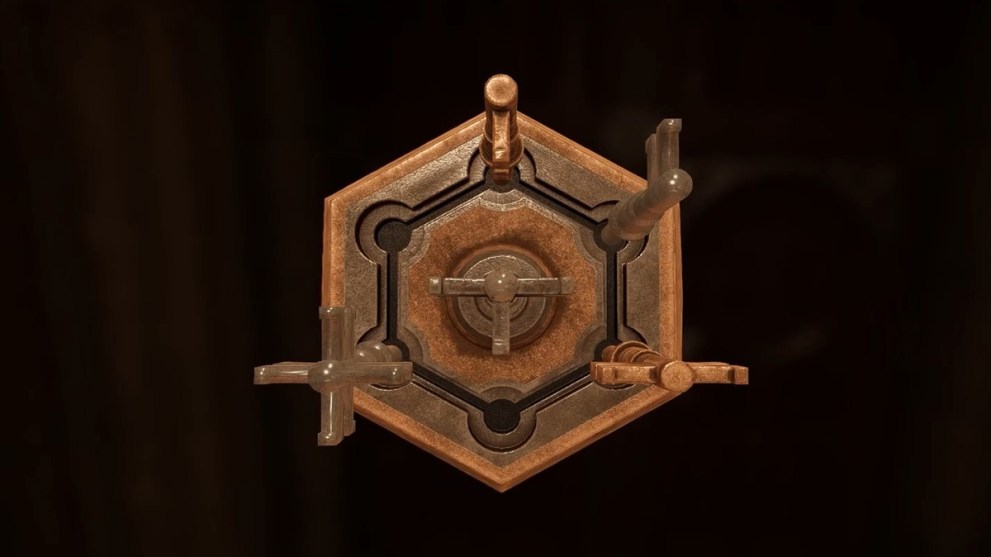
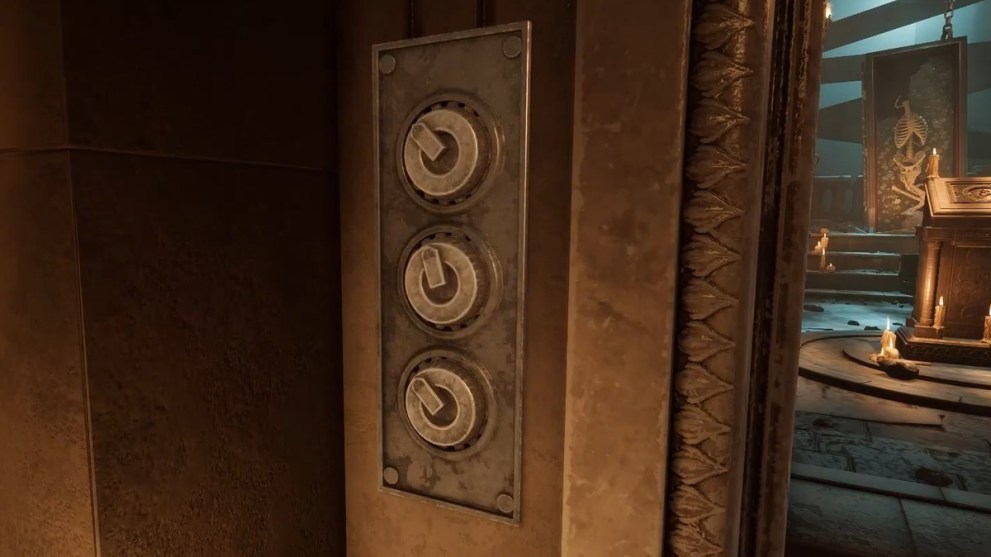
As soon as you spawn inside the ominous crypt, you need to rotate the small arrow of the clock-like mechanism that has only eight divisions on the wall in the following sequence: 2 – 6 – 1
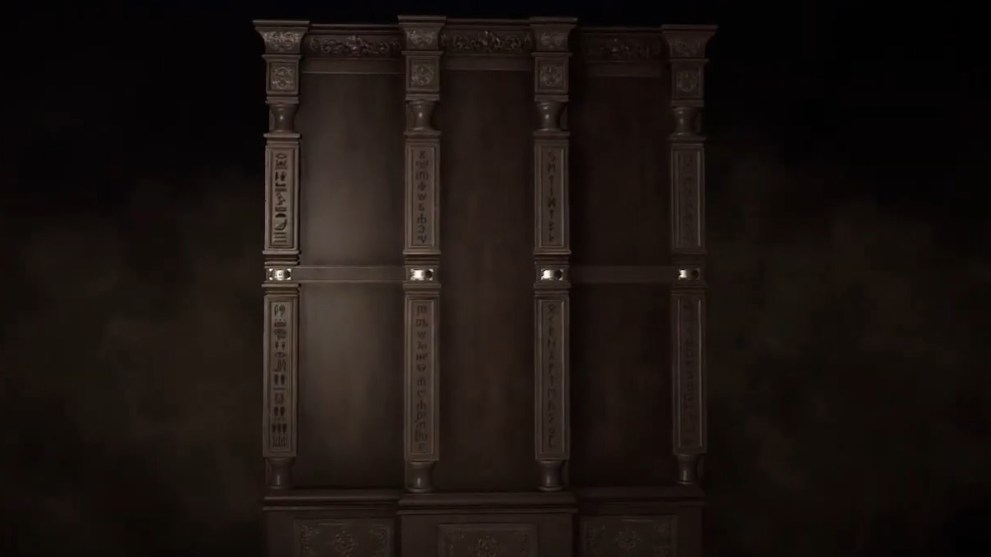
Once you’ve been able to transition into the larger room, approach the chest to your right and position the three sliders on the lock as shown in the image above. Then, proceed to do this:
- Pick up a Golden Sphere from the chest.
- Give it to one of the four hands protruding from the wall.
- Then, pick up and break the vase from the niche to your right.
- Pick up another golden sphere and give it to the second hand.
- You can pick up the third sphere from the shelf on the opposite side of the room.
- Give this sphere to the third hand and pick up a key dropped by the fourth hand.
- Insert this key into one of the locks of a small cage next to the portrait of Count Dracula.

Approach the central window with the chained coffin and pick up a small chest at its base. Use the image above to find the correct parts of the map on the chest’s lock. Then, follow these steps:
- Pick up a key from the small chest and insert it into the small cage as before.
- Pick up a strange key and a blue gem from the niche behind the cage.
- Insert the blue gem into the small tribune that stands in the middle of the crypt.
- Pick up a Mysterious Eye from the niche and use it to find the slot for the strange key.
- Insert the key into the slot of a small mausoleum structure near the chained coffin.
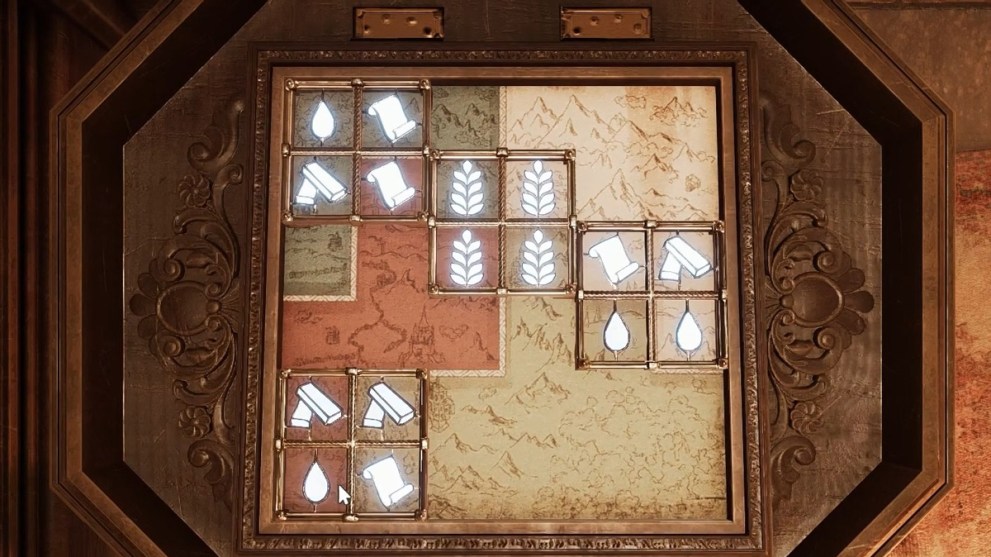
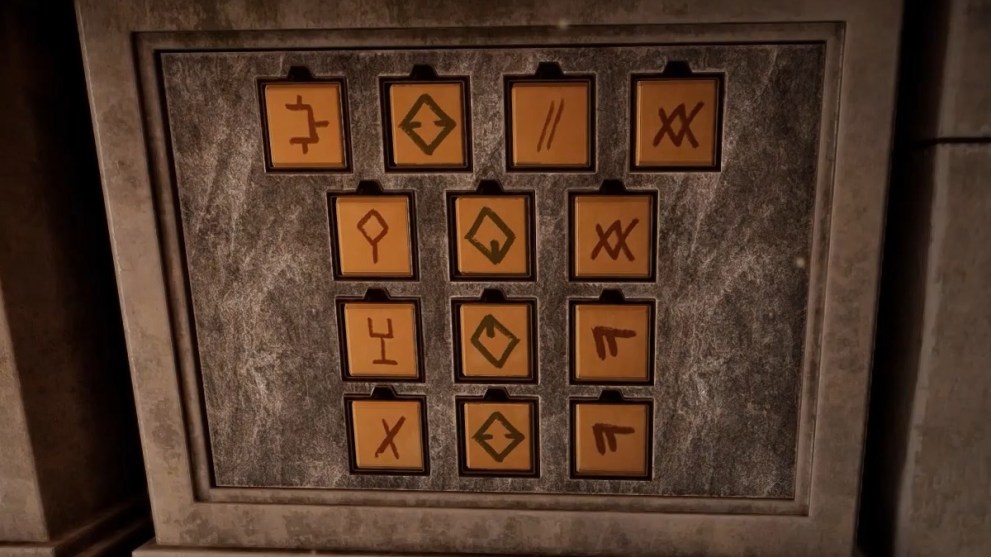
Pick up a scroll from the niche that will help you solve the next puzzle and place the icons on the mosaic as shown in the image above. This will remove one of the chains from the hanging coffin. Repeat the same process for the other small mausoleum on the other side of the coffin:
- Once the coffin drops from the chains, pick up a strange key from the ground.
- Insert this key into the slot of the gates that block your path out of the crypt.
- Enter the next section and pick up a vampire stake from the leather bag on the floor.
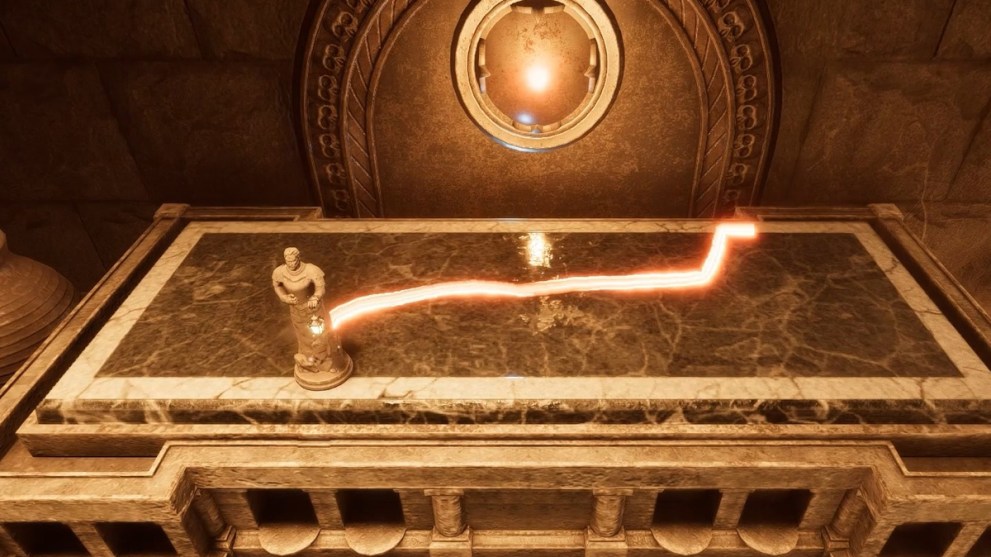
Approach a platform with a small statuette and move it as shown in the image above to activate the light path:
- The light path must touch the base of the statue in the previous section of the crypt.
- Once the light hits it right, pull the lever next to the statue and pick up a stake and a skull from the niche.
- Go back to the section with the platform and look in the opposite side.
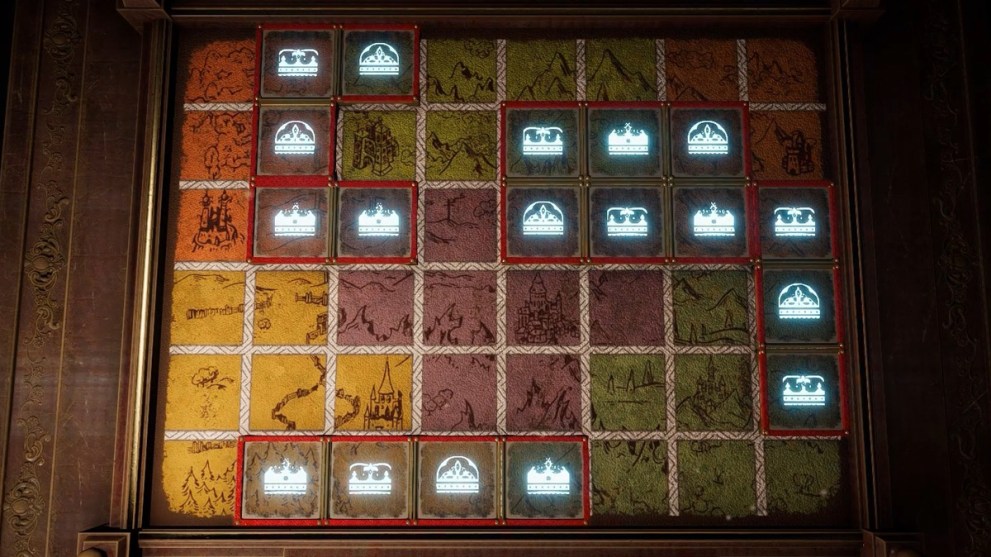
- You should see two rows of bells: three at the top and four below.
- If you count them from left to right and top to bottom, then the correct sequence is: 2 – 5 – 4 – 7 – 3 – 1 – 6
- Once the floor lifts, pick up another skull from the niche.
- Pick up a third skull near the box, which you need to open and pick up a Rotary Scrollbox.
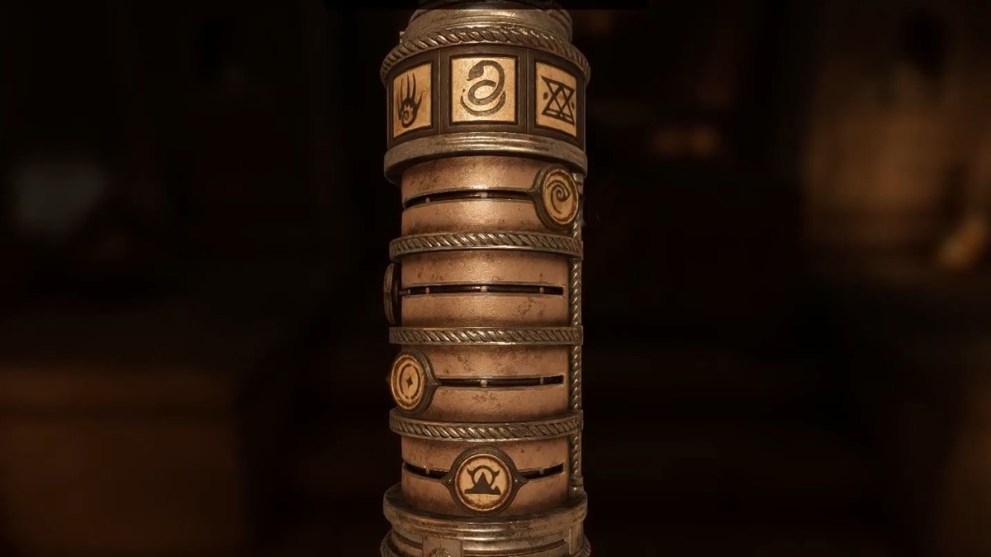
Align the images on the Rotary Scrollbox as shown in the image above and pick up another stake from the niche. Then, proceed:
- Go back to the coffin and insert the three stakes into the holes of the coffin.
- Pick up another skull once the coffin shatters.
- Go back to the entrance of the coffin room.
- Rotate the three parts of the image at the entrance so that they align into one perfect image.
The screenshot above shows exactly how the three parts of the image should be aligned. Once that’s done, follow these steps:
- Pick up the final skull from the niche.
- Return to the smaller section of the crypt and place the skulls you’ve collected into the niches at the locked gate.
- This will unlock the last gate, which will allow you to escape the crypt and the Dracula’s Castle for good.
Crypt Darkest Puzzle
For the final darkest puzzle in Dracula’s Castle, you need to pick up a Mysterious Eye and use it to solve the puzzle on the wall. But if you don’t want to waste any more of your time, then simply use the solution as it is shown in the image above.
That’s all you need to know on how to complete the Escape Simulator 2: Dracula’s Castle walkthrough. For more guides, check out Baby Steps Walkthrough Guide: The Fastest Way Up and Roblox Piggy Decay & Delirium Walkthrough Guide.


Updated: Nov 9, 2025 08:29 am