
Investigate the Ruins is one of the first optional quests you can follow in Baldur’s Gate 3, involving the exploration of your first potential underground dungeon in the game. Don’t let this fool you, though; there are plenty of dangers and traps to navigate along the way, so follow along below for all the information you’ll need to guide you through this quest, defeat a few enemies, and snag some sweet loot.
How to Start the Investigate the Ruins Quest in Baldur’s Gate 3
There are two possible ways to initiate the Investigate the Ruins Quiz in Baldur’s Gate 3, depending on if you choose to free or leave Shadowheart when fleeing the Nautiloid Ship. If you abandoned Shadowheart or failed to locate her when fleeing the Nautiloid, you will need to first locate and recruit her.
From your first starting point of the Nautiloid Ship crash site, follow the path heading North along the beach until you reach the Overgrown Ruins. You will be able to find Shadowheart in this location, standing in front of one of the doors to the Ruins. Upon speaking to Shadowheart, she will reveal that she is trying to get into the Ruins, but that the door is locked, prompting the ‘Investigate the Ruins’ quest.
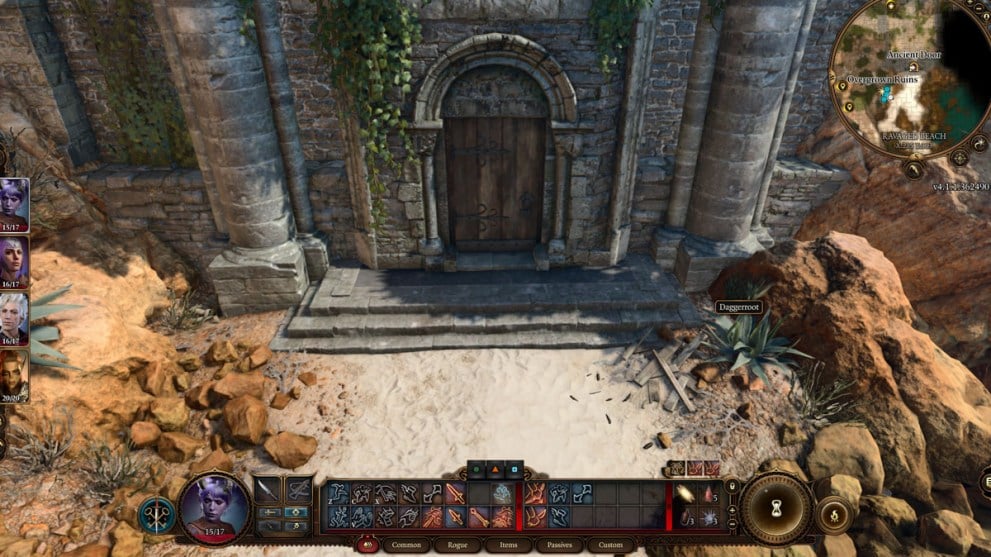
Upon interacting with the door, you will have the option to try and lockpick it if you have a character with Thieves Tools within your party. If you succeed in passing this check and unlocking the door, then congratulations! You’ve skipped right ahead to the trap room and can scroll down further through this guide for the next step, which involves how to avoid and disarm the Dank Crypt sarcophagus traps.
Alternatively, if you managed to free and recruit Shadowheart while fleeing the Nautiloid Ship, she will instead be the first character you stumble upon at the beach, right next to where you wake up. Because of this, there is no way to initiate the conversation that kickstarts the Investigate the Ruins quest, but you can still do so by heading over to the Overgrown Ruins and discovering the underground dungeon below.
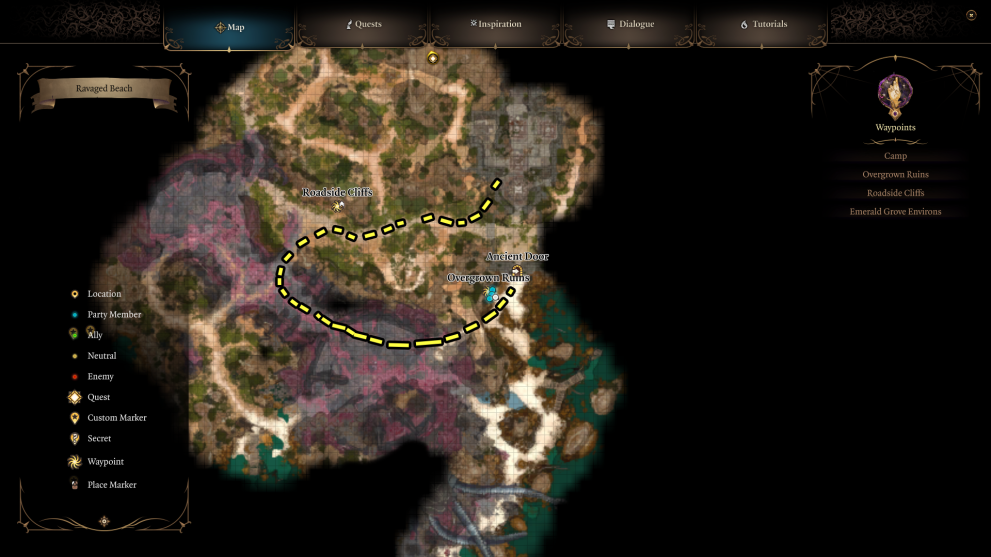
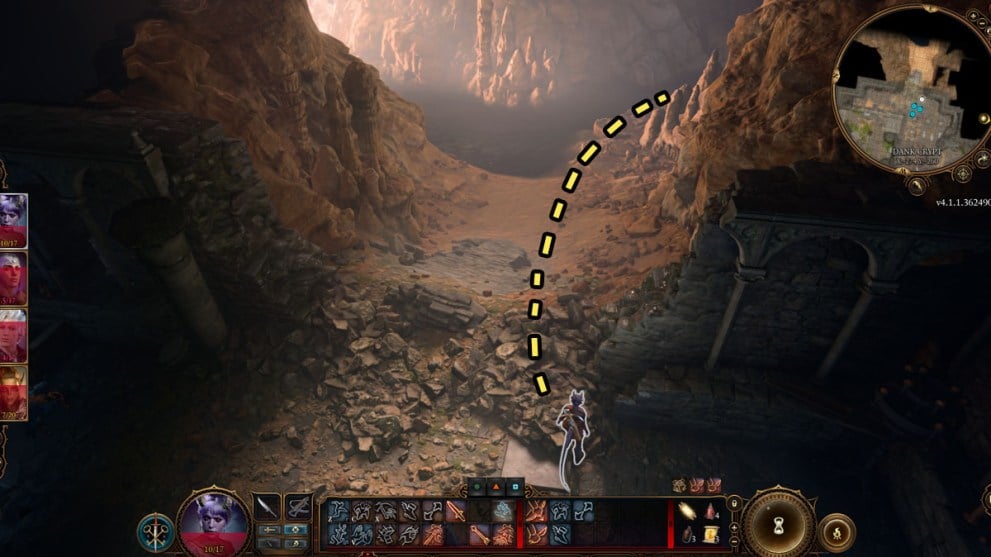
Because you’ll face a few encounters along the way when taking this route, I highly recommend first making a stop to pick up Asterion or Gale and free Lae’zel for your party so that you have a complete group of four. Once you’ve done so, head on over to the Overgrown Ruins’ Chapel, located above the door containing the shortcut to the trap room. You’ll need to make a quick backtrack through this area of the map to reach the top level, so I’ve marked out a clear path for you from the shortcut door to the top level of the Chapel on the map below:
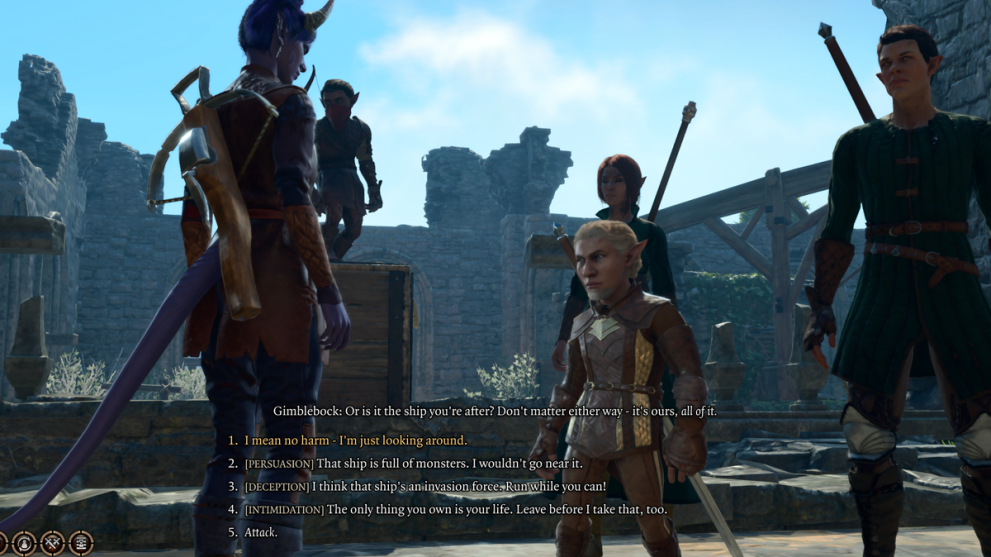
As you reach and enter the chapel, you will encounter a group of bandits. There are several different ways that you can approach this situation, depending on your personal preferences and the strengths of your character. I chose to fight them, mostly because I’m a combat gremlin, and I always enjoy the extra loot and EXP, but the other options for how you can handle this group are as follows:
- Convince the bandits that the loot isn’t worth it (Persuasion check)
- Trick the bandits into leaving (Deception check)
- Threaten / frighten the bandits into running away (Intimidation check)
- Attack the bandits / initiate combat
After you’ve dealt with these bandits, it’s time to move on and enter the Ruins. There are a couple of different doorways you can use, though they both lead to the same underground dungeon area, so I’ll explain the perks of each option in more detail below.
How to Enter & Begin Investigate the Ruins Quest
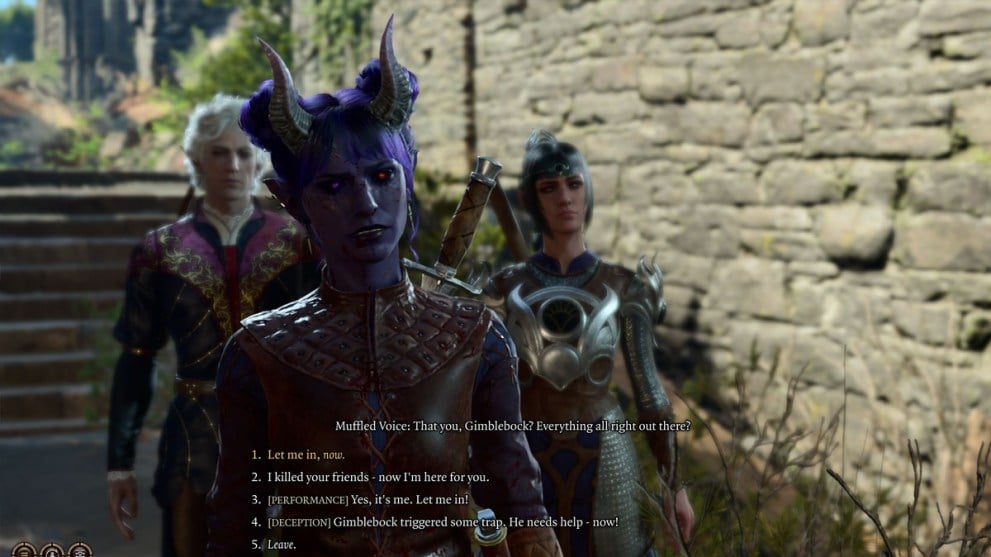
From this top level of the Chapel, there are two different doorways that you can use to enter the underground Ruins, with each one requiring a different method to enter. The first of these methods is the door located at the Northern end of the Chapel.
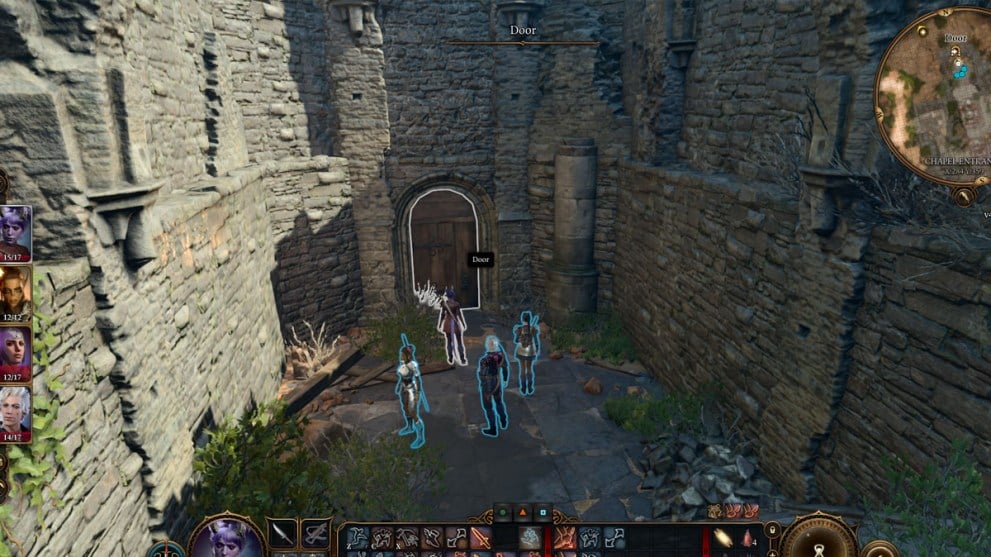
To enter through this door, you will need to trick or force the guard on the opposing side to open it by using one of the options below:
- Pretending to be an ally (Performance check)
- Tell a lie about the guard’s ally being stuck in a trap and needing help (Deception check)
- If you chose any of the other threats, the guard will inform you that he has more friends inside, and the door will remain locked permanently, forcing you to take the alternate entrace
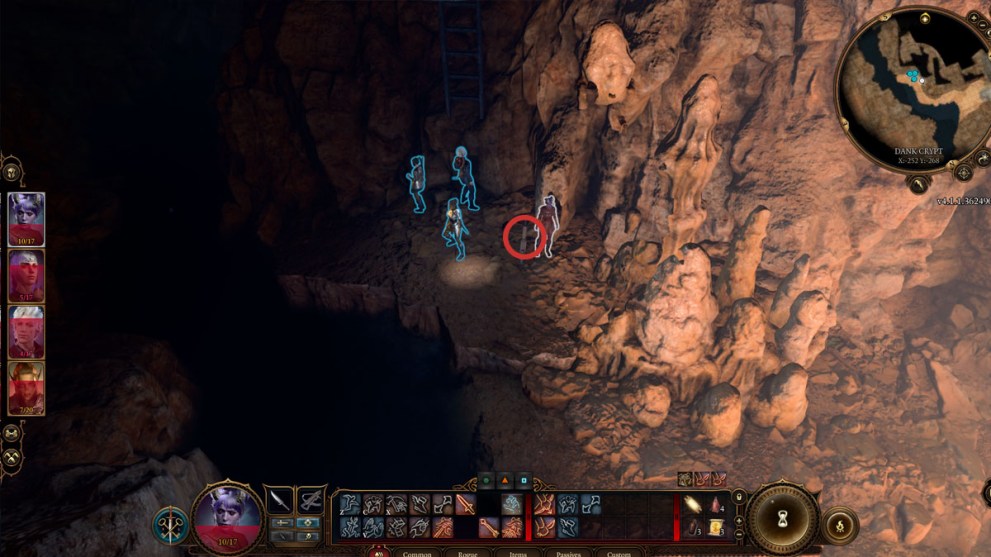
As my character is not super strong in either Performance or Deception, I opted to walk away and take the second entrance. This entrance is through a hole in the ground, which you can create. If you’re choosing to go with this second entrance as I did, then head down in the north direction for a few steps, and you will come across a stone pillar hanging from a rope.
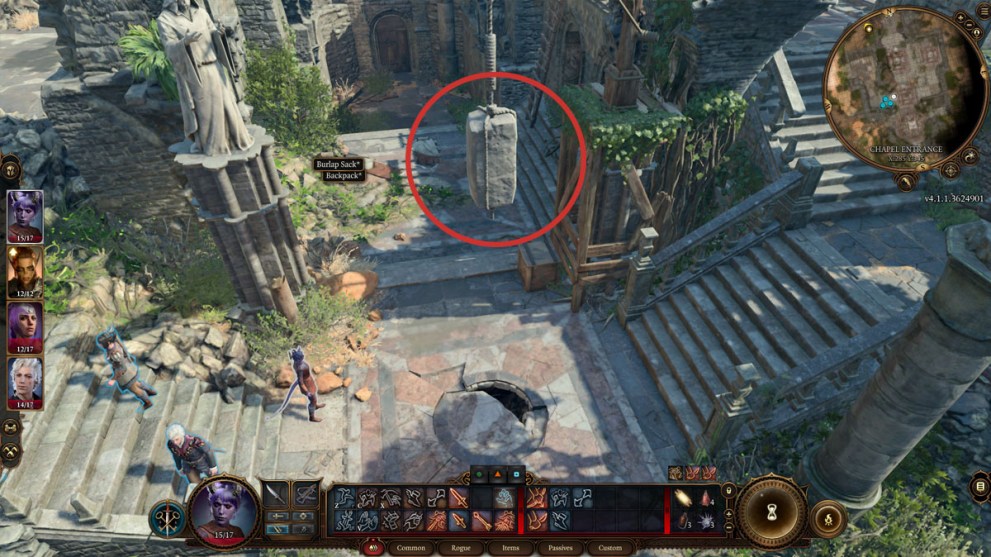
Select a character equipped with a Bow, and have them fire an arrow to snap the rope. This will drop the pillar, creating a hole in the ground. You can now climb down this hole to enter the Ruins. However, I recommend healing your party to full health through potions or a short rest if they’re missing HP, as you’ll be faced with a battle once you descend. Also, make sure none of your comrades are standing near this area when you drop the pillar, as otherwise they will take damage, and fall down below, likely causing them to be downed for the start of combat.
Navigating Enemy Combat & Discovering the Dank Crypt
If you enter via the hole in the ground, you will immediately engage in combat against several opponents. These guys have some pretty annoying AOE Spells up their sleeves, but there is a method that you can use to make your fight with them much easier within the first couple rounds of combat.
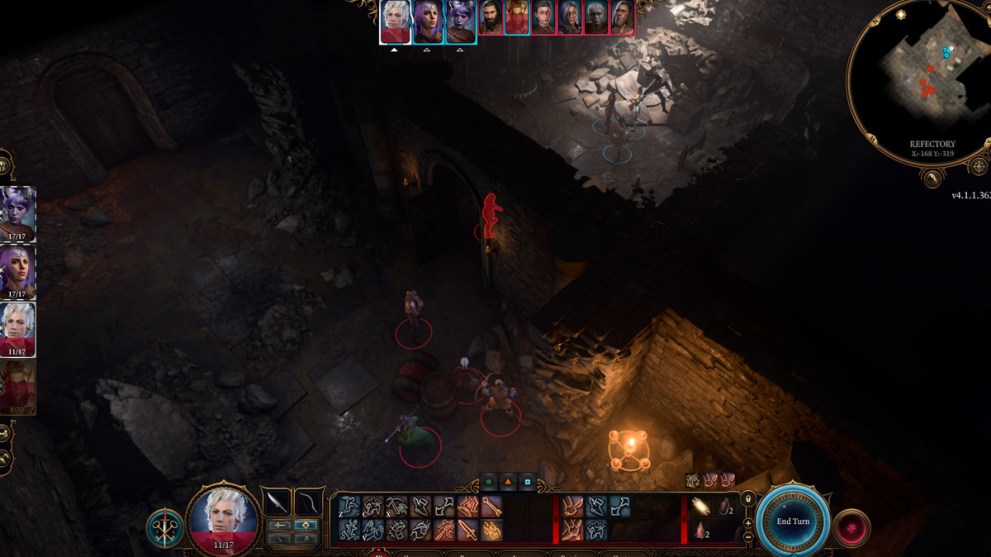
Behind the doorway where the enemies are gathered to begin with, you will be able to see a red barrel. This barrel is filled with oil, so use a character equipped with a bow to shoot and puncture the barrel from afar, creating an oil spill to surround the enemy. Now follow up by having one of your Spellcasters use a Fire spell on a section of the oily ground, and all enemies within the surrounding area will be lit on fire, taking damage.
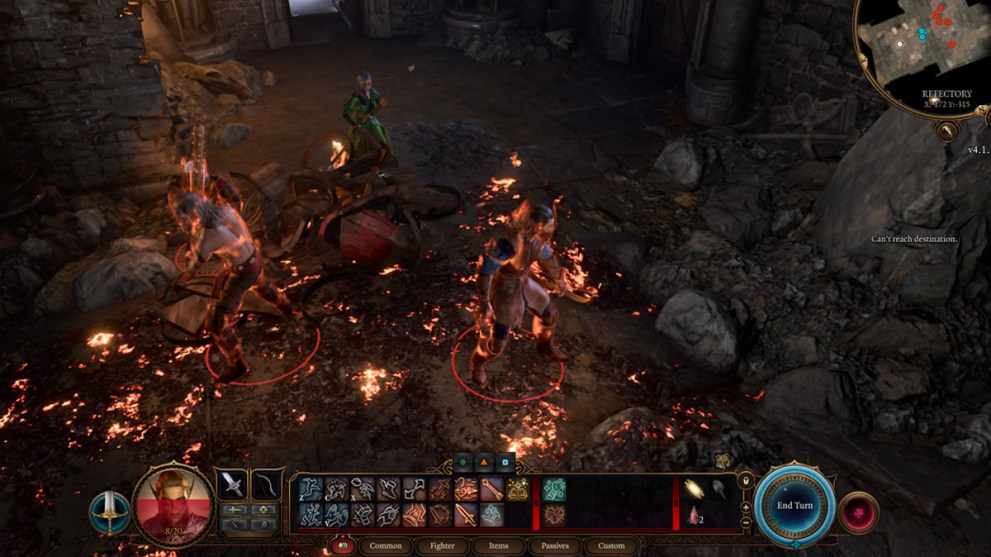
You can use this terrain to your advantage with your positioning of your party to force the enemy to stand in this area, taking further damage. If they manage to step out of it and approach you, you can also take the Shove action to try and push them back onto the fire, so utilize this to take care of this group quickly.
After defeating these enemies, head to the right side of the room and look for the door. If it wasn’t opened by one of your opponents in battle, then go ahead and pull the lever to open it now. There will be one more enemy inside, none other than the guard from the first door outside the Chapel.
Alternatively, if you enter through this first door, this lone guard will be the first enemy that you face. Try to take him out quickly and stealthily so you can sneak up on the group in the next room and catch them off guard with a Surprise round. Most importantly, the guard in this room will have a key. Make sure that you loot it from his corpse, as you will need it to progress further.
Look at the doors within the main hallway, and you will notice one of them is locked. Unfortunately, this door is impossible to lockpick, but there’s a quick fix to this, so go ahead and follow the path I’ve marked out on the map below:
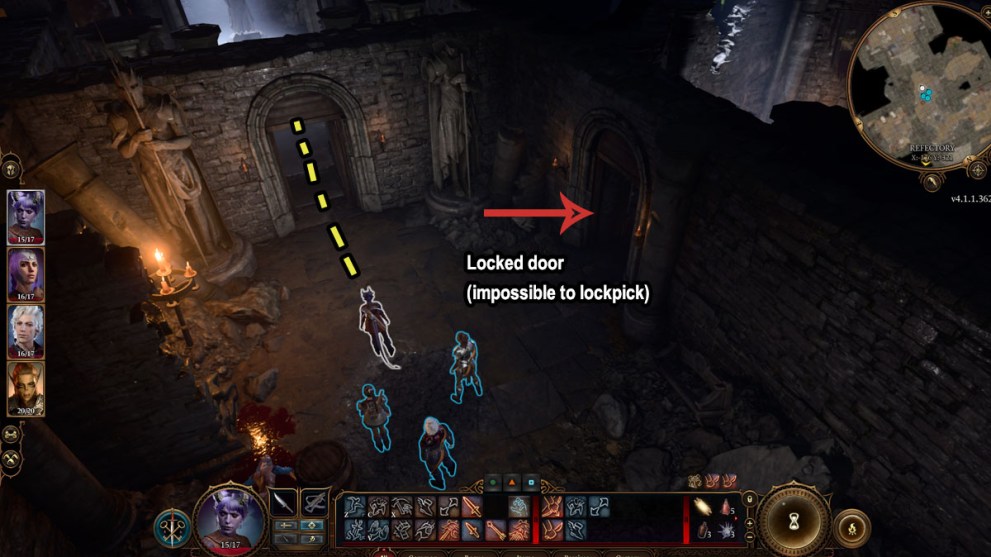
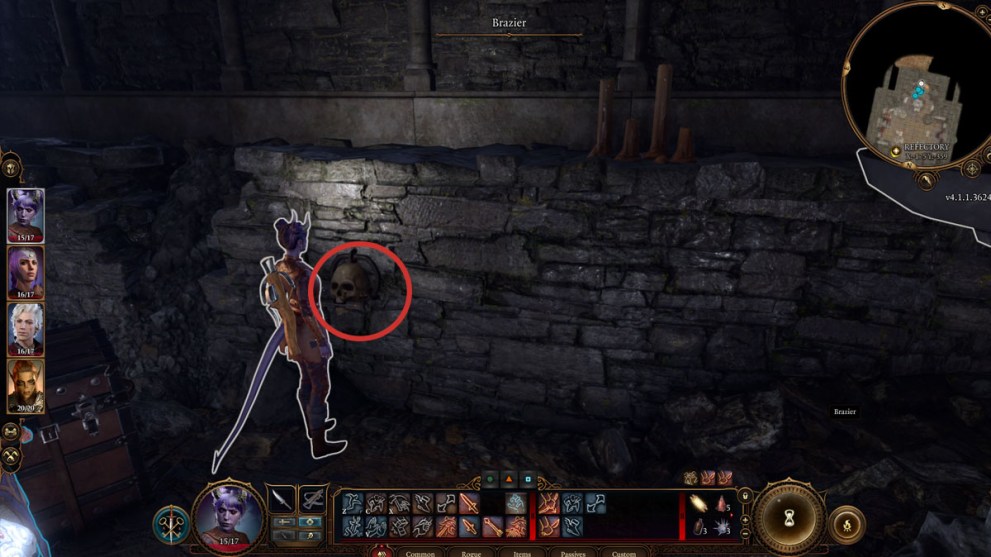
After entering this second room, head towards the very back wall. As you approach, you may get a Perception check. If you pass this, a secret lever will be revealed to you on the wall. If you’re having trouble finding this, just look for the skull.
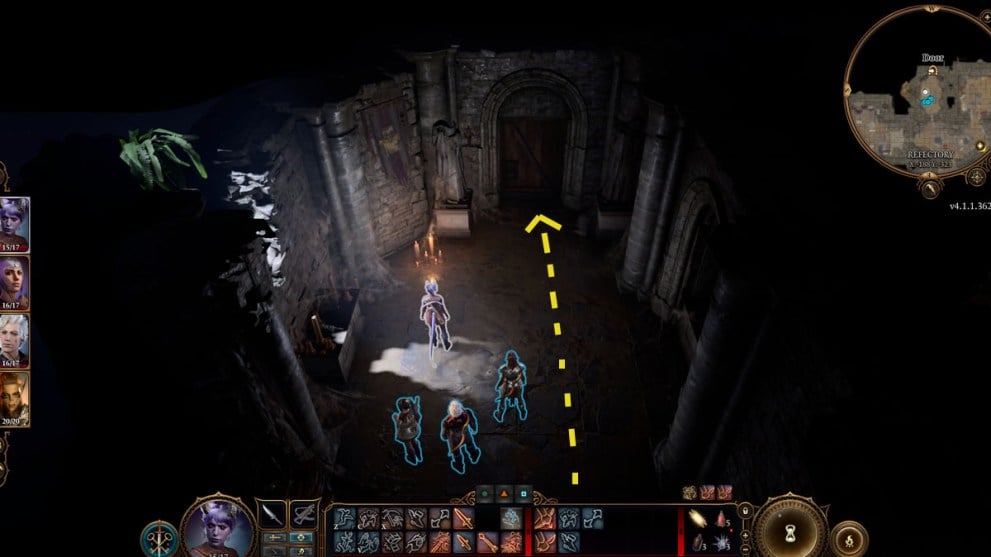
After triggering this lever, the previously locked door will now open, so backtrack towards the hallway and pass through the newly unlocked door. In this second room, there will be two more doors, but just head straight for the one below and you will have finally made your way to the Dank Crypt.
How to Avoid & Disarm the Dank Crypt Sarcophagus Traps
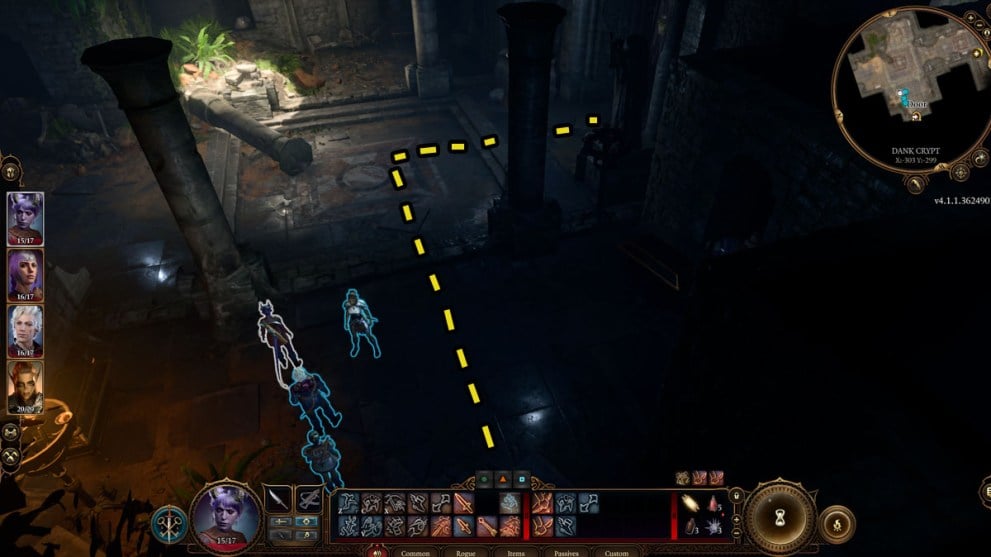
Upon entering the Dark Crypt, grab some extra loot from the two chests near the entrance before following my pathing below to the large door on the right, and proceed through.
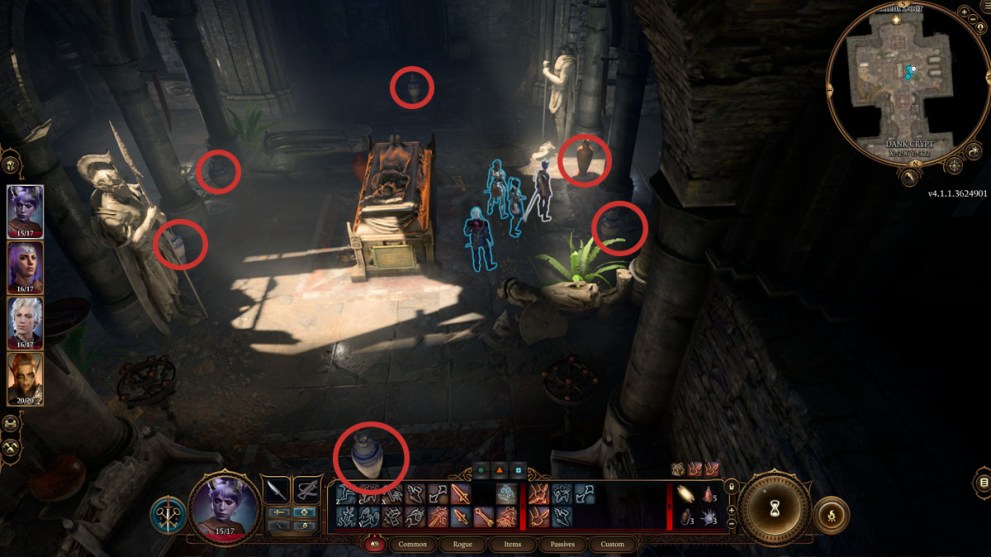
Inside this room, you will see a room with a sarcophagus inside. As you approach, your entire party will undergo a Perception check, so mind your step, as there are traps nearby. Run around the room tentatively, and your party should be able to uncover most of these traps (floor vents and gargoyle heads on the walls) just fine.
To proceed, pick up the various Vases around the room (Jugs will not work) and place them on the vents that you have discovered. Just in case your party fails any of these checks, I’ve circled the exact location of these vents below. These vents are all completely symmetrical from one another, so you can use that to help line up the vases in areas where you were unable to discover a vent.
Now go ahead and loot the sarcophaguses on the sides of the room, but make sure not to touch the one in the center of the room just yet. You’ll find plenty of decent stuff in doing so, including a Soul Coin.
We’re now ready to open this tempting centerpiece! However, as soon as you open it, flames will come rushing out from the Gargoyle heads on the walls. Luckily, we can stop this by entering Turn-Based mode, indicated by the golden hourglass button on your bottom menu. Go ahead and click this button to switch to Turn-Based mode, and now right-click on the sarcophagus and press Open.
You can now loot the opened sarcophagus, which will allow you to receive The Watcher’s Guide Rapier, and an Engraved Key, which can be used to open the other door in the Dank Crypt’s main hallway.
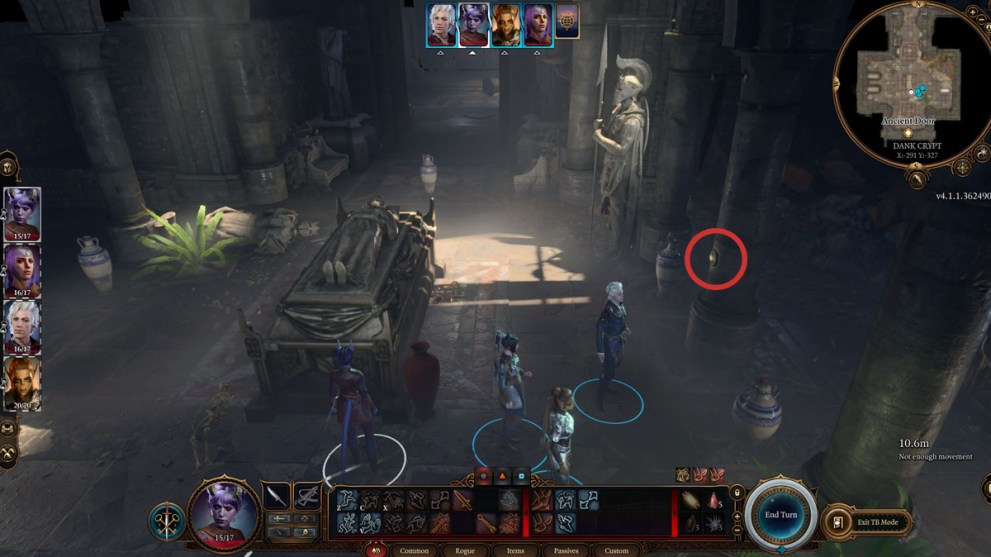
After looting, you will now need to press the button on the pillar indicated below. If your character does not have enough movement to reach this button, then simply click the blue ‘End Turn’ button on your bottom menu to proceed to your next party member, and have them do it instead. This will stop the fire being triggered from the Gargoyle heads as you progress. Now you can go ahead and exit Turn-Based mode before leaving the room and returning to the main hall.
Approach the Heavy Oak Doors on the other side of the room, and the Key that you just received will open them. Go ahead and enter this room, you will notice several dead Scribes scattered throughout the room. Go ahead and loot them, before making your way to the left side of the room, where you will find three more sarcophagi. Loot the corpse located next to the center sarcophagus to receive a Key that unlocks the lockpickable door where you first met Shadowheart, granting you a future shortcut into Dank Crypt.
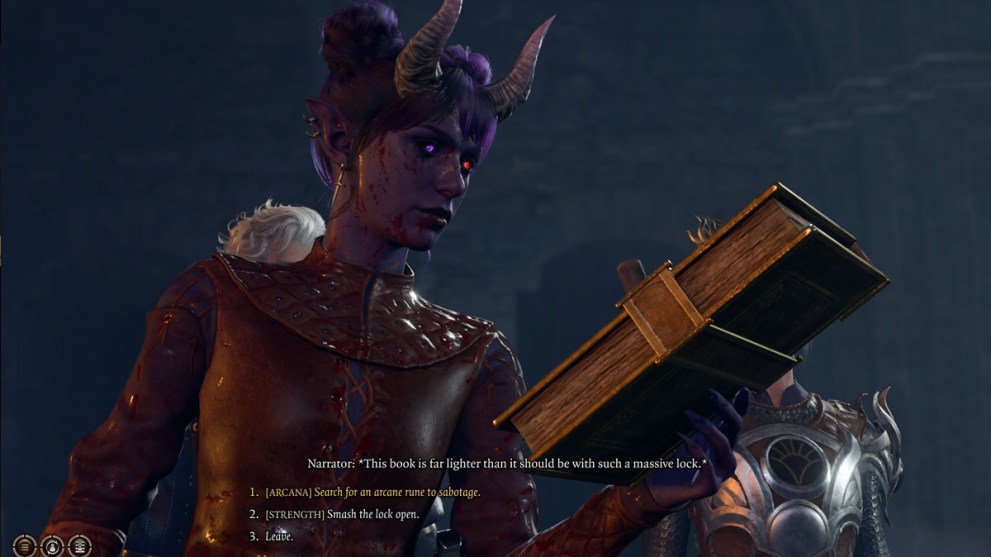
Now open the door to the left of these three sarcophagi, and secure loot from the Heavy Chest as well as the Book of the Dead Gods, with the latter requiring you to unlock it through a Strength check, Arcana check, or lockpicking.
Exit this side room and walk back into the main room, heading towards the altar. On the left side wall of the altar, there is a hidden button for you to push. Upon pushing this button, a secret passage will be revealed and all undead in the room will come back to life and attack you.

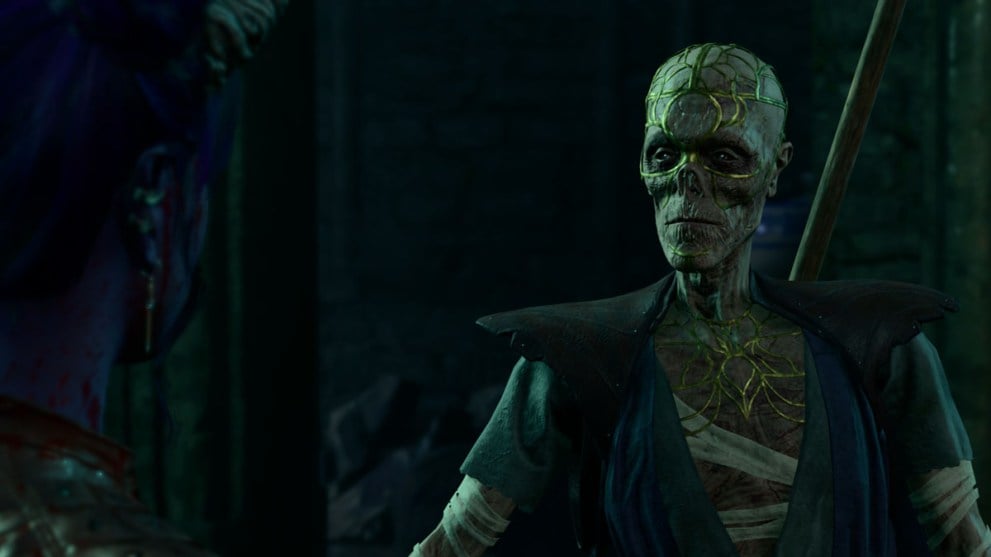
You shouldn’t have too much trouble overcoming these Skeletons in combat, so once they’ve all been defeated, head back into this secret passage. Inside this passage you will find another chest to loot, granting you the Amulet of Lost Voices. This is an extremely useful item that allows you to speak with the dead, so make sure to claim it for your character! as well as one last sarcophagus to open. Go ahead and open this final sarcophagus, and you will come face to face with an undead individual known as Withers, who has some very interesting and mysterious dialogue to share.
Now the ‘Investigate the Ruins’ quest is finally complete and it’s time to leave the Dank Crypt, so I’ll guide you through the exit path. First, walk out of Wither’s hidden passageway, and back into the room with the altar. Turn to your right, and you will see a huge hole in the wall. Go ahead and exit through this gap, following the path down before making a right turn at the edge of the water.
As you turn the corner, you will come across a lever. Simply pull this lever to drop a ladder down to you and your party. Now climb the ladder, and you’ll find yourself back outside the Chapel entrance, right where you started.
That’s everything you need to know about how to clear the Dank Crypt sarcophagus traps and complete the Investigate the Ruins quest in Baldur’s Gate 3. Now that you’ve completed one of the first dungeons available in the game, feel free to check out our guide covering how to prepare Spells, as this may help you gain an upper hand during your next combat or dungeon exploration.


Updated: Aug 8, 2023 12:59 am