How to Use Photo Mode in Division 2
The snowy streets of New York City were beautiful in the first Division game, but the sequel takes place in a far more open Washington D.C. Just as many modern games do, it allows you to take photos of the stunning world. Here’s everything you need to know about how to use photo mode in Division 2.
Gone are the snow covered buildings and dark corners of the first game, with overgrown monuments and open areas making up most of Division 2’s landscape.
If you’re out exploring to see the famous sights of the city, or simply come across something impressive in the world, it’s pretty easy to bring up photo mode.
How to Access Photo Mode
All you need to do to access photo mode in Division 2 is press the Options button on PS4 (Menu on Xbox One, ESC on PC). When you’re in the menu, you simply need to hold Square/X to bring up the photo mode. You can see down below what it’ll look like.
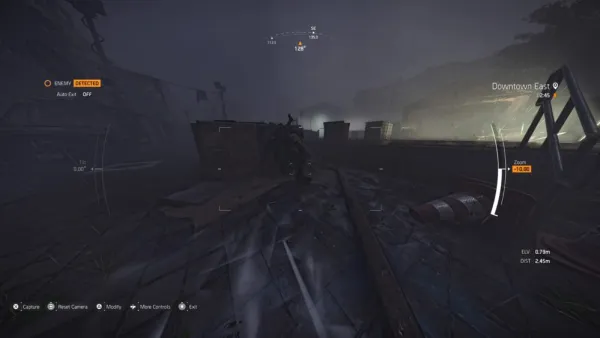
You are able to zoom in and out with the triggers on console (L2/R2/LT/RT), or with the mouse button on PC, as well as pan around freely with the analog sticks. Then, once you’ve got the photo you want all set, just press X/A to capture it.
Photo Options in Division 2
As for other movements you can do in photo mode in Division 2, L1 and R1 (LB and RB) will tilt the camera and up/down on the d-pad will move the camera in those directions. You can also press the pause button once again to hide the UI for the perfect picture.
If you want to find the photos that you have taken, so that you can save them to another device or share them on social media, all the screenshots that you take in Division 2’s photo mode will be saved to the capture gallery on PS4 or the Upload Studio on Xbox One.
That’s everything you need to know about how to use photo mode in Division 2. For more tips and tricks on the game, be sure to check out our Division 2 wiki guide.









Updated: Mar 12, 2019 12:42 pm