As you battle your way across the hostile expanses of Enoch, you’ll do so from the comfort of a truck that servers as your mobile HQ. It’s from here you’ll not only upgrade your character and inventory but also the truck itself. Here’s how to customize vehicle color and parts in Outriders.
How to Customize Vehicle Color & Parts in Outriders
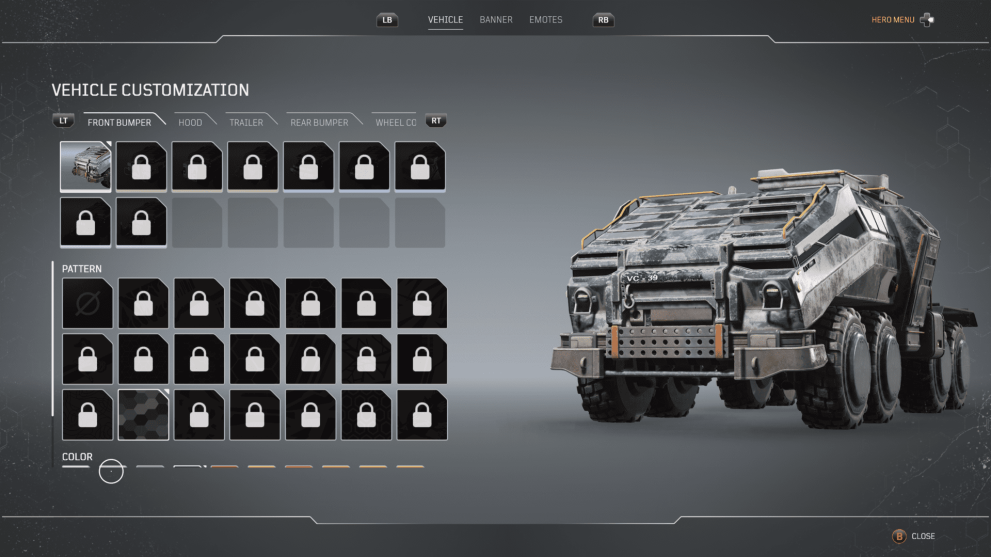
Customizing your vehicle in Outriders is fairly straightforward, but you’ll need to have played through at least the first few missions to actually unlock it. You’ll do so right after you head to the First City.
Once that’s done, to bring up the menu, press the View button/ touchpad to open the Hero menu, then press right on the d-pad.
Here’s where the vehicle customizing begins. You can then change the color at the bottom of this screen, as well as the Front Bumper, Hood, Trailer, Rear Bumper, and Wheel Cover parts themselves.
You can also change the ‘pattern’ on the vehicle. Select the part, color, and/or pattern that you want using the left analog stick, and then press A on Xbox and X on PlayStation to confirm your choice.
As you can see in the image above, most of the upgrades aren’t available from the start of the game. These are instead unlocked by completing accolades/ challenges or reaching a new accolade level.
That’s everything you need to know on how to get customize vehicle color and parts in Outriders. For more tips, tricks, and guides, head over to our guide wiki, or search Twinfinite for all of our latest coverage.
Otherwise, you should also see some related content below that may prove useful. If you can’t find an answer to a particular question you have, then do feel free to reach out to us in the comment section below and we’ll do our best to lend a hand.








Updated: Apr 12, 2021 10:45 am