Photo mode has become a bit of a staple feature in many AAA titles as of late, and Days Gone is no different. If you’re looking to get a gruesome photo of a Freaker, or just want to share the corrupted beauty of Days Gone’s desolate world, you may want to know how to make the most of this feature. Here’s how to use photo mode in Days Gone.
How to Use Photo Mode in Days Gone
When you’ve actually got photo mode up and running in Days Gone, using it will feel fairly familiar to those that you’ve used in titles like Horizon Zero Dawn, God of War, and Uncharted 4. First, though, you need to actually know how to access this mode so you can snap all the artsy, cinematic shots your heart desires.
How to Open Photo Mode
To actually access this feature, you’ll need to first reach the pause menu by pressing the Options button on your controller. From here, you’ll then simply want to choose the ‘Photo Mode’ option by scrolling down with the left analog stick. Press X to open it up and the game will immediately transition into this mode from where you’d paused the action.
All Photo Mode Controls
If you’re having some issues navigating the various menus, settings, and controls for photo mode in Days Gone, then we’re here to give you a helping hand. Down below, you’ll find a screenshot detailing all over the various controls in the game. We’ve also broken these down for you in text, just in case you struggle to spot the image.
Keep in mind, however, you can check these at any time in the game yourself by pressing Square when in photo mode to show/ hide this list.
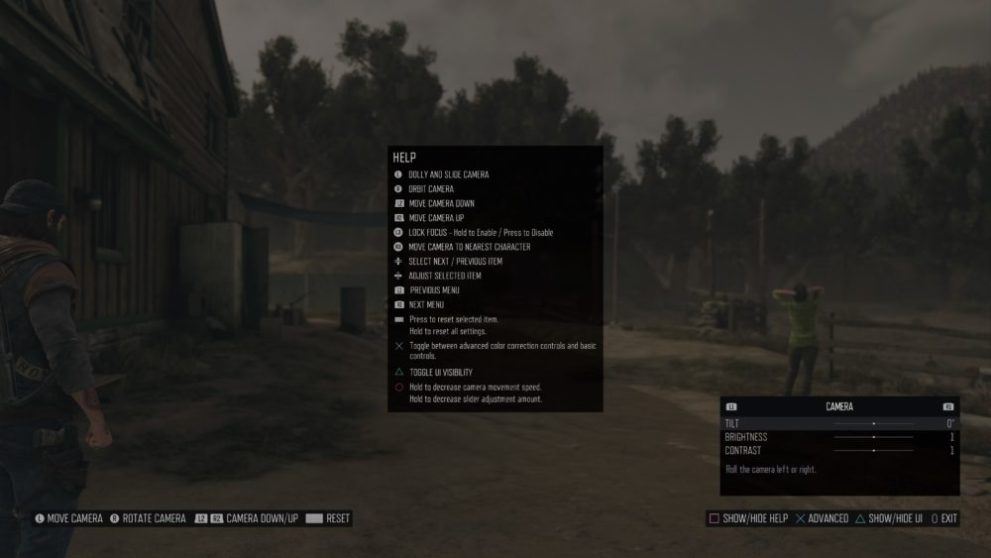
- Left analog stick – Dolly and slide camera
- Right analog stick – Orbit camera
- L2 – Move camera down
- R2 – Move camera up
- L3 – Lock Focus (Hold to Enable/ Press to Disable)
- R3 – Move camera to nearest character
- Up/ Down on D-Pad – Select next/ previous item
- Left/ Right on D-Pad – Adjust selected item
- L1 – Previous Menu (bottom right)
- R1 – Next Menu (bottom right)
- Press Touchpad – Reset selected item
- Hold Touchpad – Reset all settings.
- X – Toggle between advanced color correction controls and basic controls (bottom right menus)
- Triangle – Toggle UI visibility
- Circle – Hold to decrease camera movement speed. Hold to decrease slider adjustment amount.
How to Take Photos in Days Gone
Now that you’re familiar with how to access photo mode and all of its various controls, you’re all set to get to work on perfecting your shot.
As you can see in the image below, there’s a ton of different color grading settings you can tweak by pressing the X button from the basic menu. There are also options to hide characters, should you want to just focus on the scenery.
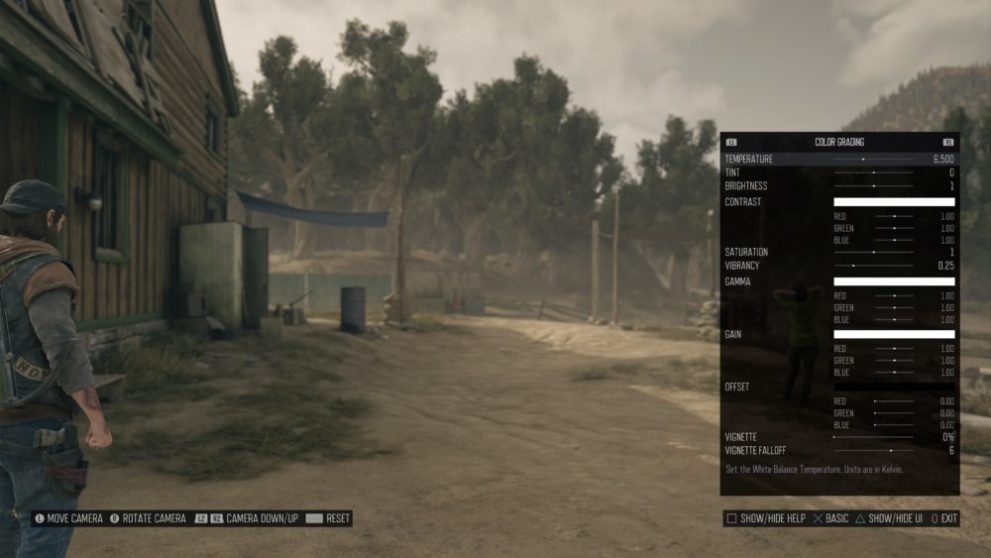
When you’re happy with how your shot looks, the next thing you’ll want to do is press Triangle to hide the UI and clear all those menus off your screen. Then, it’s simply a case of pressing the ‘Share’ button on your DualShock 4 controller and pressing Triangle to save the screenshot.
Where to Find Screenshots from Days Gone’s Photo Mode
Because Days Gone’s photo mode uses the ‘Share’ functionality of the PS4, you’ll find your screenshots in the Capture Gallery. To access this, return to your PS4’s home screen and look for the ‘Capture Gallery’ app.
If you’ve not used this recently, or ever, you’ll need to head to the very far right of the row of tiles to find ‘Library’ and open it from the ‘Apps’ section here.
Find Days Gone in the various games that you’ve taken screenshots for and there you’ll find your various photo mode screenshots alongside other standard screenshots and trophy captures if your PS4 is set to take these.
That’s everything you need to know about how to use photo mode in Days Gone. For more tips, tricks, and guides, be sure to check out our ever-expanding guide wiki.




Updated: Apr 25, 2019 08:15 am