Escape rooms can be exhilarating. Qithout one nearby, you’ll have to resort to Samsara Room to capture that anxiety. It’s full of twists and turns, despite taking place in one room. The game may get confusing at times, but luckily our complete Samsara Room walkthrough can help fill the gaps!
Complete Samsara Room Walkthrough Guide
Part 1: Make a Call
Start by taking stock of everything in the room, using the arrows at the edges of the screen to navigate Samsara Room. You’ll see a mirror, a locked cabinet with a candle on top, a table with a rotary phone and an envelope, a dresser with a chest, a locked grandfather clock, and a window.
- First, examine the cabinet. You can pluck the candle from the flower pot.
- Turn around and face the dresser. Starting from the top to bottom, open the 2nd, 3rd, and 4th dresser to find a knife, fish, and candle, respectively.
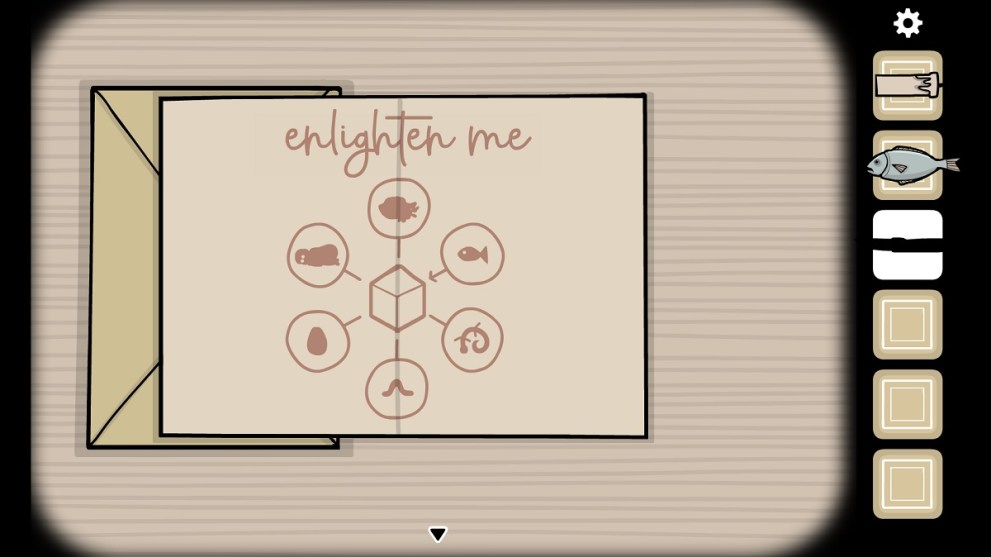
- Step away from the dresser and turn back to the table. Using the knife, you can slice open the envelope to get a message that reads: Enlighten me.
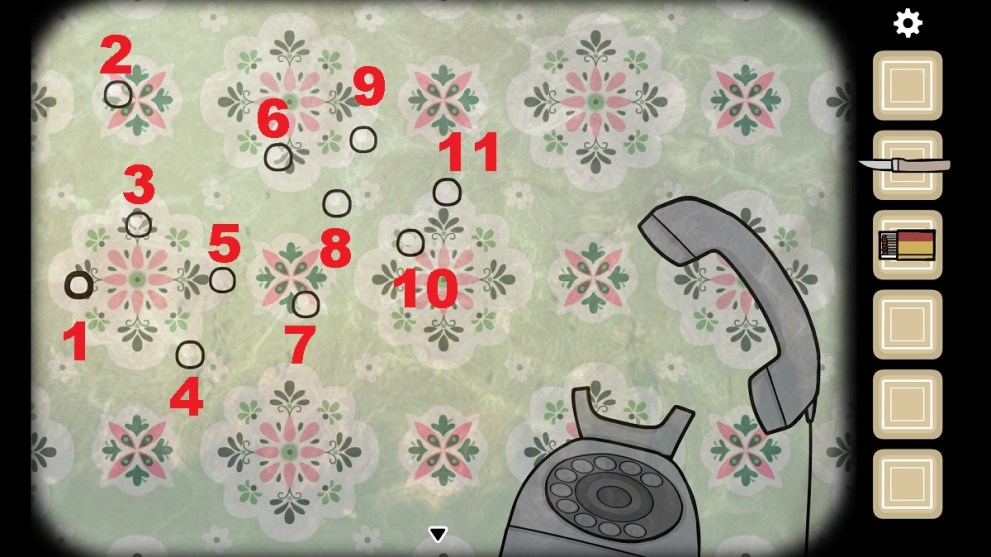
- Interacting with the rotary phone will make letters appear. You have to spell a specific message, the same one you got from the letter.
Now pick up the matches that appeared and let’s move on to the next part.
Part 2: Solving the Chest
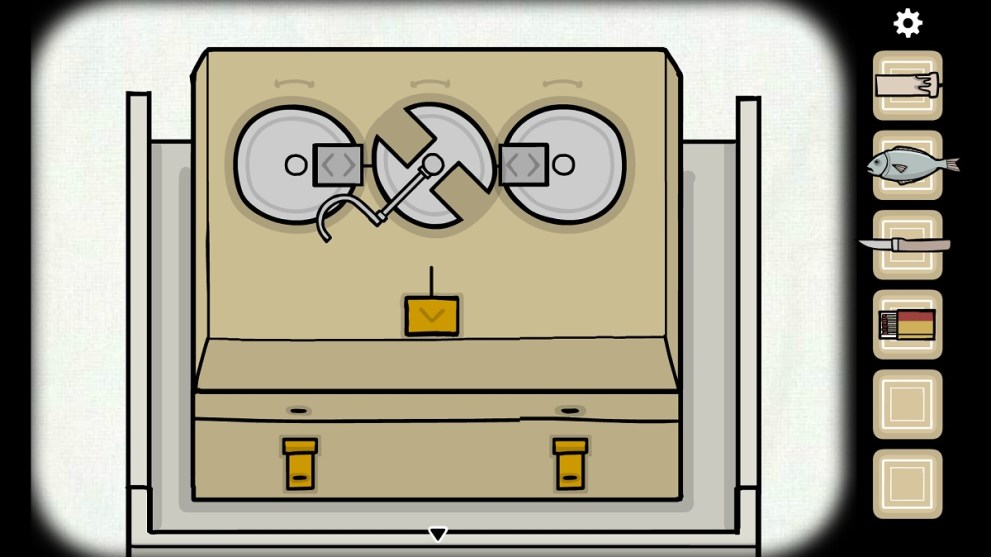
Turn back to the dresser and interact with the chest on top. You’ll notice it has three gray circles—we’ll call these discs. Additionally, there are two gray boxes with less than and greater than symbols. Each disc can spin, except the middle one won’t budge.
- Spin the left and right discs until the gaps are lined up with the gray boxes.
- Slide the gray boxes into the left and right discs.
- Now you can turn the middle disc to your left.
- Pull the orange box down to unlock the chest.
In doing so, another candle appears. Take it with you; there should be three candles now.
Part 3: Become the Fish-Man…?
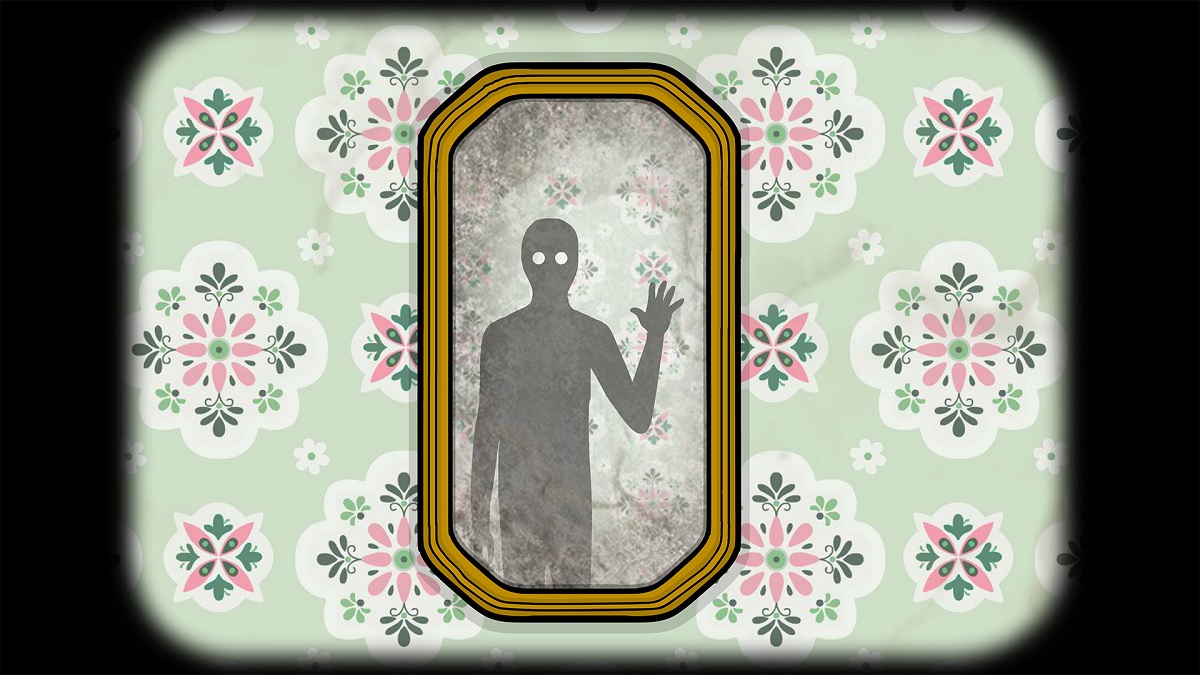
Examine yourself in the mirror. Click and drag to shift the image of yourself to your left. See the S-shaped symbol in the corner? Remember that, as you’ll need it down the road.
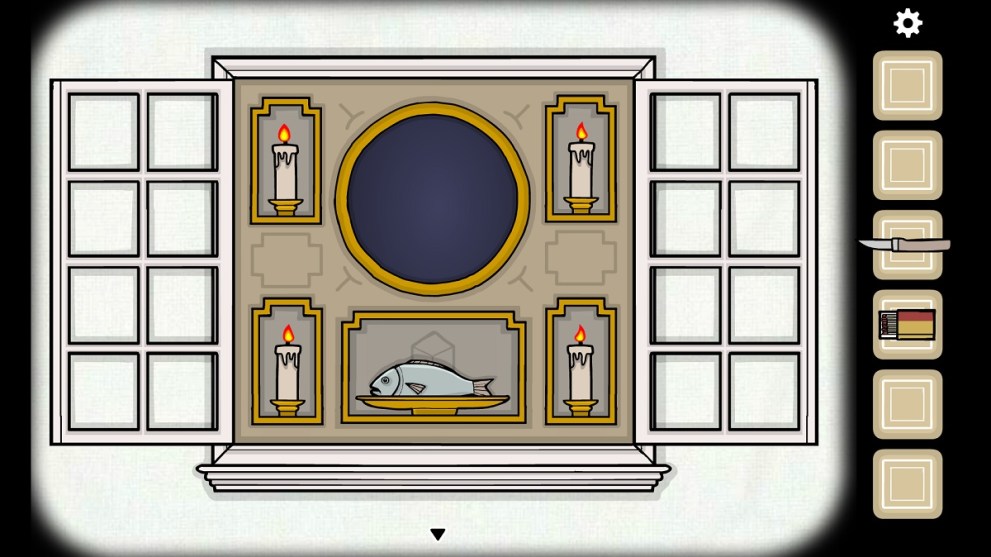
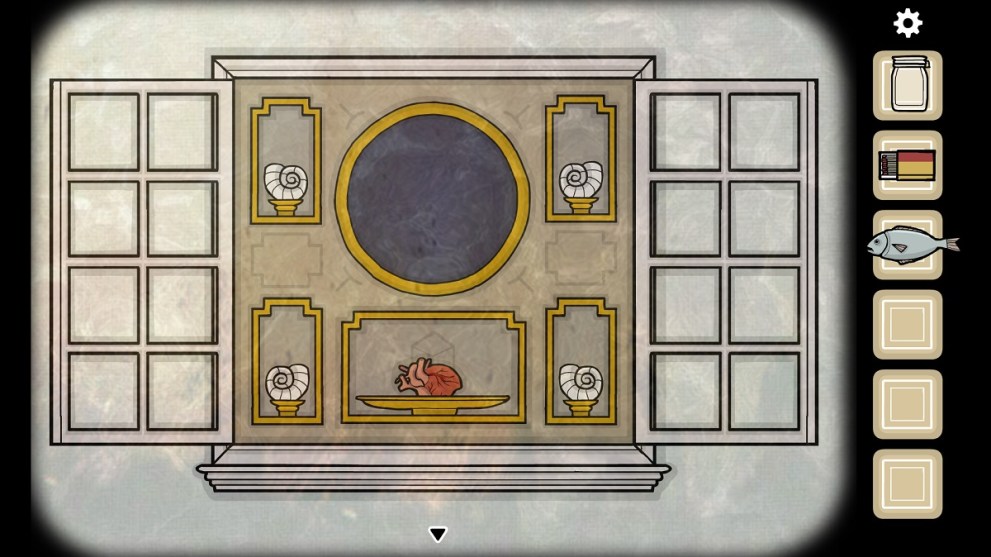
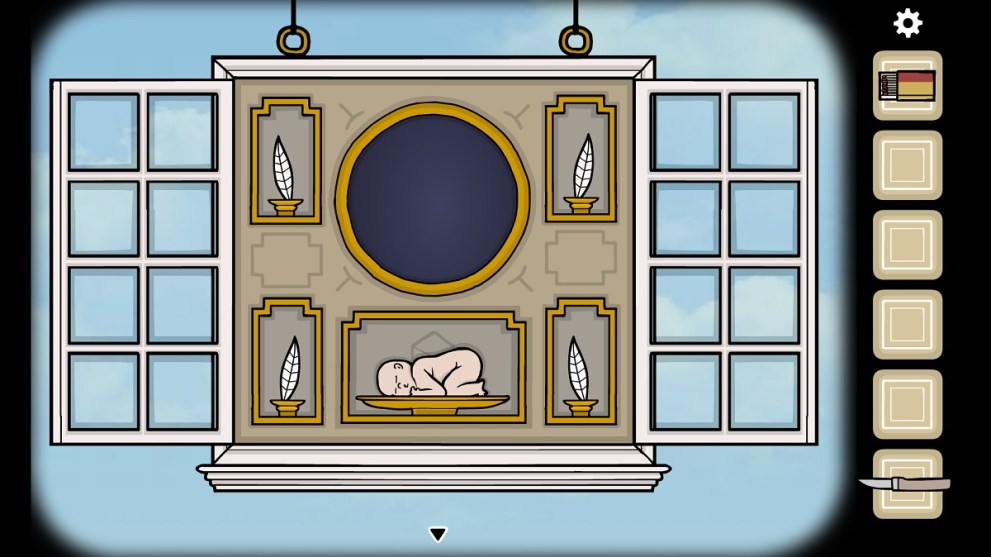
- Now turn towards the window and get a closer look. Open the window to reveal a lovely scene. Nice, right? It’s not real. Take your knife and slice where the gap is in the “window”. Grab ahold of the wallpaper and pull it off.
- With the three candles you hold, place them in each corner. At the bottom, on the plate, place the fish as an offering.
- Using the matches, light all four candles.
In doing so, a hole appears. Interacting with it takes you to a dark void with a cube at the center. Selecting it twice will transport you to another similar room, but now you’re a fish-man. At least you still have your personality.
Part 4: Make a Call 2: Electric Boogaloo
Before you start, examine the mirror again. As you did before, shifting the angle of the mirror will reveal another symbol. Now, step back and examine the phone on the table.
- Pick up the phone for another obscure message, but this time with bubbles.
- Pop each one in order, from left to right (use our screenshot for assistance). It’ll spell the message: Let it sink in.
- Clicking on the paper boat will unfold it until it reveals a key.
With that key, unlock the cabinet next to the table and add the jar to your inventory. That’ll be used for later.
Part 5: Be Still My Beating Heart
If you circle the room, you might notice a few shells lying about. Some are obvious, others are hidden. Either way, you need to collect them all to perform an almost identical ritual to the candles.
- Above the mirror is seashell #1.
- In the chest, floating above the dresser, is seashell #2.
- Back away from the chest and examine what appears to be a cucumber. See all the bumps on it? Some bumps have dark spots underneath and others don’t. Touch every bump that doesn’t have a dark spot and seashell #3 will appear.
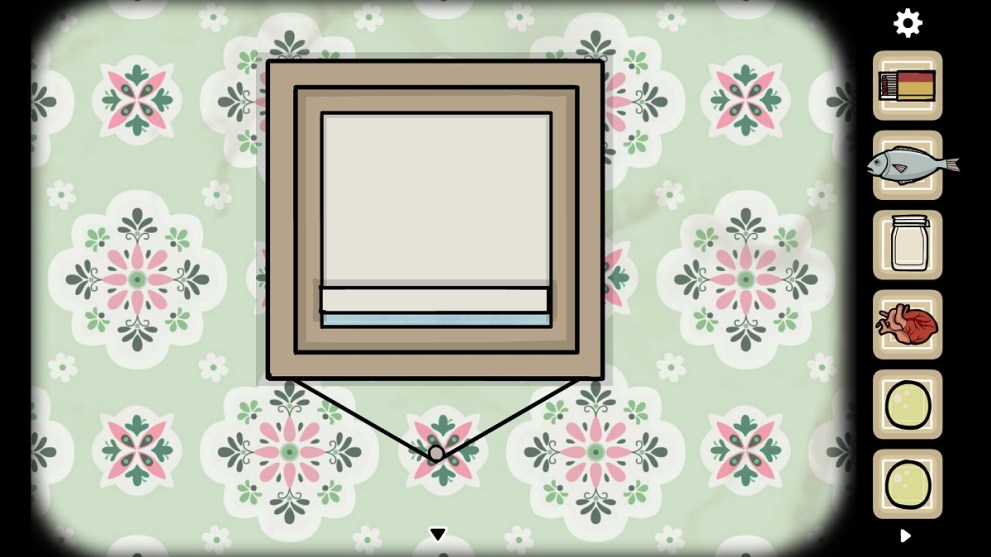
- In the jar floating by the grandfather clock is seashell #4. To free the seashell, click on the cracks of the bottle, where it’s darkest, until it shatters.
- Go over to the window, throw open the doors, and place the seashells on the candle holders. Leave that for now, but grab the fish first.
- Back up and revisit the grandfather clock. Near the bottom, on the right side, you’ll notice a nail stick out. Get a closer look and pluck it from the wood. Pull the wood back to pluck another nail until a hand appears.
- Give the hand your knife and, in return, you’ll get a heart (Ewww… it’s warm).
- Go back to the window and place the heart on the plate at the bottom.
Enter the void again and interact with the cube again. You’ll be sent back to the first room of Samsara Room.
Part 6: Welcome to the Upside Down
Ready for another ritual? This one is easy and will take you straight to a new room, one that turns your world upside down. Again, the mirror in this room has another sign for you to make note of.
- If you aren’t already, turn back to the window.
- Using the jar in your inventory, capture the little lizard in the top-right corner.
- Swap the still-warm heart with your new lizard friend. I know he’s cute, but it’s necessary.
Step into the void once again and interact with the cube to be transported to a copy of the same room, only upside down.
Part 7: You’ve Lost Your Marbles
In this similar-yet-new room, take a look in the mirror. Like before, you can shift your view and, in doing so, you’ll find another symbol to make note of.
- Since you’re already staring at the cabinet, you might as well grab the marble inside the flower pot.
- Turn towards the bookshelf. Pluck another marble in the top-left corner.
- Keep turning until you see a chandelier. See how they’re different lengths? Light each candle, shortest to longest, which unlocks a compartment with marble #3.
- Turn towards the grandfather clock to see three pictures on the wall. Get close to the one further on the left and shift it to the side. In doing so, it’ll create a tear. Pull the tear to remove the picture to reveal marble #4.
- Additionally, set the clock to 3:55. This will unlock a compartment with a tetrahedron inside. Take it with you.
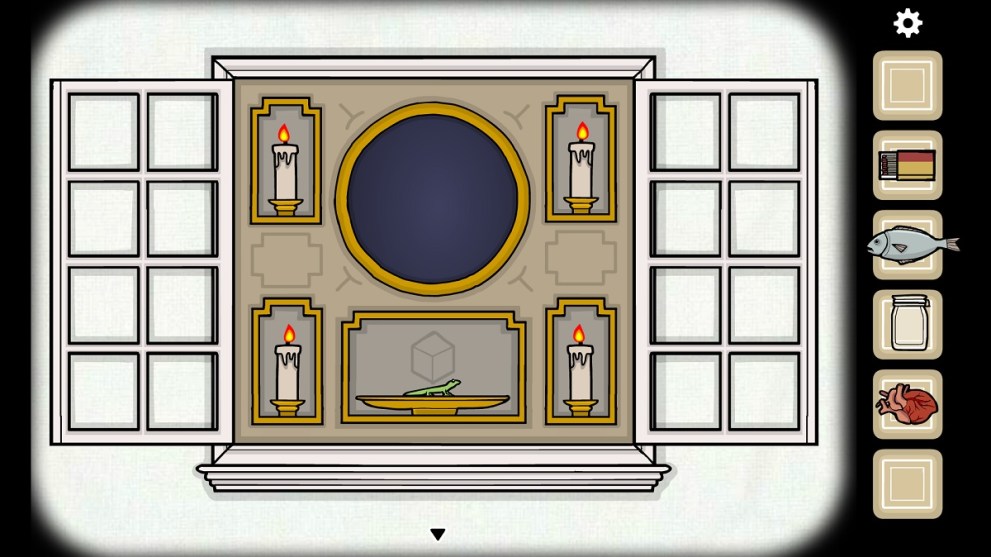
With all four marbles, revisit the window and place the four marbles on each candle holder. Then replace the lizard with your fish.
Part 8: Roll Your D4, Fish-Man
You already have one tetrahedron, now you need to collect the others. Your first stop is at the grandfather clock.
- Just you have before, set the clock to 2:15 to open another compartment. That’s tetrahedron #2.
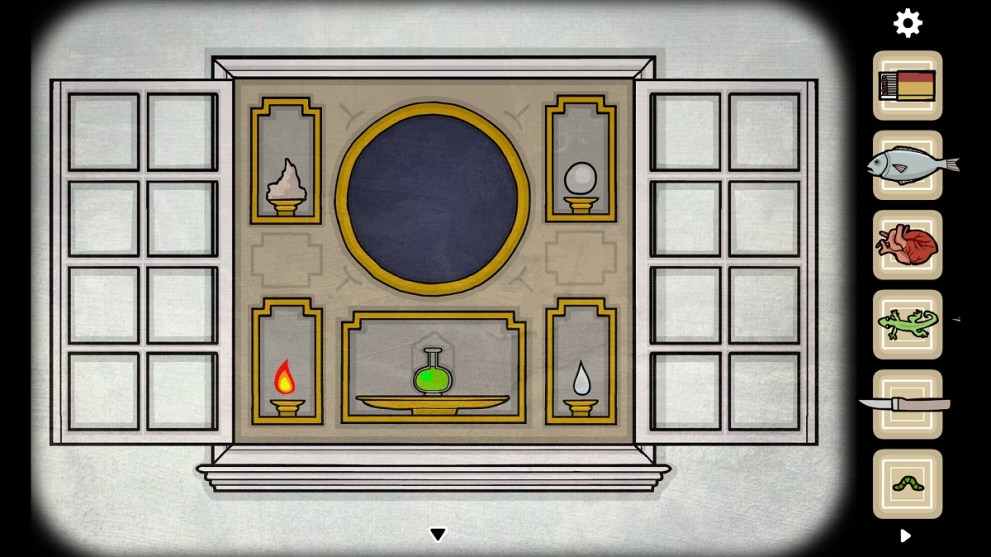
- If you didn’t notice, being in what I like to call the “Fish Room,” you are underwater. Using your empty jar, you can fill it with water by using it on any empty space.
- Go back to the window, swap the fish for the heart, and go back to the original room.
- Set this grandfather clock to 8:25 to grab the last and final D4 dice.
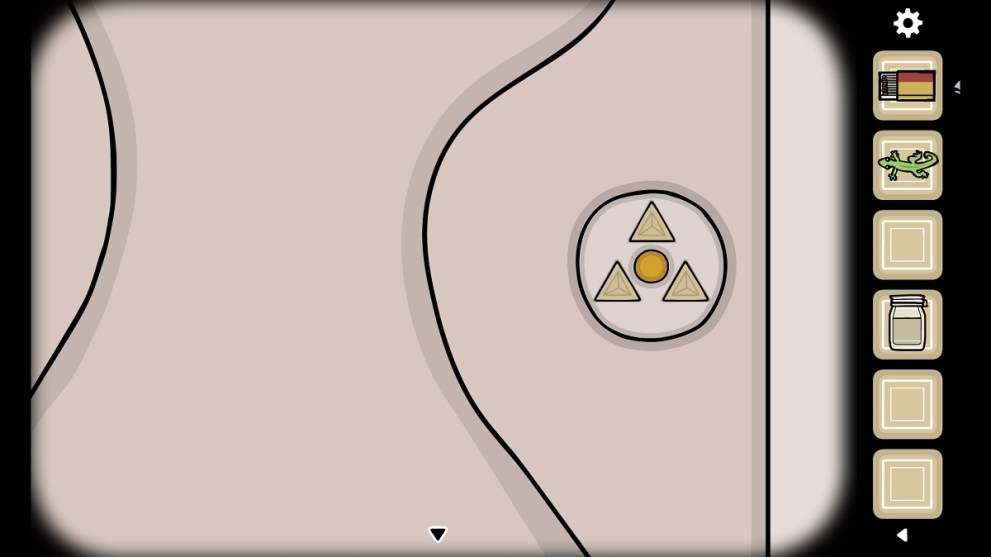
- Back up from the grandfather clock, but this time get closer to the door. Insert all three D4 dice into the triangular slots and open the door to find a corpse.
Part 9: Life… Uh… Finds a Way
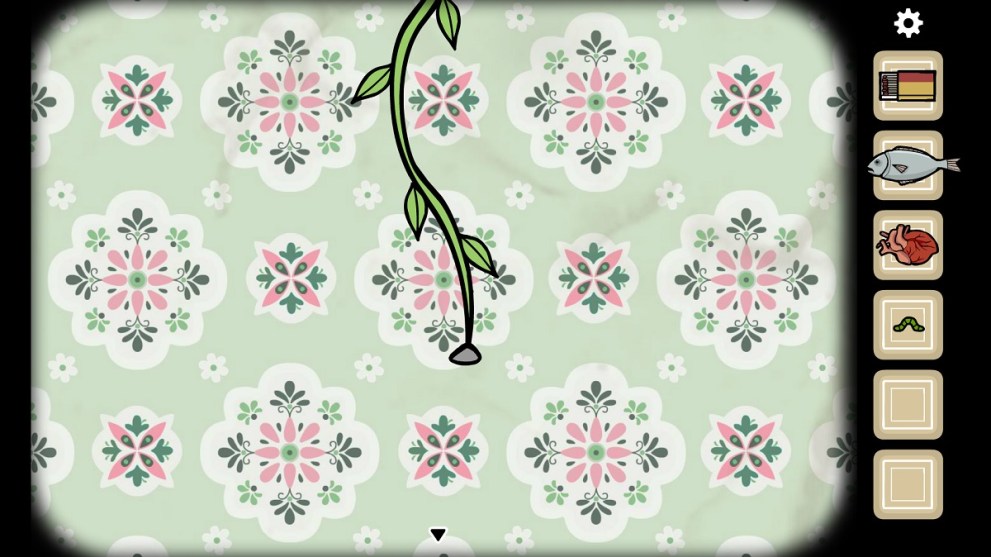
If you interact with the corpse, he’ll fall out. Rude, but he has something you need: a flower seed. He’s dead; he has no use for it anymore.
- Click on his hand so he’ll drop a seed.
- Behind you, atop the cabinet, is an empty flower pot. Drop the flower inside, pour your glass of water in, and it’ll grow.
- Go back to the window, replace the heart with the lizard, and step through to the Upside Down room.
- Revisit the flower, now that you can see its petals. Pluck every petal until you reveal a worm. Pick up the little guy and keep him warm in your inventory.
- Take your new friend and place him on the plate at the window.
Now, when you step into the void and interact with the cube, you’ll be transported to a new room.
Part 10: Would You Still Love Me If I Were a Worm?
With you being a worm, you’re now on the ground floor, onto the smelly, likely uncleaned carpet. Start by checking yourself out in the mirror. Shift it around to find another symbol to make note of.
- If you view the mirror long enough, a flower petal will fall. It floats around the room, so if you see it, bat at it a couple times. Eventually, it’ll fall to the floor by the dresser for you to retrieve.
- Take a look inside the grandfather clock now. Pick up the knife. See the pile of wood? You can move those aside to reveal another petal.
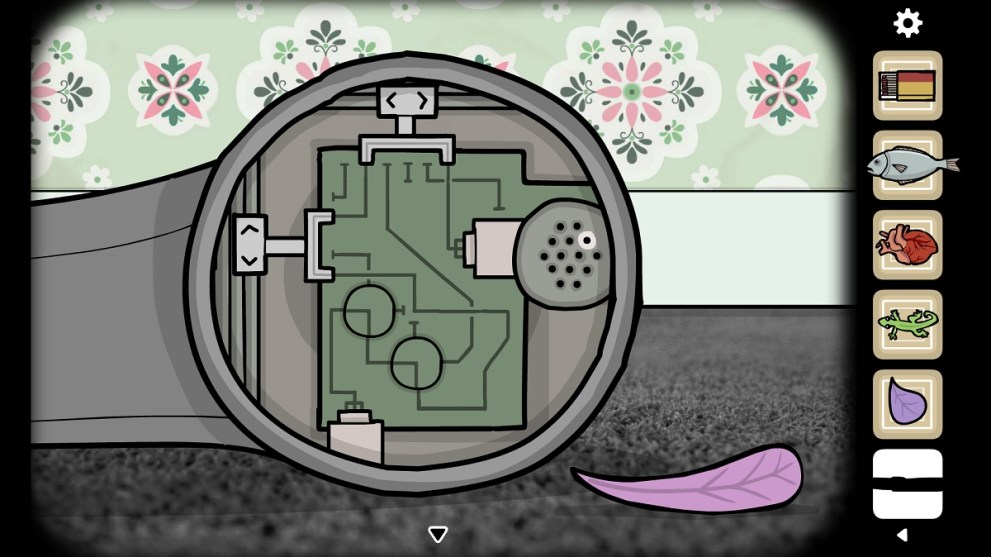
- Move back to the side with the mirror. You can knock the phone off the receiver by clicking on it. Get closer to the mouthpiece. Using the knife, you can remove the two screws.
- To get another petal, the traces have to be connected without being broken. Use our screenshot above for assistance. When the glowing dots on the mouthpiece start flashing, click on the mouthpiece until the petal appears.
- Keep turning until you see a book on the floor. You can’t open the book on your own. Use the knife to prop up the page, then take the last petal.
Part 11: In the Belly of the Beast
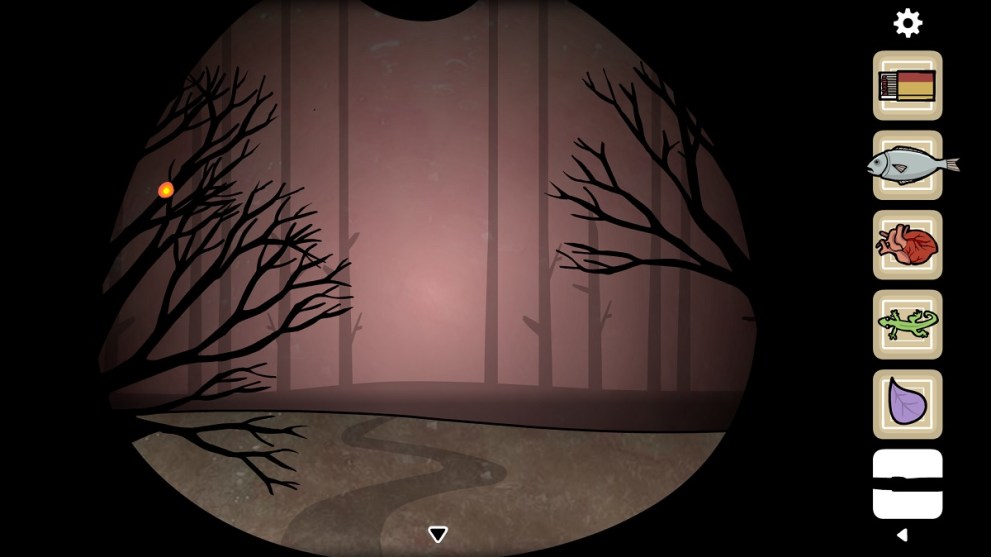
If you continue through the red forest, you’ll come to a small, wooden contraption. It has four glass containers and is adorned with symbols. Each glass container is meant to capture a single orange light.
To capture the orange lights, you have to wait at each forest scene until the entity glows. Look in the trees! Bop the orange lights a few times to capture it, then move onto the next. They won’t appear in your inventory, but rather automatically appear in the glass containers.
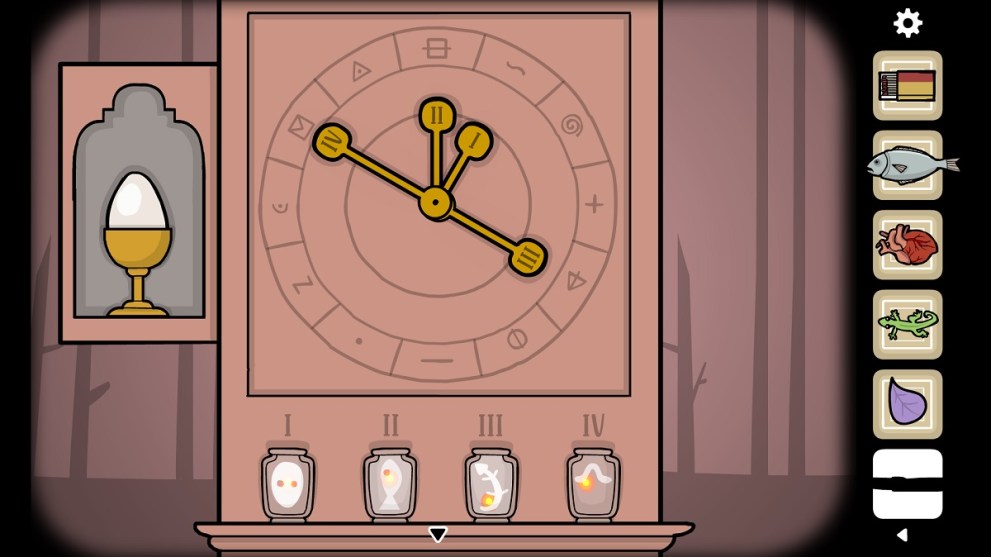
Remember the symbols I told you to keep track of? Each glass container is linked to a specific symbol. You have to move each hand into place:
- I: S-shaped symbol
- II: Box with line
- III: Triangle with line
- IV: Envelope symbol
With the arms in the right places, an egg will appear. Take the egg and go back to the window in the room.
Part 12: Too Many Mouths to Feed
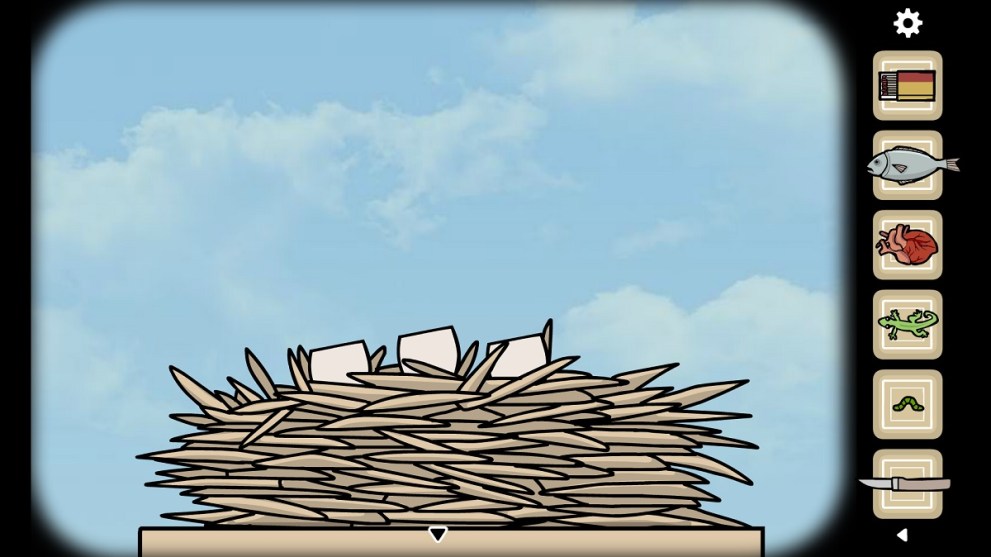
In the new room, pick up the egg from the window. Step away from the window and examine the nearby bird’s nest. Drop the egg into the bird’s nest. You can crack each one open, like you did with the glass jar. Now, you have to select each bird in a specific order:
- Bird on the right.
- Bird in the middle.
- Bird on the left.
- Bird on the left.
- Finger on the right.
- White bird on the right.
- White bird on the left.
- White bird in the middle.
Grab the feather, one of several you’ll need to collect to complete Samsara Room.
Part 13: I’ll Trade My Sunflower Seed For Your Feather
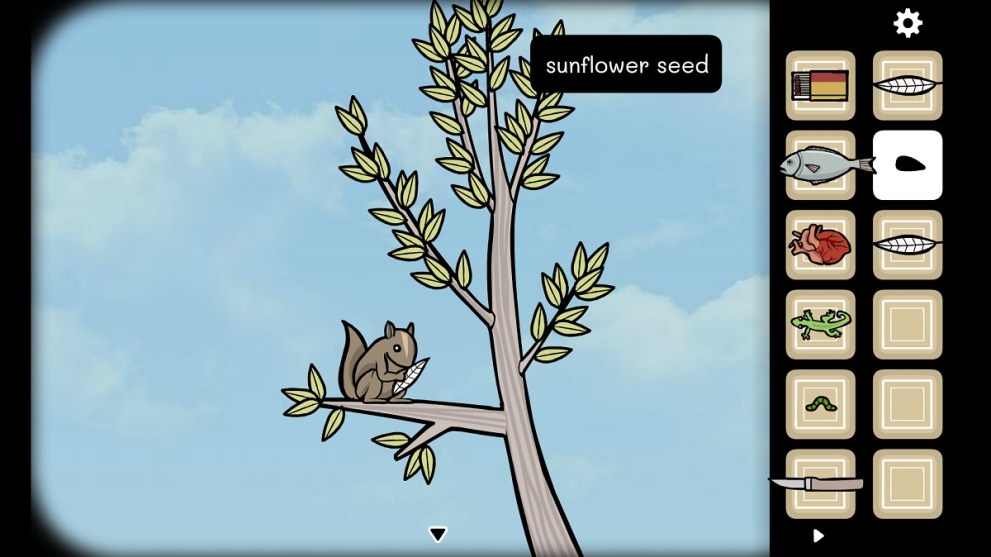
If you’ve taken stock of the room, you may have noticed a squirrel holding a feather. No matter what you do, the little guy won’t give it up.
- See the clouds in the background? Examine them. You can actually move them around and, in doing so, they’ll take shape resembling a worm, lizard, egg, and fish. When the fifth cloud appears, move it until it takes the shape of a clock.
- Now examine the time on the clock. Move the hands to 7:25, the same as the cloud. There will now be a sunflower in the nest.
- Turn towards the wall with the dresser. If you wait a second, you’ll see a paper airplane float by. Bat at it to make it land, then interact with it to release a feather, along with a note that reads: Rise up. Using the phone or the table, spell out the same message.
- Bop the hot air balloon that appears and it’ll move over to the grandfather clock. Bop it again. See the gas canister? Turn the knob to release gas, then light it with matches.
- Now take your knife and cut the rope. Click on the sack and it’ll spew a chest, sand, and two scales. Grab the sand, then fill the flower pot with sand and plant the flower.
- Grab the sun and lift it into the top-right corner. This will make the sunflower tip over, dropping a sunflower seed in the process.
- Change the grandfather clock to 2:00, then trade that sunflower to the squirrel for another feather.
Wow! All that for a single feather? The squirrel really makes you work for that one!
Part 14: What’s in the Box?
Now, use the grandfather clock once again and change it to 4:15. It’ll be nighttime now. You’re going to start by batting the owl roosting on the tree, by the dresser. This will force him to perch on the grandfather clock instead.
If you click and drag the owl’s head, you can make it move and stop in four directions. Stopping between directions, move the owl’s head in order: right, forward, left, forward, backwards. If you make a mistake, back away, then examine the owl again. Pick up the feather he leaves behind.
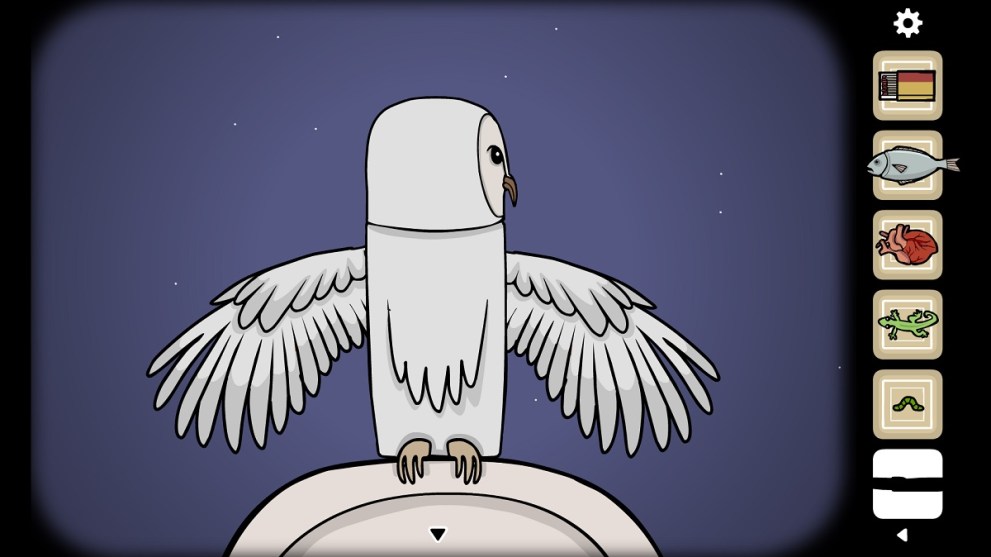
Return to the clock once more and change it to 7:45. In doing so, a heron will appear at the bird’s nest. Get a closer look; he looks hungry. Why don’t you feed it the fish, lizard, worm, and heart you have on you? Click on his body a couple times and he’ll spit up a baby. Go ahead and take it.
Back to the clock again, but this time change it to 2:00. Visit the window one last time. Place the feathers on the candle holders and the baby on the plate. Step into the void once more and click on the cube a few times. Keep clicking until every item (including the baby) is batted away.
Part 15: The Secret Room

While you can technically call it quits with Samsara Room right here, there is a secret ending you can unlock and it wouldn’t be much of a walkthrough without it. Remember how you climb into the dead guy’s mouth and had to capture those lights? Play the game up until you reach that point.
Adjust the hands on the contraption, using our screenshot for reference, like so:
- I: Triangle with line
- II: Box with line
- III: Spiral
- IV: S-shaped symbol
Instead of getting an egg, you’ll be rewarded with a shrimp. Take it, leave the guy’s insides, and head back to the window. With the four petals and shrimp on the plate, step through the void into a new, secret room.
Turn towards the overturned dresser and examine it closer to find a pencil. Next to the dresser is a nearly destroyed clock. Turn its hands to 2:45 to reveal a compartment with a glass bottle. See the giant shrimp? Pull its head to find the poor dead fellow again. Open his mouth and collect the green goo with the glass bottle you just found.
Now back up and face the wall with the window. See the knocked over flower pot? Clicking on it will make sand appear, so pick it up, then turn towards the mirror. Look closer at the mirror and you’ll see a tiny water droplet in the top-left corner. Collect that, too.
Step back and examine the note on the table. Using the pencil, you can draw a key. Now, crumple the paper, unfold it, and a key will appear. Use that to unlock the cabinet by the table, click on the jar, and collect the bubble.
Turn towards the wall with the window again. See the chest on the floor? It’s storing flammable twigs. Light them up with matches and collect a mote of fire. Go back to the window and remove the shrimp from the plate. On the candle holders, place the sand, bubble, droplet, and mote of fire.
Once you step on through, click the image at the center a couple times and you’ll watch a secret scene unfold!
With that, you no longer need our Samsara Room walkthrough guide. You’ve completed everything! It’s probably best you take a walk after this one. If escape rooms are your thing, why not try out the beautifully done Trace? Or you could try something a little more trippy like Superliminal.


Updated: Feb 29, 2024 07:30 am