
There are a fair number of quests to complete in Metaphor ReFantazio, and they run the gamut in terms of what they require to be completed. Fortunately, we’re here to walk you through each side quest and how to complete them fast and easy.
Metaphor ReFantazio Quests: How to Complete All Quests & What They Do
There are a total of 77 quests to complete during a given playthrough of Metaphor ReFantazio. Some are tied to the main story, while others are classified as Bounties, Hunts, Searches, and so on.
While main story quests are given to you and cleared through basic story progression, the rest require you to speak to NPCs at specific times. Not only that, but some even have time limits and can be failed if you don’t finish them promptly enough.
With that said though, every quest is completable even during a first playthrough of the game. at most, you may need to put some off until the last few days of its time period to ensure you have the necessary skills, items, or funds to finish them.
We’ve detailed every quest down below for your convenience, along with info on what type of quest it is, where it’s found, if it has a time limit, and some tips on how to complete it with minimal headaches.
| Quest Name | Quest Type | Location/Where to Start | Does it Have a Time Limit? | How to Complete |
|---|---|---|---|---|
| Save the Prince From the Death Curse | Main Story Quest | Multiple, N/A | Yes (part of the story) | This is one of the first quests given to you, and its completion is tied to story progression. Just focus on moving through the story to cross this quest off your list. |
| Necromancer Takedown | Main Story Quest | Grand Trad | Yes, 6/22 | Another story-related quest, this one is completed so long as you clear the first dungeon by the time limit |
| Thwart Zorba’s Plan | Main Story Quest | Grand Trad | N/A (Must be cleared immediately after you finish the previous story quest) | This story-related task is given to you as soon as you finish the last one, and you can’t progress the game until you beat it. as such, it’s impossible to miss and easy enough to cross off your list. |
| Apprehend the Real Kidnapper | Main Story Quest | Martira | Yes, 7/16 | The second major portion of the main story. So long as you enter and clear the dungeon before the deadline, you can finish this one with ease. |
| Infiltrate the Charadrius | Main Story Quest | Oceana | Yes, 8/12 | This quest is a little more difficult compared to past storyline missions, but it functions the same way. Head in once you’re around level 35+, and you should be able to advance the plot without much fuss. |
| Obtain Drakadios | Main Story Quest | Virga Island | Yes, 9/05 | Once again more difficult than the preceding story quests, this one requires both high level party members and a lot of magic usage. Take your time with this one, and try to have a solid stockpile of MP recovery items before you attempt the dungeon tied to it. |
| Eliminate Virga Island’s Threat | Main Story Quest | Virga Island | N/A (Must be cleared immediately after you finish the previous story quest) | Triggered immediately after you clear the previous task, this one entails a pretty annoying boss fight. Go into it with a party of magic users and a wide array of basic weapon types to make it as easy as possible. |
| Prepare for the Final Battle | Main Story Quest | Multiple Locations, N/A | Yes, 9/22 | This one is more of a grace period, as it allows you to go off and clean up some miscellaneous tasks before a big showdown. Spend the time as you see fit, and then do your best to clear the following dungeon in a single day. |
| Skybound Avatar Conquest | Main Story Quest | N/A | N/A (Must be cleared after completion of the previous story quest) | While it may seem intimidating once it triggers, this quest is a simple one: Clear the dungeon your foe is hiding in, and then it will be cleared after your initial battle with them. |
| Save the Country | Main Story Quest | N/A | Yes , 10/25 | As the quest says when it’s given to you, this is the final story mission in the game. Use the time frame before the deadline to power yourself up, and then clear this mission on the game’s final day. |
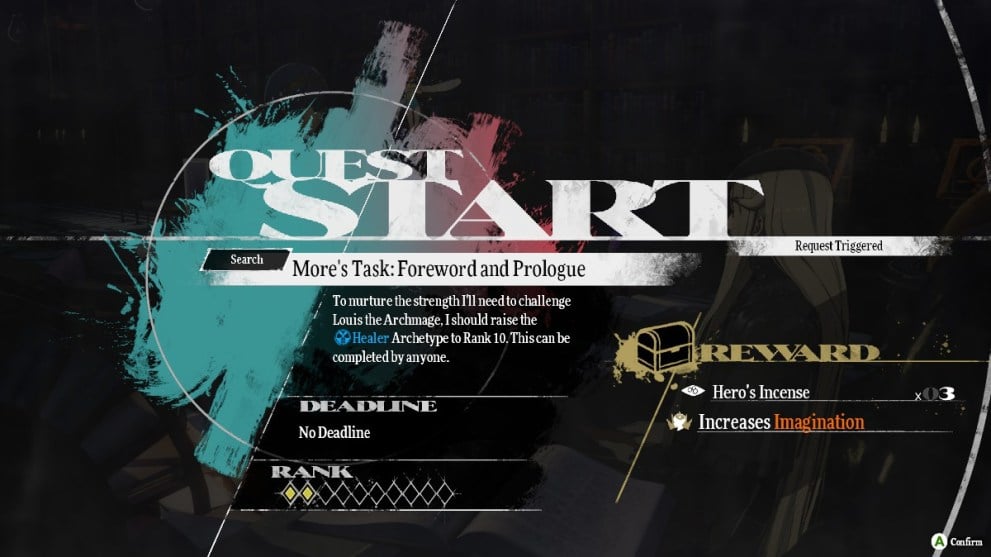
| More’s Task: Foreword and Prologue | Search/Research | N/A | No | Raise the Healer Archetype to Rank 10. You gain access to the Healer Archetype after you establish a Bond with Maria during the main story. It can be boosted to Rank 10 quickly with Hero’s Incense and Hero’s Fruit, and the first main dungeon in the game has enemies who are weak to its Light magic and good for EXP grinding. |
| More’s Task Chapter 1: Ordeal | Search/Research | N/A | No | Study and gain access to the Gunner Archetype. This is accessible after you clear the Providing a Spark side quest for your Gun Runner pilot Neuros, which entails a trip to the town of Komero to collect a Relic left to him by an old mentor. After you give the Relic to Neuros, his Bond is unlocked and you can study the Gunner Archetype in Akademeia. |
| More’s Task Chapter 2: Solitude | Search/Research | N/A | No | Unlock the Merchant Archetype and raise its rank to 15. The Merchant Archetype is tied to Brigitta, and you can establish your Bond with her after your Intelligence Royal Virtue reaches level 2. You can raise the Merchant Archetype’s rank to 15 quickly via Hero’s Incense, Fruit, Leaf of Light, or Jeweled Roots. |
| More’s Task Chapter 3: Drifting | Search/Research | N/A | No | Unlock and Study 15 different Archetypes. This total includes Archetypes in the same line (i.e. Seeker, Magic Seeker, etc.) and Archetypes unlocked by your Party Members, so you can clear this more easily if you wait until you’ve unlocked more party members. You should also try to reach at least the fourth rank for all of your Followers with an Adept Archetype ability. This unlocks additional Archetypes for you to study, and allows you to reach your quota without waiting to access every Bond in the game. |
| More’s Task Chapter 4: Turmoil | Search/Research | N/A | No | Study the General Archetype and raise its rank to 15. The General is part of the Commander line of Archetypes, which are unlocked via the Bardon relationship tract. Play through the main story until you track down the Bounty target in Martira, and then return there and talk to him after you reach the third major city. Continue to improve your relationship with him until you reach the fourth rank of your Bond with him, and the General will become available for unlock once you max out the General rank to 20. Both Archetypes can have their Ranks increased fast via Hero’s Incense, Fruit, Leaf of Light, and Jeweled Roots. |
| More’s Task Chapter 5: Resolve | Search/Research | N/A | No | Unlock and Study 25 different Archetypes. This once again includes Archetypes from the same line and those unlocked by your party members, so you don’t have to worry about unlocking all 25 with the same character. Given the total required, it’s almost a necessity to wait until you unlock the majority of your party members and increase your Royal Virtues enough to progress your Bonds to their Elite Archetype unlock ranks. |
| More’s Task Chapter 6: The End | Search/Research | N/A | No | Max out the rank of at least one Elite Archetype. At this point, you should at least have the Soul Hacker Archetype unlocked and ready to Study/Equip via the Seeker line, so use some Hero’s Leaf of Light or Hero’s Jeweled Root items to raise its rank to 20. If you’re low on either item, you can go to any given Dungeon, equip an Archetype you have maxed out, and then grind through the enemies there to turn the Archetype’s excess EXP into Hero’s Leaf of Lights. |
| Providing a Spark | Search | Gauntlet Runner (Given by Neuras) | No | After you speak to Neuras, you learn that he wants to collect a Relic left to him by his mentor. It’s located in the town of Komero, and you can go there after you gain access to the Gauntlet Runner for travel. Once there, choose the Listen option to speak with the townspeople and obtain the items left to Neuras. |
| Relic Search: Inventor’s Bequest | Search | Gauntlet Runner (Given by Neuras) | No | following your discovery of the first Relic, Neuras asks you to find another. It’s located in a chest in the Tomb of Lament first floor, on the left-hand side in a gated room you can access via a hidden passage in the hallway southwest of it. Collect the relic, and then bring it back to Neuras. You’ll know you’re at the right Dungeon when Gallica tells you she senses something in the Dungeon after you enter it. |
| Relic Search: Dregs of Destiny | Search | Gauntlet Runner (Given by Neuras) | No | After you turn in the previous Relic, Neuras asks you to find another. This next one is in the Maneater’s Grotto, and is marked on your map after Gallica detects it. |
| Relic Search: Youth’s Folly | Search | Gauntlet Runner (Given by Neuras) | No | Once you return the latest Relic, Neuras asks you to find a fourth Relic in the Land of Ceremony. after you enter the dungeon, Gallica marks it on your map and you can make your way toward it at your leisure. |
| Relic Search: Engineer’s Destiny | Search | Gauntlet Runner (Given by Neuras) | No | The next Relic is located in Scoundrel’s Hold. Head there, and then make your way toward the map marker that appears thanks to Gallica sensing the Relic. |
| Relic Search: Bitter Memories | Search | Gauntlet Runner (Given by Neuras) | No | Everfrost Forest is your next stop in your quest to uncover every Relic. Go there at your earliest convenience and then look for the map marker Gallica creates when she senses the artifact. |
| Relic Search: A Dream’s Origin | Search | Gauntlet Runner (Given by Neuras) | No | Mt. Vulkano is the final dungeon with a Relic in it. head there, and then make your way toward the map marker Gallica creates. |
| Petty Thief | Hunt | Gauntlet Runner (Given by Neuras) | No | After you retrieve all of the artifacts, a King’s candidate steals them and tries to use them. fly toward his Gauntlet runner as fast as possible and defeat him to reclaim them. |
| Pagan’s Dilemma | Favour | Grand Trad – Sunshade Row | Yes, 6/15 | Speak to the Mustari man in Sunshade Row, and he’ll ask you to buy some medicine for his daughter. You can then go and purchase the medicine from the church on Sunlumeo Street for 500 gold. Return to the man with the medicine and hand it over to complete the quest. |
| Help the Hushed Honeybee | Favour | Grand Trad – Sunshade Row | N/A | Speak to the man in Sunshade Row, and he’ll ask you to help Fabienne make food at the Hushed Honeybee Inn at night. Do so by talking to Fabienne at night, and then give the right cooking answer to get the best possible result. Once you do, Return to the quest giver for your reward. |
| A Friend in Need | Favour | Grand Trad – Mausoleum: Catacombs | Same day you receive the quest | after you re-enter the Mausoleum, you encounter Catherina. She asks you to find her friend, and as you progress further into the dungeon, you learn she’s trapped in a room with other hostages. You also hear that the key is in a nearby room. Collect the key, and then backtrack toward the room with the hostages and unlock it to find Catherina’s friend. |
| Man’s Not-so Best Friend | Bounty | Multiple (Recruitment Centers) | N/A | One of the first bounties you can claim is for the Maneater Manjula. Its location in the Tradia Desert is revealed after you take on the request, and you can take it down fast with concentrated magic and physical skills after you kill enough of the weaker enemies in the area. |
| A Bullish Embargo | Hunt | Grand Trad – Sun-Lumeo Street | N/A | After you reach level 2 Intelligence, speak to Brigitta in front of the Igniter shop. She then gives you the location of the Grotesque Guptauros and asks you to defeat it. You can do so quickly with Piercing Weapons and abilities. |
| The Old Castle Town Kidnapper | Bounty | Multiple (Recruitment Centers, partially tied to the story) | Yes, 7/16 | This quest is a pseudo story quest, and it’s completed after you track down the kidnapper in Martira. Prioritize story progress after you reach the old castle town, and it’ll be resolved before long. |
| Promising Returns | Search | Grand Trad – Sunshade Row | N/A | After you leave Grand Trad, you have the option to return and talk to Maria once you gain the ability to teleport between towns. wait to do so until after you witness a sight while travelling on the Guantlet Runner, as Neuras draws the scene and gives you the picture as a souvenir for Maria. Once you have a picture, return to the Hushed Honeybee Inn and talk to Fabienne so that she can give it to Maria. |
| Hatching a Plan | Favour | Martira – Thoroughfare Square | N/A | Speak to the man in Martira’s Thoroughfare Square to learn that he needs a Practical Pigeon’s Parcel from Komero. You can then go there via the Gauntlet Runner and purchase it from the town merchant. |
| The New King of Imps | Bounty | Multiple (Recruitment Centers) | N/A | Talk to any officer at a Recruitment office and agree to take down the Goborn King in the King of Imp’s Den. It appears after you kill enough regular Goborns in black cloaks, and it can be defeated quickly if you put it to sleep. |
| A Dagger, a Ring, and a Rake | Search | Martira (Marked by Alonzo) | N/A | After Grius’ Dagger is stolen, speak to Alonzo and convince him to help you get it back. In return, he asks you to retrieve a special ring from the dungeon he marks on your map. The Merchant Archetype is helpful here, as the dungeon is crawling with Mimic demons. Retrieve the ring, and then return it to Alonzo to wrap up the quest. |
| The Man-Eater in the Mine | Bounty | Multiple (Recruitment Centers) | N/A | After you reach Martira, this bounty becomes available. It can be found in a mine near the old castle town, and you can kill it quickly with Ice spells and attacks. |
| A Haunted Heirloom | Retrieval | Grand Trad – Sunlumeo Street | Yes, 7/30 | Speak to the noble on Sunlumeo Street in July and he’ll ask you to retrieve his late wife’s necklace from the city’s Mausoleum. It’ll be marked on your map after you enter the dungeon. Just make sure you don’t finish this quest before the Skullduggery quest, as both need to be taken on and completed at the same time to avoid failing the Skullduggery quest. |
| Skullduggery | Search | Grand Trad – Catacombs Entrance | Yes, 7/30 | Speak to the guard outside the Mausoleum dungeon and agree to kill the requisite number of skeletons for their skulls. They’re marked on your map as soon as they spawn in the dungeon. Make sure you don’t try to finish this quest after the A Haunted Heirloom quest, as both need to be taken on and completed at the same time to make the Skeletons spawn correctly. |
| A Noble’s Legacy | Favour | Martira: Thoroughfare Square | No | After you progress Strohl’s Bond far enough, he asks for your help finding the merchant his father used to meet with. Raise all of your Royal Virtues to level 3, and then go to Grand Trad and speak to the merchants in the Regalith Grand Cathedral district. Follow their directions until they tell you to speak to the noble in the northern section of the area, and then convince him you’re really Strohl’s friend to finish the quest. |
| The Queen of Cuisine: Heart | Favour | Martira Tavern | No | A traveling chef in Martira asks you to make something that incorporates ingredients from the area. Make her Benevolent Bread for the best result. |
| Soldier’s Solace | Search | Port Brilehaven – Angler’s Inn Square | N/A | Find and speak to the woman at the Angler’s Inn Square and agree to collect Dragonthistle Berry samples from the dungeon she marks on your map. Go to the points marked on the map to collect the samples, and then return them to her as quickly as possible. |
| Efflorescent Boy | Favour | Port Brilehaven – Seabreeze Street | N/A | Speak to the young boy on Seabreeze Street and agree to track down some pretty flowers for him. head to the town he tells you about, purchase the flower decoration, and then bring it back to him to finish the quest. |
| Dental Distress | Favour | Port Brilehaven – Seabreeze Street | N/A | Interact with the man on Seabreeze Street and agree to purchase a toothbrush for him from Inundo. Head to the village, buy the Toothbrush, and then give it to the man to finish the task. |
| Grieving Ghost of the Goblet | Bounty | Multiple (Recruitment Centers) | N/A | Talk to any Recruitment Center soldier to take on this bounty, and then head to the Tomb of Lament to take down the Fatolich. It can be killed quickly via Light Magic and other spells that aren’t Dark affinity. Once it’s dead, take the Chalice of Legends back to the Recruitment Office as proof you succeeded. Note that this must be done in order to complete the Chalice vs. The Brew quest. |
| Deeds and Diversions | Favour | Port Brilehaven – Angler’s Inn Square | N/A | Find the overfamiliar man in the Angler’s Inn Square and then agree to reclaim the deed to his tavern. Before speaking to the noble at the coliseum though, complete any task that takes you to the nearby Forsaken Tower dungeon, such as the Superior Scrimshaw quest. Once that’s done, speak to the Noble and tell him about the tower to entertain him and earn the deed. Take the deed back to the overfamiliar man to complete the quest. |
| Superior Scrimshaw | Hunt | Port Brilehaven – Merchants’ Bazaar | N/A | Talk to the artist in the Merchant’s Bazaar and agree to track down an Ebony Horn for him to work with. It’s dropped by the Orgas in the Forsaken Tower, and the Orgas is easier to deal with via Spells and ranged attacks from the back row. |
| The Chalice vs. The Brew | Search | Port Brilehaven – Arenafront Wharf | N/A | Head to the man at the top of the Arenafront Wharf and tell him you’ll find the Chalice of Legends for him. This is dropped by the Fatolich in the Tomb of Lament. after you defeat the Fatolich and show the chalice to the Recruitment Center, bring it to this quest giver to complete the quest. |
| Obtain Sergeant Xanth’s Key | Search | Charadrius | Yes, 8/12 | A pseudo-story mission. Defeat the Sergeant on the Charadrius and claim his key before the infiltration date to progress the story. This is easier to do if you inflict him with ailments like Poison and Burn. |
| Obtain Master Sergeant Glechom’s Key | Search | Charadrius | Yes, 8/12 | A pseudo-story mission. Defeat the Master Sergeant on the Charadrius and claim his key before the infiltration date to progress the story. He’s invulnerable to physical attacks unless you use a move that dispells this effect, so have at least one party member equipped with a max rank Seeker or Magic Seeker. |
| Obtain Maintenance Chief Ceiba’s Key | Search | Charadrius | Yes, 8/12 | A pseudo-story mission. Defeat the Maintenance Chief on the Charadrius and claim his key before the infiltration date to progress the story. You can avoid his more deadly attacks with moves that draw his attention via the Knight line of Archetypes. |
| The Right to Rule | Hunt | Martira – Kriegante Gate | N/A | After you advance Bardon’s Bond to a high enough rank, he’ll ask you for help with defeating a Sandworm Human on its way to Martira. Speak to him when you’re ready to fight it, and then defeat it to complete the quest. |
| Ancestral Solution | Search | Virga Island | 9/05 | Yet another pseudo-story mission. It requires you to make a Potion of Blight to clear the way to the Dragon Temple, which you can obtain by purchasing the ingredients for it from a merchant in Grand Trad after you buy the necessary information from an information broker. Buy the ingredients and then deliver them to the quest giver on Virga Island to make the potion. |
| Peak Curiosity | Hunt | Virga Island | N/A | Talk to the man on Virga Island and he’ll ask you to avenge his sister at a nearby dungeon. Once you arrive though, you’ll discover she’s alive and then she asks you to defeat a monster that stole her monster research notebook. Defeat the monster, return the notebook to the woman, and then return to the man for your reward. |
| The Price of Hope | Favour | Virga Island | N/A | This quest is only available after you establish a bond with Brigitta and gain access to the Igniter shop in Grand Trad. Speak to the old woman on Virga Island, and then agree to take an igniter to the Igniter shop for appraisal. After you learn that it’s incredibly valuable, bring it back to the old woman to cross the task off your list. |
| Save the Mourning Snakes | Hunt | Virga Island | N/A | Once you arrive at Virga Island and successfully rescue Eupha, Junah will request that you help her defeat the monsters that have invaded the ruins where Virga Island’s residents lay their dead to rest. Defeat the monster at the end of the Dungeon and the quest will be complete. |
| A Guiding Gift | Search | Virga Island | N/A | Speak to the old woman on Virga Island and agree to track down the Polar Stones she lost in the ruins she mentions. These are marked on your map and appear in-world as item glimmers, so pick up as many as you can (ideally every item glimmer in the ruins to be safe). Then, return to the old woman for your reward. |
| Trial of Malnova | Hunt | Martira – Stairstone Market | N/A | After you reach Malnova, Eupha requests your help with a trial in the nearby Land of Ceremony. Make sure you have Archetypes equipped that can resist wind attacks and dish out Fire spells for the final boss, and then speak to Eupha after the trial is completed. |
| The Great One-Eyed Scoundrel | Bounty | Multiple (Recruitment Centers) | N/A | After you reach Virga Island, accept this bounty from the Recruitment Center. The Psyocropos can be found in the Scoundrel’s Hold, and it’s weak to Peirce attacks from the Gunner and Knight Archetype Lines. Just be careful not to wipe out all of the smaller monsters with it too quickly, or else it’ll fly into a rage and hit harder. |
| Defeat the Coliseum Monster | Hunt | Port Brilehaven – Varmareno Coliseum | N/A | Once you progress the story enough, the option to take part in ranked Coliseum matches becomes available. One tied to this requires you to defeat a specific monster, and you clear this quest once it’s in the ground. |
| Warmth in Winter | Favour | Altabury Heights – Dia Franco Street | N/A | When you reach Altabury Heights, find the man on Dia Franco Street who needs help acquiring Durable Spider Silk. Agree to get it for him, and then purchase it from the nearby village of Malva. Bring the threads back to the man to collect your reward. |
| Proof of Power | Hunt | Altabury Heights – Opera House Square | Yes, 9/22 | During your preparation period for your fight with another King’s Candidate, a soldier asks you to prove you’re up to the task by acquiring the Bramblethorn Batton from the Ziocropos. It’s found in the Tower of Insolence, and can be dealt with fast via Pierce attacks from Gunner or Knight type Archetypes. |
| The Fiend in the Frozen Forest | Bounty | Multiple (Recruitment Centers) | N/A | Speak to any Recruitment Center soldiers during the final section of the game to hunt down the Icebeast Chimenzahn. It’s located in the Everfrost Forest, and can be obliterated via Fire attacks after you dispel its resistance to them. Otherwise, fast and hard physical attacks can beat it down quickly. |
| Defeat Milo | Hunt | Altabury Heights – Dia Franco Street | N/A | After you defeat Loveless during the final stretch of the game, he reveals Milo has been spreading rumors to try and cause others to hate you. Confront Milo at his Gauntlet Runner on the world map, and then defeat him in battle. The best way to do this is with consistent attacks from three party members while the fourth buffs your attack and agility or debuffs Milo. Once he’s defeated, return to Loveless for one of the best Accessories in the game. |
| The Edge of Glory | Search | Grand Trad – Sunshade Row | N/A | Speak to the man in Sunshade Row during the last stretch of the game and agree to retrieve the legendary sword from the chest in Mt. Vulkano. It’s marked on the map once you reach the proper level, so proceed through the area until the map marker appears and nab the old blade. Return to the quest giver, and he’ll restore the sword for you as your reward. |
| The Queen of Cuisine: Soul | Favour | Grand Trad – Dunlumeo Street | N/A | The traveling chef once again requests that you give her a specific dish; this time using something that is easy to replicate and make for rich and poor citizens alike. We got the best reaction from the Amber Stew. |
| The Incarnate in the Woods | Bounty | Multiple (Recruitment Centers) | N/A | Speak to any Recruitment Center soldier to accept this request, and then go to the Abandoned Path to take out the Ordemos. It’s weak to Dark, so the Ninja line of Archetypes are perfect for dispatching it quickly. |
| The Apostles of the Apocalypse | Bounty | Multiple (Recruitment Centers) | N/A | This bounty becomes available during the endgame, and tasks you with defeating some zealots out to carry out the apocalypse. They’re found in the Disgraced Ruins, and can be defeated fast via Merchant skills that toss money as a distraction and Light magic. They also summon a monster to help them, and it’s immune to Lightning attacks. |
| The Cockatrice of the Clouds | Bounty | Multiple (Recruitment Centers) | N/A | For this Bounty, you need to take down the Kokamordos in the Manor of the Ascendant dungeon. It’s weak to Ice, so hammer it with spells and attacks tied to this affinity to avoid getting hit by its one-hit-kill attacks. |
| Trial of the Dragon: Heroes’ Rest | Investigation | Virga Island | 10/25 | During the final stretch of the game, you have the option to defeat some optional bosses to prove your claim as a King’s Candidate and get some of the best gear in the game. It requires you to beat three dragons, each of which are located at the Spires and Towers throughout the game. For this one, head to the Spire of Blind Faith near Virga Island and face down the dragon successfully to clear the trial. This is easiest to do when your characters can block or repel magic attacks and physical attacks, so equip gear that does this or Archetypes with skills that can apply these effects. Likewise, try to make some Sublime Spoonfuls to give yourself extra turns to work with. |
| Trial of the Dragon: Mad Mischief | Investigation | Port Brilehaven – Angler’s Inn Square | 10/25 | Next up is the Dragon in the Forsaken Tower. It retaliates if you repel or block its attacks, so try to buff your characters and debuff it instead. Use the Knight line of Archetypes to create some tanks to absorb damage, and build your other two party members around maximum damage output. |
| Trial of the Dragon: Bygone Legacy | Investigation | Altabury Heights – Blue Sky Bridge | 10/25 | Finally, there’s the Dragon at the Tower of Insolence. It reflects all affinities other than Almighty, and frequently launches off attacks that afflict your party members with Poison or Hex. Purchase some accessories that prevent these ailments, and keep some healing items handy besides. Past that, you can focus on using moves that reflect physical damage and fire damage, and spec at least two characters into classes like the General to dish out Almighty damage consistently. |
| Deliver Hot Spring Water | Favour | Altabury Heights – Blue Sky Bridge | N/A | Speak to the woman at the Blue Sky Bridge and agree to take a bath at the hot springs. Afterward, collect some of the water so she can mass produce it for a new Bath Salt. |
| Become Champion of the Coliseum | Hunt | Port Brilehaven – Varmareno Coliseum | N/A | After you reach a certain point in the game, you can participate in a ranked tournament at the coliseum. Complete all of the rounds and emerge victorious to complete this quest, preferably in the endgame. |
| A Brother’s Mercy | Hunt | Grand Trad – Sunshade Row | N/A | Once you reach a high enough Bond rank with Basilio, he asks for your help to take down a former friend who has gone berserk. Speak to him in Gran Trad when you’re ready, and then defeat him at the old dumping ground from the Igniter Experiments. |
| Wayward Shepard | Hunt | Grand Trad – Sunlumeo Street | N/A | After you reach a certain Bond rank with Eupha, she requests your help saving some sick Sanctist church members from Mt. Vulcano. Agree, and then head to the dungeon and take down the man who took them there. |
| A Rake’s Last Wish | Favour | Port Brilehaven – Angler’s Inn Square | N/A | Following the conclusion of Alonzo’s Bond story, talk to Daturam at Angler’s Inn square to deliver the money he stole back to Alonzo’s home town and gain their support. |
| Trial of the Dragon: Essence of Power | Investigation | N/A | 10/25 | After you clear the final Trial of the Dragon, this quest is automatically assigned to you. We recommend you only take this on once you have a full party of damage dealers, are at least level 70, and have at least two Sublime Spoonfuls on hand. Once all this is done, head to the Dragon Temple and proceed to the lowest level to take on an aspect of the people’s anxiety. All of its attacks are multitarget instant kill Almighty moves, so letting it get a turn isn’t an option. As soon as the battle starts, use your Sublime Spoonfuls each time you get down to one turn icon left. Unload on the boss with the strongest attacks you have, and boost your number of turn icons as many times as possible. If done right, this defeats the boss before he can attack you and clears the quest. |
What Do You Get for Completing Every Quest in Metaphor ReFantazio?
As for what you get from completing every quest in Metaphor ReFantazio, it’s pretty substantial.
In addition to a slew of rewards that range from rare accessories to valuable items and money, it also nets you Popularity which can improve your rank in the Tournament of Kings. This allows you to net bonuses like even more money, and puts you on track to get the good ending.
Likewise, completing every quest possible allows you to see the true ending. This isn’t too different from the good ending, but does include some special scenes that provide extra context for what your victory means for every other character.
And that’s all we have on how to complete every quest in Metaphor ReFantazio. For more on the game, check out our other guides on how to complete every Bounty.


Updated: Oct 11, 2024 04:46 am