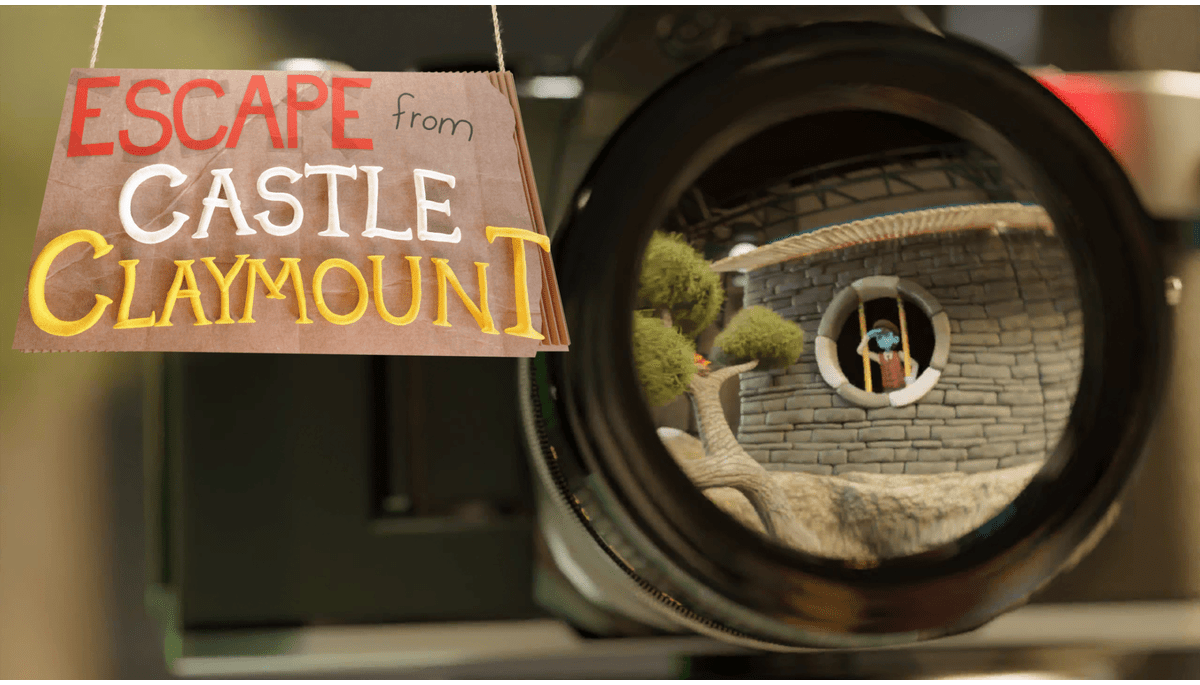
Escape from Castle Claymount is a free point-and-click claymation puzzler by Colorbomb. Mixing traditional puzzle-solving shenanigans with a lovable cast of Aardman-esc characters, this 30-minute caper can take ten times as long if you’re not prepared!
The game can be played, for free, in your browser on mobile on Coolmathgames.com.
To improve your time taken to beat the game, and to solve all the title’s puzzles, continue reading for our complete walkthrough and puzzle guide for Escape from Castle Claymount.
Escaping your Jailcell:
- Once you can control your character, you can click the arrows on the screen to move yourself into new positions around the room you are in.
- Approach the desk on the left, and click on the wrench hanging on the supporting beam of the desk.
- Click on the wrench in your inventory, and then click on the screws locking the drawer of the cabinet closed. This will unscrew them, opening the cabinet.
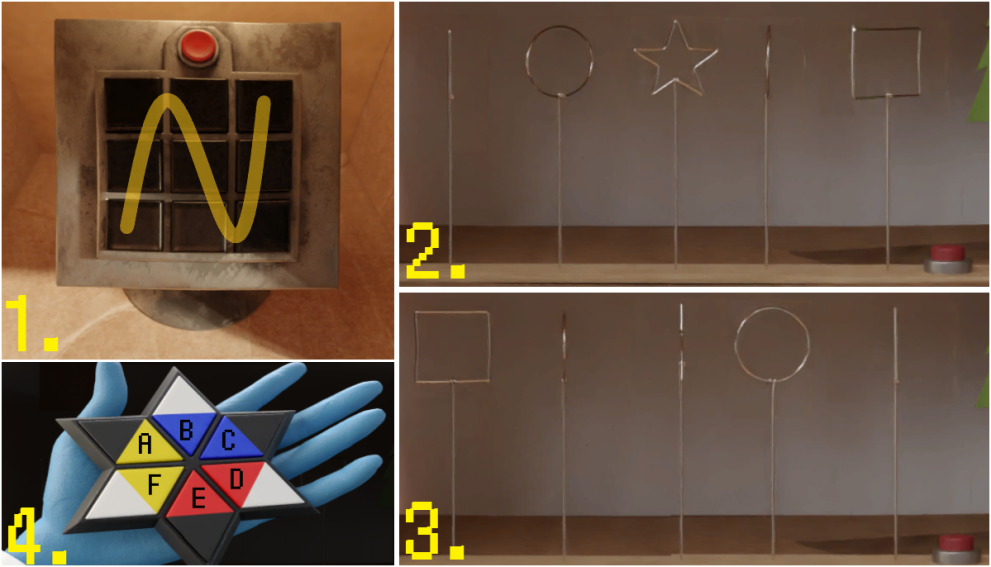
- You will be presented with a metallic keypad inside the cabinet – seemingly out of place in this rustic bedroom.
- Press the keys of the keypad lock in the correct pattern – seen through image number one – from the top right-hand corner to the bottom left-hand corner.
- Once the pattern has been placed into the keypad, press the red button on top of the keypad.
- The keypad will open up, revealing a hidden compartment, containing a red ornament.
- Take this ornament from the newly opened drawer.
- Reverse from your current position, and approach the side of the wardrobe.
- On the side of the wardrobe there is a paper cut-out of an egg – place the red ornament you have just discovered onto the egg to display a calculation.
- Go back on your steps and approach the top of the wardrobe.
- Arrange the wireframe shapes into the correct pattern – as shown in image two – and press the red button on the bottom right.
- An object will fall from a trapdoor on the ceiling of the wardrobe – pick it up.
- The object is a black hexagram, in the form of a puzzle box.
- Returning to the wireframe shapes, rearrange them into the second pattern – as shown in image three – and press the button again.
- Another object will fall from the other trapdoor on the ceiling of the wardrobe – pick it up.
- The object is a black cardboard hat.
- Inspect the hexagram. Do this by clicking the magnifying glass icon on the hexagram in your inventory.
- Press the buttons on the hexagram – as seen in image four – in the following sequence: A, D, B, E, C, F.
- The hexagram will then open up to reveal a piece of paper – pick it up.
- Interact with the piece of paper to smooth it out, to reveal a section of a map.
- Approach the desk you previously opened with the wrench.
- Type the code 315 into the drawer lock above the cabinet section of the desk.
- This will open the drawer, to reveal another piece of paper.
- Take the second piece of paper from the drawer and combine it with the first piece.
- This will form a full map, showing the cell window and a loose brick.
- Turn towards the window and approach the cell wall.
- Click on the appropriate brick to remove it.
- This will reveal a hidden key, which you should pick up.
- Approach the colorful drawer and use the key to unlock the top drawer.
Exploring the Hallway and Cavern:
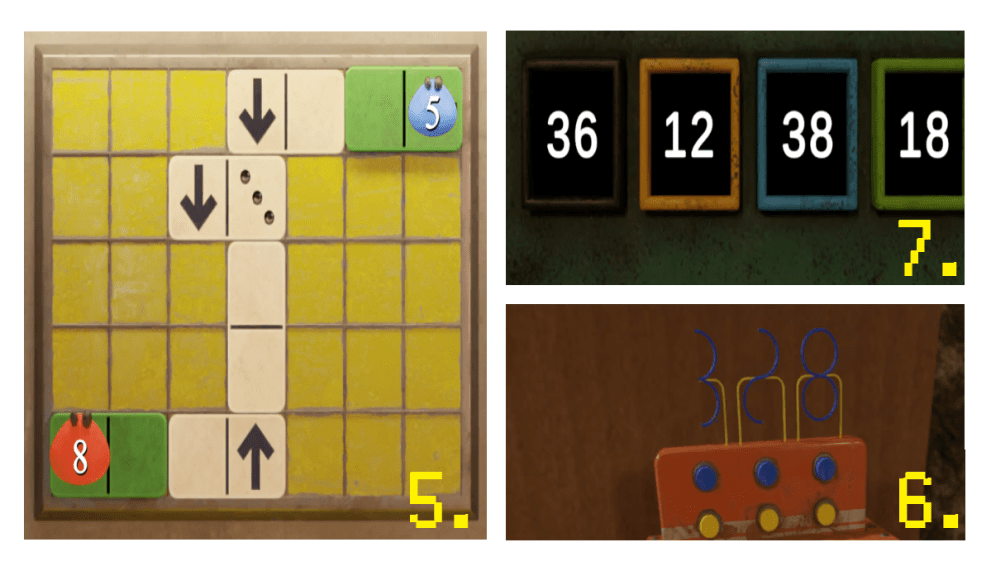
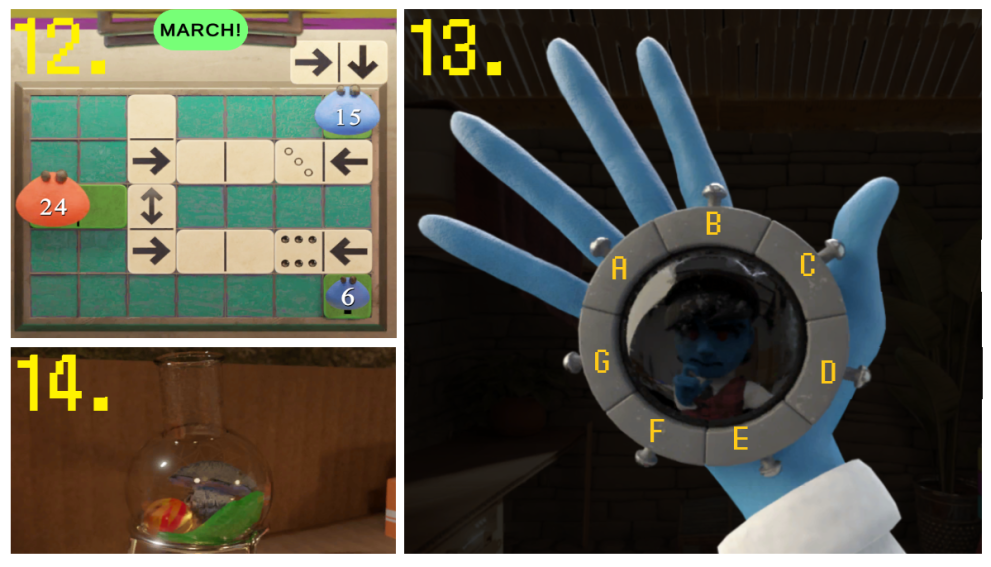
- Open the drawer, to reveal a domino puzzle.
- Arrange the dominos in the correct pattern – as shown through image five – and press the ‘MARCH!’ button to initiate the solution.
- A yellow opening will pop out from the top of the drawers.
- Interacting with the opening will reveal a red dart – pick it up.
- Take a step back, and look towards the barred exit of your cell.
- From this position, look towards the ceiling.
- Interact with the red dart and the red balloon on the ceiling – this will throw the dart at the balloon.
- The balloon will burst, revealing a key hidden inside which falls to the floor.
- Pick up the key.
- Interact with the key and the cell door to open the cell.
- Turn left once you’ve stepped outside your cell.
- Head forward, and go straight to the door at the end of the hallway.
- Place the black paper hat from your inventory onto the goose’s head.
- Retreat on your steps twice, and then turn right twice.
- You should be facing a wardrobe – head towards, and interact with, it.
- Use the passcode 36 12 38 18 – as seen in image seven – to unlock the wardrobe and open it.
- Opening the wardrobe will reveal a ladder, descending into the building.
- Climb down the ladder.
- Press the turn around arrow in the bottom right corner, this will pivot your character.
- Go forward, then right, and approach the periodic table.
- Read the sign on the whiteboard with the periodic table.
- Take steps back, and approach the orange cash-register.
- Arrange the blue lines to spell the code 328 – as is presented in image number six.
- This will open up the register, to reveal a blue key and a magic wand.
- Pick up the two items, and approach the machine which looks somewhat like an arcade cabinet.
The ‘Arcade Cabinet’ Tree Branch Puzzle:
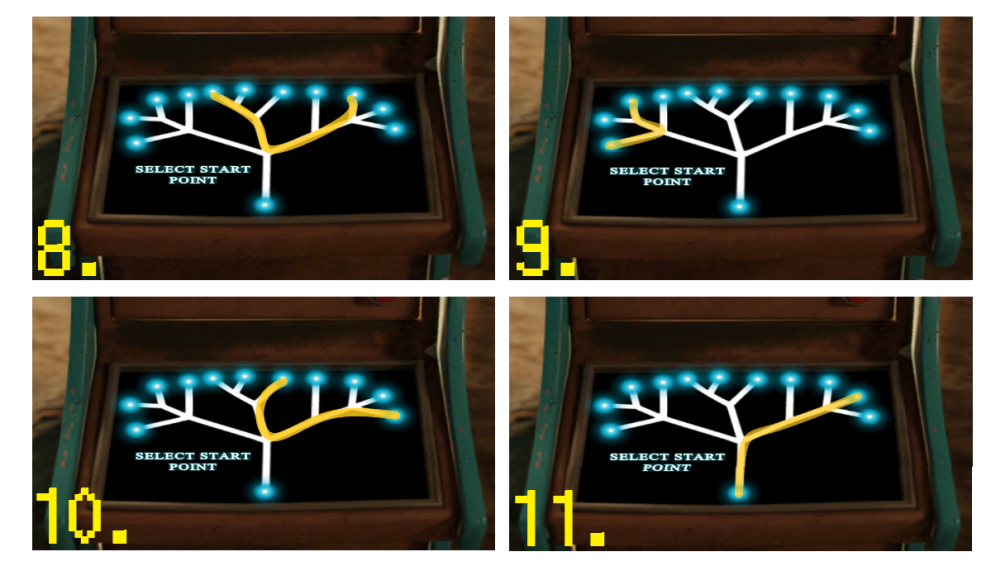
As this puzzle has multiple layers to it, a standalone section of the walkthrough is dedicated to its completion. The aim of the puzzle is to select individual dots on the route to navigate a cohesive line from one branch to another.
- Firstly, select the branch third from the right.
- With image number eight as guidance, navigate the dots until reaching the endpoint.
- This will complete this quarter of the puzzle.
- Secondly, select the first branch on the left.
- With image number nine as your guide, navigate the dots until you reach the endpoint.
- You’re now halfway to having completed this puzzle.
- Thirdly, select the first branch on the right.
- With image 10 available to guide you, navigate the dots until you reach the endpoint.
- You’re almost finished with the puzzle.
- Lastly, select the ‘trunk’ of the tree.
- With image number 11 guiding you, navigate the dots until you reach the endpoint.
- And, with that, you can wipe your hands of this puzzle.
- A cable is revealed through a secret compartment.
- Pick up the cable, and head back to your cell.
The Final Stretch:
- Use the blue key to unlock the blue drawer.
- Place the dominos in the correct pattern – as seen through Image 12 – and press ‘MARCH!’
- Open the blue section on top of the drawers and pick up the round object that has appeared.
- Interact with the object in your inventory to examine it.
- In examining it, press the buttons – as seen from image 13 – in the right sequence: A, F, C, D.
- The item will extend into a telescope.
- Take the telescope and go to the window of your cell.
- Look through the window and turn to your right – you will be met with a princess character.
- Interact with the telescope item, and then the princess, to throw the telescope to her.
- In return for the telescope, she will throw you a marble.
- Exit the jail cell, turn left, then go forward and approach the cell to the right.
- The inmate of this prison cell is a soda-can-looking robot.
- Interacting with your Game Boy-looking portable video game console, combine it with the cable in your inventory.
- Use the video game console on the green can to gift it to them, and receive a green fish in return.
- Head back down the hallway towards the cell across from your own.
- Interact with the scary-looking eyes in the dark, and offer them the magic wand from your inventory.
- The monster will be revealed to be a kindly wizard – they will gift you a mushroom.
- Climb down the ladder inside the wardrobe, to head back down them.
- Approach the chemistry desk and place the glass flask into the metal holder.
- From your inventory; add the marble, green fish, and mushroom into the flask – as seen in image 14.
- The ingredients will form a chemical – interact with it, and the orange bowl, to pour it.
- The chemical will sprout ears – interact with the chemical to add it to your inventory – it is a cat!
- Turn around and head back up the ladder to the hallway.
- Open the door at the end of the hallway – the one with the goose drawing on it – and exit.
- You are stopped from leaving Castle Claymount by a patrolling soldier.
- Interact with the cat, and the soldier, to gift them the cat.
End of Game Cutscene and Stats:

Congratulations, you have completed Escape from Castle Claymount!
Sit back, relax, and enjoy an entertaining stop-motion cutscene where you and your friends are able to escape the castle. You will be met with an end-of-game still frame, where your time to complete will be stated, along with some fireworks to celebrate your victory.
Eager for some more puzzle title walkthroughs? Why not head over to our chapter-by-chapter run-through of Ghost Trick’s fiendish mysteries? Or, maybe read our list of the best puzzle games on Xbox?


Updated: Jul 29, 2024 10:55 am