
Welcome to our complete Darkness and Flame: The Dark Side walkthrough! This amazing adventure is full of hidden objects puzzles and tricky mini-games, so it is understandable if you get stuck. Luckily, we have every answer to every tricky puzzle right here. Find everything you need in our complete Darkness and Flame: The Dark Side walkthrough.
Darkness and Flame Walkthrough
We have split the walkthrough into chapters to help you easily find the puzzle answers you need. Read on to find all mini-puzzle answers and keys to each hidden object puzzle below!
Chapter 1: The Cave Settlement
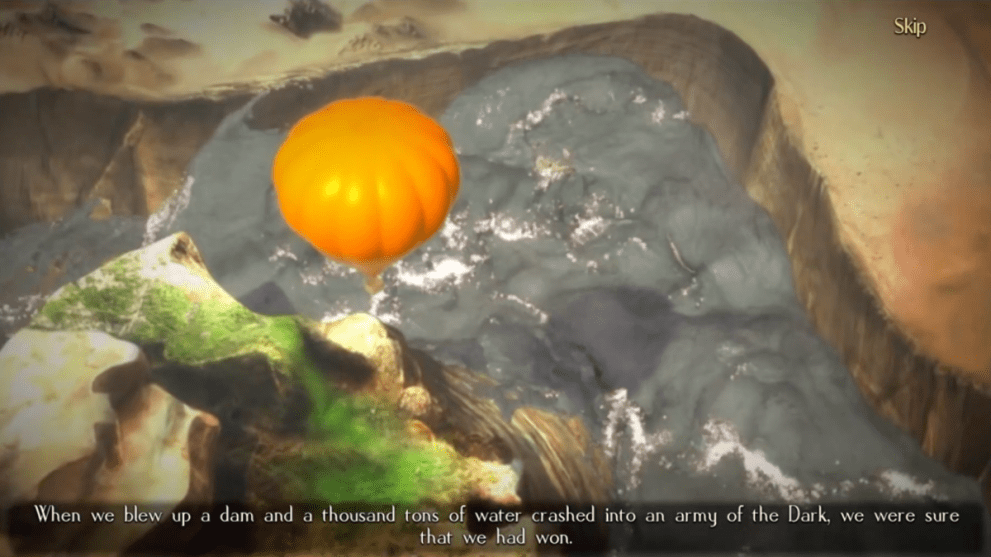
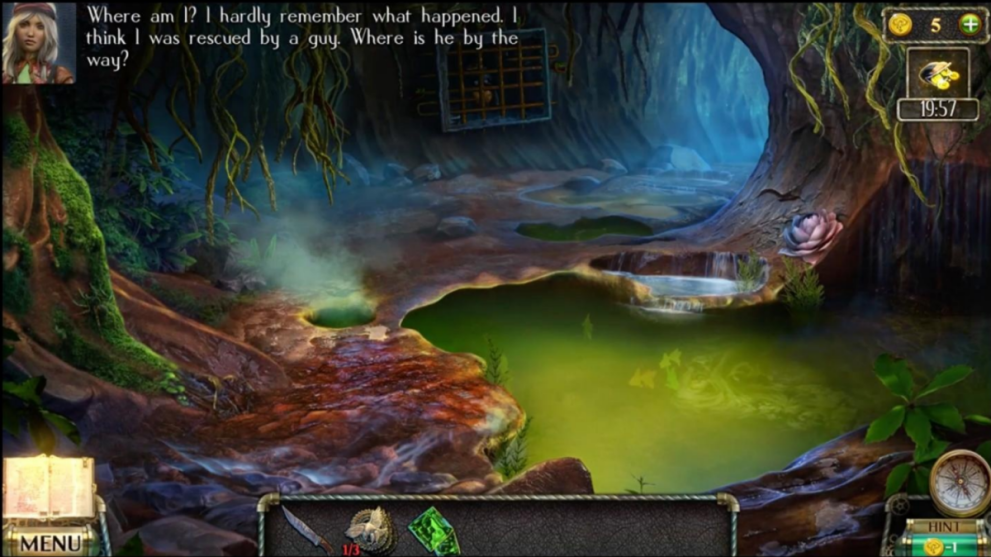
Darkness and Flame: The Dark Side begins after your hot air balloon crashes dramatically near a cliff. Your search for answers begins…
- Pick up the bread and wire;
- Use the wire to open the clasp on the bag;
- Take the pair of nippers and the package;
- Use the nippers on the package and take the knife;
- Use the knife on the tree branches;
- Go forward;
- Use the knife to get the cloth and then the rope;
- Use the bread and the cloth on the rat to get the ice axe;
- Go back;
- Tie the rope to the basket;
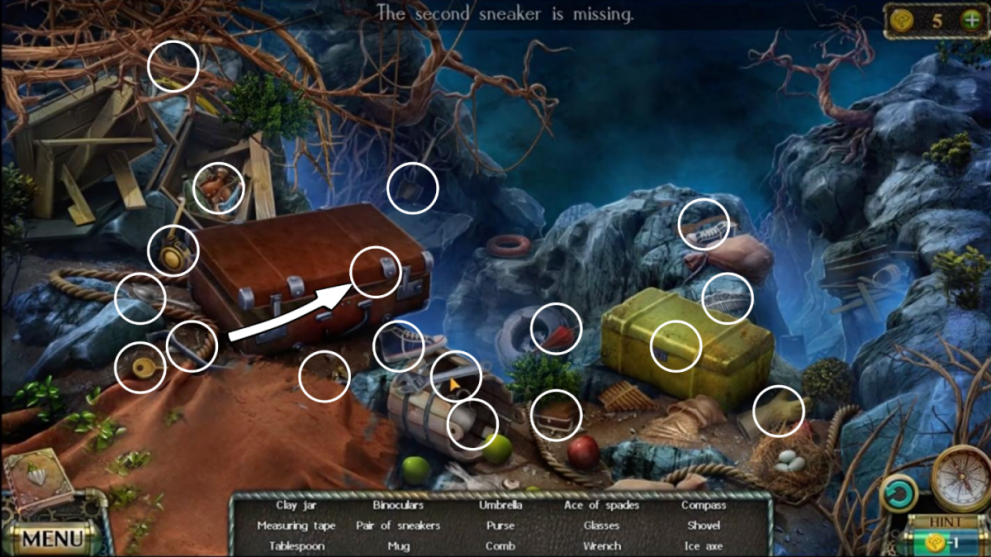
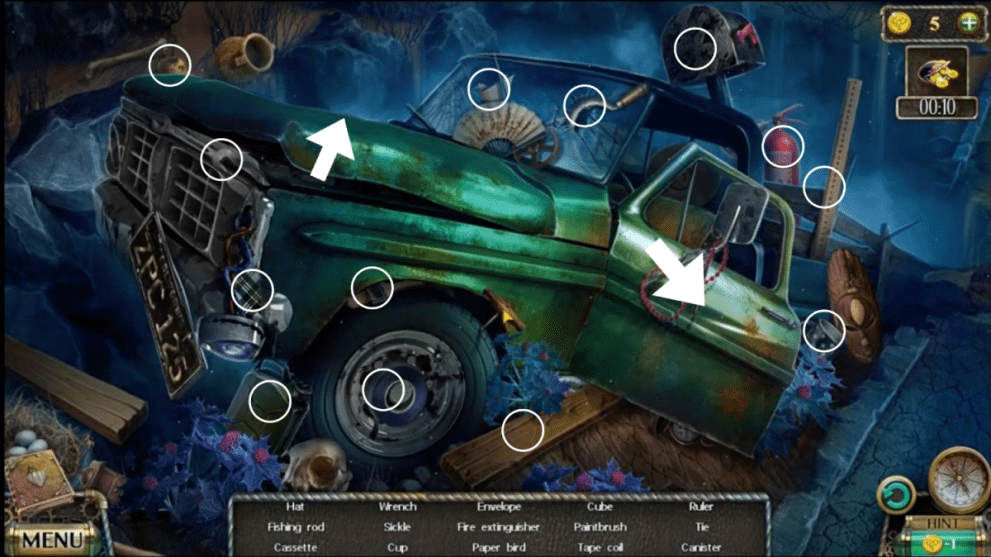
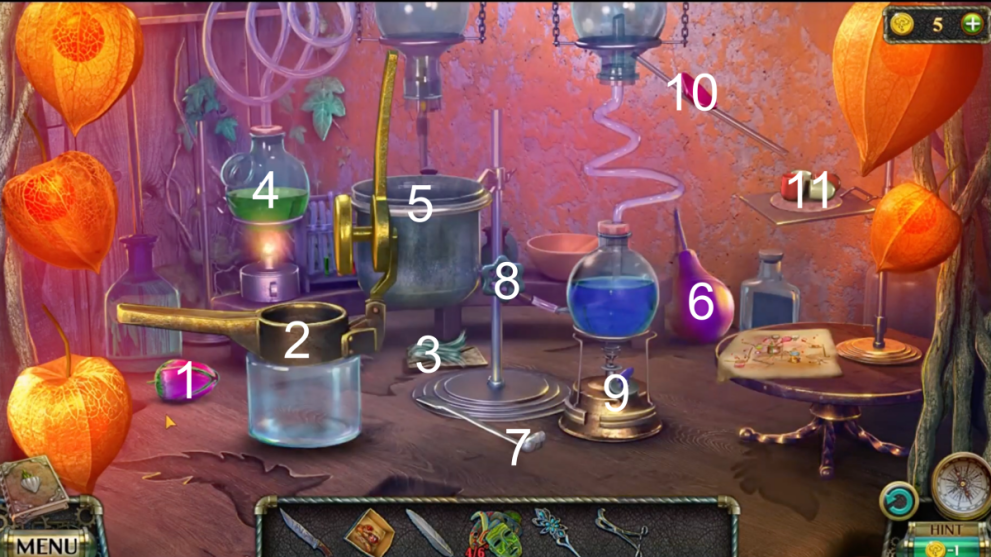
- Solve the Hidden Object Puzzle.
Darkness and Flame: The Dark Side Hidden Object Puzzle 1
- Take the ice axe;
- Go forward;
- Use the two ice axes on the rock face;
- Each rock can only be used once so choose one on the left and then the right;
- Climb upwards;
- Talk to the child;
- Take the magnet;
- Place the magnet in the marsh and drag it through to get the blunt scissors;
- Use the blunt scissors on the sharpener wheel;
- Pick up the basket and the wrench;
- Look to the left and take the fish food;
- Use the basket and scissors on the sheep and get the fleece;
- Give the fleece to the kid and get the medallion;
- Find the lotus figurine in the weeds to the right;
- Go back twice;
- Use the wrench on the cannister in the balloon;
- Take the pipe and valve;
- Go forward twice;
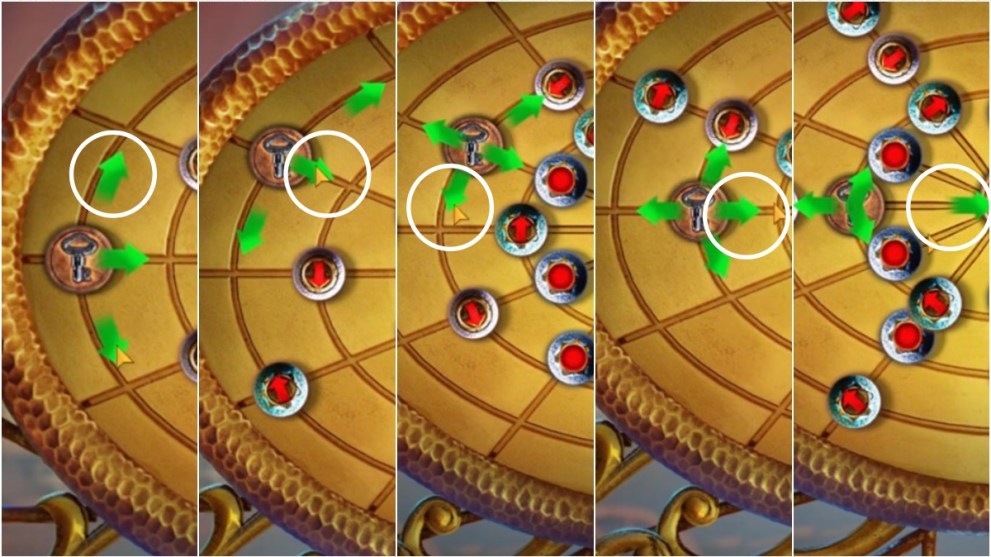
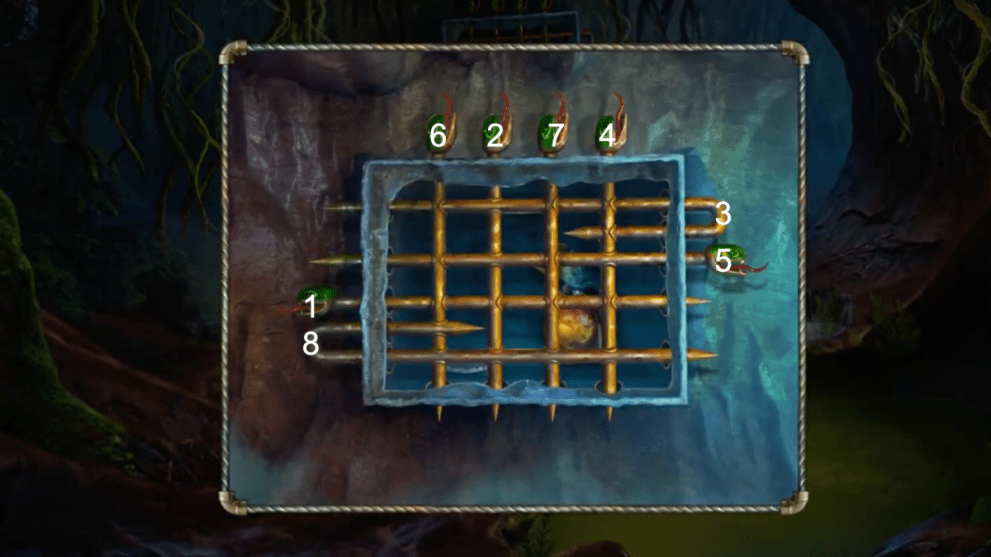
- Use the medallion on the gate and solve the puzzle.
Gate Medallion Puzzle Solution
- Go forward;
- Click the red cloth on the bridge;
- Use the pair of nippers on the basketball hoop;
- Take the chain;
- Take the fish figurine from the water;
- Use the fish food and chain in the water to get the key;
- Use the key on the house door;
- Go through;
- Go to the room on the left;
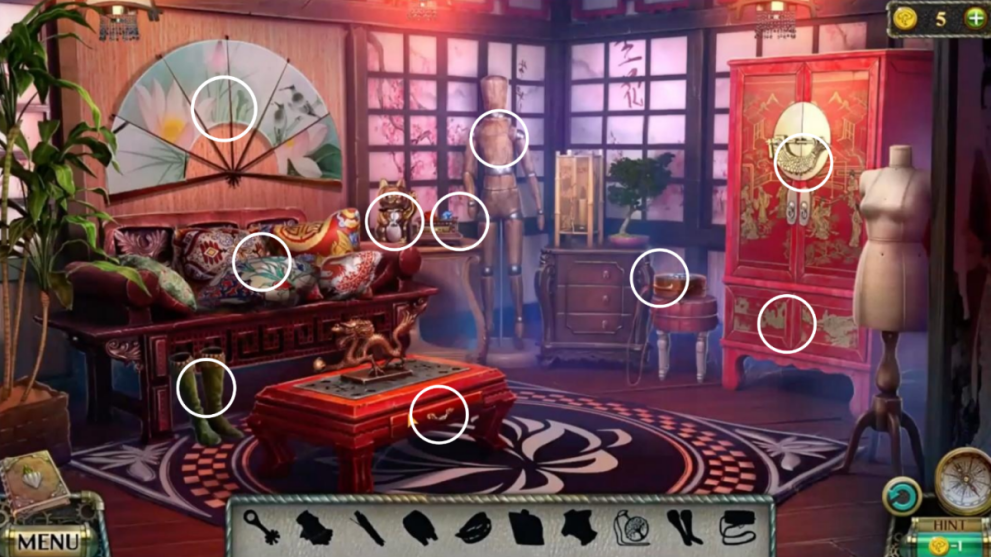
- Solve the hidden object puzzle.
Darkness and Flame: The Dark Side Hidden Object Puzzle 2
- Get fireplace matches;
- Get the bird figurine from the dresser on the right;
- Go back twice and head left into a cave;
- Use the matches on the red lantern;
- Use the knife on the lantern and take the tiger figurine;
- Use the pair of nippers on the chain link fence;
- Take the mechanism part;
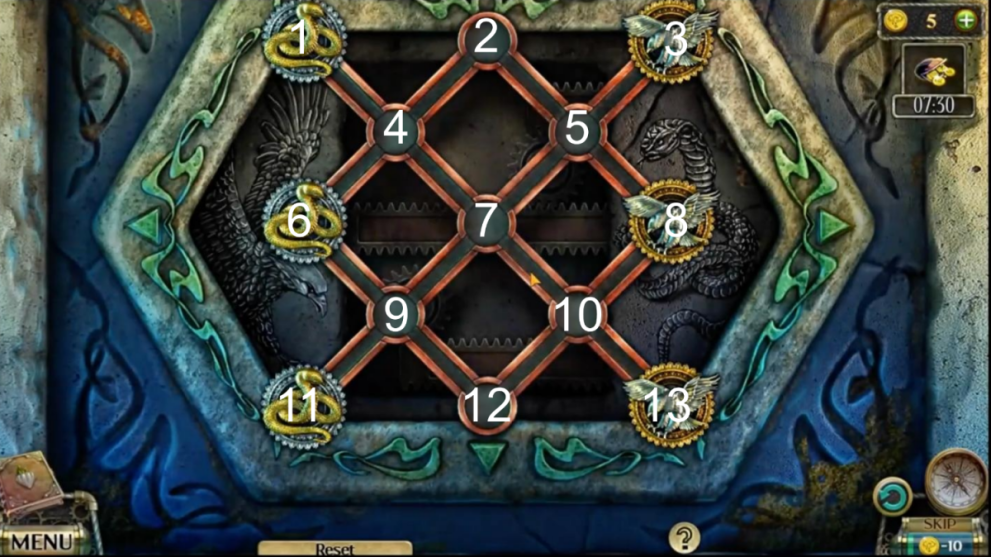
- Move the rocks to find an eagle medallion;
- Go back and then straight ahead to the village again;
- Click the statue to the left and place all figurines;
- Take the symbol tile;
- Click the bridge and place the symbol tile;
- Solve the puzzle by selecting all pairs to create the center symbol;
- Take the emeralds and the elevator handle;
- Go back and head left again;
- Use the elevator handle on the elevator;
- Take the tweezers;
- Place the mechanism part in the machine;
- Go back twice;
- Use tweezers to take the key from the crack in the rocks;
- Go forward and then head left to the elevator;
- Use the key on the red toolbox and take the lever;
- Use the lever on the elevator and select it to go.
Chapter 2: The Canyon
Darkness and Flame: The Dark Side continues as you enter a desert area searching for the answers to the mystery surrounding you.
- Pick up the long stick from the rock formation to the back;
- Get the shovel blade to the right;
- Combine the shovel blade and the long stick then use the knife to create a shovel;
- Use the shovel with the bucket to get a bucket of sand;
- Throw the bucket of sand at the plank to the left and gain a glass tube;
- Go forward;
- Speak to the person by the campfire;
- Put the wood on the fire to get charcoal;
- Take your bag from the unconscious person and the nail scissors;
- Go back and head to the right;
- Place the pipe and the valve on the machine and tap the valve;
- Take the llama statue and the snake skull;
- Go back three times and select the lit hut on the right;
- Place the llama statue in the space on the box;
- Open the box and solve the puzzle by moving the disc LEFT and RIGHT:
- R, L, R, R, L, L, L, L, R, R, R, L, L, R, L, L, R, L, R.
- Take the brush;
- Go forward twice.
Medicine Ingredients
- Talk to the old woman and get the list of ingredients;
- Use the nail scissors on the bonsai tree;
- Get the key;
- Use the key on the cupboard and get the jar and the fan;
- Use the fan at the window and get the paper bag;
- Use the knife on the tree and take the cherry blossom;
- Go back twice;
- Use the paper bag and the knife to collect stinging grass pollen;
- Go to the camp;
- Use the glass tube and the jar to get cactus juice;
- Place each ingredient on the list;
- Go back to the old woman and give her the ingredients;
- Take the dragon statue;
- Go back;
- Select the puzzle on the left by the red curtains;
- Place the dragon figurine.
Dragon Puzzle Solution
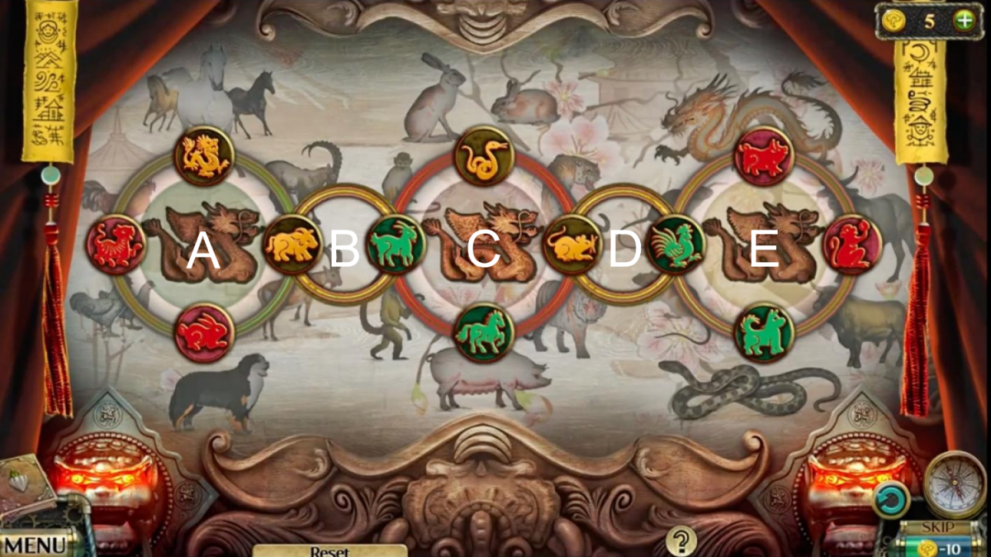
- Dragon puzzle solution:
- B-A-D-E-E-E-C-C-B-A-D-C-B-A-A-C-B-A-A-A-B-C-C-D-E-D-E-C-D-E-D-C-C-C-D-C-C-C
- Go left;
- Pick up the recipe with tarnished picture;
- Take tea leaves;
- Go back and then back to the house;
- Place the recipe in the bowl;
- Remove the pot lid and add tea leaves;
- Replace the lid and tap the pot to pour the tea;
- Take the recipe;
- Go back and left.
Crafting the Medicine
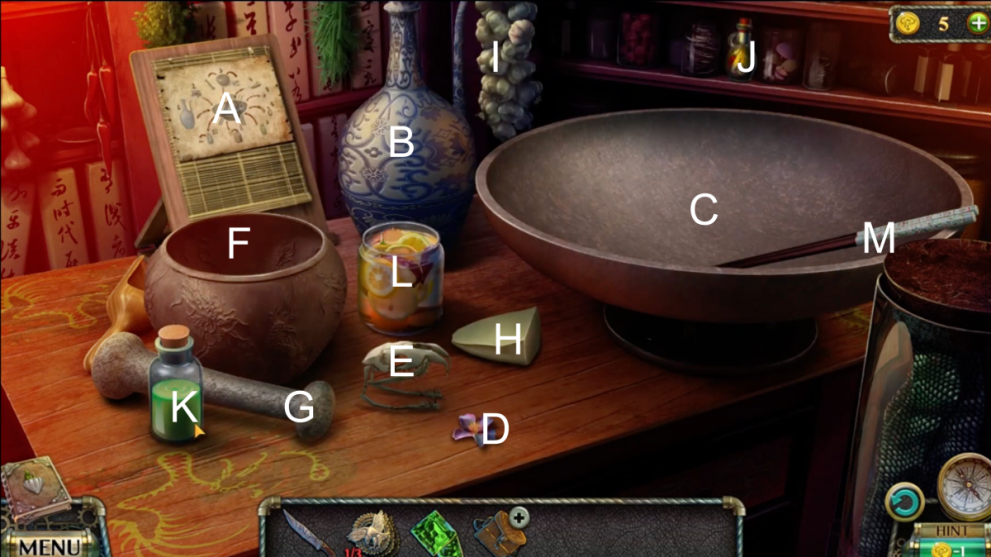
- Place ingredients in this order:
- Place A on recipe stand;
- B – C
- D – C
- E – F
- G – F
- F- C
- H – C
- I – C
- J – C
- Remove the cork from K
- K – C
- L – C
- Click M
- K – C
- Replace cork on K and take medicine.
- Go back to the camp;
- Give the medicine to the unconscious man;
- Take the medallion and use it on the bag;
- Get the sheet of paper;
- Open the album and take the pin;
- Go back to the desert area;
- Use the paper and the charcoal on the pattern;
- Go right;
- Use the pin on the drawer to the back;
- Take the machete and use it on the thorny bush;
- Get the buttons;
- Select the puzzle and solve by matching the tiles to the patten you found.
Button Puzzle Solution
- Place the pattern drawing;
- Button puzzle solution:
- Ax2, Dx2, H, F, Hx2, I, G, I, J, G, Hx2, J, I, J, I
- Select the ladder and go up;
- Open the hatch on the left;
- Take the valve from the pipe on the right;
- Go up;
- Place the valve on the door and go right;
- Pick up the chisel on the floor;
- Head right;
- Use the chisel and get crystal on the right;
- Go back;
- Use the crystal to light your way left;
- Go through the right tunnel;
- Take the wooden boards;
- Go back;
- Place the boards on the stepping stones;
- Go through the left tunnel;
- Move the vines on the left and go through;
- Take the stick and use it to move the debris on the right;
- Go through the right passage;
- Take the grappling hook from the ceiling and go back;
- Use the grappling hook on the sunlit gap in the ceiling.
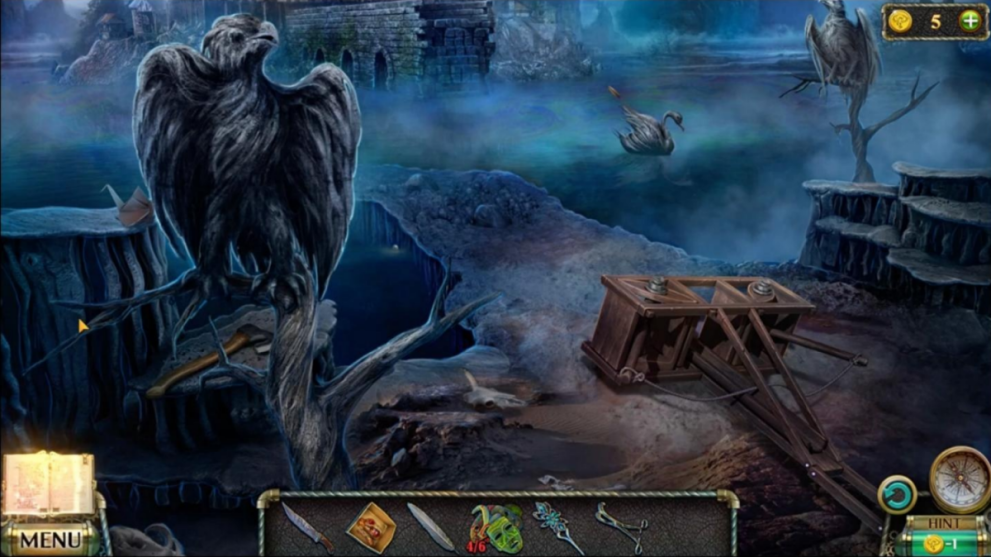
Chapter 3: Inside The Cave
Darkness and Flame: The Dark Side begins as you explore more of the underground cave system. What is this strange place?
- Use the knife on the trailing vines;
- Get the boomerang;
- Solve the snake pipe puzzle.
Snake Pipe Puzzle Solution
- Select snake pipes 1 – 8;
- Take the lens and the fish figurine;
- Go right;
- Pick up the brick;
- Take the fish figurine;
- Use the boomerang to get the ladder down;
- Take the broom;
- Place the lens and then look through it;
- Remember the pattern;
- Enter than pattern on the door;
- Go through;
- Talk to the person inside;
- Take the fish figurine;
- Use the knife on the package on the table;
- Take the strong tape and the poker;
- Take the fish figurine from the table by the window;
- Use the broom on the cobwebs and take the handle;
- Use the handle and poker on the fire;
- Get coin and fish figurine;
- Take the mug from on top of the green box;
- Use the coin to open the green box;
- Take the weight;
- Go back;
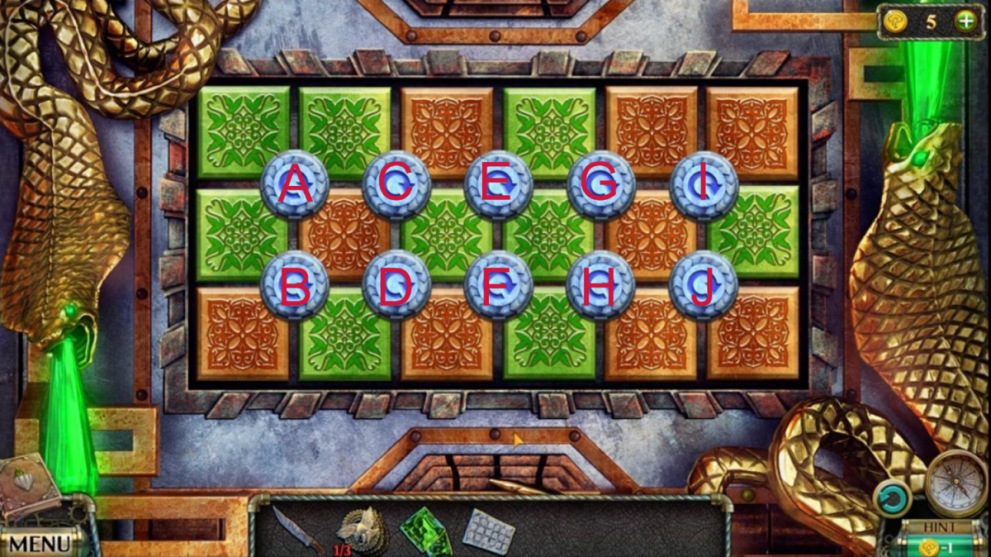
- Select the fish puzzle box on the left.
Fish Puzzle Box Solution

- Move the fish figurines so they don’t overlap (as above);
- Take the chain and unusual key;
- Go back;
- Use the mug on the pool and get the coin;
- Head right and then forward;
- Use the coin on the blue box;
- Get the paddle blade;
- Combine the blade with the stick on the table using the strong tape;
- Go back;
- Use the paddle on the boat;
- Use the unusual key and get the wooden leaf;
- Tap the stone and head right;
- Use the weight to break the skull;
- Take the figurine of the pigeon and the eagle medallion;
- Head right;
- Pick up the pipe and the figurine of the pigeon;
- Use the long pipe to get the brush from the gap by the bridge;
- Go back and head left x 2;
- Pick up the pigeon figurine on the gate;
- Go back;
- Place all pigeons on the gate;
- Tap the binoculars;
- Take the final eagle medallion;
- Go back to the desert and find the puzzle in the sand;
- Place the eagle medallions and solve the puzzle.
Predator and Prey Puzzle Box Solution
- Solve puzzle:
- 8 – 6, 13 – 8, 6 – 12, 1 – 9, 5 – 1, 8 – 4, 3 – 2, 12 – 13, 9 – 8, 11 – 10, 4 – 11, 2 – 6, 10 – 3.
- Take the symbol tile, carabiner and screwdriver;
- Head right then straight ahead;
- Go right twice until you’re back at the well;
- Remove the debris;
- Use the carabiner and chain at the well;
- Take the shovel;
- Go right;
- Use the knife and the shovel in the grasses;
- Take the keys and the wooden leaf;
- Use the screwdriver on the sign and take the road sign;
- Go down and head left twice to the gate;
- Use the road sign in the split tree.
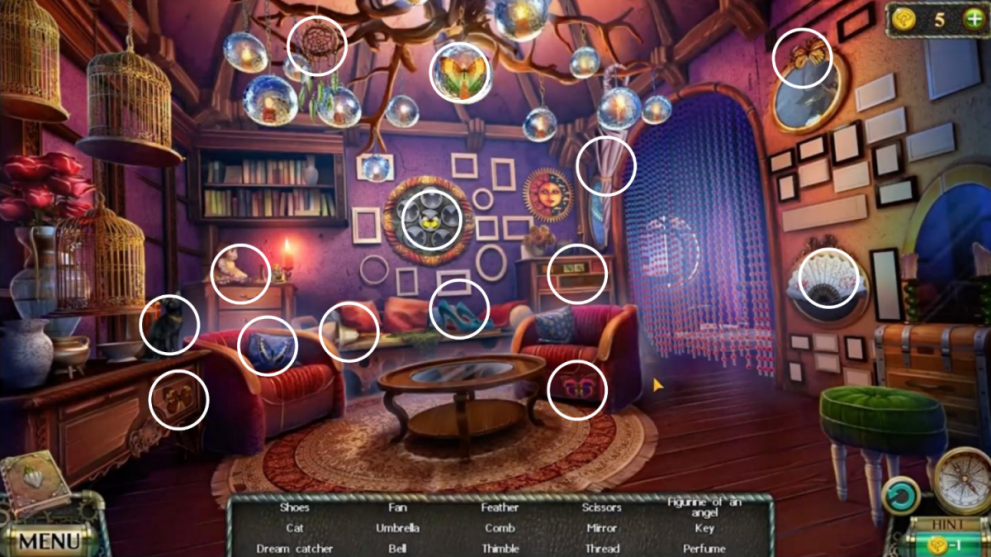
Darkness and Flame: The Dark Side Hidden Object Puzzle 3
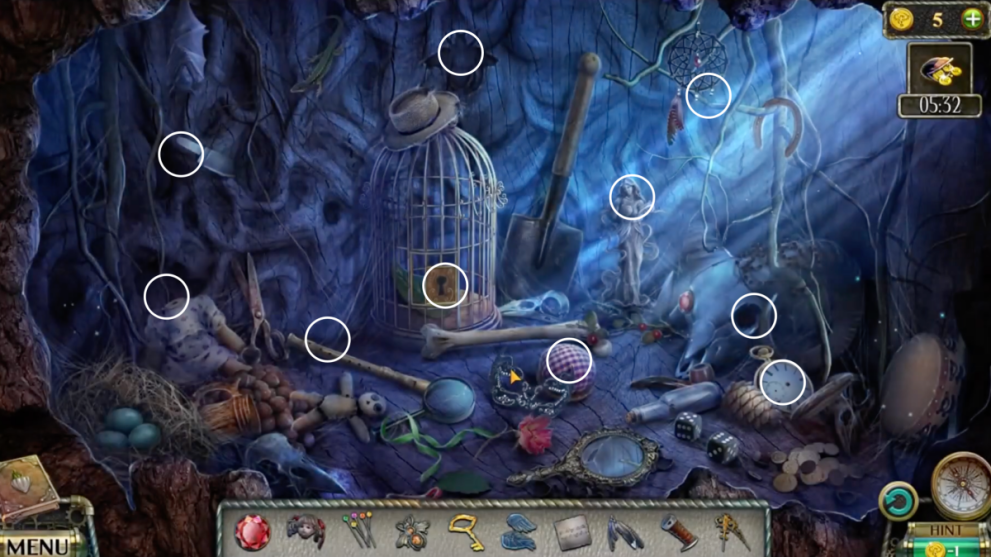
- Solve the hidden object puzzle:
- Use the key on the birdcage;
- Place the pins on the cushion;
- Put the wings on the angel;
- Place the scarab on the wall;
- Put feathers on the dreamcatcher;
- Place the grip on the knife;
- Put the clock hands on the watch;
- Put the doll head back on the doll;
- Place the ruby in the ram head;
- Put the notes by the flute.
- Take the wooden leaf;
- Place the symbol tile and tap the stones in order;
- Take the topazes;
- Go back twice;
- Select the tree;
- Use the brush to clear the debris;
- Place the wooden leaves.
Wooden Leaves Puzzle Solution

- Solve the wooden leaf puzzle:
- Select 3, 2, 6, 6, 6
- Slide 7 left one space
- Select 3, 2, 6, 6, 3, 2, 2, 2, 6, 1, 3, 1, 3, 3, 6
- Slide 7 one space right
- Select 4.
- Take the keys;
- Go right;
- Head forward to the bridge and tap the car wreck in the distance.
Darkness and Flame: The Dark Side Hidden Object Puzzle 4
- Solve the hidden object puzzle:
- Some objects are behind the car door, under the hood, and in the mailbox.
- Get the keys.
Chapter 4: The Cliffs
- Get the pickaxe from the rock face;
- Take the steps;
- Use the pickaxe to get the coin and box;
- Put the steps against the tree and select them;
- Use the box and the knife in the tree;
- Get the tar;
- Go down three times then head forward to thecolored boxes;
- Use the coin on the red box;
- Take the slingshot and pinch bar;
- Go back to the makeshift camp;
- Use the slingshot to get the feather and key from the cliff top;
- Go back and head right to the area with the toll booth;
- Use the pinch bar to move the wooden slats;
- Use the key and take the dynamite;
- Go to the first area of the city under the dome;
- Place the dynamite at the rock and power it up;
- Go through;
- Take the watering can;
- Go forward;
- Take the sickle from the wall;
- Get the toothpick from the window sill;
- Use the sickle on the bushes;
- Take the flower figurine;
- Place the flower figurine on the door;
- Head to the right;
- Talk to the man and take the key.
Darkness and Flame: The Dark Side Hidden Object Puzzle 5
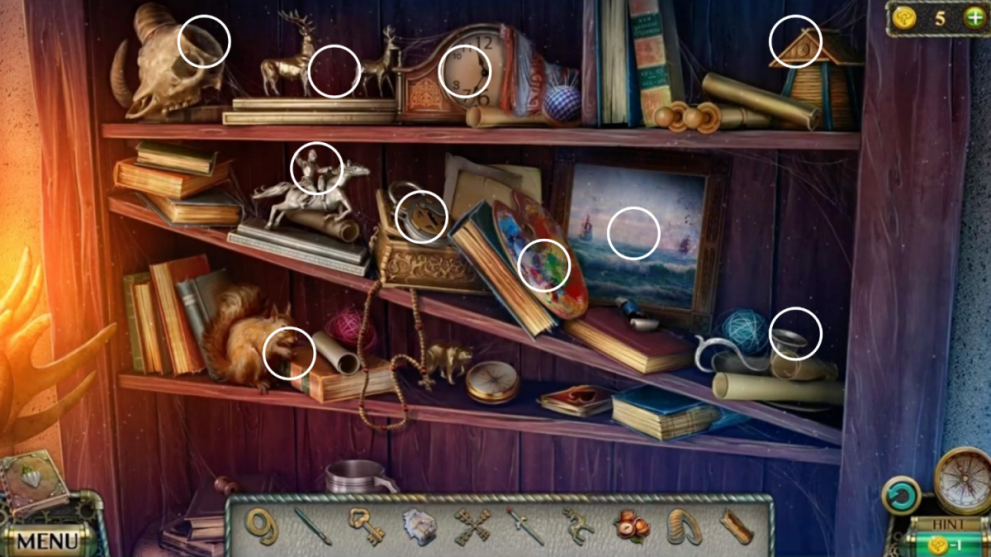
- Solve the hidden object puzzle:
- Place the candle in the candle holder;
- Put the ram horn in the skull;
- Give the nuts to the squirrel;
- Place the deer figurine with the others;
- Give the sword to the soldier figurine;
- Give the windmill back its sails;
- Place the ship in the painting;
- Put the key in the lock;
- Put the paintbrush on the palette;
- Place the 9 on the clock.
- Take the key;
- Go back;
- Use the key on the door at the very back of the area;
- Go forward;
- Talk to the person there and take the list;
- Read the list;
- Open the door and take the empty jar;
- Use the watering can on the glowing plant;
- Take the metal feather;
- Use the knife on the box and take the net;
- Go back twice;
- Use the toothpick on the venus flytrap;
- Take the clip;
- Go ahead and then right;
- Use the clip to unzip the cushion;
- Take the mask and rubies;
- Go back 4x to the desert area with the ram skulls;
- Place the gems in the skull eyes;
- Take the metal feather;
- Go forward twice;
- Move the purple vines;
- Tap the peacock.
Peacock Feather Puzzle Solution
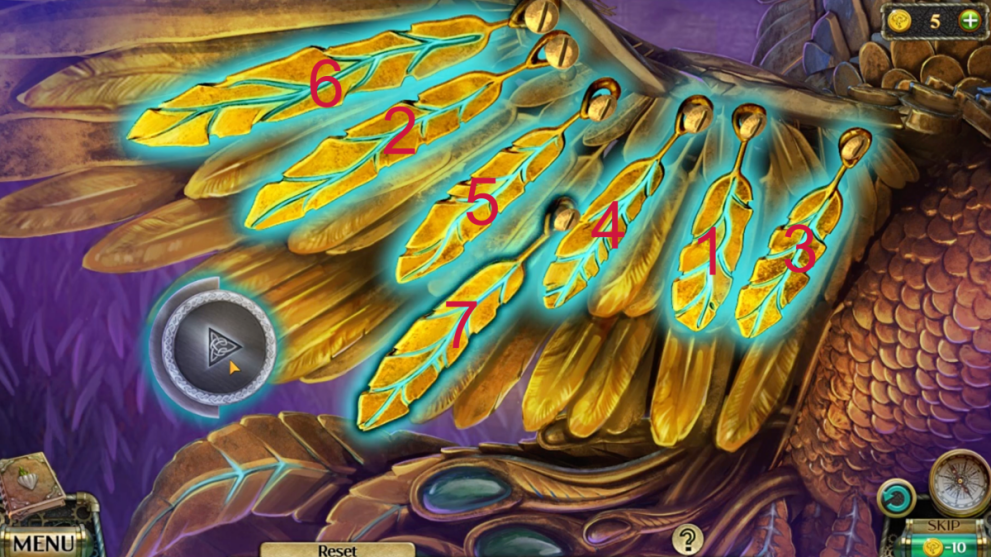
- Place metal feathers and use the screwdriver to secure;
- Press the feathers in the order they glow after pressing the play symbol button;
- Take the hairpin;
- Go back three times and then head left twice until you get to the chained gate;
- Use the four keys;
- Go through;
- Use the hairpin on the broken plinth to the right;
- Take the letters;
- Go back to the lab in the city under the dome with the strange plant;
- Place the letters on the sign on the wall;
- Take the acid and the capsule;
- Go back to the graveyard;
- Use the acid to melt the grid;
- Take the key, mask, and hair;
- Go to the lab again;
- Use the key on the locked cupboard;
- Take the mask, bulb, and rag;
- Go back;
- Use the rag to clean the wall and find the code 253;
- Enter the code;
- Take the rake and the mask;
- Go back twice;
- Look closer at the rocks;
- Use the rake to clear;
- Take the clamp and pipe;
- Combine the pipe and the bulb;
- Go forward;
- Use the rubber bulb on the plant to get juice;
- Go back 10x to gather fireflies with the jar and net;
- Go to the lab;
- Use the desert fireflies on the strange plant and cut a bud off with the knife;
- Place the ingredients on the list;
- Tap the table.
Making the Capsules
- Craft the capsules:
- Place the ingredients;
- 1 – 2 and select;
- 3-4, 2-5, 6-5, 7-5;
- Select 8, 9, 10;
- Select and take the capsules (11).
Chapter 5: The Lake
Darkness and Flame: The Dark Side continues as the darkness has taken over. Is there any hope left?
- Take the axe;
- Pick up the long stick;
- Use the clamp on the wooden structure;
- Take the stone tile;
- Go back;
- Use the axe on the roots and take the mask, key, and chest;
- Go to the street in the city under the dome;
- Use the key on the locked door.
Darkness and Flame: The Dark Side Hidden Object Puzzle 6
- Solve the hidden puzzle room;
- Find all butterflies before opening the center circle panel;
- The colored drawer on the right contains multiple items including the tile to open the top drawer.
- Take the mask;
- Go forward then right into the hut.
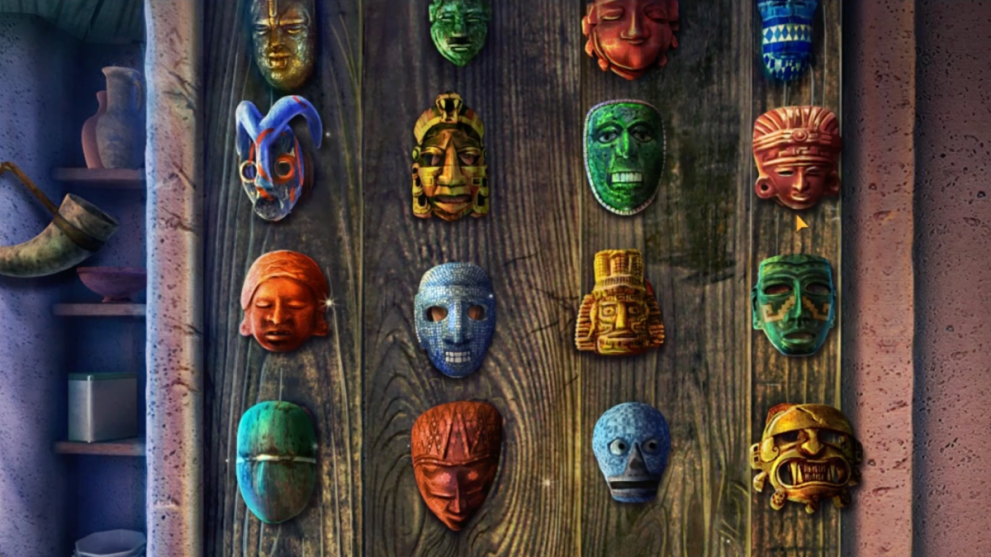
Mask Puzzle Solution
- Take the tree figurine;
- Go to the graveyard;
- Place the stone tile and solve the puzzle by matching the pairs until the tiles disappear;
- Go straight;
- Place the tree figurine in the space on the coffin;
- Take the rubber glove and the hammer.
Darkness and Flame: The Dark Side Hidden Object Puzzle 7
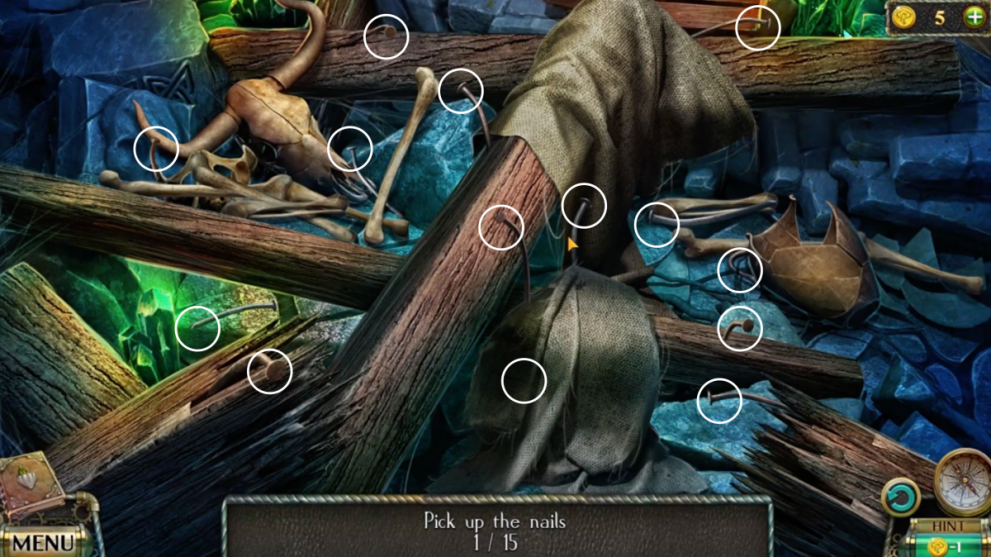
- Solve the hidden object puzzle by finding all 15 nails;
- One is hidden under the dirty rag.
- Get nails;
- Go forward;
- Use the hairpin on the grave stone;
- Take the wooden part;
- Go back to the green pool in the desert area;
- Use the rubber glove in the pool;
- Get an electric fish;
- Go right twice and then head left;
- Put the electric fish in the cage;
- Take the cage with bait and the bracelet;
- Go left twice and the forward x3 to the mermaid statue;
- Place the bracelet on the statue;
- Take the key;
- Go back;
- Use the key on the box on the plinth;
- Take the scoop;
- Open the book and take the drawing and puzzle pieces;
- Place the puzzle pieces on the chest and rearrange;
- Take the lever;
- Place the drawing down and select the pieces as shown;
- Combine the spearhead and the long stick to get an arrow;
- Go back then head right;
- Use the scoop in the water to get a pearl;
- Go back and then head straight twice;
- Place the pearl in the golden puzzle and rearrange.
Golden Pearl Puzzle Solution
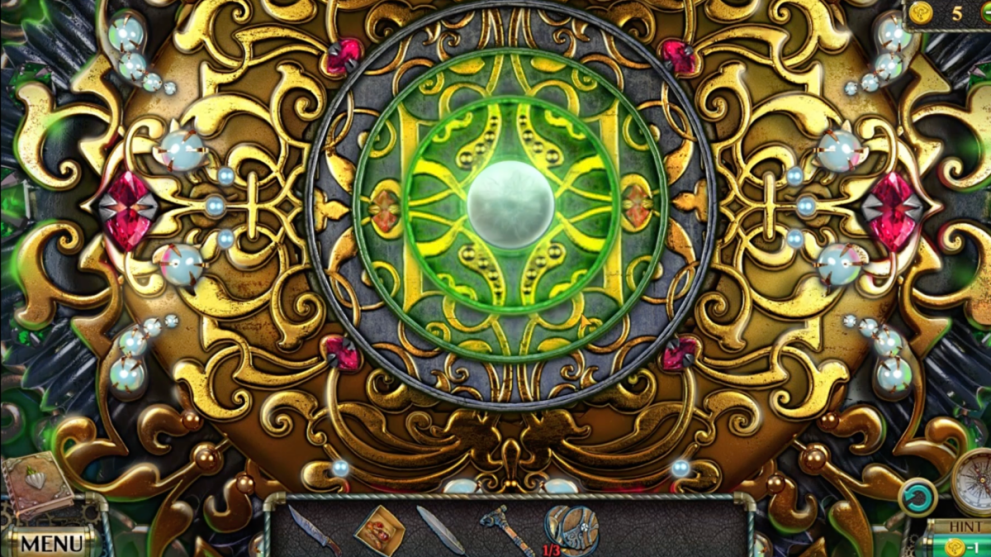
- Take the layout part;
- Go to the hunter’s house;
- Use the lever on the box;
- Take the jack;
- Head to the Black Lake;
- Place the jack on the broken wooden machine and select it;
- Place the boards and nails and use the hammer to secure;
- Place the arrow;
- Go forward.
Chapter 6: The Settlement
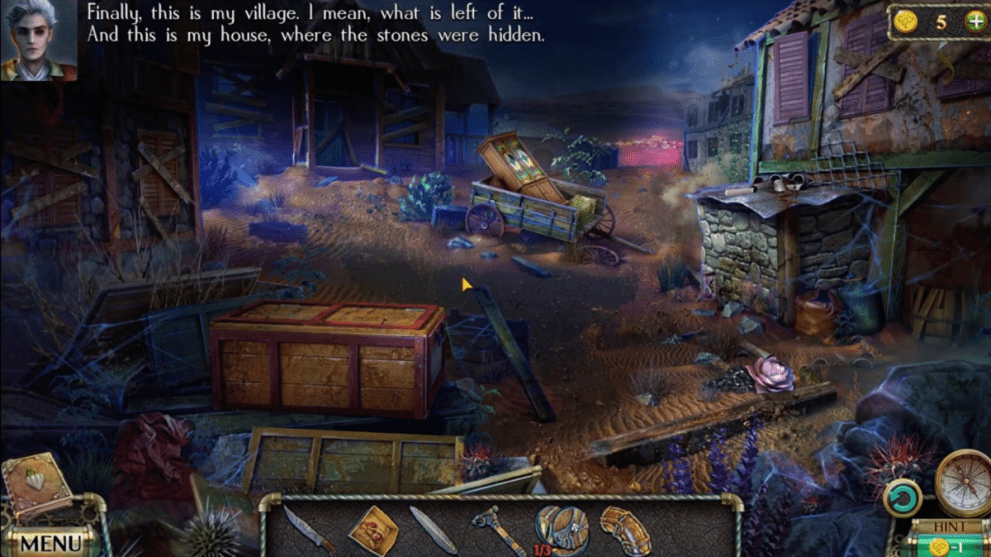
The final chapter of Darkness and Flame: The Dark Side and the story is almost complete…
- Use the hammer on the chest;
- Take the oil and the cloth;
- Go forward;
- Take the whip;
- Take the knitting needle;
- Use the branch on the flame and get a torch;
- Read the paper to the left;
- Take the stone symbol;
- Use the oil and torch in the gutter to create fire;
- Use the stone symbol on the bridge;
- Go to the swan;
- Use the whip on the swan and get the arrow;
- Go down;
- Use the knitting needle to open the small door and get the ink;
- Go down;
- Use the arrow to get the diamond from the skull;
- Go forward then right and forward again;
- Use the cloth, ink, feather and knife on the colored glass door;
- Get templates of missing fragments of the glass window;
- Use the templates and the diamond to create colored glass fragments;
- Place the fragments in the gaps;
- Take the handle;
- Go to the house;
- Use the handle and go in;
- Use the tar and stick the mirror pieces back together;
- Open the chets;
- Use the knife to open the sack and get the stone head;
- Remove the cover on the left;
- Place the layout part and restore all other parts (they glow when you tap on them);
- Get the hook;
- Head back to the precipice;
- Use the hook to get the ring from the branch;
- Go down twice;
- Go right the forward and head left;
- Place the ring on the puzzle on the floor;
- Move the ring along the glowing path;
- Tap the lock on the chest.
Chest Lock Puzzle Solution
- Solve the chest lock puzzle;
- Take the lever and read the note;
- Go down and then head forward;
- Use lever by the waterfall;
- Go through;
- Talk to the person;
- Go forward;
- Take the hammer;
- Walk down;
- Use the hammer on the hatch and open the door;
- Take the broom, sieve, and rope with hook;
- Use the knife on the meat;
- Go forward;
- Use the piece of meat to distract the dog;
- Place the stone head on the door;
- Use the sieve in the pond;
- Take the wooden part.
Darkness and Flame: The Dark Side Hidden Object Puzzle 8
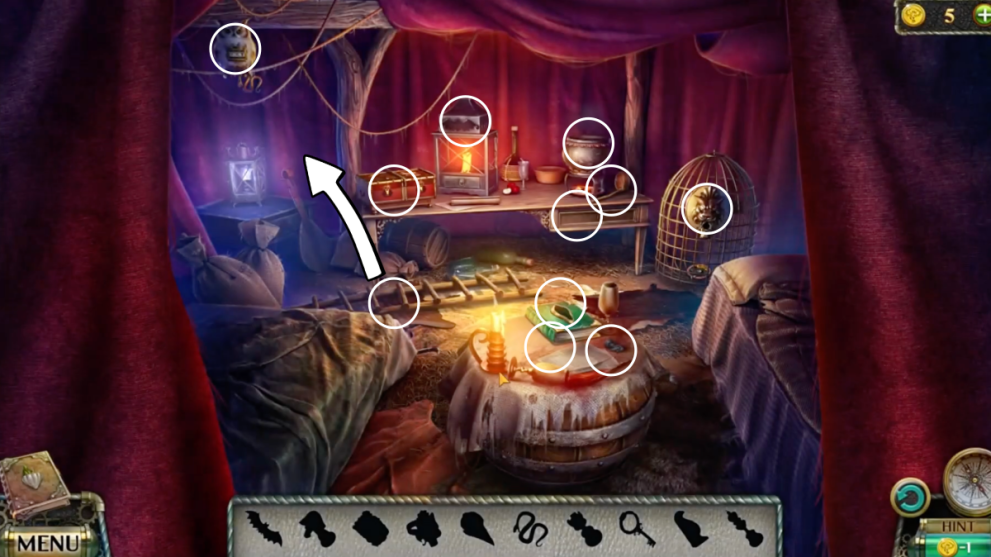
- Solve the hidden object puzzle:
- Use the ladle in the potion to get half a mask;
- Place the bat figurine from the table in the candle holder;
- Place the mask in the box to get the bird skull shape;
- Place the bird skull in the green book;
- Find all 8 skulls in the book- large, small, human and animal- and get the code;
- Use the code to unlock the owl lock and get the snake;
- Use the snake on the other small box lid;
- The key opens the desk drawer;
- Place the chess figurines in the spaces provided;
- Place the ring in the lion on the cage;
- Take the wooden part.
- Go down x3 and head left;
- Place the wooden parts on the door.
Wooden Flower Door Puzzle Solution

- Collect all circle parts;
- Take the gas;
- Go down and then forward twice;
- Talk to the person;
- Use the gas on the dog;
- Go forward;
- Use the rope and hook on the tree base;
- Use the well and handle;
- Take the dog foot figurine;
- Go down;
- Use the dog foot figurine on the pack on the dog’s back;
- Take the key;
- Go down;
- Use the broom on the debris to the right;
- Use the candle on the fire;
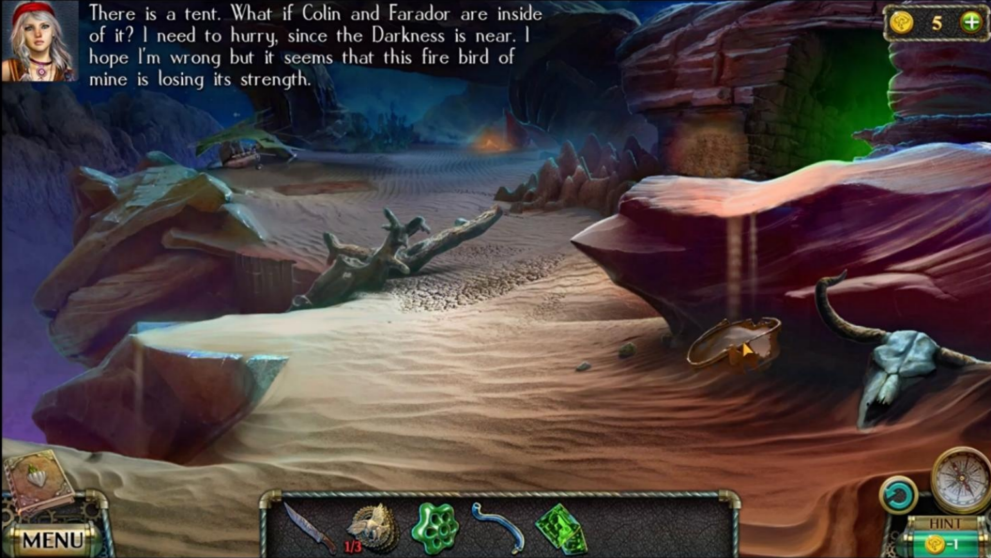
- Use the knife to open the tent;
- Open the lamp and place the candle inside;
- Use the key on the case and take the tile;
- Go forward x2;
- Shift the tiles to move the blue block to the blue area and the red block to the red area.
That concludes Darkness and Flame: The Darkside walkthrough! Next up check out another Darkness and Flame walkthrough.


Updated: Jul 12, 2024 05:26 am