
In the Lost Lands 11 puzzle mobile game, you need to help Cassandra and the Young Prince open and stabilize the escape portal from the Big City. You’ll be challenged to solve 30 different puzzles across the two chapters. Follow this guide for the puzzle solutions and a complete walkthrough of the game.
Table of contents
- Chapter 1: Anomalous Event
- Chapter 2: The Trials of the Big City
- Rotating Mechanism Puzzle
- Fire Torch Puzzle
- Syringe Chest Puzzle
- Double Dagger Puzzle
- Hunter’s Guild Puzzle
- Armor Suit Puzzle
- Girlur’s Box Puzzle
- The Mace Puzzle
- The Arena Puzzles
- Wooden Gate Lock Puzzle
- Head in the Wall Puzzle
- Wooden Door Puzzle
- Glowing Lantern Puzzle
- Chained Minotaur Puzzle
- River Valves Puzzle
- Magic Stabilizer Puzzle
Chapter 1: Anomalous Event
As soon as Cassandra arrives at the unfinished tower, be sure to pick up your first manuscript, a saw, and a crowbar from the barrel in the bottom left corner. Then, follow these steps:
- Pick up some candles from the rotating mechanism with cogwheels.
- Place the candles on the table on the right side of the screen.
- Use the smoking pipe to light the candles and another manuscript.
- Open a small casket by solving the puzzle with color schemes as shown above.
- Pick up a feather, a snowflake, and a powder from the casket.
- After speaking to an old man Dudi, pick up a fragment of paper from the table.
- Use the crowbar to open the chests near the table and pick up a handle and a metal bunch.
- Use the handle and the crowbar to turn the rotating mechanism.
This action will help the platform descend from the ceiling. Then, take one candle from the table and place it on the platform to light up the way.
Chamber of Balance Puzzle
Pick up the missing fragments from the bottom of the pit and assimilate the picture. Once you place it at the bottom of the pit, it will fill up with water. After that, do this:
- Throw a feather and a powder into the water to activate the portal.
- Once you’re on the other side, pick up an anchor and some coins.
- Use the saw to cut the beam and coins to unscrew the bolts.
- Pick up a candelabra and screw it to the chain.
- Throw it down into the hole and use it to pick up a ladder.
- Go down into the Chamber of Balance.
- Pick up everything you can inside and leave through the terrace outside.
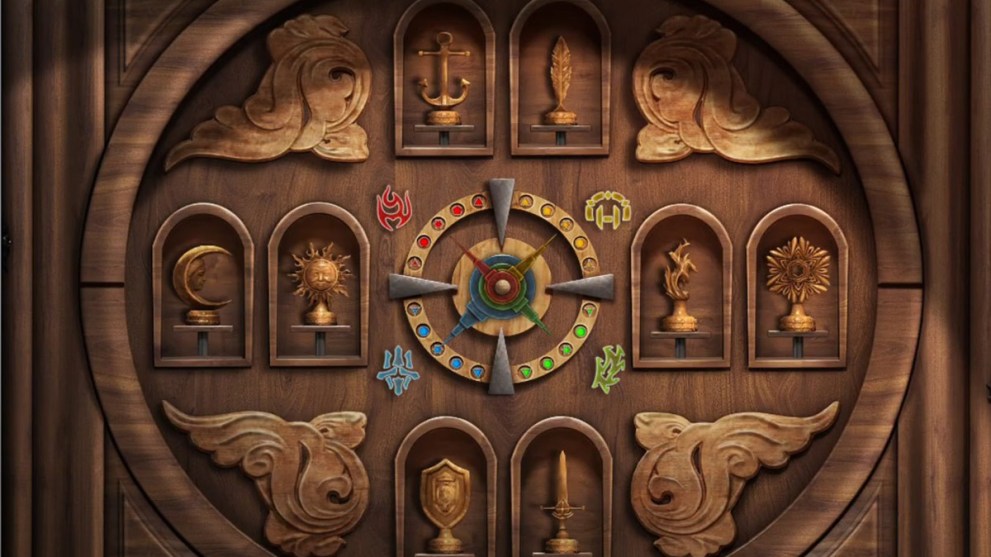
- Pick up a small sword from the pile and go back to the chamber.
- Place all the objects into the slots of the chamber wall as shown in the image above.
To solve the puzzle of the chamber wall, you need to rotate the arrows as shown in the bottom image above. This will unlock the treasure room.
Pillar of Balance Puzzle
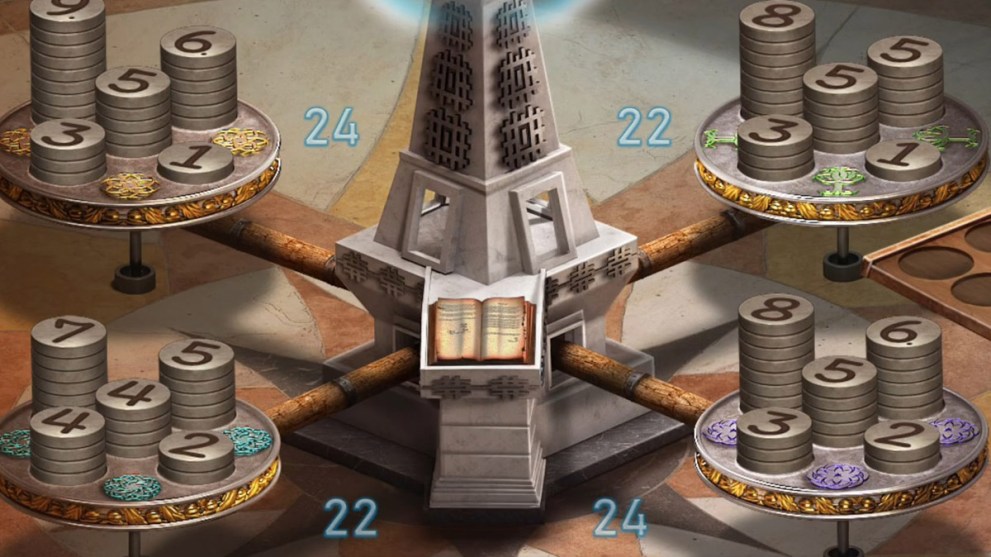
Pick up all the Weights of Creation from the treasure room and go back to the main chamber to solve the Pillar of Balance puzzle.
- Place all the stacks as shown in the image above to gain the balance of the weights.
- This will unlock another portal, which you need to pass through.
- Pick up a key from the ground after speaking to the beggar in the new town.
- Use it to unlock a shed and pick up a knife to cut the ropes on the fence.
- Get a lotus flower from the garden and give it to a cook for his soup.
Cart Box Puzzle
Leave the cook’s kitchen and tap the cart with vegetables and a box on the street. Solve the puzzle by moving the balls into the fish mouths, as shown in the image above.
- Pick up a bobber and a hook from the cart box.
- Use a stick to pick up maggots from the fish and put them inside a leaf.
- Craft a fishing rod from the bamboo stick, a bobber, and a hook.
- Use maggots as bait to catch fish and collect the rest of the veggies for the cook’s recipe.
- Go back to the kitchen, cook the fish soup, and bring it to the beggar on the street.
- Pick up some coins from the garden and use them to call a guard at the gate.
Prison Escape Puzzle
The guard will take you to the prison, so you must escape it. Here’s what you need to do:
- Use the lightning magic to knock out the guard.
- Solve the lock puzzle as shown in the image above.
- Pick up a keyring and a wakizashi sword from the guard.
- Lock up the rest of the guards inside the prison cell and unlock the cell on the ground.
- Unlock the guard offices and pick up a ladder to get the gemstones from the ground cells.
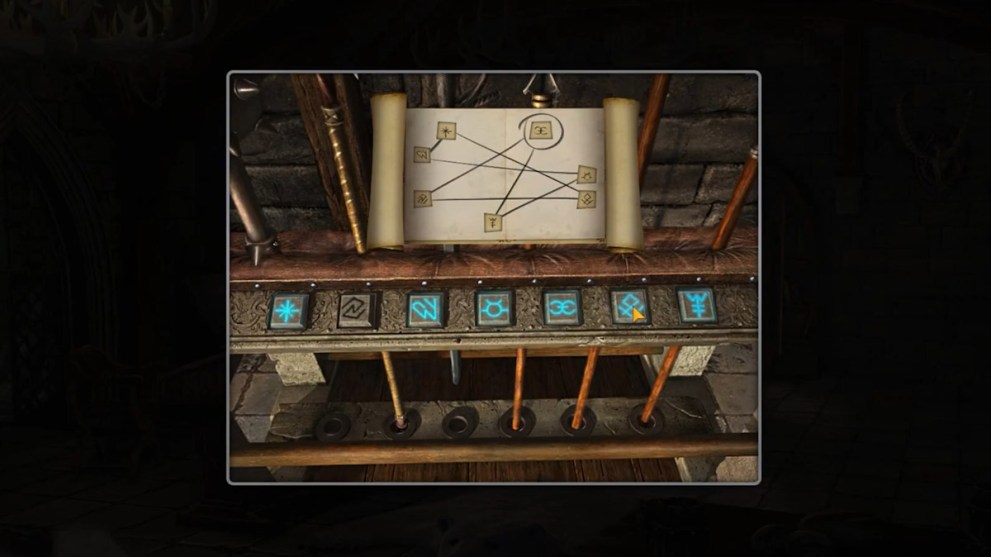
The Scroll Puzzle
Inside the prison offices, you can unlock a scroll on the small coffee table. Set up symbols as shown above to open it up.
- Pick up a balcony key and all other items from the unlocked scroll.
- Use the key to unlock the balcony door and walk the line above the street to the tower.
- Pick up a gift box with key details and modify the prison keyring.
- Use it to unlock another cell in the prison and release a young lady from the shackles.
- Pick up the items from the stove in the same room and use them to create fireworks.
- Grind some powder and copper shavings in the stone circle.
- Mix the gunpowder into the empty scroll box and attach the fuse.
- Place the rocket in the garden and use the torch to fire up the fuse.
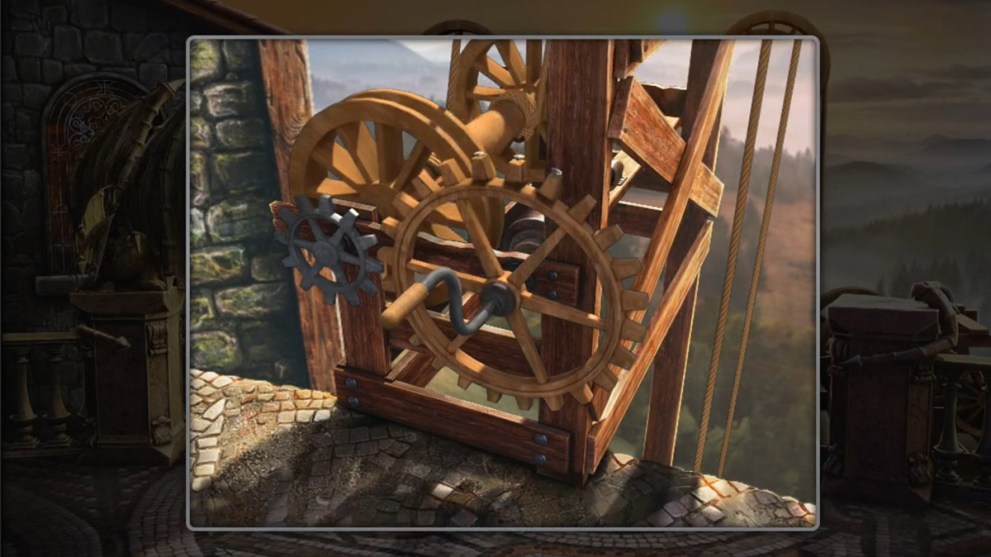
The Elevator Puzzle
When the fireworks distract the town guards, you can safely bring out the prisoners from their cells and back into the portal.
- Upon returning to the Chamber of Balance, you need to fix the elevator outside the balcony.
- Pick up some nails and a hammer from the unfinished tower, and fix the elevator as shown above.
- Use it to descend into the valley and investigate it, picking up any items you can.
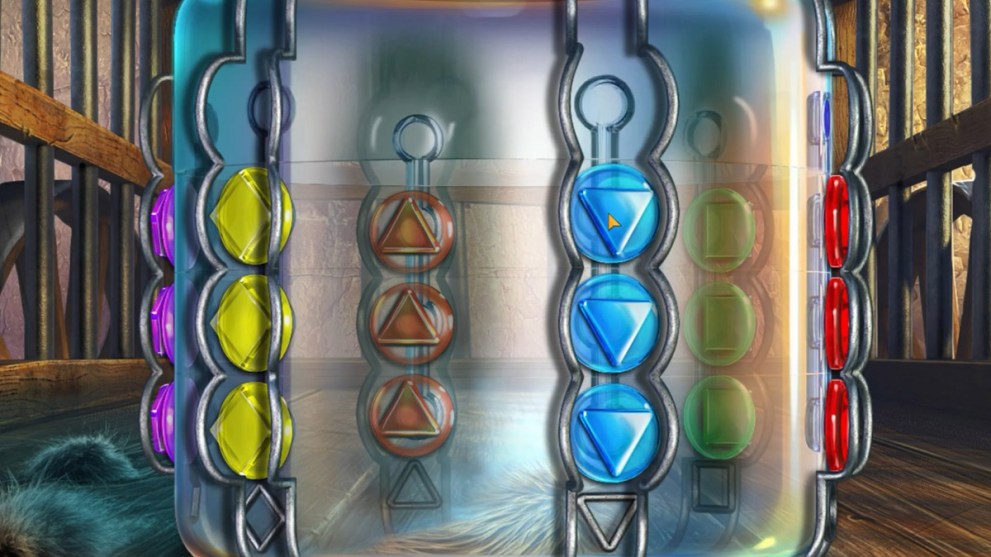
Ice Cubes Puzzle
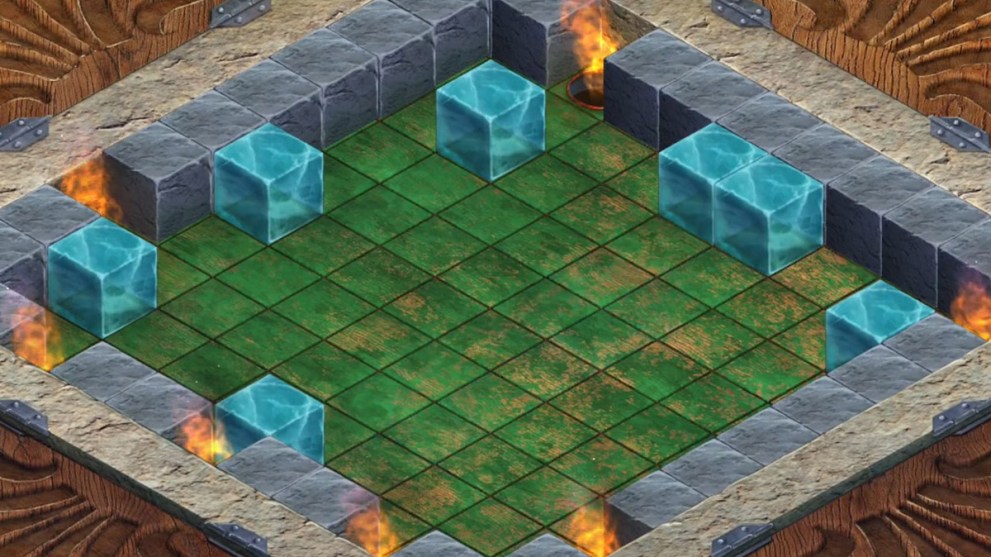
Upon investigating, you should encounter a traveling wagon submerged in the water. There, you’ll find a box with ice cubes, which need to be arranged as shown above.
- Pick up a key and the rest of the items from the box.
- Unlock the wagon and grab everything you can from inside.
- Use a bucket of water to fill up a hole in the ground to lure out the field mouse.
- Put the mouse in the cage and go back to the wagon.
- Place the mouse in a cage on the shore to lure out the snake.
- Use the snakecatcher to extract some of its venom into the bottle.
- Return to the elevator and go back up.
- You can now assemble all the ingredients into a sprayer.
- Lastly, tap the gargoyle statue and remove the skull talisman from its back.
Cave Chest Puzzle
Use the sprayer on the bushes in the valley to make a way into the forest. Cut the tree vines to unlock a cave and go inside.
- Pick up a crystal and a pendant key.
- Drop down a chest that’s stuck on the cave’s ceiling.
- Solve the lock puzzle by rotating the blue pieces as shown in the image above.
- Use a silk handkerchief from the bag outside the cave to light up the crystals in the cave.
- Release the Young Prince from one of the webbings.
Spider Legs Puzzle
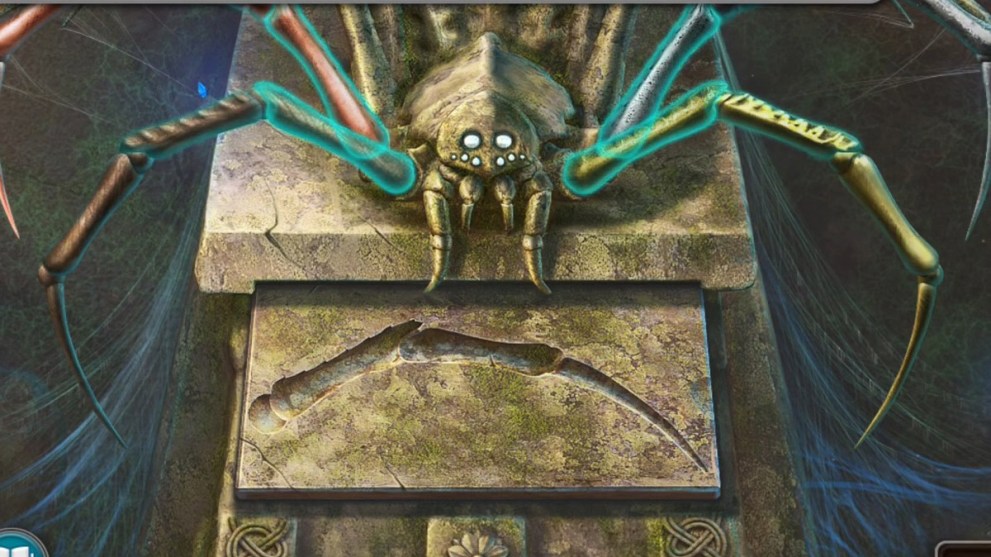
Once you pick up all the spider legs in the cave, a giant spider will let you into a secret chamber, where you need to solve another puzzle.
- Use the various shapes and colors of the spider legs to assemble them correctly on a spider.
- You can use the spider leg imprint on the stone or refer to the image above for the correct pieces.
- Pick up a manuscript and a glowing orb from the niche.
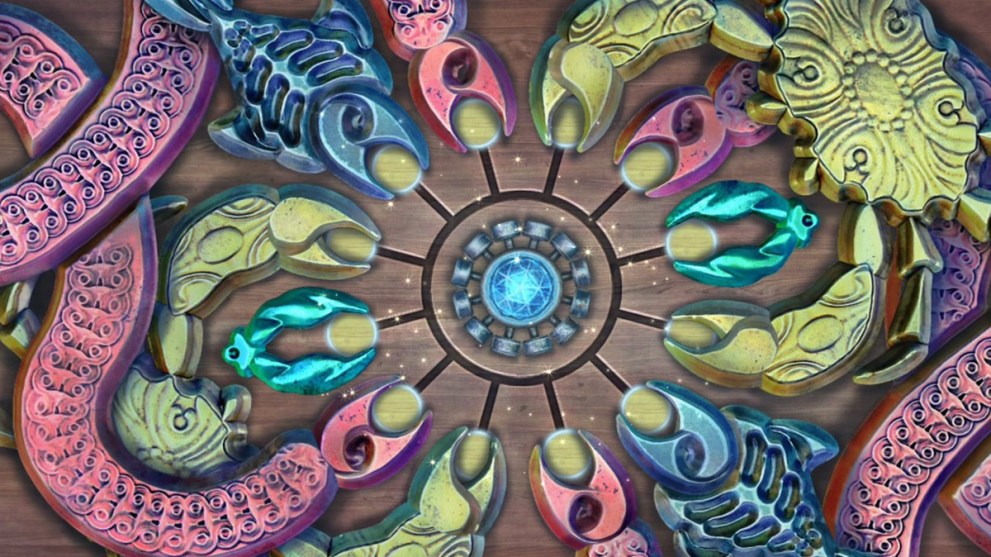
Colored Gems Puzzle
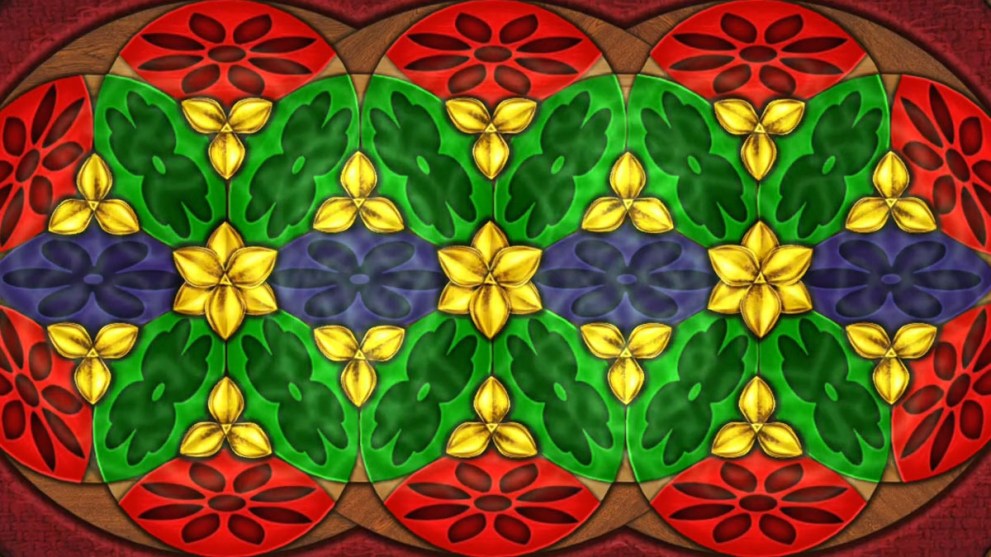
Enter another dark chamber and use the glowing orb to light up what turns out to be a treasure room. Collect pieces of the animal images and assemble them on the wall.
- Once you unlock a chest with a puzzle, assemble the colored gems as shown above.
- When al the animal tiles are placed, a new treasure room is revealed.
- Go back to the Chamber of Balance and reactivate the portal.
- Once Cassandra and the Young Prince enter the portal, the first chapter will be over.
Chapter 2: The Trials of the Big City
As soon as the Young Prince appears in a new location, pick up some tools from the pile. Use an axe to cut the tree and walk on it to the top platform.
- Investigate the area and pick up some mechanical parts.
- Repair the part as shown above and insert it into the main mechanism.
- Now you can activate the puzzle.
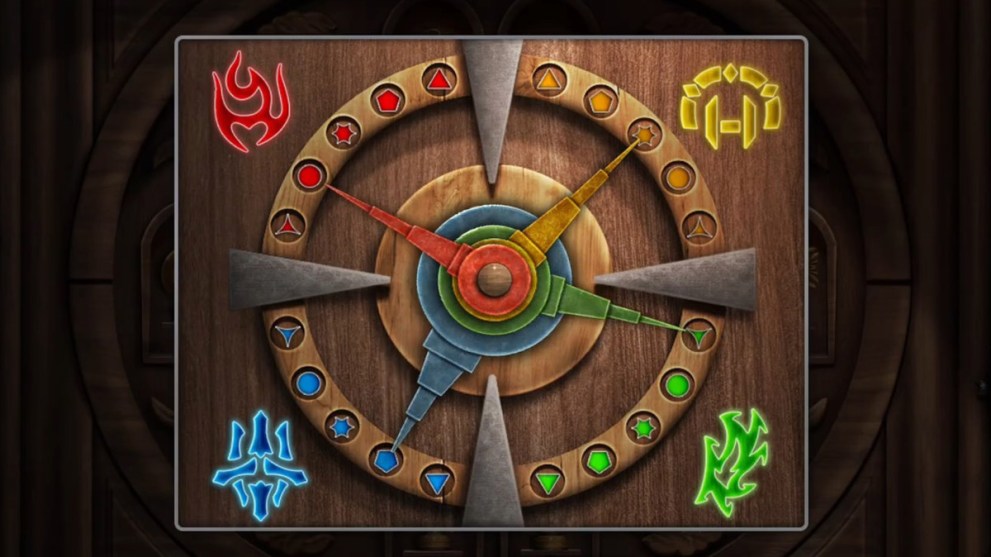
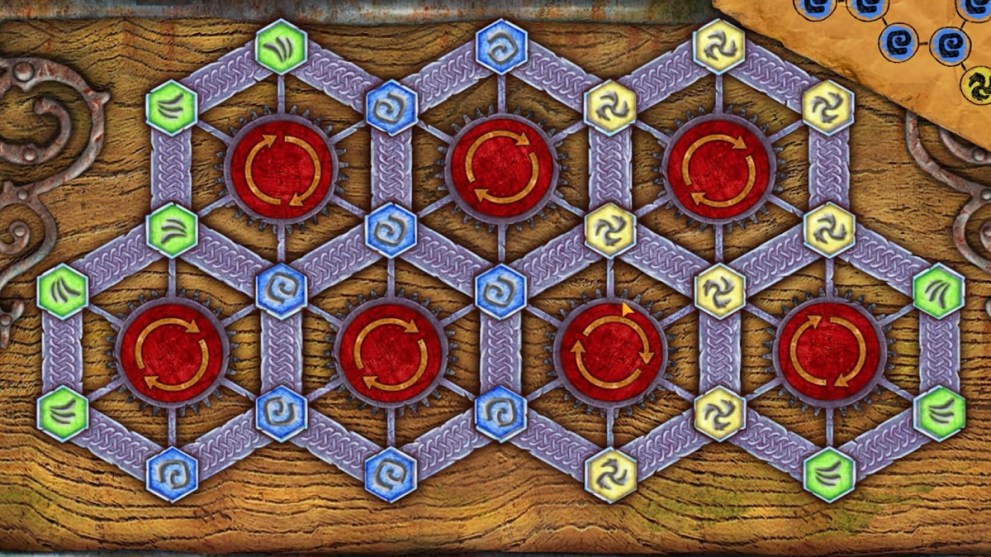
Rotating Mechanism Puzzle
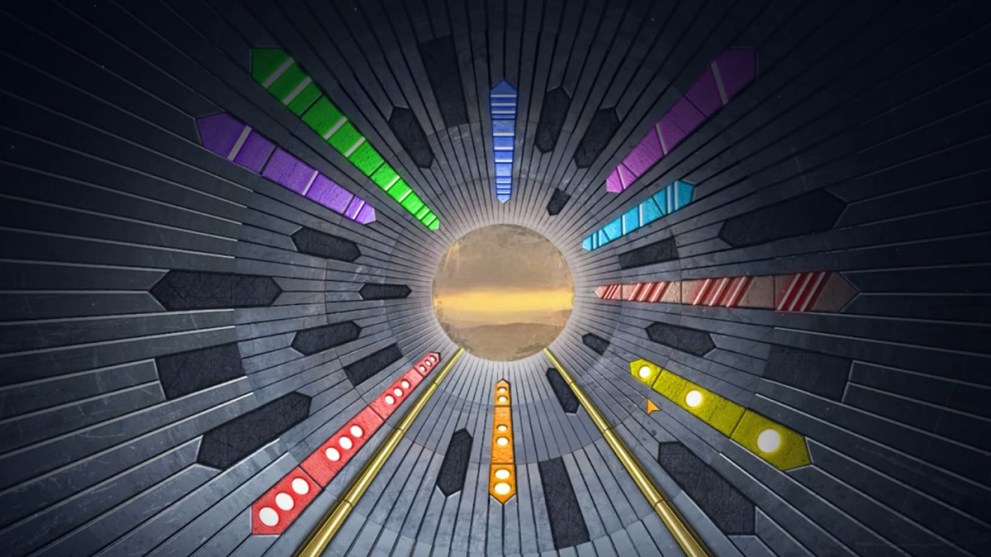
Rotate the parts of the mechanism so that all colored lines assemble correctly as shown in the image above.
- When it’s done, use it to investigate the rest of the area from above.
- Go downhill and enter the cave near the camp.
- You need to release the minotaur from the cage using the torch.
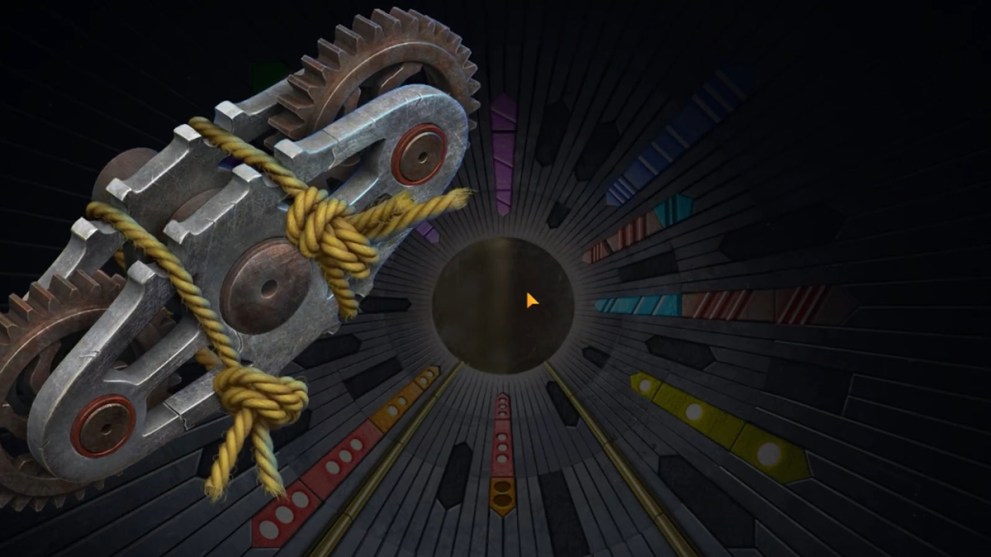
Fire Torch Puzzle
Once you pick up the torch from the cave, you need to return to the rotating mechanism on the hill and reassamble the parts to light up the torch.
- Use the cogwheels as shown above to turn the mechanism into a magnifying glass.
- The sunrays will help you fire up the torch.
- But before you can release the minotaur, you need to tranquilize the guards.
- Go back into the cave and prepare a sleep potion.
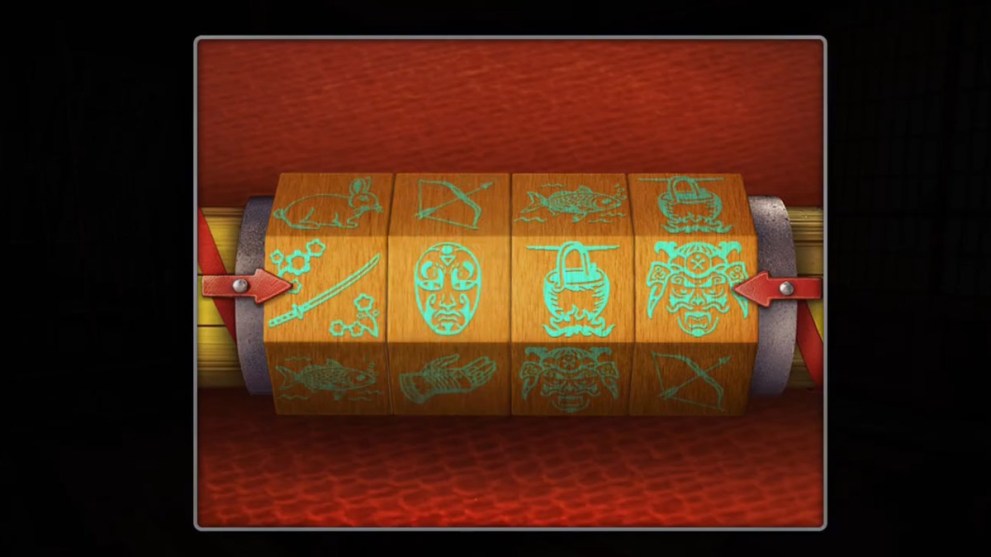
Syringe Chest Puzzle
Inside the cave, you’ll find a chest with a puzzle that involves animal tiles. Arrange them as shown above to unlock it.
- Fill the syringe with the sleep potion and tranquilize the guard.
- Once the guard falls asleep, pick up a notebook from his arms.
- This notebook contains the puzzle to the double daggers.
Double Dagger Puzzle
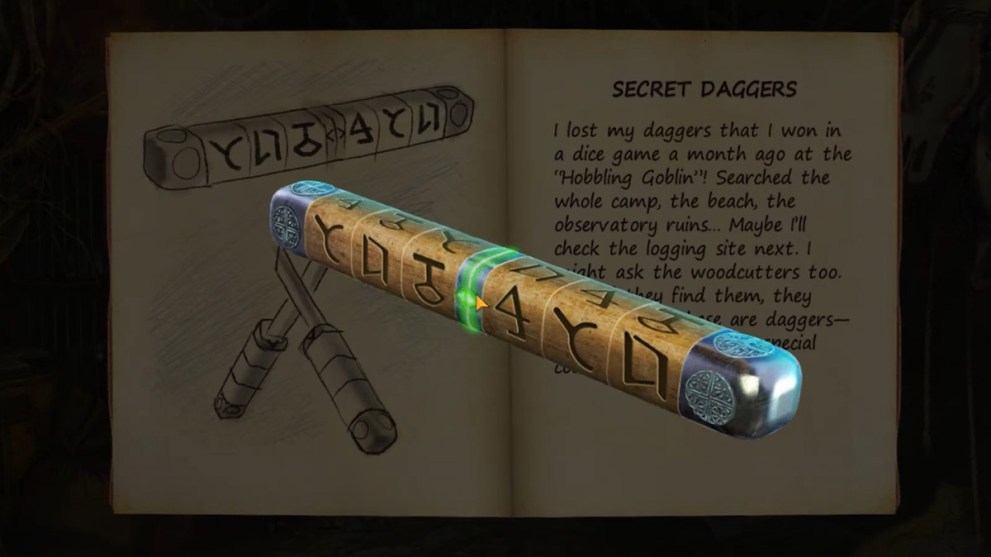
You need to assemble the symbols on both sides of the dagger as shown above to unlock them. After that, do the following:
- Now you can release the minotaur from his cage, as well as the rest of the animals.
- Go to the river bank and assemble the boat from the found wooden parts.
- Use the knives to cut the sack hanging on the tree by the river.
- Pick up a scoop and fill it with burning wood from the fireplace back at the camp.
- Use the wood to distract the honey bees at spawn and get some honey into the pot.
- Go back to the cave and make some wax from honey to fix the cracks on the boat.
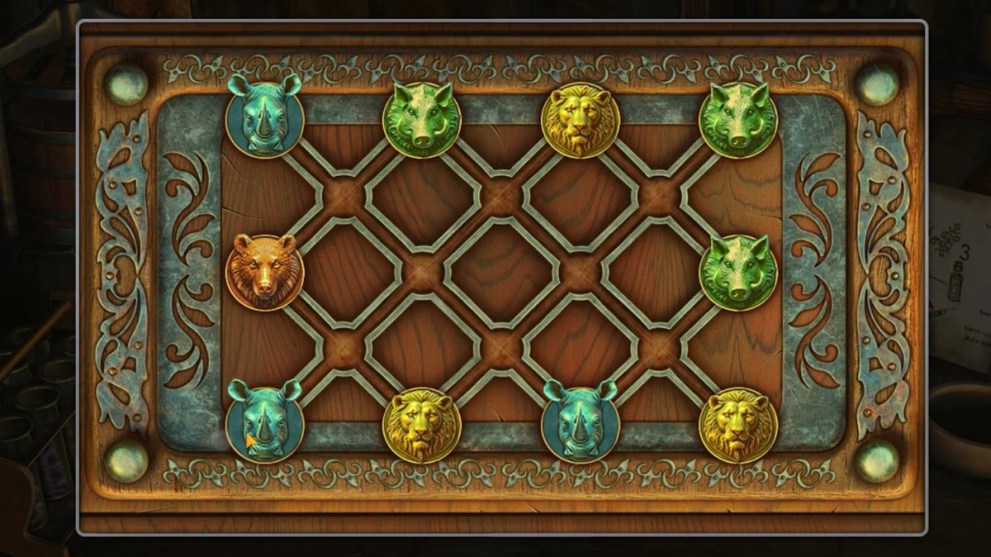
Hunter’s Guild Puzzle
Take the boat to the big city and speak to the guards at the Hunter’s Guild. You must enter the following numbers into the guild’s parchment: 2-5-1-3-4
- Use these numbers to enter the guild and receive a hint from one of the members.
- Return to the cave where you saved the minotaur and solve the puzzle to unlock the chest on the ground as shown above.
- Pick up the Girlur’s Box and other tools from the chest.
- Bring back the Girlur’s Box to the Hunter’s Guild and investigate the fountain outside.
- Pick up all the Kyols that you can get and visit Zair, the owner of the arena.
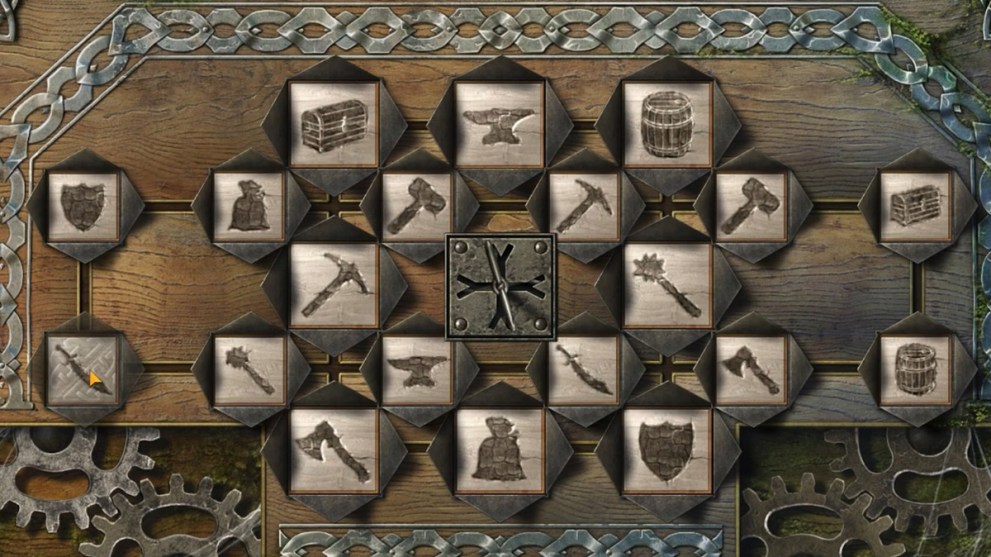
Armor Suit Puzzle
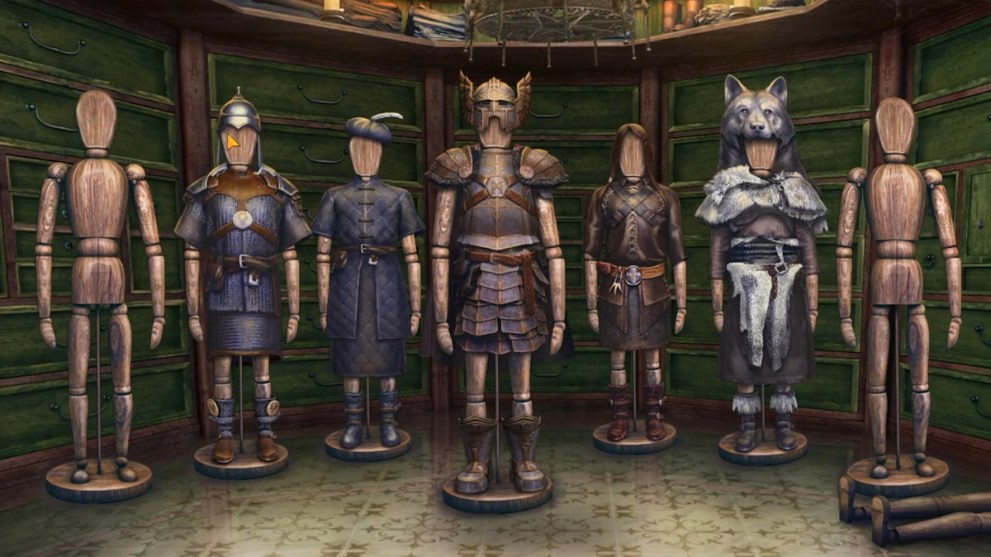
After speaking to Zair, you need to obtain the armor for your fight in the arena. Go back to the Hunter’s Guild and assemble the armor suits as shown in the image above.
- Pick up all the available keys from the guild, as well as the Girlur’s Box.
- Return to the camp where they kept the minotaur and start digging in the bottom right corner.
- You should be able to pick up a bottle with a message that includes a code to unlock the Girlur’s Box.
Girlur’s Box Puzzle
To unlock the Girlur’s Box, you need to press the three buttons in the sequence shown on the paper above.
- Press the button with two etches once.
- Press the button with one etche once.
- Press the button with four etches twice.
- Press the button with two etches once again.
- Press the button with one etche once again.
- Lastly, shift the metal lock to open the box
The Mace Puzzle
Return to the Hunter’s Guild and unlock the drawer with the mace for your fight in the arena by pressing the buttons as shown in the sequence above.
- Take the mace and go back to Zair.
- Now you can enter the arena and reach the prize chest.
- Here, you need to solve a series of timed puzzles.
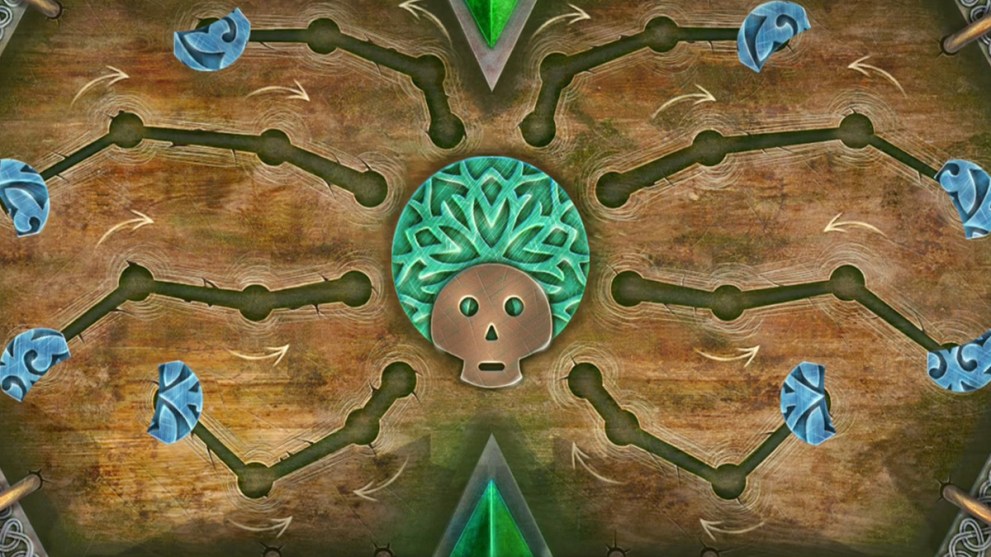
The Arena Puzzles
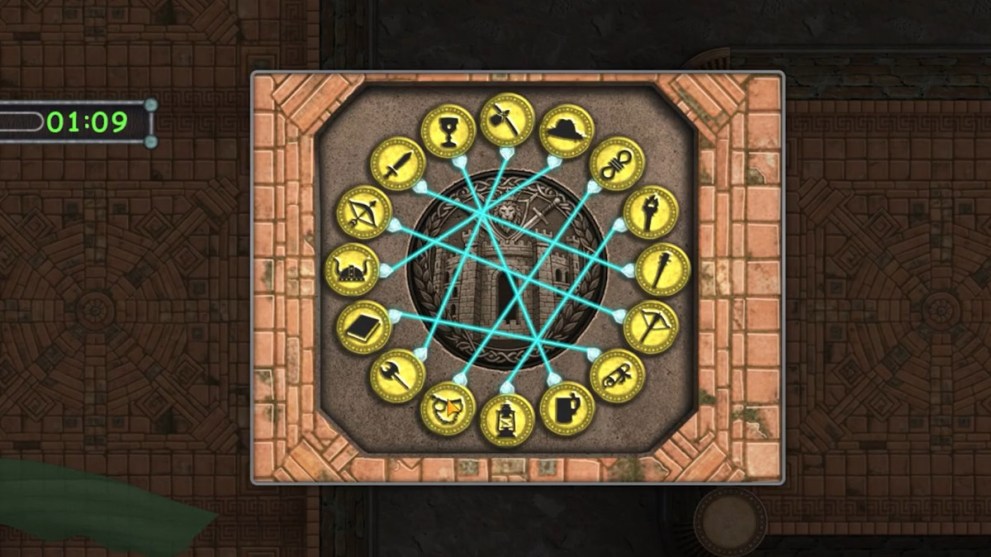
The first puzzle that you encounter in the arena requires you to connect specific symbols in about two minutes.
- Connect the symbols in the circle as shown in the image above.
- Keep moving across the arena until you reach a simple puzzle that requires you to assemble a mosaic image.
- The next one is similar to the second one, so you should have no problem solving it.
- To unlock the prize chest at the end, solve a simple labyrinth puzzle.
- Unfortunately, once you pick up your prize, the Young Prince will be chained.
Wooden Gate Lock Puzzle
Once you wake up in the shed, chained to the wall, use the fishing rod to release yourself from the clutches.
- As soon as you enter the yard, pick up a bird figurine to reveal the lock on the wooden gate.
- Assemble the three symbols on the puzzle using the arrow buttons as shown above.
- When you’re free again, you’ll arrive at the Chamber of Balance.
- Use your mace to crash the gargoyle statue and place its head into the slot on the wall.
Head in the Wall Puzzle
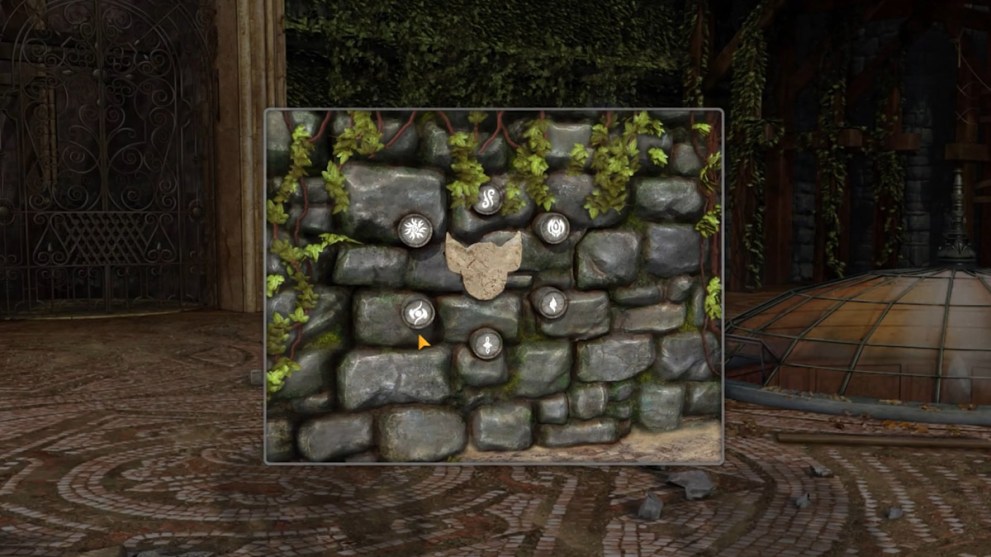
The Chamber of Balance holds the key to the puzzle on the wall, where you need to place the symbols into the slots as shown in the image above.
- This will unlock a secret niche behind the wall.
- Investigate the inside niche and pick up an antidote recipe.
- Study the recipe for all the ingredients that you need to find.
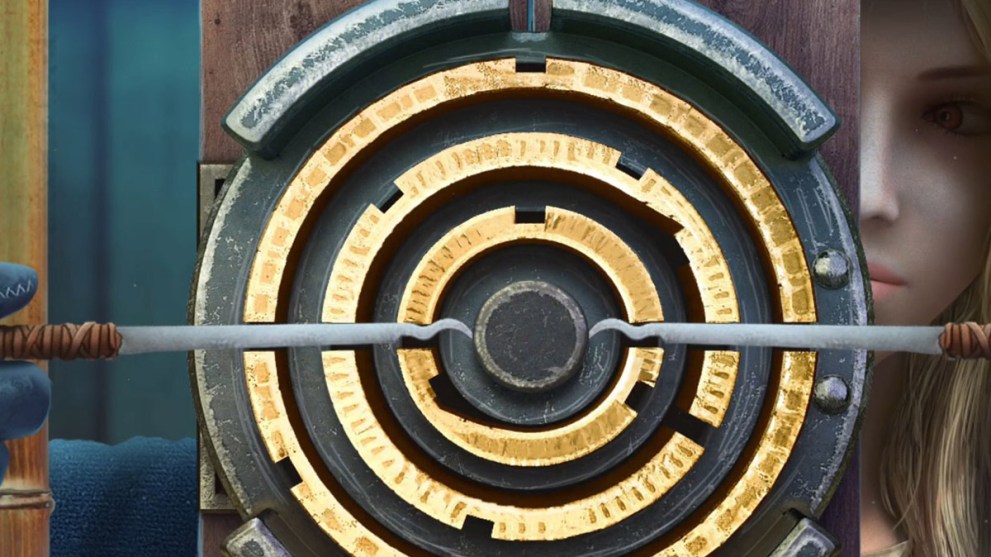
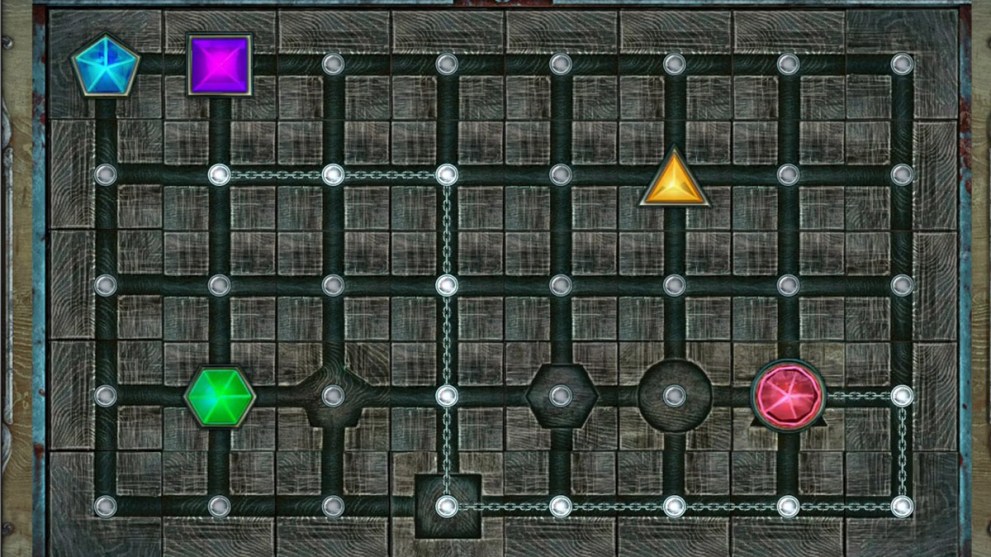
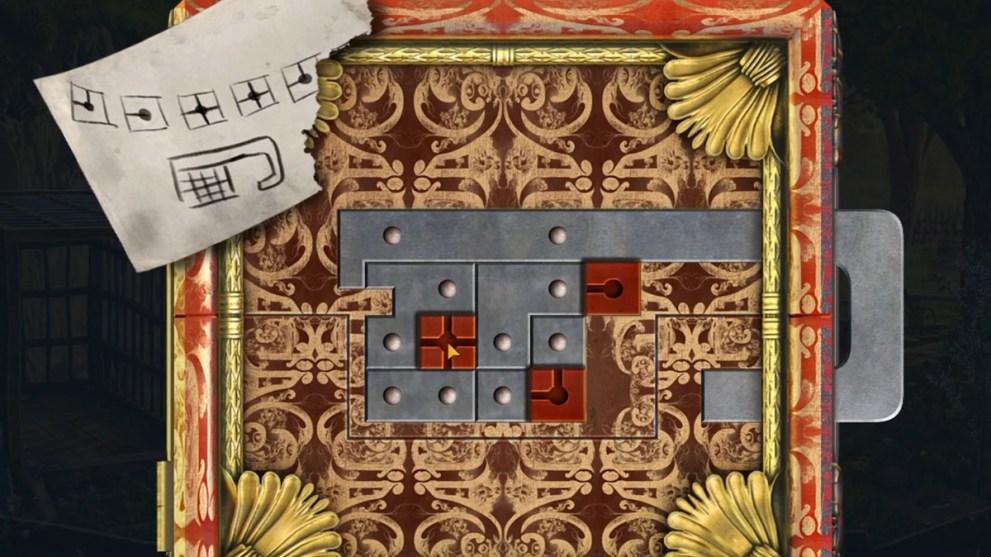
Wooden Door Puzzle
At the bottom of the elevator, in the right corner, you’ll see a wooden door with a complicated lock puzzle. You need to assemble all the symbols as shown in the image above to unlock it.
- Pick up all the ingredients from the antidote recipe once you unlock the door.
- Take all the ingredients back to the niche behind the wall and carefully assemble them.
- Once you obtain the sprayer, take it outside the tower.
- Pick up a crate with bottles from the bottom of the well and fill the sprayer with the liquid from the bottles.
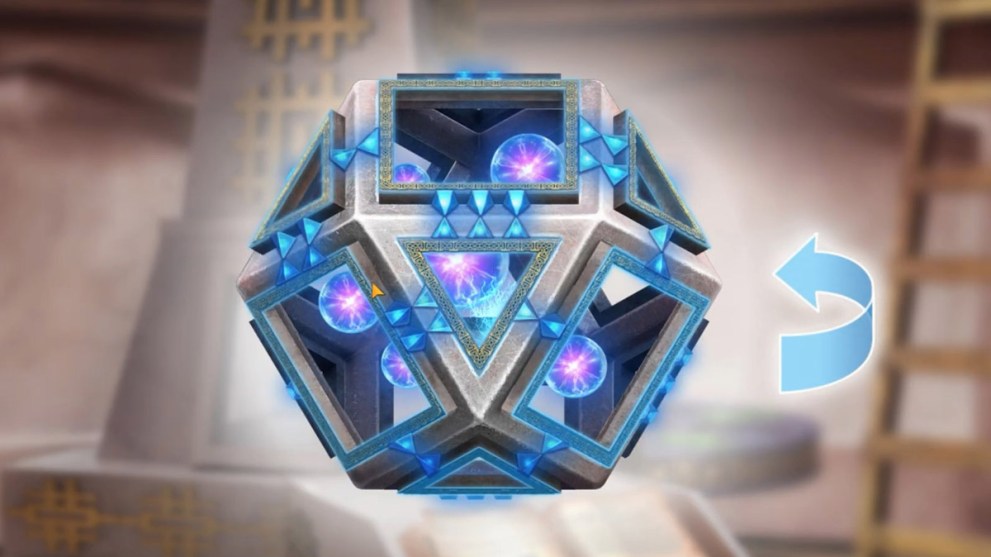
Glowing Lantern Puzzle
After you speak to a ranger back in town and obtain the lantern, go back to the camp and place it in the cage with mini’s fur.
- Rotate the colored gems on the lantern as shown above in the correct pattern, similar to Rubik’s Cube.
- Take the glowing lantern to Zair and find the trapdoor on the floor.
- Once you descend, you’ll encounter a chained minotaur inside.
Chained Minotaur Puzzle
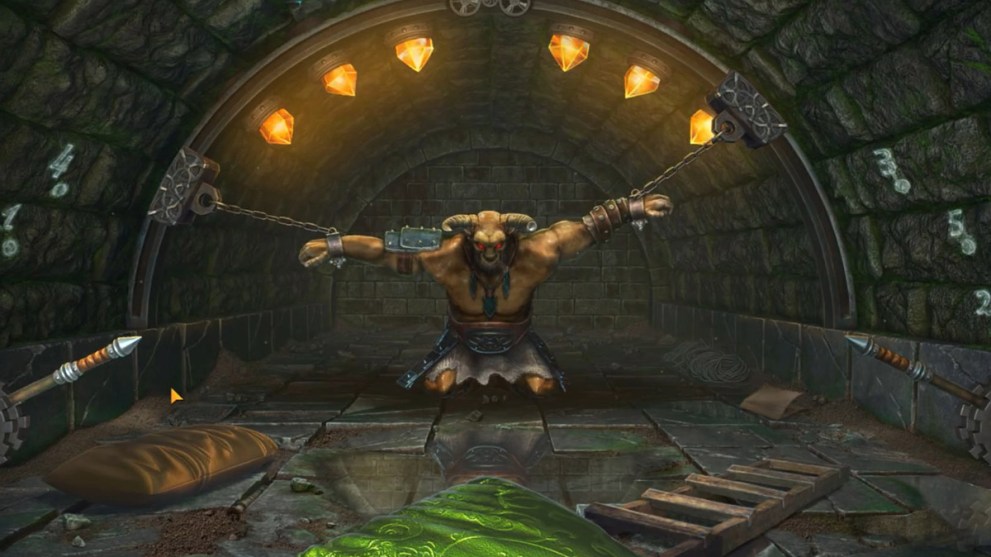
Use the levers on both sides of the tunnel to activate the crystals above the chained minotaur. Simply follow the sequence of the numbers 1, 2, 3, 4, 5, and 6 to release him.
- Use the antidote from the sprayer on the minotaur to bring him back to his senses.
- Then, direct him at the wall behind, so he can break it.
- Behind the broken wall, you’ll find a series of river flows, a sort of an aqueduct.
River Valves Puzzle

Here, you need to follow the streams and turn the valves accordingly. Once all the valves are activated, the secret door will unlock.
- You’ll end up in a dark maze, where you need to press the buttons in a sequence from left ot right.
- Once you reach the place for digging, pick up a bag of kyolls.
- In the end, give this bag to the statue of a frog to find your way out of the dungeon.
- Make your way back to the Hunter’s Guild and pick up a ranger’s diary.
- Pick up some corn from the field and head over to the yard with chickens, where they kept the Young Prince.
- Use the tools on the table to craft a Bear Gum.
- Add more ingredients in the campers’ cave and burn it in the Zair’s room using the burner.
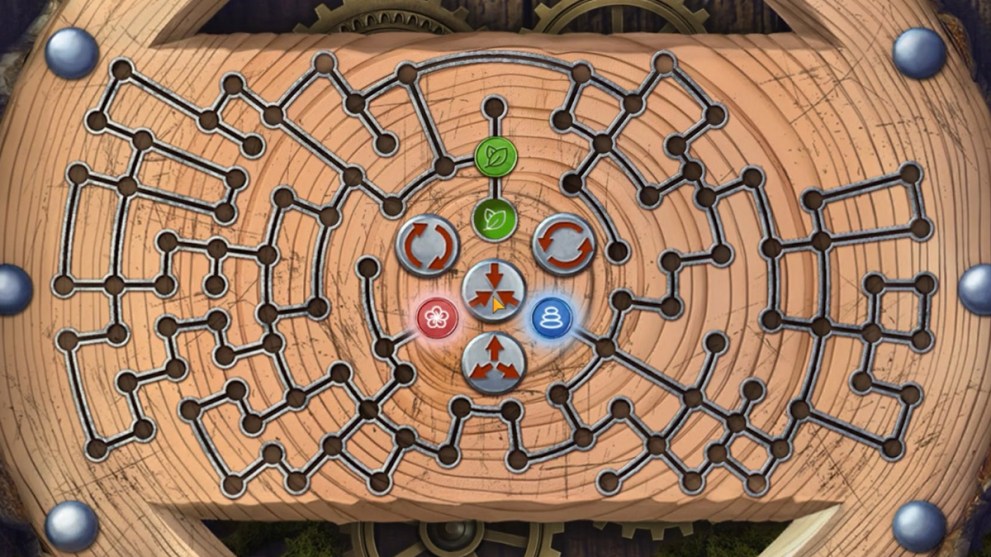
Magic Stabilizer Puzzle
Use the honey gum back at the Chamber of Balance as a sponge to remove the dirt from the old book. It’ll reveal the Magic Stabilizer puzzle, which you need to assemble as shown in the image above.
- This Magic Stabilizer will keep the anomaly in balance and allow the Young Prince to go back home.
- After a short discussion with Dudi and the minotaur, the Young Prince will be free.
- This final puzzle ends the second chapter.
That’s everything you need to know on how to complete the Lost Lands 11 walkthrough. For more guides, check out Rooms & Exits: Christmas Rescue Walkthrough Guide and Escape Simulator 2: Dracula’s Castle Walkthrough.


Updated: Jan 11, 2026 08:42 am