Lost Lands 9 continues the dramatic story of Folnur and Maaron as they defend the lands against a mysterious entity, uniting to stand up against evil. The game is full of puzzles and quests, so to help you complete each chapter, we have all solutions right here in our Lost Lands 9 walkthrough.
Recommended Videos
Table of contents
- Chapter 1: Unchildlike Mischief
- Chapter 2: Academic Interest
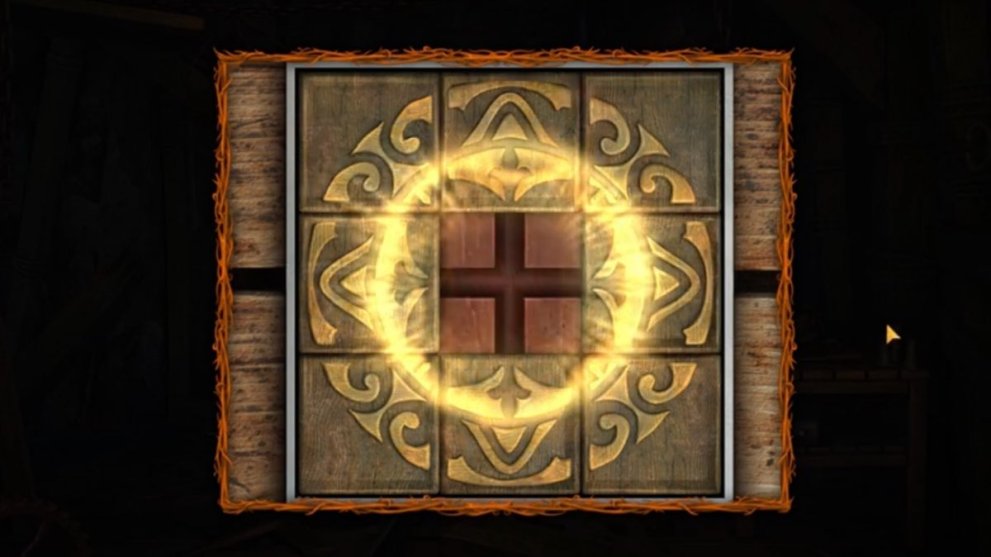
- Rainbow Circle Puzzle
- Bird Puzzle
- Metal Door Code Puzzle
- Hidden Object Puzzle 2
- Crystal Star Puzzle
- Element Casket Box Puzzle
- Portal Puzzle
- Castle Gate Puzzle
- Tent Spell Puzzle
- Tree Chest Puzzle
- Healing Ointment Puzzle
- Bottomless Bag Puzzle
- Talking Mask Ingredients
- Puzzle Piece Chest
- Blank Masks Puzzle
- Talking Mask Ritual Puzzle
- Trilly Valley Portal Puzzle
- Making the horse move
- Chalkboard Puzzle
- Hidden Object Puzzle 3
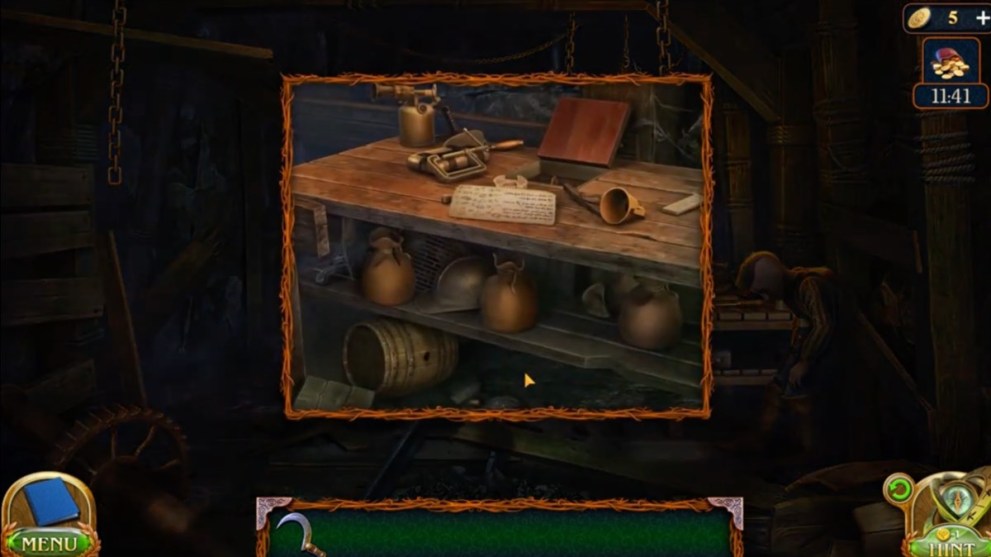
- Mining Bench Puzzle
- Chapter 3: First Brotherhood
- Keg of Gunpowder Puzzle
- Mine Cart Puzzle
- Tree Puzzle
- Castle Gate Puzzle
- Embroidery Hoop Puzzle
- Chameleon Hidden Object Puzzle
- Castle Portal Puzzle
- Library Door Puzzle
- Enchantment Potions
- Crystal Flames Puzzle
- Cat’s Intutition Potion
- Elephant’s Memory Potion
- Hidden Key Puzzle
- Office Back Door Puzzle
- Hidden Object Puzzle 4
- Animal Cabinet Puzzle
- Leaf Pattern Pieces
- Wardrobe Figure Puzzle
- Canyon Portal Puzzle
- Well Tile Puzzle
- Tower Steps Puzzle
- Tower Rings Puzzle
- Crystal Podium Puzzle
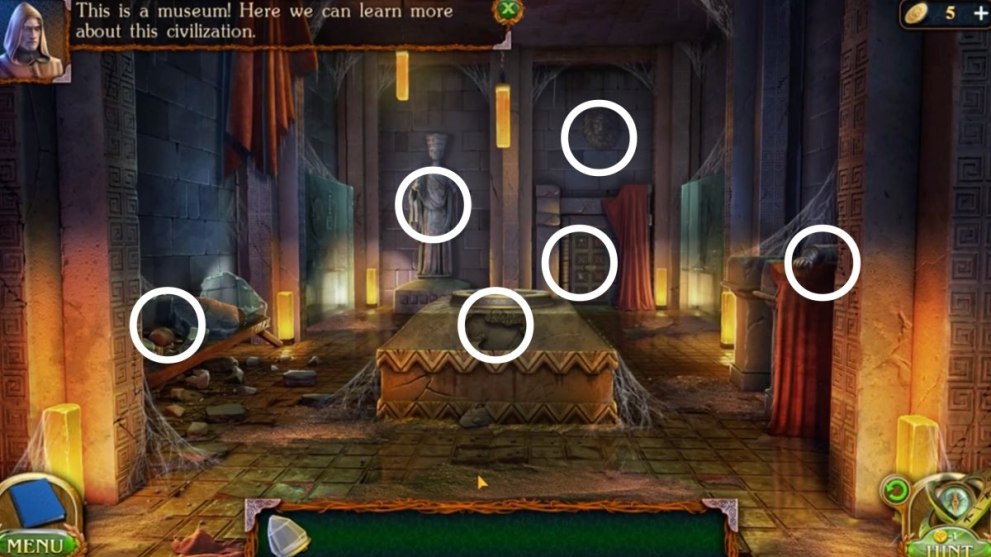
- Museum Door Lock Puzzle
- Hidden Object Puzzle 5
- Diving Helmet Puzzle
- Powering the Generator
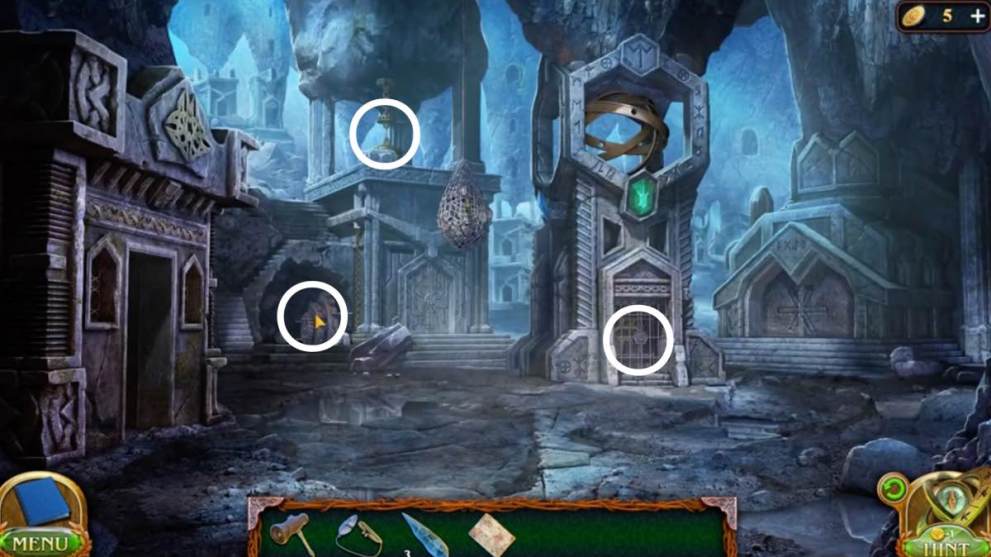
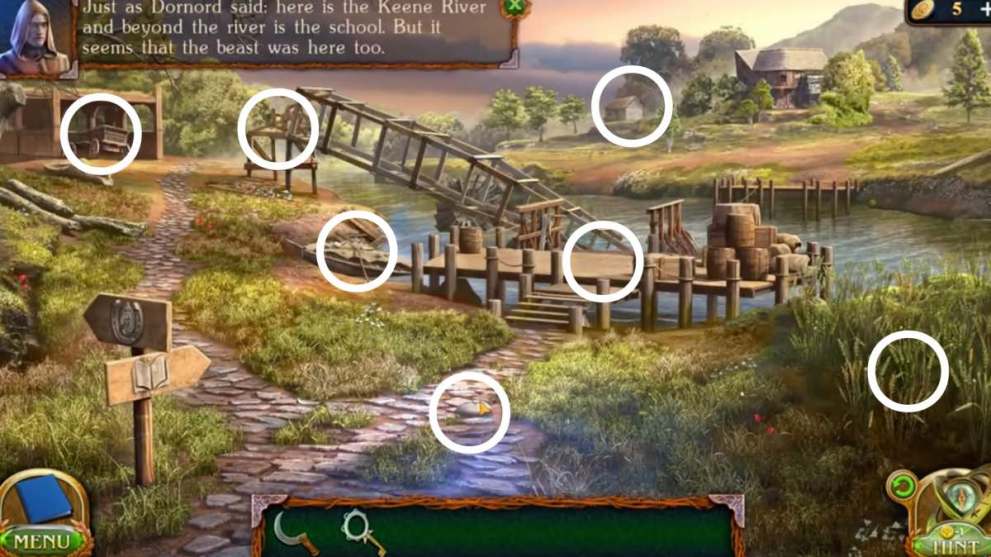
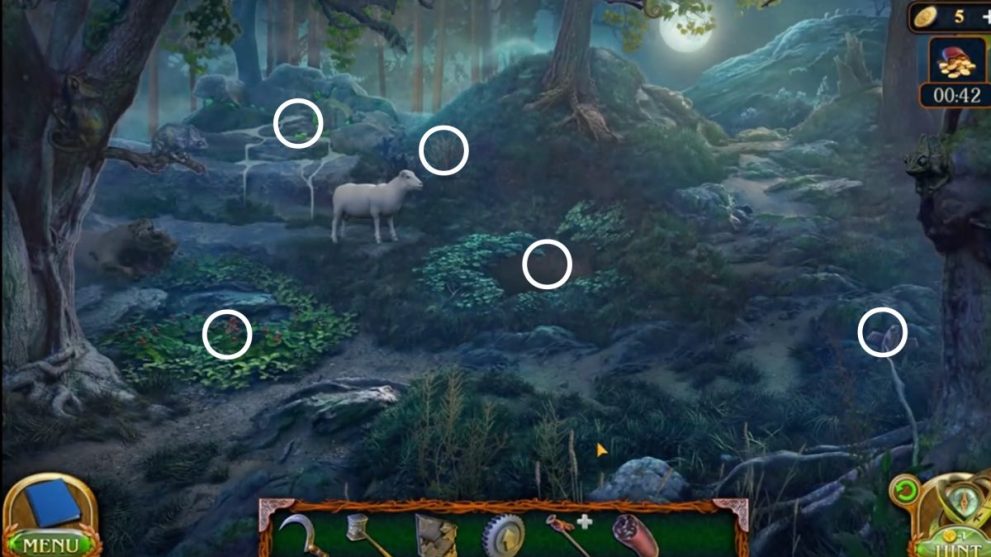
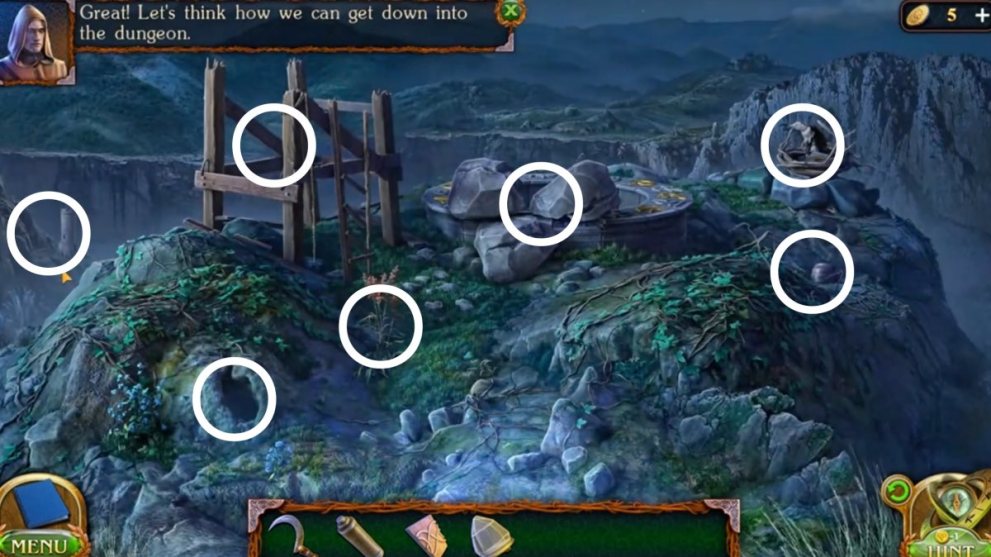
Chapter 1: Unchildlike Mischief

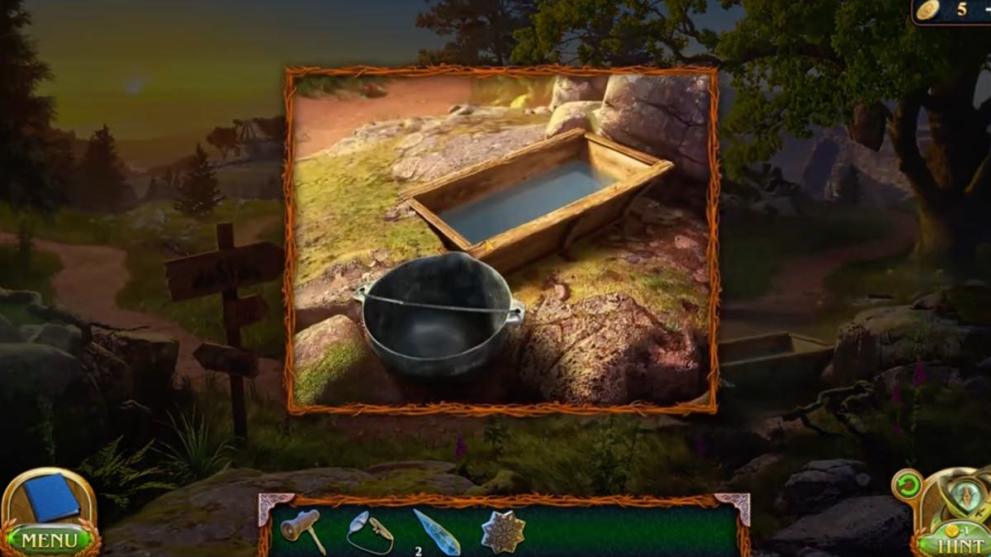
- Take the iron flower from the trough.
- Take the stick from the signpost.
- Hit the beehive with the stick.
- Take the screwdrive piece from the signpost.
- Put the iron flower in the obelisk.
- Head right along the road.
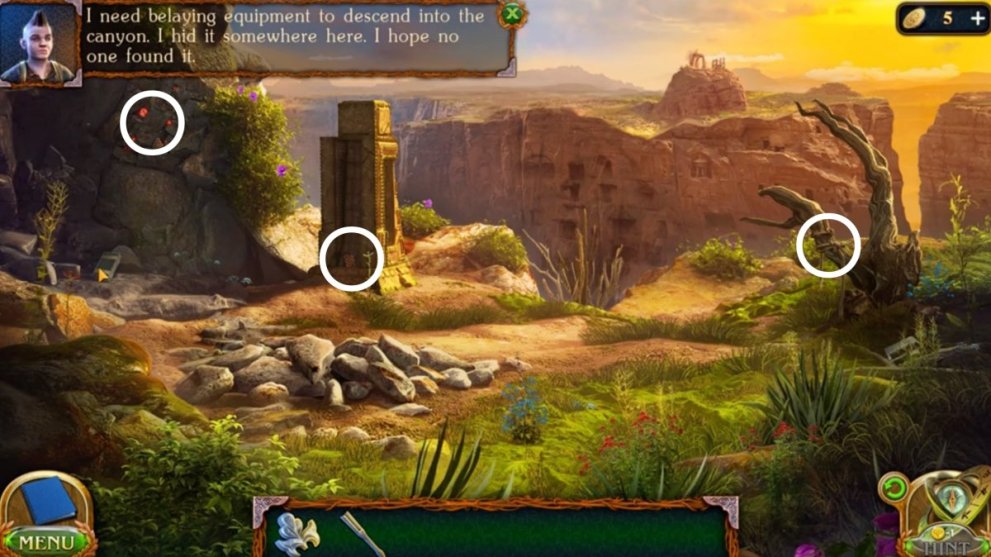
- Take the ascender from by the tree.
- Take the wooden honeycomb from the pedestal, the tree on the right, and by the rocks.
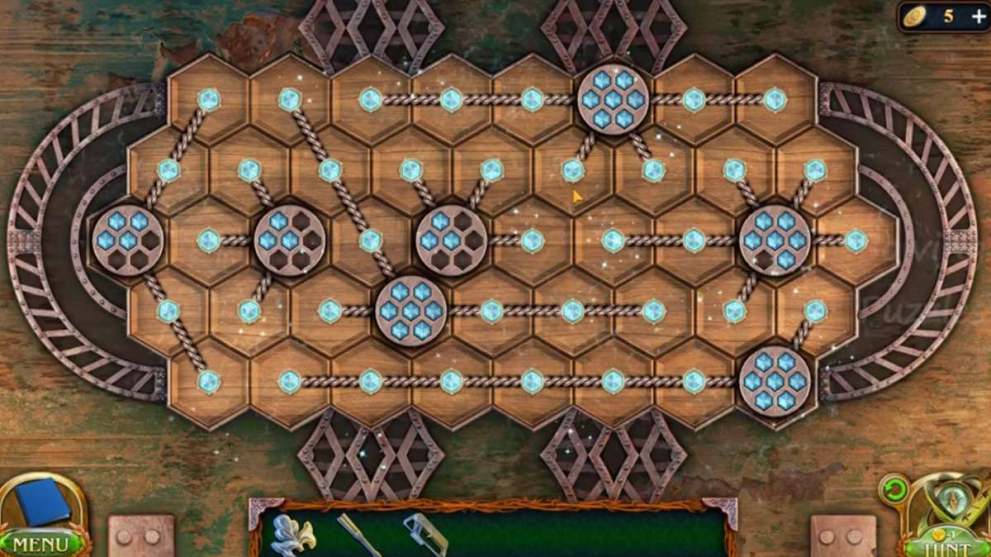
- Get the chest from the pile of rocks and use the wooden honeycomb.
- Solve the puzzle by using the threads to fill all honeycombs, and get the rope and key.
Honeycomb Puzzle
- Tie the rope to the tree.
- Put the ascender on the rope.
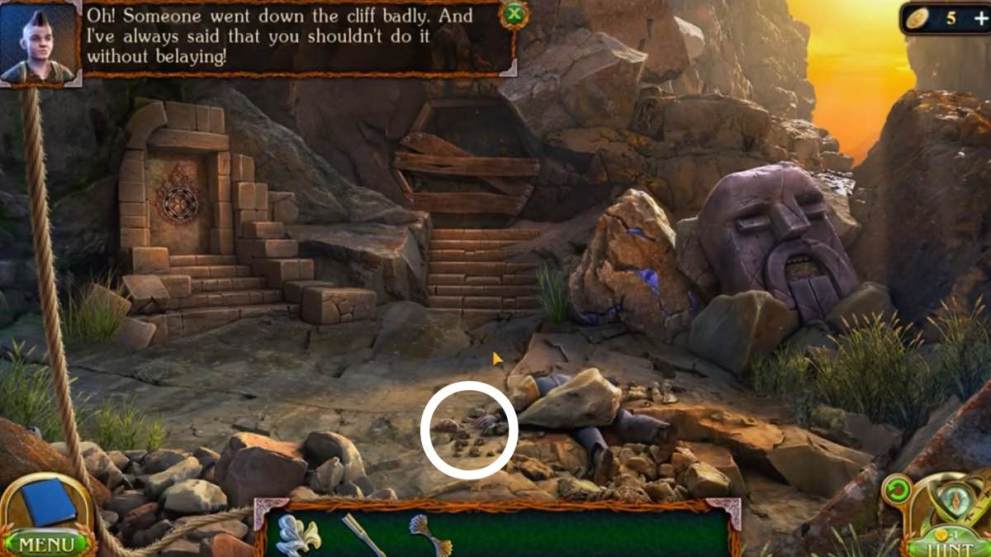
- Go down into the canyon.
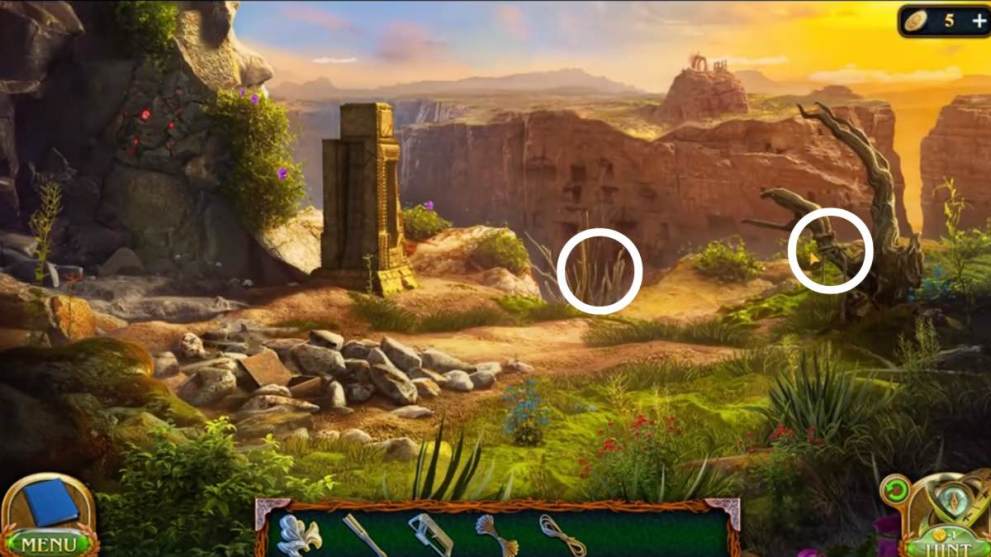
- Take the traveller’s key from the body.
- Click the flask.
- Click the figure to the right.
Dragon Snake Puzzle
- Solve the puzzle by placing the dragons/snakes with one head per column.
- Get the rest of the screwdriver.
- Connect the screwdriver pieces.
- Go back to the village where you started using the green back button twice.
- Use the traveller’s key to open the locked bag by the fire pit.
- Take the flint.
- Go left along the road.
- Use the screwdriver on the lion head on the door.
- Take the iron flower from the fountain.
- Place the lion head on the statue.

- Get the barn key.
- Use the barn key on the door to the right.
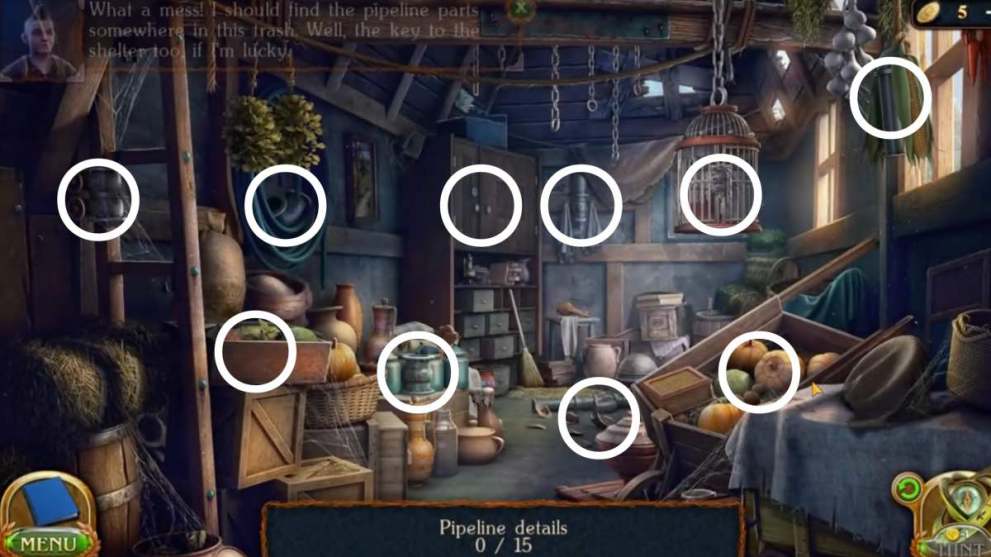
- Find the key under the books to unlock the cupboard.
- Take 15 plumbing parts.
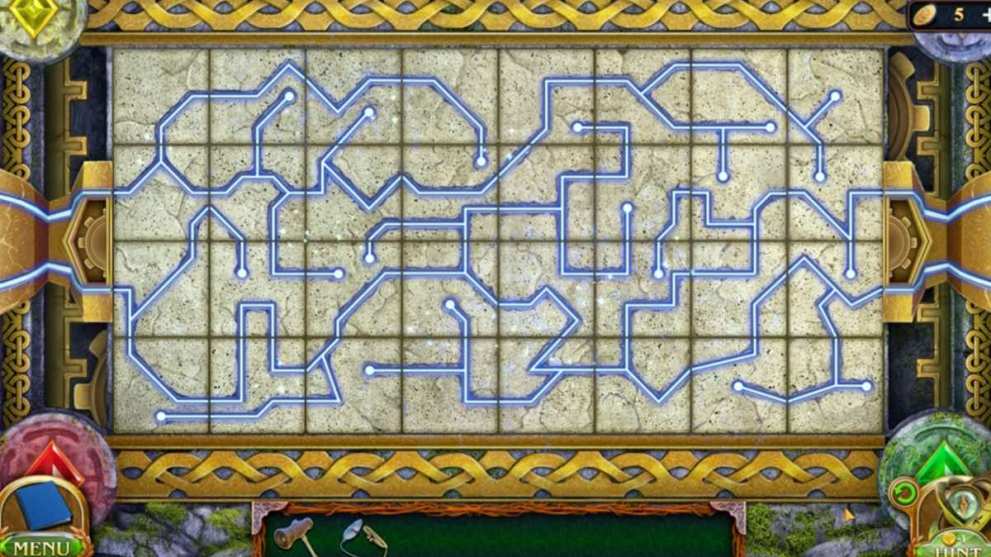
Hidden Object Puzzle 1
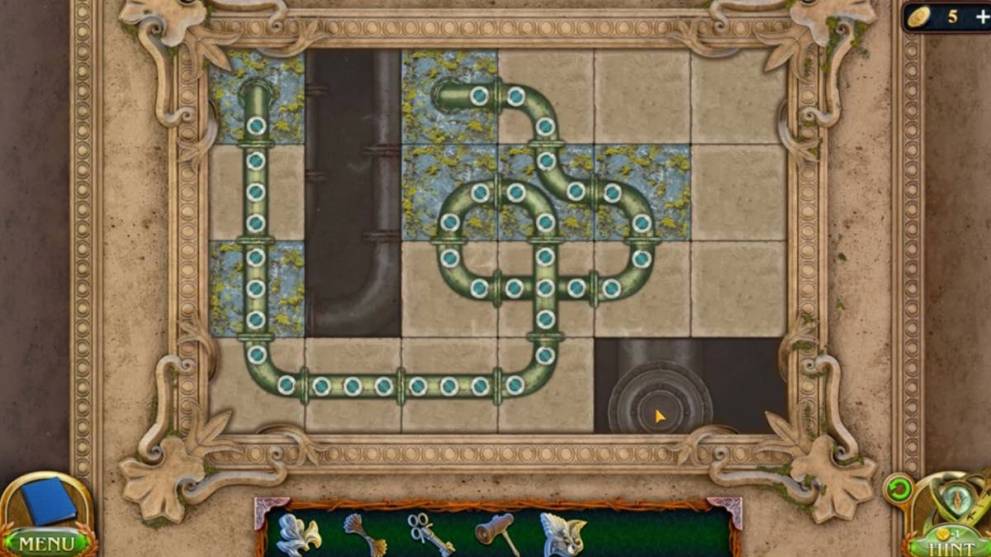
- Solve the 3 puzzles by connecting the pipes until they form a connected pipe. This is randomly generated for each player, so has no set solution.
- Use the screwdriver to open the grate for the drain in the fountain.
- Get the shelter key.
- Head to the canyon.
- Use the shelter keys on the door.
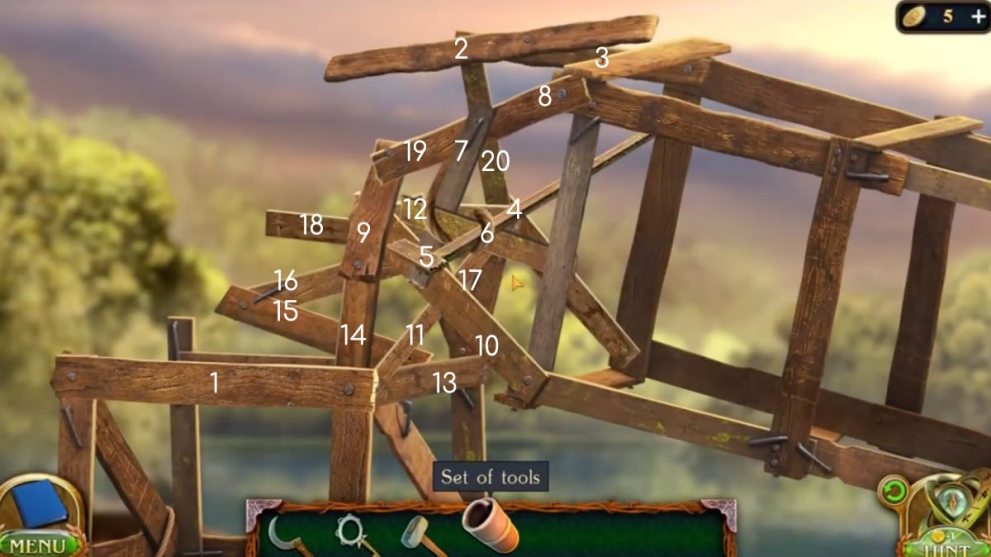
- Place the grindstone on the bench.
- Take the red belt and place it on the gears.
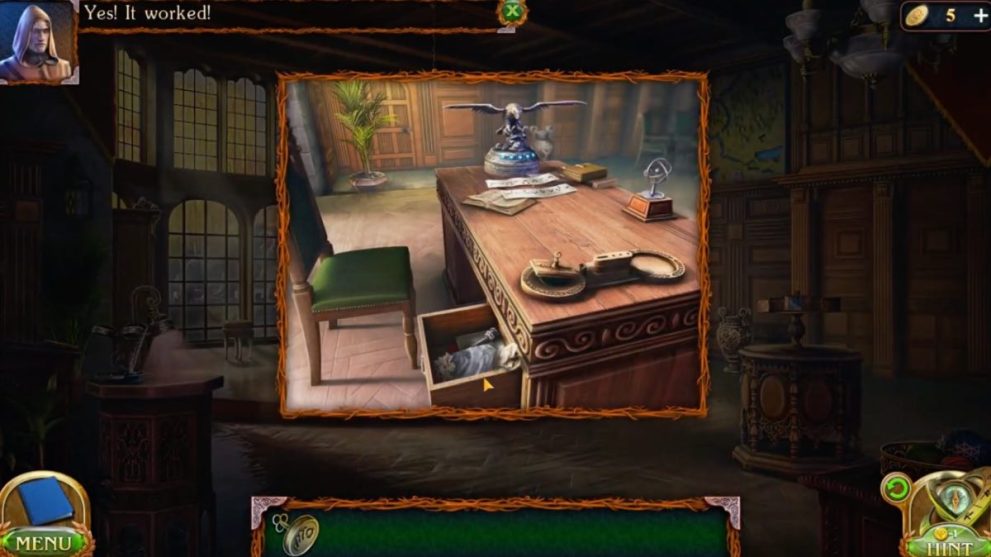
- Look closer at the gemstone clamps on the desk.
- Pick up the iron flower.
- Get the toolset chest key and unlock the chest.
- Get the gear transmitter and hammer.
- Place the transmitter on the grindstone bench.
- Solve the puzzle by placing the gears and slide everything into place.

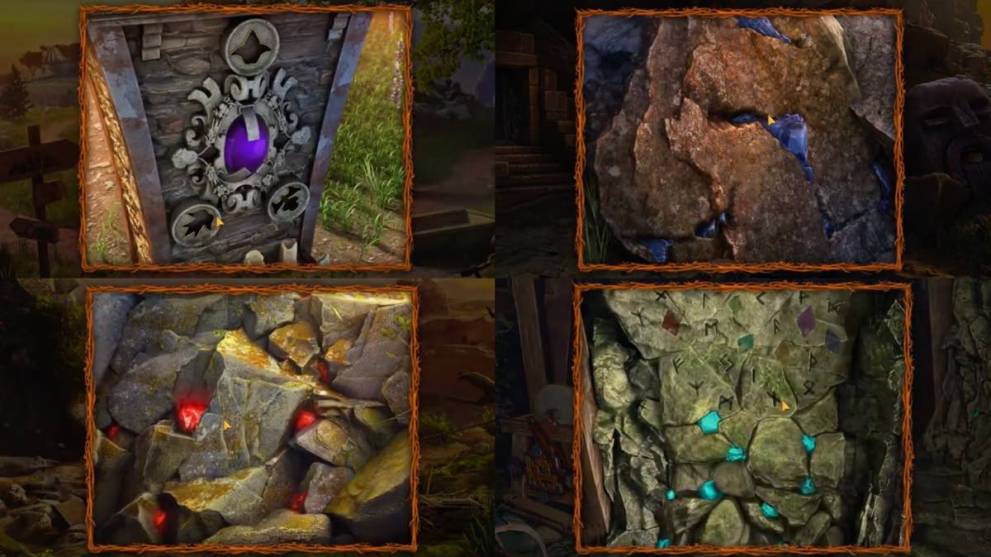
- Go back to the canyon.
- Use the hammer to get red stones from the rocks.
- Go back again.
- Use the hammer again to get purple/blue stones.
- Go back again.
- Use the iron flowers in the missing spots to get the purple gem.
- Go to the shelter.
- Use the hammer to get azure stones from the rocks.
- Place all stones on the grindstone bench.
- Go to the starting location.
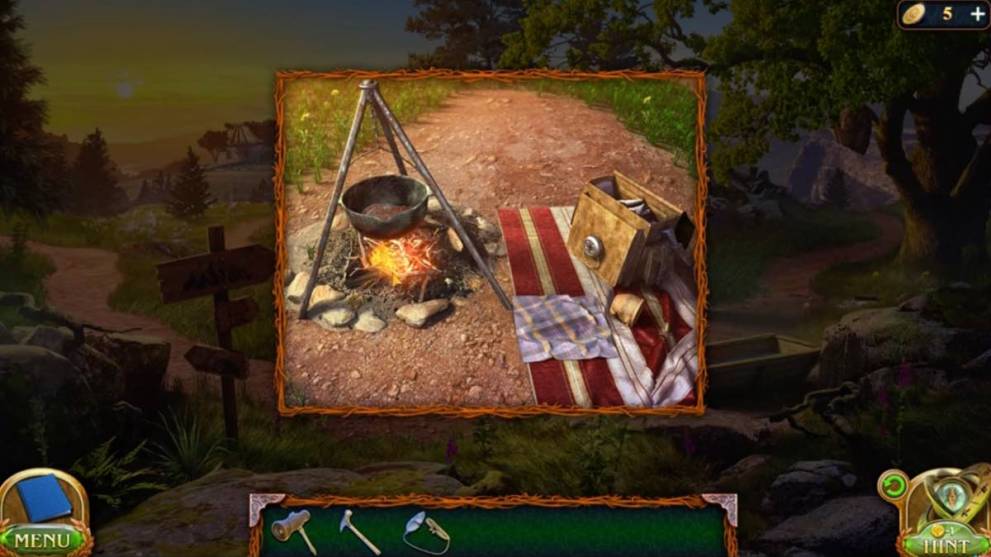
- Take meat from the unlocked bag and place it on the pot on the fire.
- Get brushwood from a nearby tree.
- Place the brushwood on the firepit and try to use the flint.
- Head to the canyon and take the flask of alcohol.
- Go back.
- Use the alcohol and flint to start a fire.
- Use the mug to get fat from the cooking meat.
- Go to the shelter.
- Use the fat to grease the grinding machine.
- Start the machine.
- Drag each stone to the sharpener to get crystals.
- Put the clamps on and then the crystals.
Rainbow Crystal Puzzle
- Use the hammer and break the crystals to reveal the puzzle.
- Solve the puzzle by getting all colored tile patterns to match. This is randomised for each player, so there is no set solution.

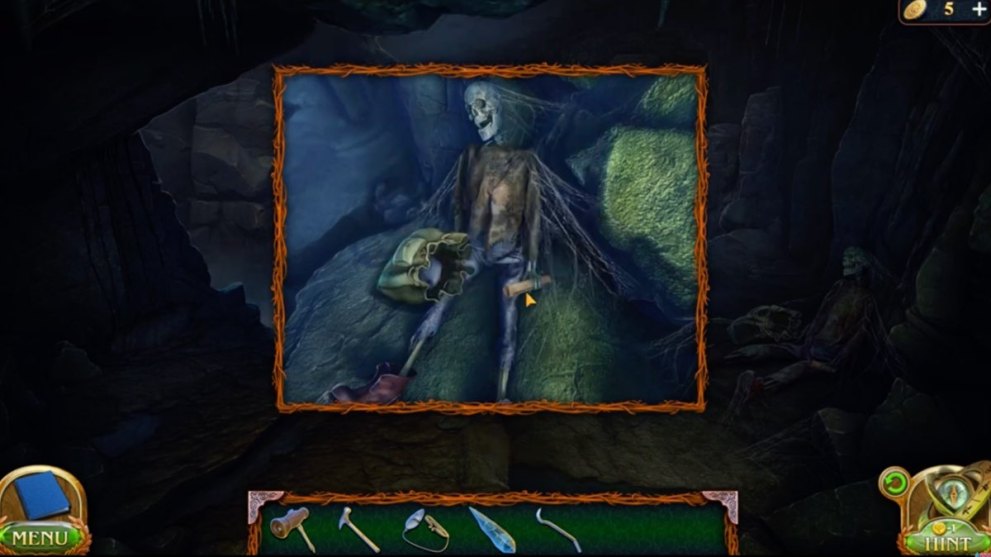
- Head right.
- Click the skeleton.
- Look at the note to find a clue to the next puzzle.
- Take the crystal and the pry bar.
- Take the crystal from the statue.
- Go back x3.
- Use the pry bar on the boarded up doors.
- Get the board.
- Go to the first location.
- Get the pot from the fire.
- Take it to the trough.
- Get a pot of water.
- Head right, then down and left, and then right again.
- Use the board to get to the seal.
- Take the seal and pick up the board.
- Place the board to make a bridge across the gap.
- You will need more boards so head back x 3.
- Take the nails by the door.
- Take more boards.
- Combine the boards, nails and hammer to get a self-made bridge.
- Head left, then right.

- Place the self-made bridge to get across the gap.
- Put the water from the pot into the statue container and take back the pot.
- Go back.
- Get the pot and find the boiling puddle by the rock.
- Get the black oil.
- Take it back to the statue and pour it in.
- Use the flint.
- Place the ancient seal.
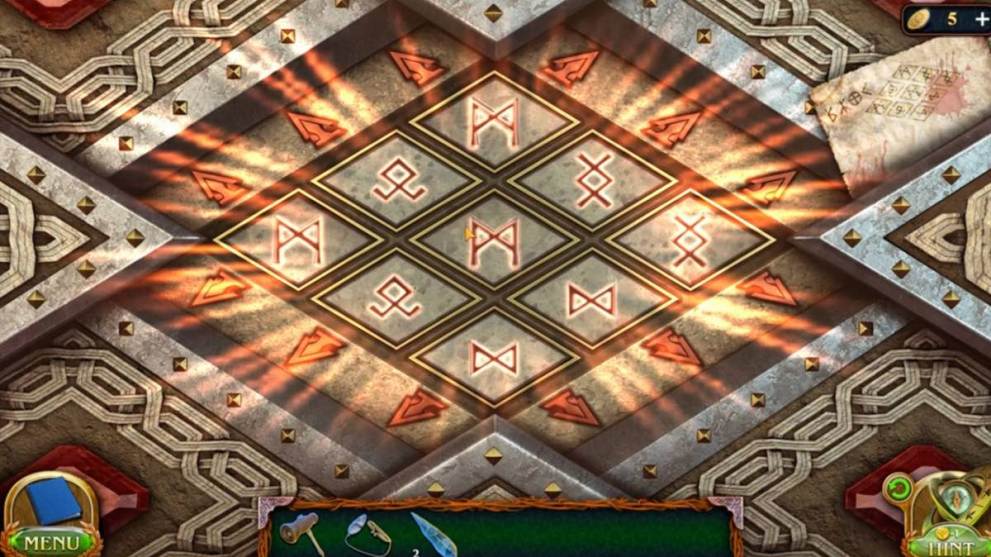
- Solve the puzzle by matching the glyphs with the ones on the note found by the skeleton.
Glyph Puzzle
- Click the metal gear.
- Move the stone by the gear and take the crystal.
- Take the shaft lock on the right.
- Use the shaft lock on the gear.
- Take the broken connector from the bell.
- Go left to the kiln area.
- Use the broken connector from the bell on the kiln.
- Collect the missing objects.
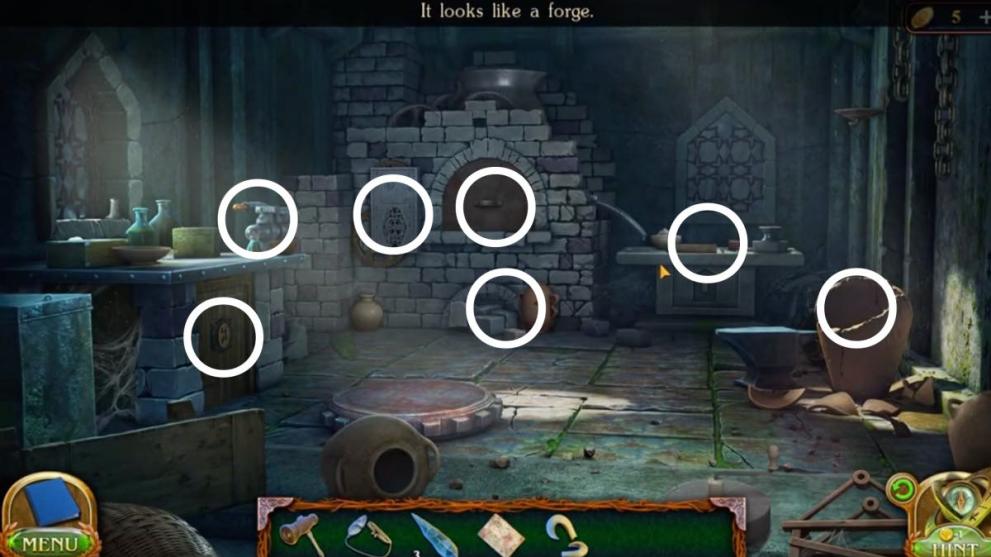
- Get the two buttons and put them in the slots on the locker to start the forge puzzle.
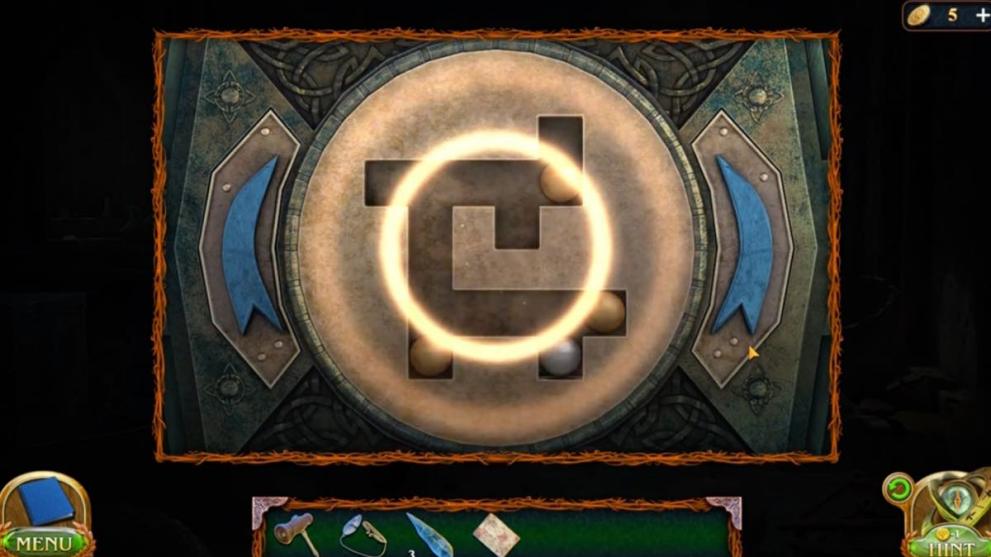
Forge Puzzle
- Solve the puzzle by rotating it left or right to move the balls: Lx2, R, Lx2, Rx3, L, R, L.
- Get the bellows.
- Use the needle on the mould.
- Use the board to repair the frame.
- Pour powder in the frame.
- Pour water in the frame.
- Mix it using the needle.
- Place the connector in the frame.
- Put coals in the forge.
- Put the bellows beneath.
- Place the lever on the gear box.
- Use lighter fluid on the coals.
- Use the bellows.
- Crank the box by the forge to pour into the mould.
- Use the pliers to lift the connector from the mould.
- Put the hot connector into the water.
- Use the hammer and the anvil to finish.
- Back at Dungeon City, interact with the bell.
- Place the connector.
- Use the gear to lift the bell.
- Get the crystal and figurine from beneath it.
- Go to the locked gate with the missing hourglass piece.
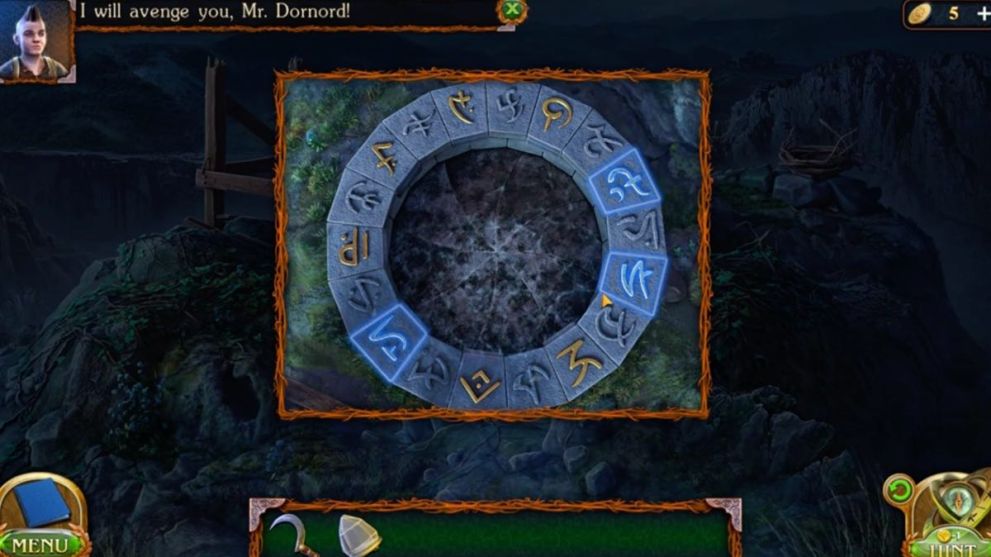
Hourglass Puzzle
- Solve the hourglass puzzle by forming all the octagon pieces together and making sure the purple lines are all connected. This is a randomized puzzle, so there is no set solution.
- When the bell rings, interact with the door under the bell tower.

- Use the note to solve the glyph puzzle and press the glyphs in order: upside-down R, stick figure, crosshair, arrow.
- Interact with the alter.
- Find the rest of the crystals.
- Place all crystals into the candlesticks and take the quill.
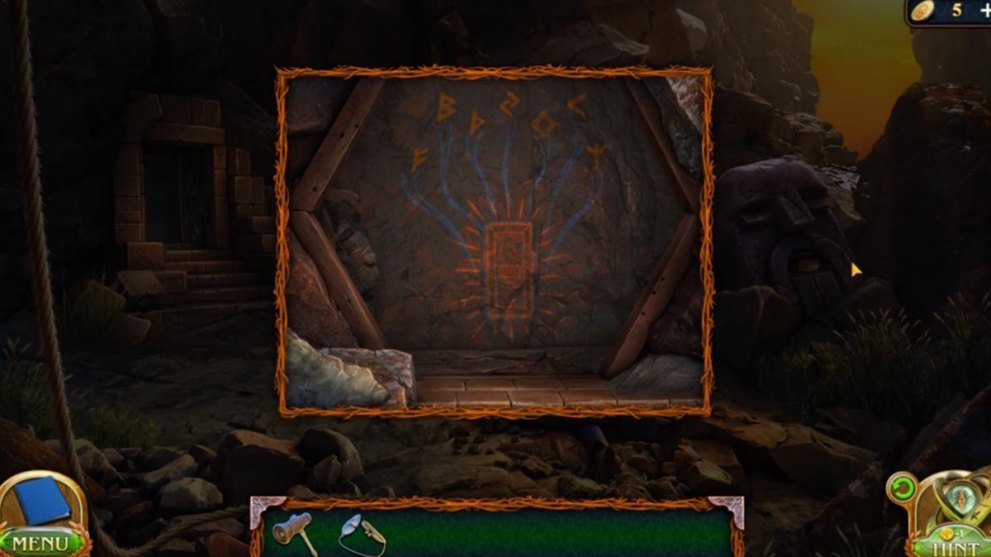
Sarcophagus Glyph Puzzle
- Use the quill and select the glyphs in the right order as seen on the wall behind the boards we took earlier: F, B, P, Connected Arrows, Diamond, Single Arrow, Fork.
- Solve the puzzle by rotating each tile until the lines glow. The puzzle is random for each player, so there is no set solution. We recommend moving from left to right and turning each tile until the path lights up, and then working back to flip any that flipped back.
- Use the screwdriver on the broken well.
- Look into the well and use the dagger to cut the rope.
- Use the end of the rope to tie the beam on the house door.
- Try using the wrench on the well to find it will not work yet.
- Open the shed and find the tools.
- Go to the backyard by clicking the barn.
- Use the hook and cable to get the beam from the door.
- Click the broken ladder by the barn.
- Get the planks nearby.
- Repair the ladder by placing the planks to form steps. Use the long planks first then fit the smaller pieces in.
- Use the ladder to reach the reel but find the cable is caught.
- Go to the yard and get the wire cutters from the shed.
- Use the cutters to cut the cable.
- Pick up the power multipull.
- Go back to the yard again and use the dagger on the rope.
- Put the multipull hook on the beam and connect the rope.
- Use the wrench on the well and unblock the door.
- Go to the village and get the grilled meat from the firepit.
- Get back to the house and place the meat by the log so the dog moves to get it.
- Get the collar.
- Combine the screwdriver and the collar to get the secret key.
- Unlock the door to the house.
- Interact with the woman in the chair.
- Check the oven.
- Go right to the curtain and through to the kitchen.
- Find all 16 of the medicine ingredients.
- Reassemble the juicer:
- Put the bucket on the stone.
- Attach the handle.
- Place the spout.
- Add the rods.
- Put the top of the bucket on the rod.
- Collect the juicer.
Medicine Hidden Object Puzzle

- Go back to the yard.
- Get the axe from the shed.
- Use the axe on the broken window in the house.
- Climb through.
- In the garden, use the axe on the dead tree.
- Use the axe again to get firewood.
- Go back inside and place the wood in the oven.
- Use the flint to start a fire.
- Put the ingredients on the counter to make the medicine.
- Use the instructions hanging on the left to craft the medicine.
- Give the medicine to the woman in the chair.
- Take the cabinet key.
- Use the key on the cabinet in the back right corner.
Cabinet Puzzle
- Solve the puzzle by moving the shapes to the correct slots and ensuring no lines overlap.

- Get the family seal and the gate key.
- Go to the backyard to the barn and use the key.
- At the cliffside you will find a wagon.
- Look closer to find a patterned chip.
- Check the gap in the path to find a chest.
- Go back to the yard to get a shovel from the shed.
- Get the leash from the log.
- Go back to the chest and use the leash on the chest.
- Use the shovel to get the chest out.
- Put the patterned chip on the chest.
Chest Puzzle
- Solve the puzzle by rotating the symbols to create the one shown in the center. There will be 14 of these. Rotate and select the symbols that match the center symbol.
- Take the potion.
- Check the crypt to see what you have to do next.
- Go to the yard and get the hoe from the shed.
- Go back to the backyard and get the bags of flower seeds:
- Purple
- Green
- Blue
- Red
- Go to the garden and go to the flower bed in the left corner.
- Clear the weeds and use the hoe to turn the dirt.
- Put the seeds in the ground.
- Go to the school yard and check the fountain.
- Grab the jug on the fountain and take some water.
- Add the potion to the jug.
- Go to the garden and water the seeds with the potion water.
- Cut the flowers with your dagger.
- Go to the grave.
Grave Flower Puzzle
- Place the flowers on the correct graves according to the pictures on the crypt.
- Add the family seal to the door and solve the puzzle.
- Solve the puzzle by using the arrows to move the gemstones until they reach their proper slots. This puzzle is randomly generated, so there is no set solution.
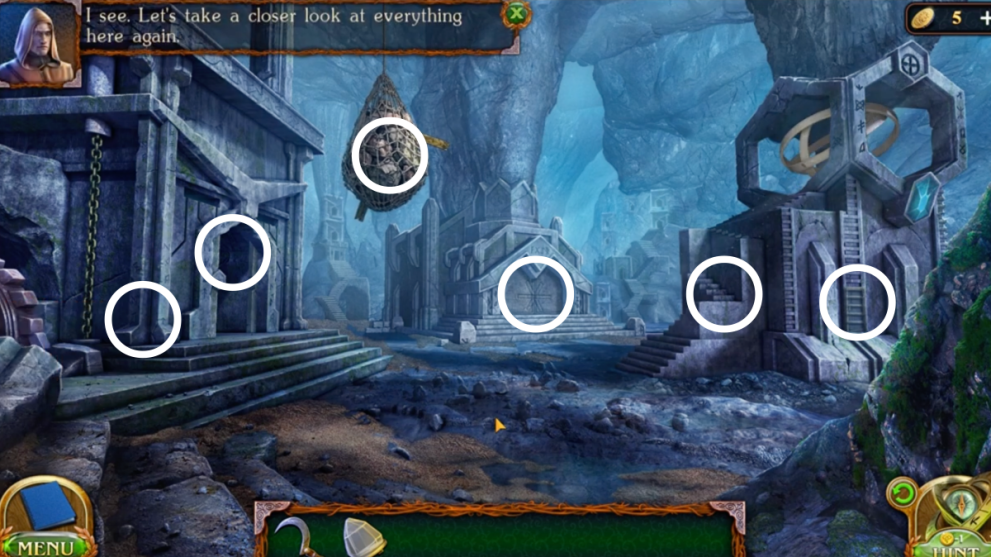
Chapter 2: Academic Interest
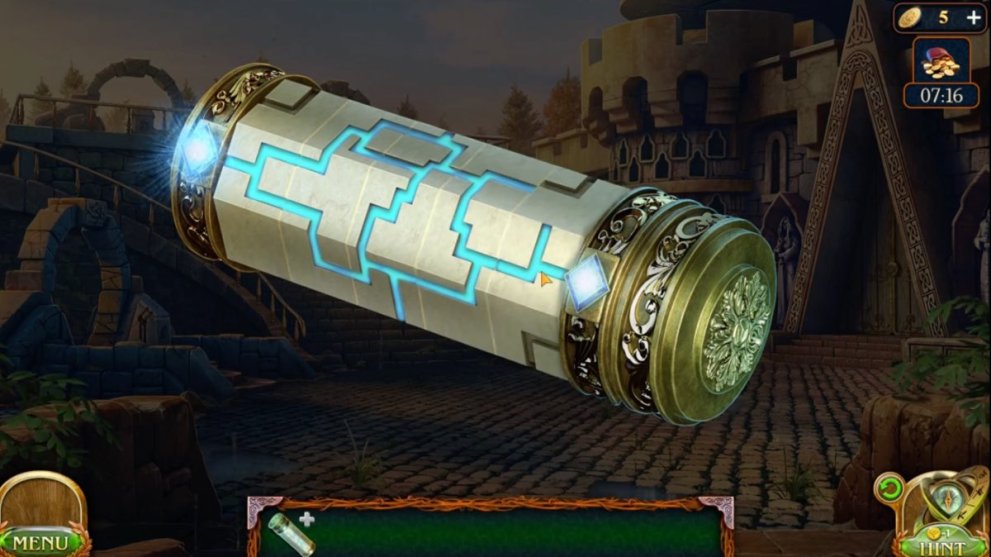
- Take the cryptex from the lion’s mouth
- Click the cryptex and solve the puzzle by joining the lines
- Take the personal signet
- Place the personal signet on the door and enter.
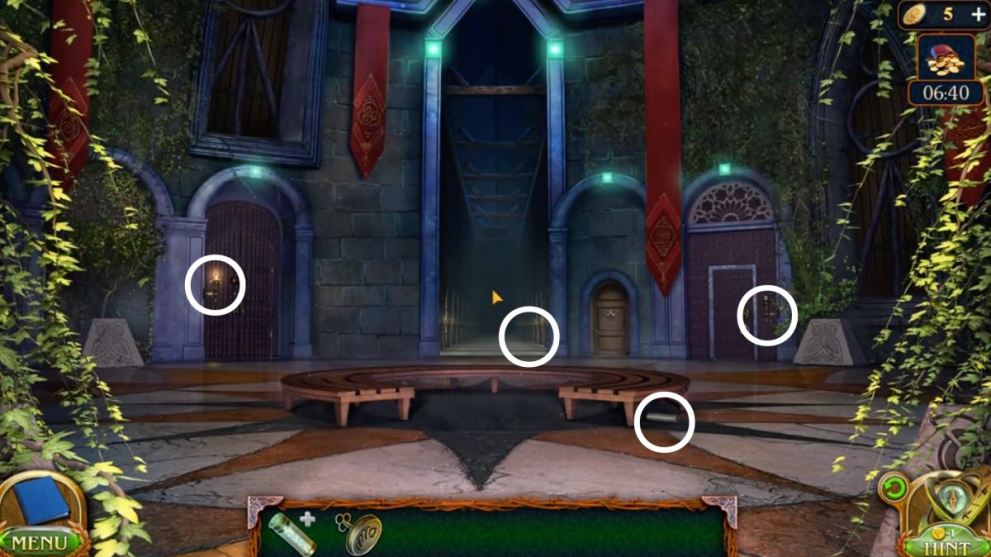
- Click the end of the corridor
- Take the candles from the right
- Take the candles from the bench in the hallway
- Take the candles from the candlestick on the right and the one on the left
- Head down the corridor twice
- Put the candles in the empty candlesticks
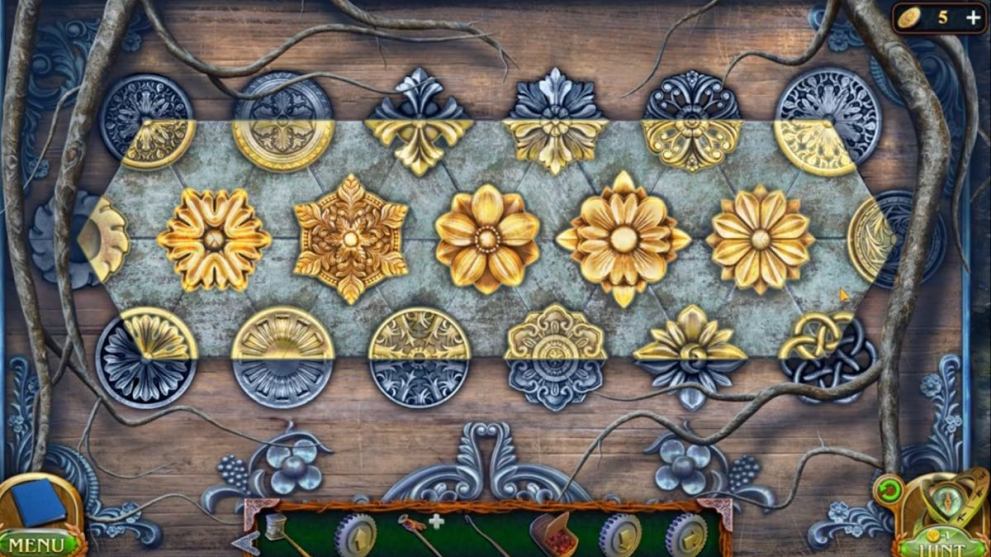
- Click the puzzle and solve it.
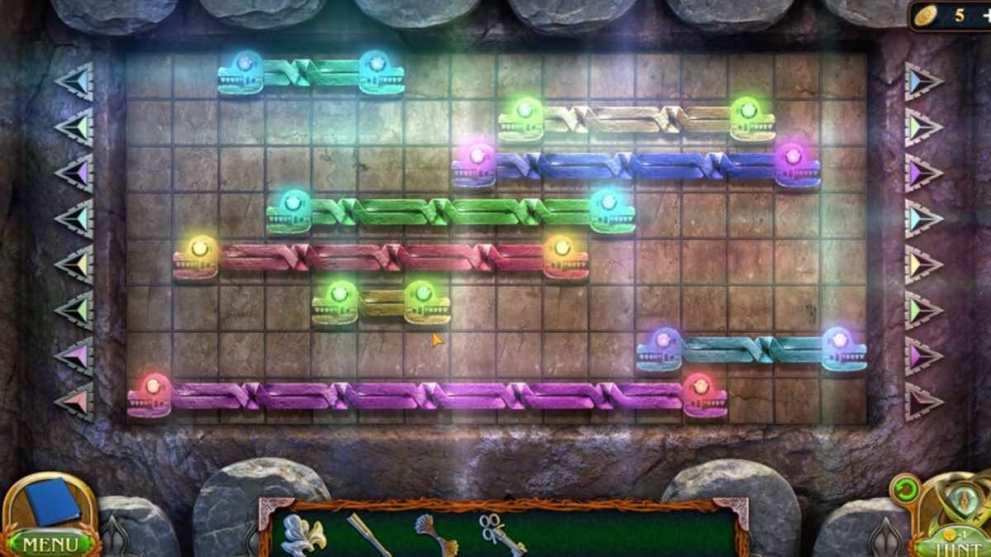
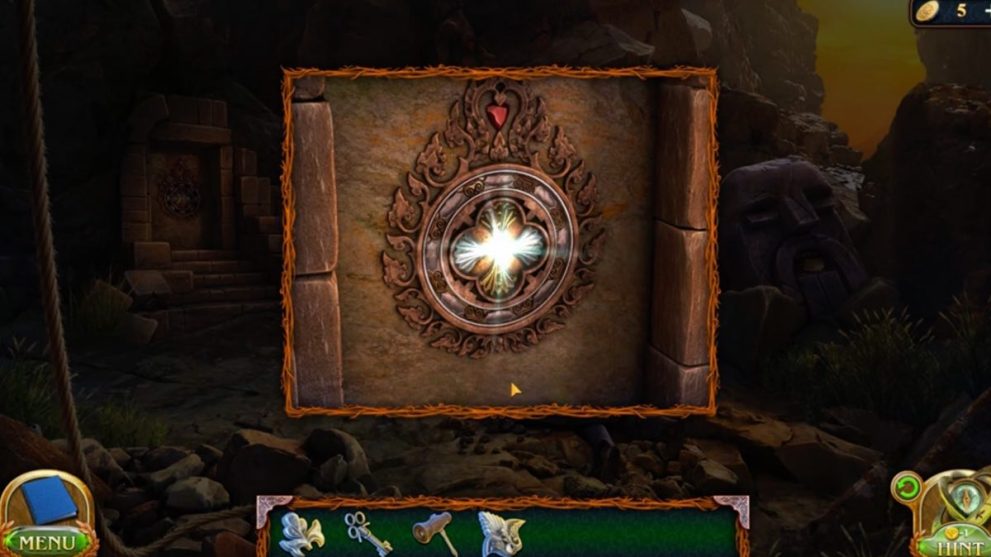
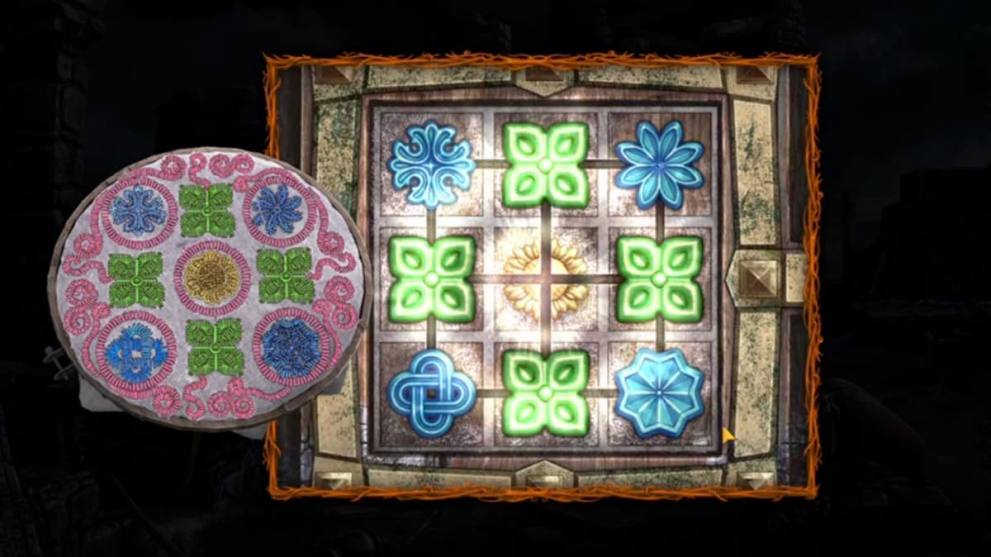
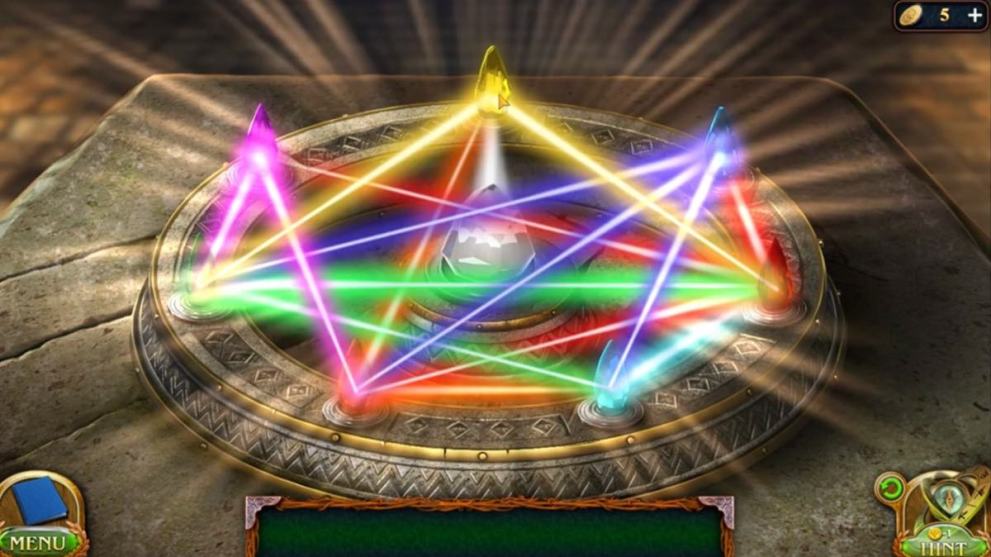
Rainbow Circle Puzzle

- Solve the puzzle by rotating the circle and matching the symbols. Use the colors to guide you.
- Go through the door
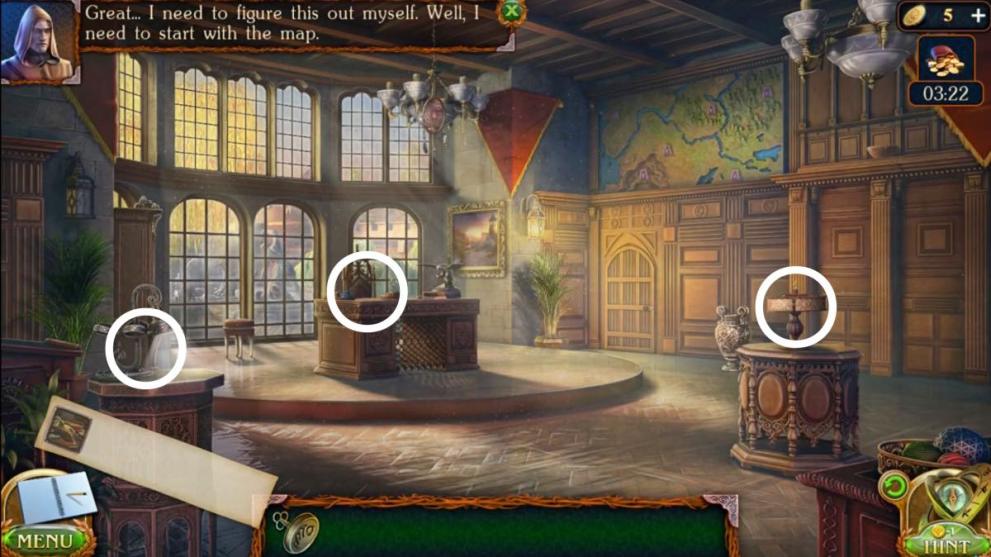
- Click the bird statue on the table
- Click on the device to the left
- Take the yellow light filter from the table
- Click the device to the right and take the red light filter
- Look closer at the bird symbols and take the animation tape
- Put the two colored filters on the left device
- Add the animation tape next to it
- Head to the hallway
- Find a green light filter to the left of the door where you found a candle
- Exit the academy
- Find a blue light filter by the lion statue’s feet
- Check the window above the ladder to find a violet light filter
- Go back to the device to add the filters.

- Add the remaining light filters
- Take the inkwell
- Put the inkwell near the device
- Head back outside
- Look om the window with the ladder
- Take the owl feather
- Go back to the room
- Get the stationery blade from the table
- Use the blade and the feather to get a quill.

- Dip the quill into the inkwell
- Click the inkwell and then the device for each light filter until you get a storyboard
- Place the storyboard by the bird figurine on the table
- Solve the puzzle.
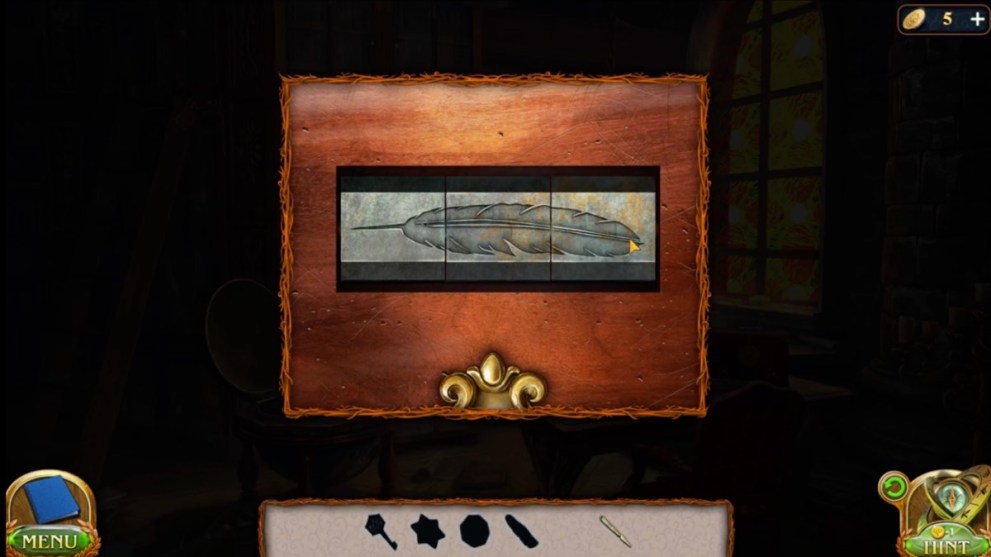
Bird Puzzle
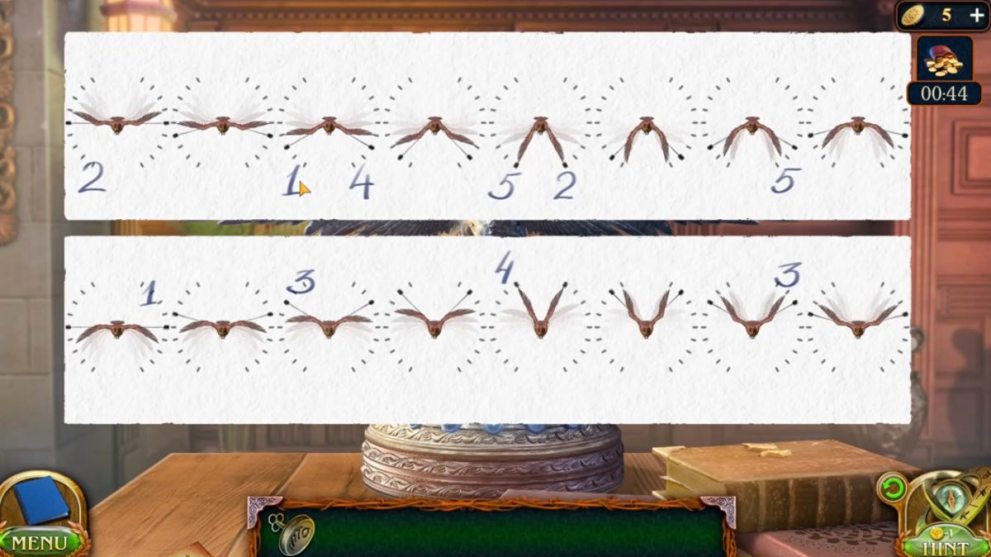
- Solve the bird puzzle by rotating the wings to match the storyboard
- Click the drawer in the desk and take the tracing paper and key
- Put the paper on the map on the wall
- Head to the hall.
- Use the key on the door to the right
- Go through the door
- Click the manuscript x2
- Check out the clues on the wall and table
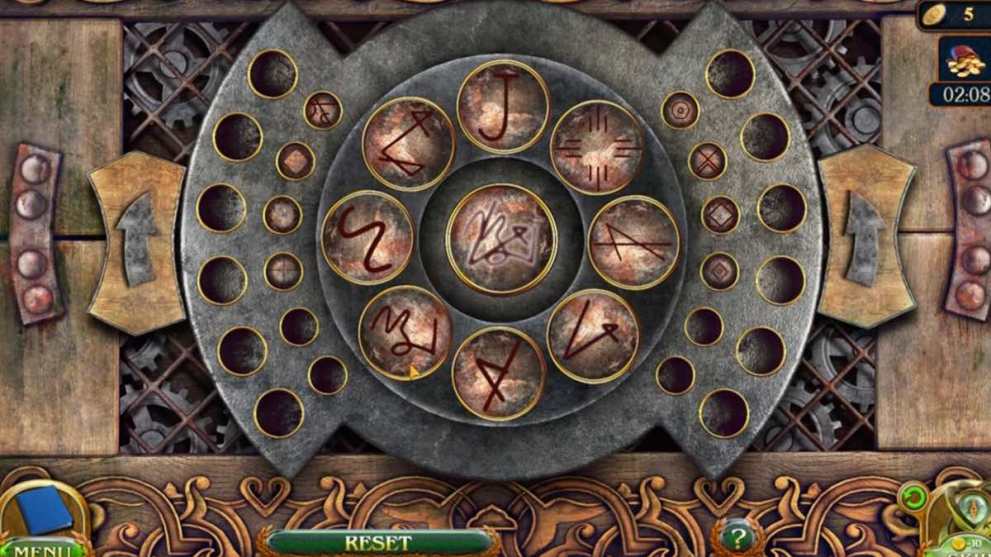
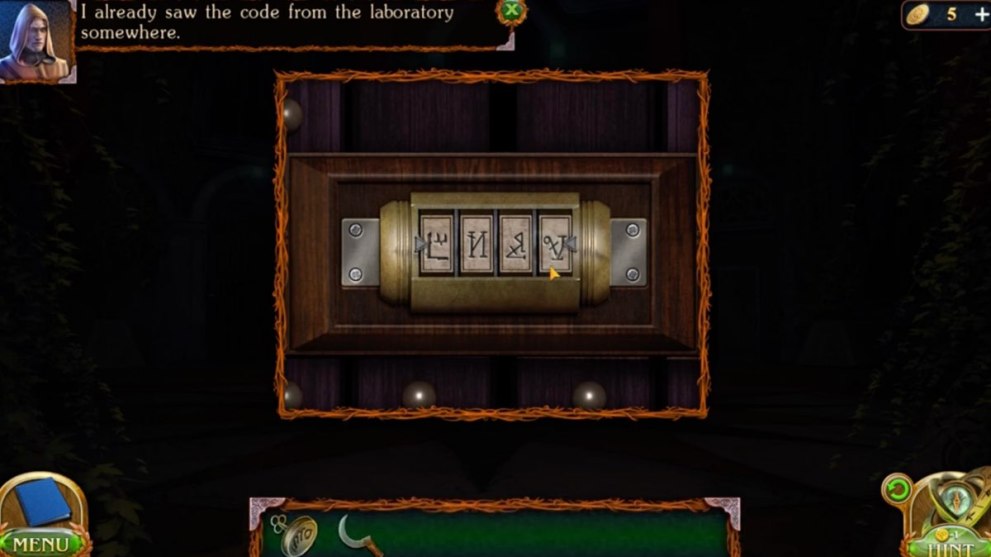
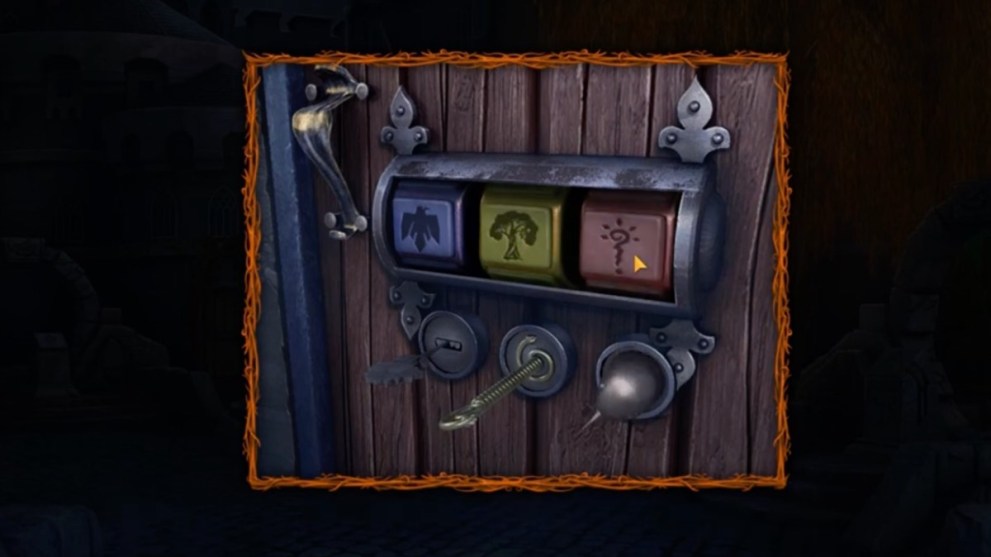
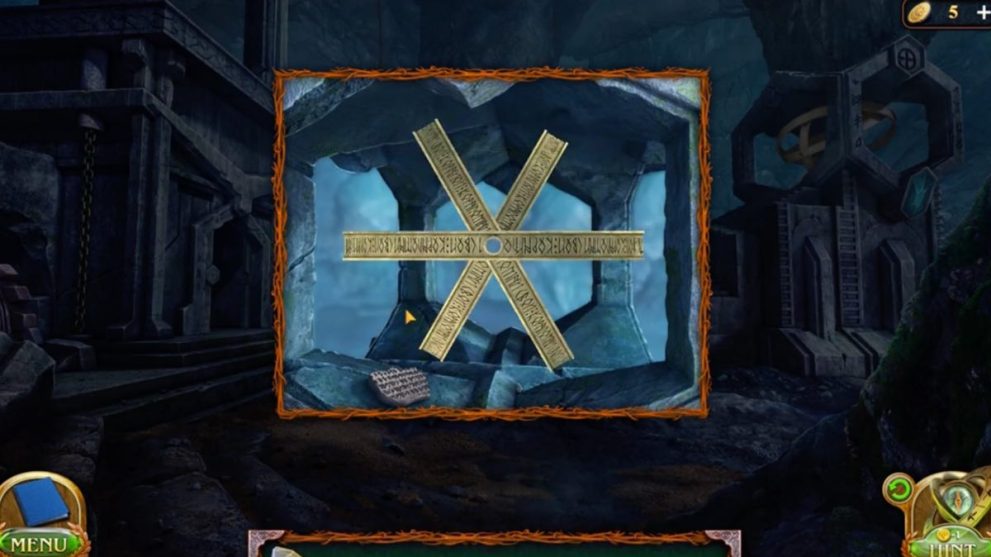
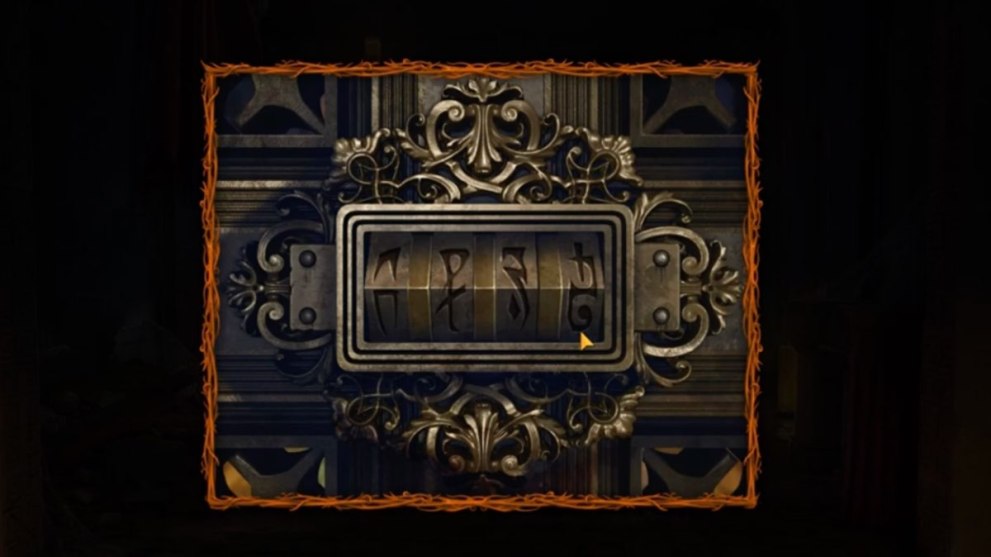
Metal Door Code Puzzle
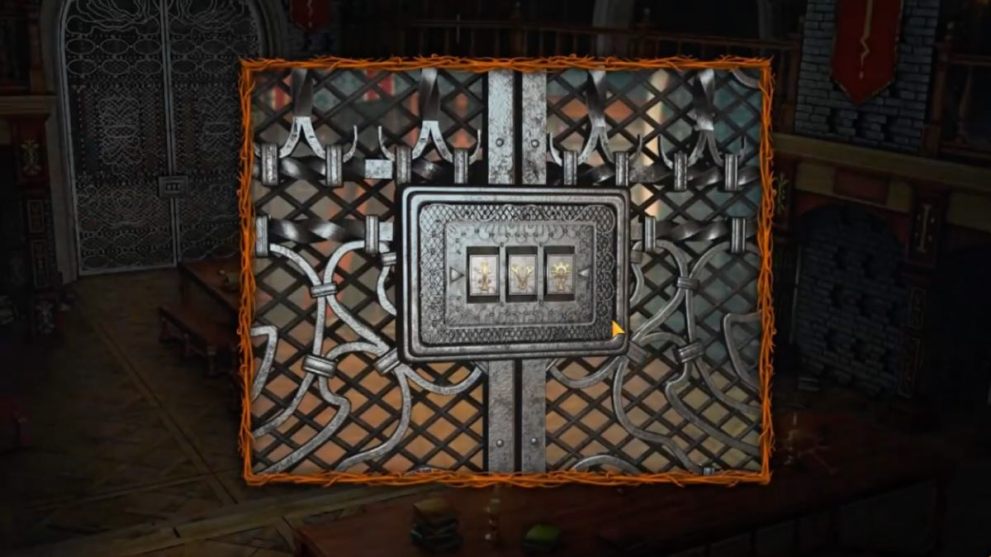
- Solve the door puzzle until the symbols match above. The symbols can be found around the room.
- Under books on the table
- On the table to the right
- On the pillar by the table
- Go through the door into the archive room.
Hidden Object Puzzle 2
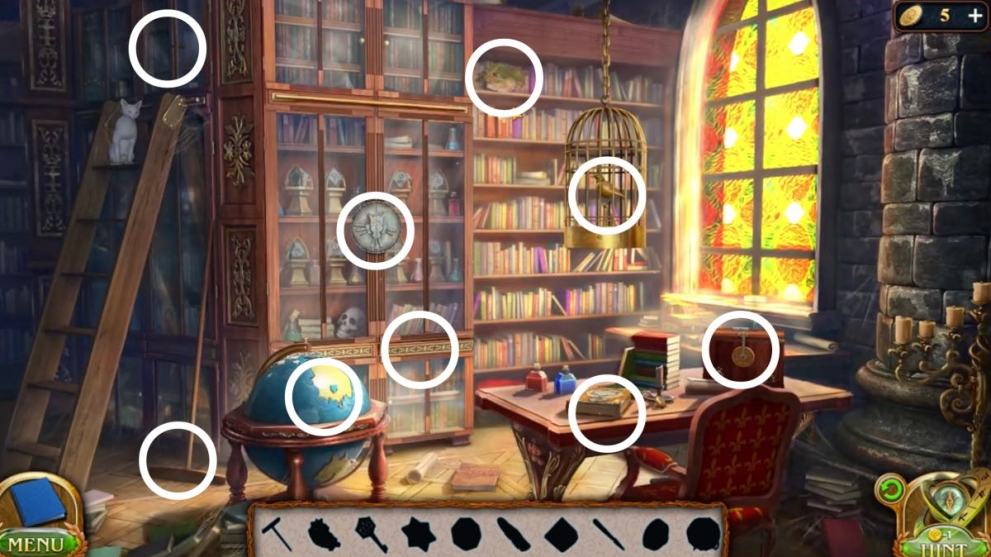
- Find all the hidden objects.
- Open the crystal star book by solving the puzzle
Crystal Star Puzzle
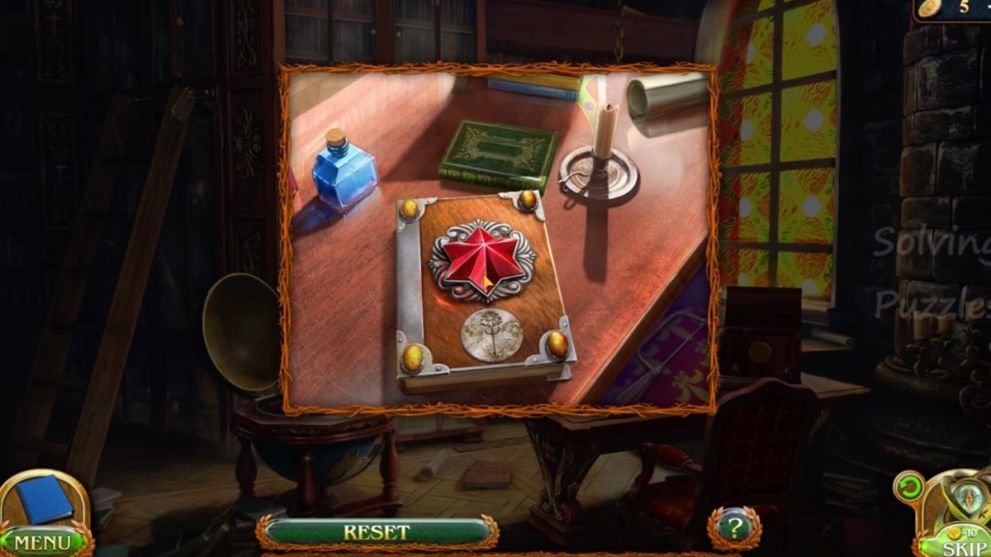
- Solve the puzzle by repeating the patten as they light up:
- Top right
- Bottom left
- Bottom right
- Top left
- Bottom left
- Top left
- Take the glass eye.
Element Casket Box Puzzle
- Solve the puzzle by recreating the image shown and moving the combination wheel.
- Take the metal feather.
- Place the metal feather and glass eye in the glass case to get the rune stone
- Go to the courtyard
- Go to the portal pedestal above the lion statue
- Place the rune stone and solve the puzzle.
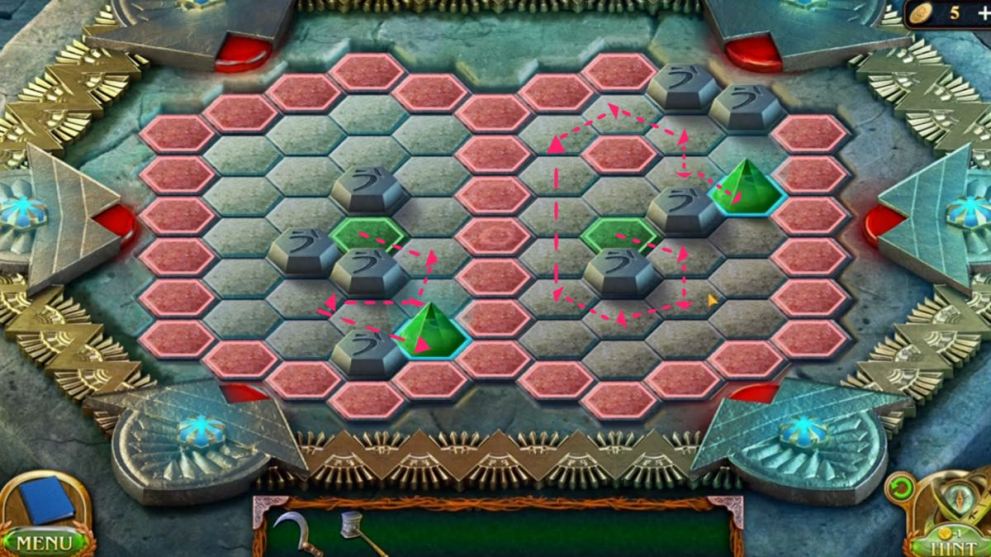
Portal Puzzle

- Solve the puzzle by moving the small discs across the rods until they fit into the correct spaces. There is no fit solution to this as it is randomly generated for each player. The trick is to pick the same pair of discs each time.
- Go through the portal to the Druid’s Waterfall.
- Find a sickle in the flowers and leaves by the rocks on the right
- Click the waterfall and take the shaft
- Use the shaft to pull the ladder from the planks
- Go ahead to the castle
- Go to the castle gate and solve the puzzle
Castle Gate Puzzle

- Solve the puzzle by pulling the bars out one by one. Only pull rods that aren’t crossed or restricted by another. Follow the solution in the image.
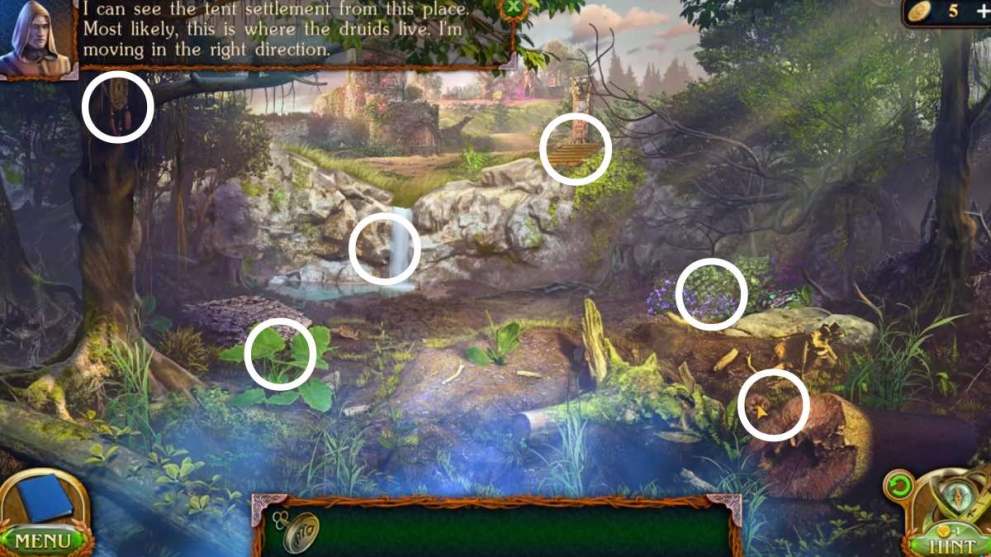
- Go toward the camp.
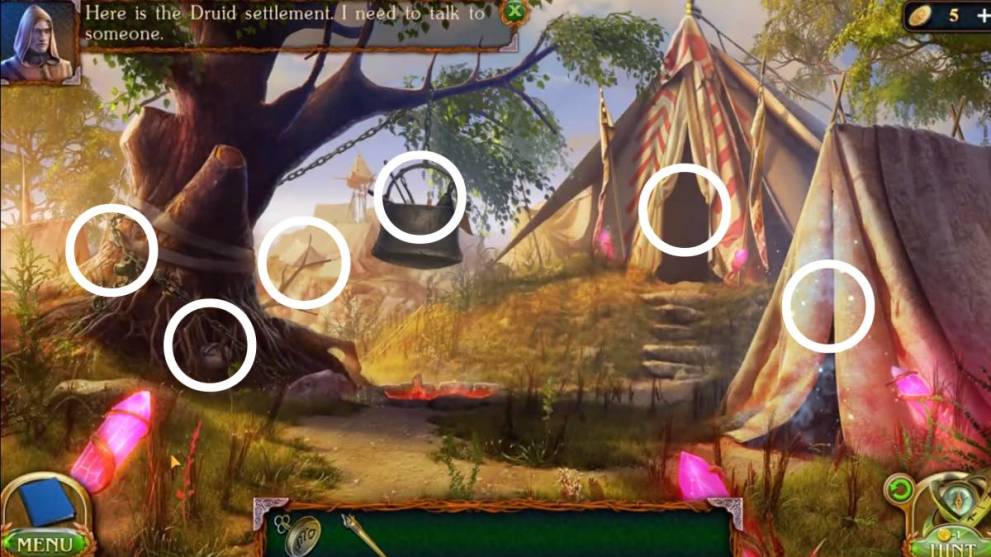
- Go through the tent at the end and speak to the person.
- Take the spell formula
- Check around the tent and go to the other tent
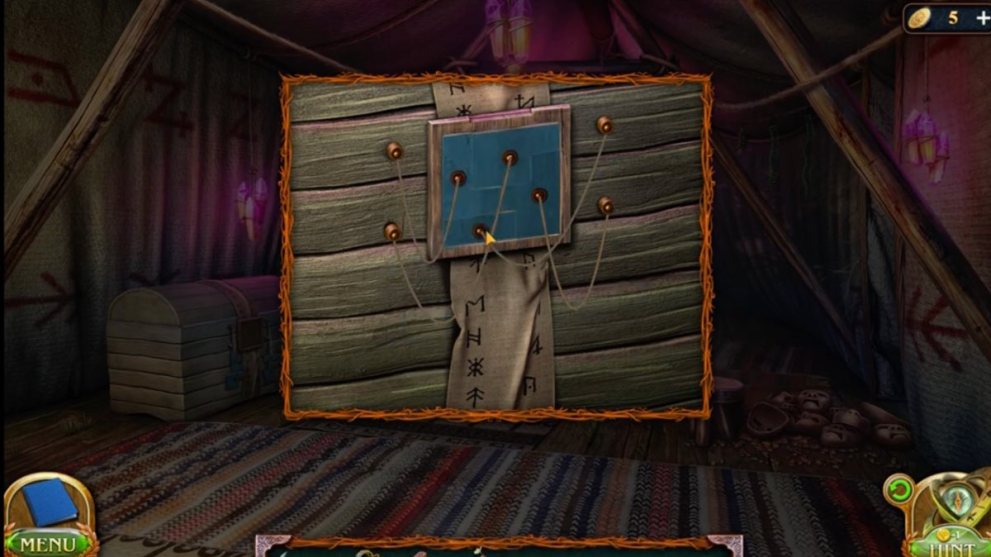
- Use the spell on the protected tent by solving the puzzle.
Tent Spell Puzzle
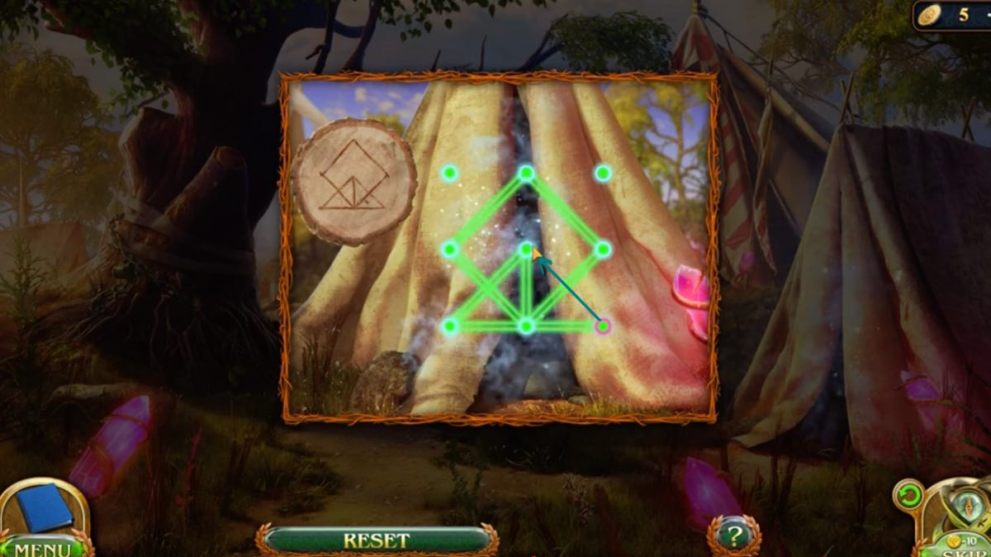
- Solve the puzzle by recreating the puzzle shown on the log with one continuous line.
- Enter the tent to find a sick dwarf.
- Take the recipe from the des
- Check out the chest with the branches
- Place the missing puzzle piece on the chest.
Tree Chest Puzzle
- Solve the puzzle by moving the oieces to the correct spaces. The cat goes to the yarn, the worm goes to the apple, and the bird to the birdhouse. Use strategy and watch what each piece does. This puzzle is randomly generated for each player and there is no set solution.
- Take the bandage and the chain key, and the manuscript page..
- Leave the tent.
- Use the chain key on the tree
- Take the leaves of healer’s tongue from the tree roots
- Take the leaves of healer’s tongue from the fallen pot
- Click the pot twice to get the flask and bowl.
- Head back.

- Use the flask on the obelisk to the right to get tears of the idol
- Take the leaves of the healer’s tongue from the base
- Take the firefly ivy flowers from the left of the archway
- Head back.
- Take the leaves of the healer’s tongue from the middle of the area
- Take the leaves of the healer’s tongue from the tree roots
- Take more leaves of the healer’s tongue from the flowers on the right
- Click the waterfall and get more leaves of the healer’s tongue to the left
- Pick up the shaft and move the nest in the tree
- Collect fairy pollen from the leaves
- Get stem of beetle milk from the flowers to the right
- Get the bowl and use it to get sand near the waterfall to receive silt
- Go back to the tents.
- Place the leaves and bandage on the table by the sick man
- Remove the bed sheets
- Put the sickle on their arm to get blood
- Open the recipe and put all the items on the list to get the set of ingredients
- Go back
Healing Ointment Puzzle
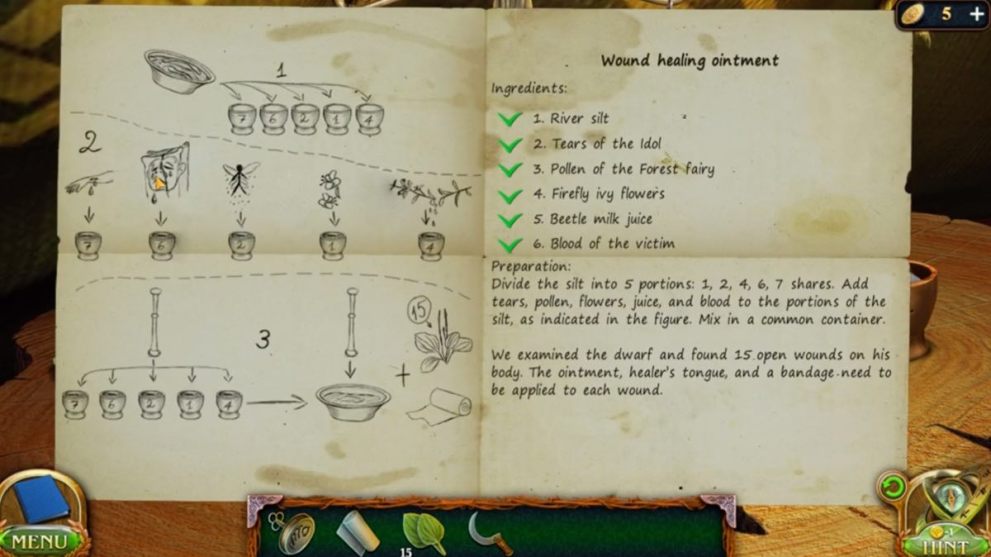
- Click the scales and solve the puzzle:
- Put cup 2 on the right with weight 3, put weight 5 on the left and pour silt in the cup
- Put cup 2 on the left with weight 5, place cup 7 on the right and pour silt into cup 7
- Put cup 2 and cup 7 on the right, put cup 4 and weight 5 on the left and pour silt into cup 4
- Put cup 4 and weight 5 on the left, put cup 6 and weight 4 on the right, and pour silt into cup 6
- Put cup 6 on the left, put cup 1 and weight 5 on the right, and pour silt into cup 1.
- Add blood into cup 7
- Add tears into cup 6
- Add pollen into cup 2
- Add firefly flowers into cup 1
- Add beetle milk juice into cup 4
- Stir each cup with the stick
- Add all cups into the bowl
- Stir the content of the bowl with the stick
- Put the bowl, bandages, and tongue of the healer’s leaves on the table by the sick man.
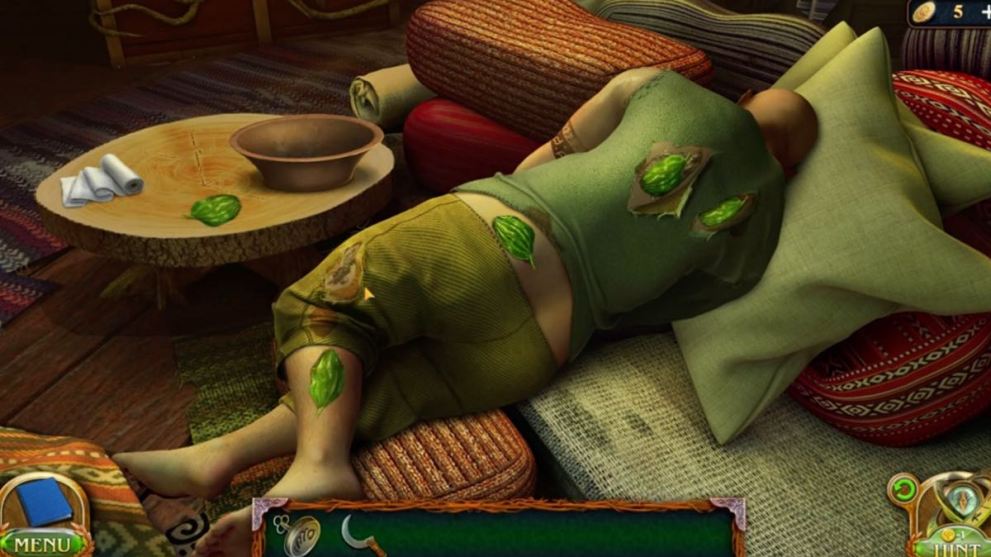
- Treat the dwarf’s wounds by moving his limbs and moving his clothes.
- Forehead
- Neck
- Right wrist
- Left bicep
- Chest
- Belly
- Left knee
- Right thigh
- Right ankle
- Right foot
- Left back
- Mid back
- Lower left back
- Left leg
- Left thigh
- Go back to the academy and the library.

- Click the arch to the right
- Click the scroll and look at the spells symbol that looks like a sun
- Go to the spells section by looking for the sun symbol
- Click the fourth shelf and get a book on Telekinesis and Telepathy
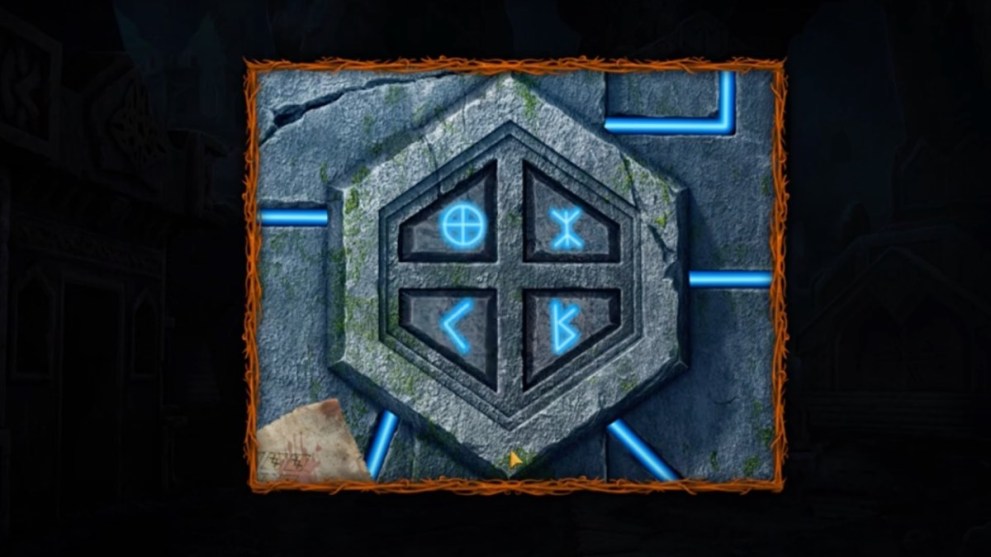
- Go to the academy and unlock the lab door by using the correct symbols below:
- Use the personal signet to open the generator
- Click the painting to get the dried rose
- Click the bag to the left of the desk
- Click on the instructions and solve the puzzle.
Bottomless Bag Puzzle

- Recreate the symbol shown on the note. Draw a symbol and then test the depth of the bag using the spear. The image is random so the one you need may be different from the one above.
- Take the spear and put it inside.
- Head back to the settlement through the portal and go to the tent.
Talking Mask Ingredients
- Mint in the locked chest to the left
- Use the shovel to scoop hot coals under the cauldron
- Dry chamomile from the vase in the library
- Dry rose from the academy lab herb pictures
- Ritual mask is from the academy lab generator. Take blank masks from the tent, put them in the bag, then put them in the generator chute and solve the puzzle.
Puzzle Piece Chest
- Put all pieces together to fit the puzzle and open the chest.
- Take the mint.
- Put the blank masks in the generator chute and solve the puzzle.
Blank Masks Puzzle
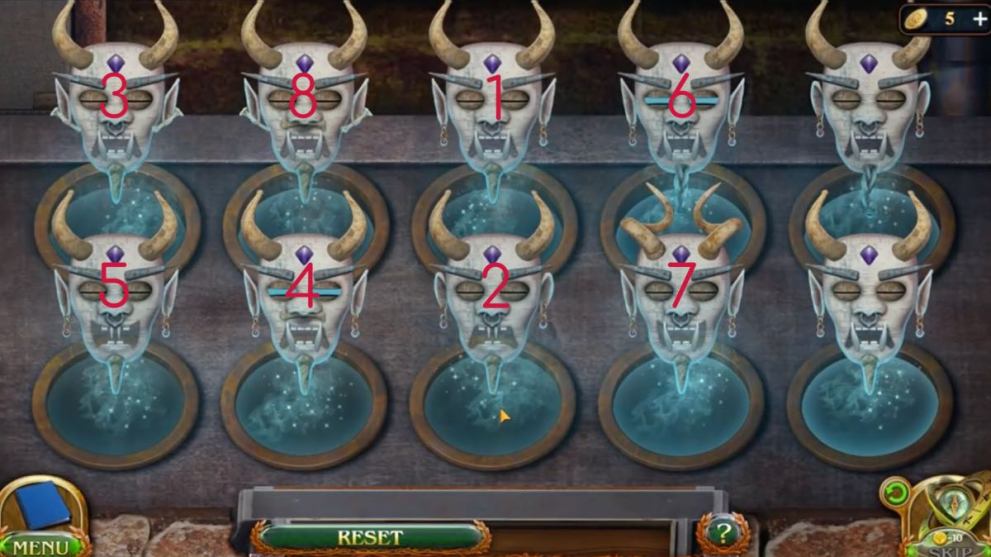
- Choose the mask that has a unique feature:
- Horns
- Smile
- Teeth
- Ears
- Beard
- Eyes
- Nose ring
- Earring
- Go back to the tent.
Talking Mask Ritual Puzzle

- Put the ritual mask on the face
- Place the herbs in the bowl
- Use hot coals to light
- Trace the beam across all lines in one continuous line.
- Take the talking mask
- Place the mask on the dwarf
- Take the key.
- Go to the academy office and check the map with the tracing paper to check the symbols for Tilly Valley
- Go to the library archive and get the rune that has a matching symbol
- Use the rune in the first courtyard pedestal.
- Solve the puzzle.
Trilly Valley Portal Puzzle
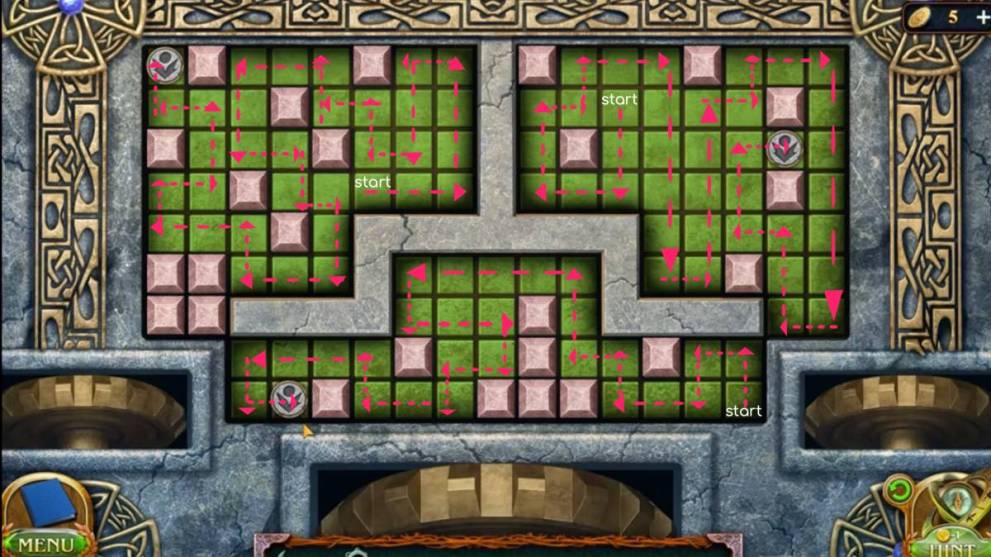
- Solve the puzzle by moving the tile across the boards until all space are filled. It must be a continuous path..
- Go through the portal.
- Check the boat
- Use the sickle to remove the cover
- Go to the stable
- Check the horse hooves to find a key stuck there.
Making the horse move
- To get the key, you need to move the horse.
- You will need to get water and oats.
- Get the hammer from by the chest and open the barrel in the boat.
- Scoop water from the river with the barrel
- Look at the plants by the right of the dock and use your sickle to take the oats
- Place water and oats in the trough.
- The horse will move and you can get the key.
- Use the key on the drawers and take the tool set
- Go to the fallen windmill.
- Remove the planks on the windmill by selecting the plank that is not restricted or behind any other. If the plank is blocked, it will show red and not move.
- Go back to the stable and get the pitchfork
- Go to the broken windmill and push it with the pitchfork
- Press the crank on the left
- Go ahead to the schoolyard
- Check the shed door to the right and take the 10 boxes
- Use the key to unlock the door
- Use the boxes to climb up through the gap
- Once inside, move the chest blocking the door
- Solve the problem on the chalkboard.
Chalkboard Puzzle

- Find the missing chalk pieces:
- Window
- Desk to the right
- Inside the same desk
- On the floor by a pot in the center
- Take them to the board and solve the puzzle by finding all 35 triangles in the image.
- Enter the code 035 in the combination lock on the door
- Get the casket from the storage room we unlocked with the code
- Get the paper
- Find all the horseshoes:
- Under bricks by the fountain in the schoolyard
- in the boat we saw earlier
- In the stable sign near the dock (use your tools)
- Near the oat plants
- In the drawers we unlocked earlier
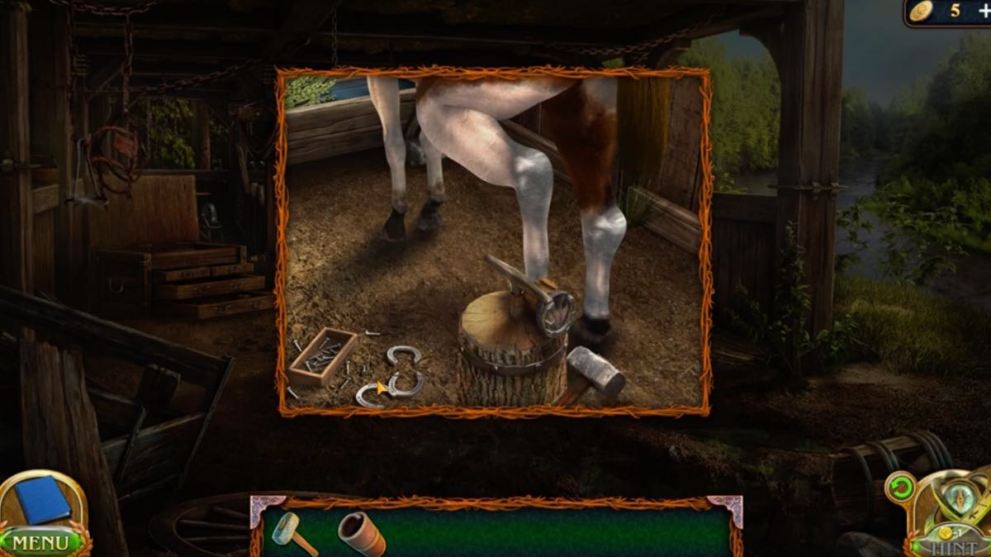
- Go to the horse and touch its hoof
- Put the nails and shoes by the stump
- Use the sickle to clean the hoof
- Use the hammer to nail the horseshoes onto the hooves
- Go to the school and through the arch in the wall.
- Look at the scroll under the canopy
- Take the climber’s reminder
- Take the end of the rope on the grate
- Try to tie the rope on the saddle
- Put the end of the rope on the anvil
- Take the metal bracket
- Hammer the bracket on the rope
- Take nuts and bolts from the table in the camp
- Put the nuts and bolts on the metal bracket
- Use your tools to tighten
- Take the rope loop and put it on the saddle
- Go through the tunnel gate.
Hidden Object Puzzle 3
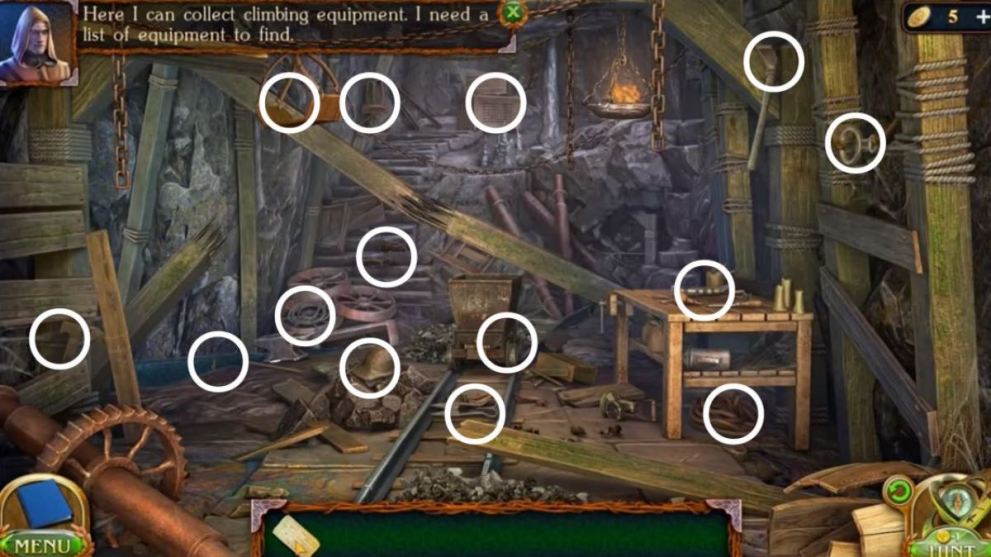
- Find all the objects for climbing according to the note.
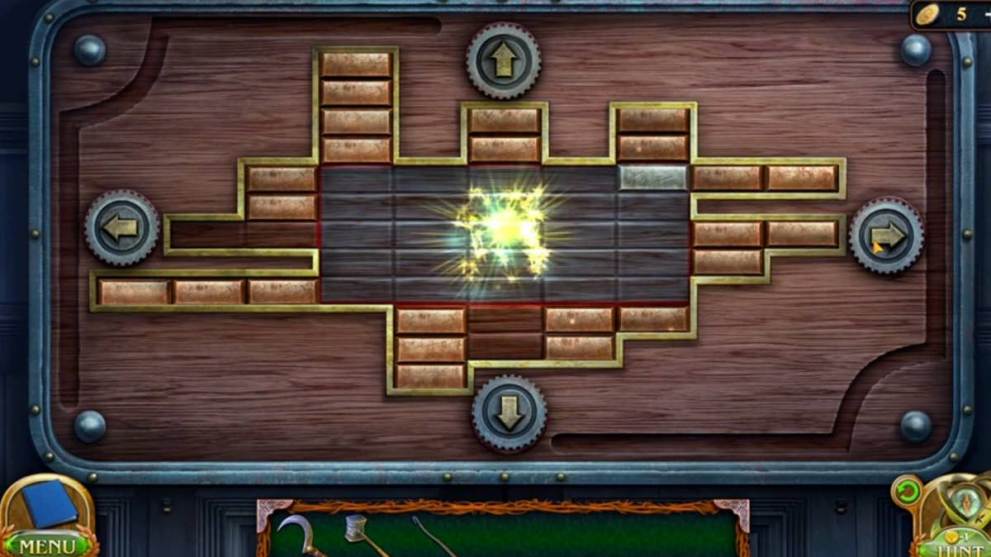
- Solve the mining bench puzzle.
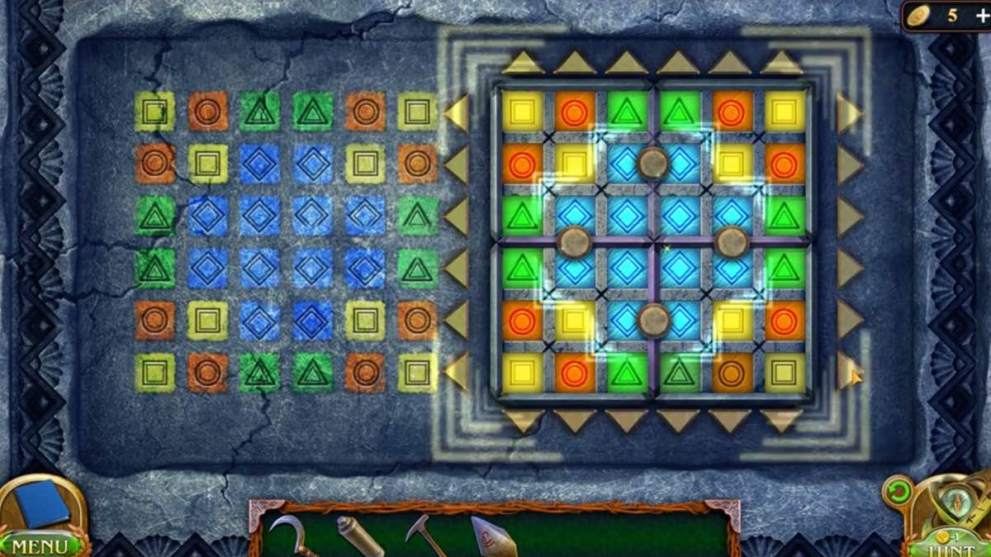
Mining Bench Puzzle
- Solve the sliding puzzle by moving the pieces until they fit and form a pattern.
- Start your climb up the hill by clicking the hill.
Once you reach the top of the hill, that concludes Chapter 2.
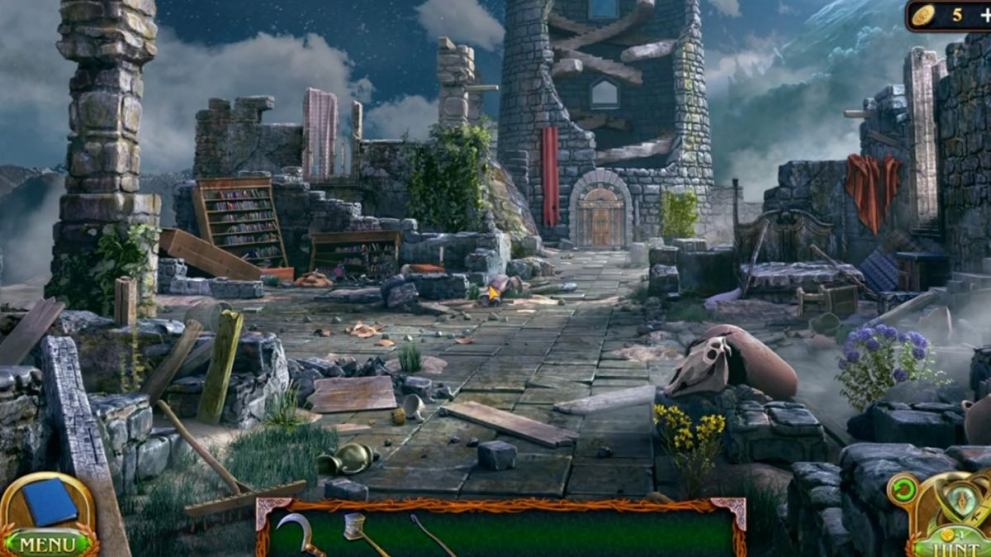
Chapter 3: First Brotherhood
- Pick up the hammer from the center
- Look closer at the rubble near the cart
- Look at the mine bench near Folly
- Move items to get the mug
- Take the items so you have the keg of gunpowder
- Use the mug to get spring water
- Talk to Folly
- Give the water to Folly
- Go to the rubble and use the gunpowder and cord
- Light the gunpowder using a sigil in one continuous line.
Keg of Gunpowder Puzzle

- Use the hammer to fix the tracks
- Escape on the minecart
Mine Cart Puzzle
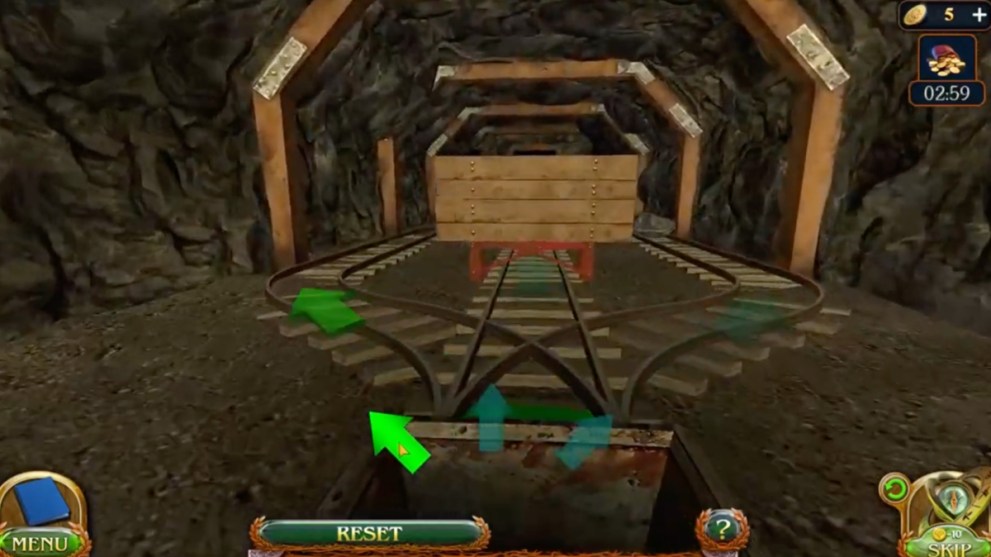
- Use the arrows to change direction:
- Right
- Straight
- Left
- Straight
- Left
- Left
- Straight
- Right
- Left
- Left
- Right
- Right
- Check out the blanket by the tree and gather the items:
- broken flag
- castle gate detail
- sausage
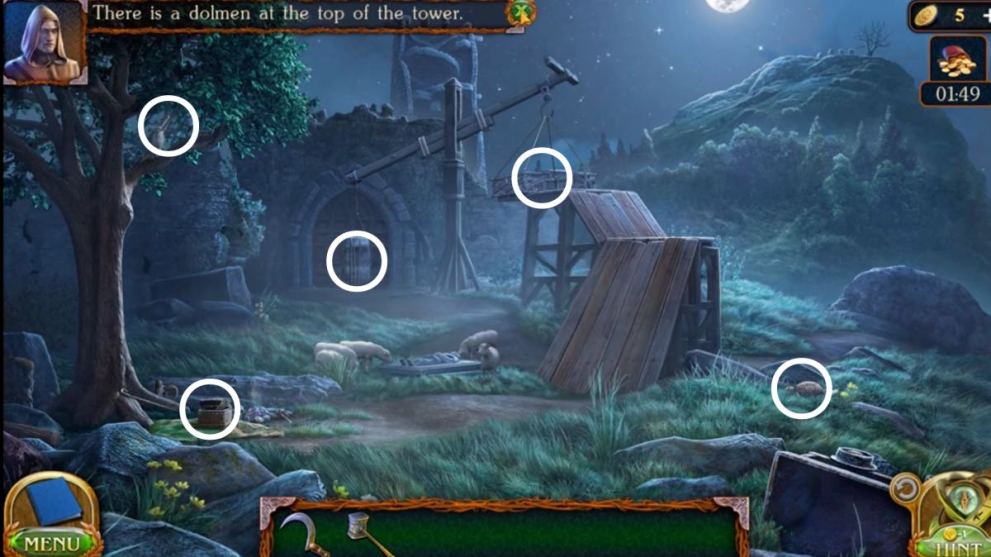
- Look at the platform
- Open the gate
- Get the puzzle piece
- Go up the hill to the woods
- Look at the strawberry plants
- Take the 2nd puzzle piece
- Go back to the Portal Tower
- Get the shepherd’s staff from near the blanket by the tree
- Use the staff to get the dog from the ditch
- Give the dog the sausage
- Take the castle gate detail from the dog
- Go up to the castle hill

- Check out the puzzle board by the tree
- Put the puzzle pieces on the board
- Solve the puzzle.
Tree Puzzle
- Solve the puzzle by rotating the pieces
- Use the sickle to cut the fabric loose
- Go back to the blanket by the tree
- Take the empty basket
- Use the basket to collect strawberries
- Use the strawberries to dye the flagpole and fabric
- Use the red flag to herd the sheep
- Go to the Portal Tower
- Go to the counterweight platform
- Put the flag in
- Use the hammer to fix it to the beam
- Check the final sheep
- Use the staff to free the sheep
- Get the castle gate detail from the grave
- Head to the castle.
Castle Gate Puzzle
- Place all four castle gate details in the puzzle.
- Solve the puzzle by moving the copper bars using the silver bar:
- Right x 2
- Up x 2
- Left
- Down x 3
- Right
- Down
- Left x 2
- Up x 3
- Left
- Down x 3
- Left
- Up x 4
- Right x 4
- Open the gate.
- Check the bookcase
- Take the glass prism
- Take the embroidery hoop
- Go to the tower gate
- Solve the puzzle.
Embroidery Hoop Puzzle
- Solve the puzzle by sliding the pieces into the right spaces.
- Go to the portal.
- Collect items to clear the fly swarms and bird bones:
- Rake from the castle ruins
- Click the chameleons in the woodlands. You will find out you need a net to catch them
- Go to the castle gate and look at the sheep on the platform
- Take the cart on wheels
- Take out your embroidery and remove the fabric
- Get the lace material from the castle ruins curtained window with the sickle
- Put the lace material into the embroidery hoop
- Use the sickle to cut the excess lace off
- Put the shepherd’s staff in the hoop and tie with fabric to make a net
- Go to the woods
- Put the cart down
- Use the net to catch chameleons.
Chameleon Hidden Object Puzzle

- Collect 15 chameleons
- Go to the tower
- Put the chameleons down to catch the flies.
- Check out the pyramid on the right
- Collect the glass prisms:
- Bookcase in the castle ruins
- Curtained window in the castle ruins
- Under the loose stone near the portal
- Place the prisms on the pyramid
- Open the portal.
Castle Portal Puzzle
- Solve the puzzle by moving the green pyramids to the blue cells.
- They move in the same direction
- They cannot step on red cells
- Use the image above to help solve this puzzle.
- Enter the academy.
- Take the chisel from the statue
- Use the chisel and hammer on the ladder
- Move the ladder to the coat of arms
- Take the spears
- Place the spears in the statue
- Go to the library.
- Go to the books section on the right
- Go to the Spirits and Deities section in the third row
- Find section 6 to get the Formless Creatures book
- Check the map in the office to find the right portal
- Go through the library archive gate.
- Open the box on the desk
- Get the spotting glass
- Go to the library archive
- Find Alchemy in row two
- Find Booster Potions in section 13
- Take the Book of Potions
Library Door Puzzle
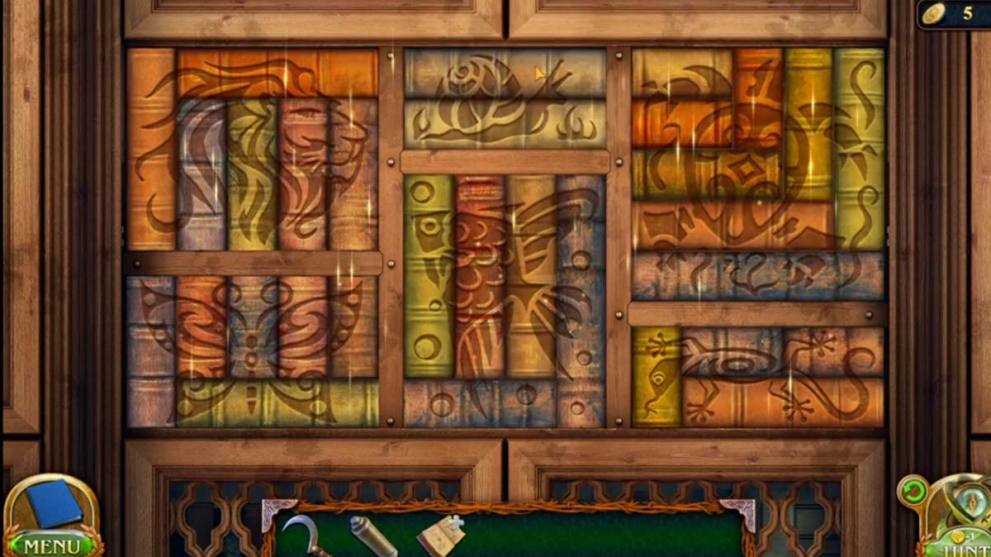
- Solve the puzzle by moving the books until they create the image above.
- Head into the hideout
- Look at the potion table
- Take the empty bottles
- Check the tool crate
- Take the mini pickaxe and the key
- Use the key to unlock the chest cabinet.
Enchantment Potions
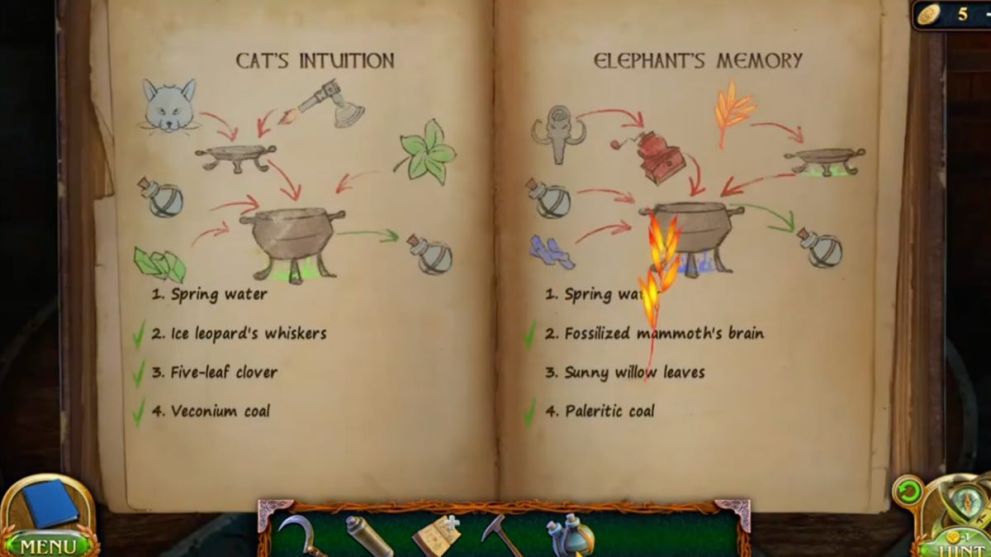
- Use the book of potions to find the ingredients
- Cat’s Intuition Potion:
- Spring water – use empty bottles in the area where you saved the dog at the castle woods
- Ice leopard’s whiskers – chest cabinet drawer
- 5-leafed clover – castle woods
- Veconium crystals – castle woods where you got the spring water
- Elephants Memory Potion:
- Spring water – as above
- Fossilized mammoth brain – chest cabinet
- Sunny willow leaves – academy backyard tree behind the ladder
- Paleritic coal – use the pick axe on the blue vein at the castle tower portal.
- Put all ingredients in the potion book
- Take the set of ingredients to the potion table in the hideout
Crystal Flames Puzzle
- Light the fire by making the right pattern with the colored lights
- Make the potions.
Cat’s Intutition Potion
- Put the cauldron on the green flame
- Add ice leopard’s whiskers to a plate
- Use the flame on the plate
- Put spring water in the caudron
- Add 5-leafed clover
- Add burnt whiskers
- Put cauldron contents into the bottle.
Elephant’s Memory Potion
- Put the cauldron on the blue flame
- Put the plate on the green flame
- Place sunny willow leaves on the plate
- Put fossilized mammoth brain in the grinder
- Put spring water in the cauldron
- Add the ground fossilized mammoth brain
- Add the burnt sunny willow leaves
- Put cauldron contents into the bottle

- Go to the office door at the academy backyard area
- Check the symbols on the door lock
- Use the memory potion
- Go to the library archive.
Hidden Key Puzzle

- Use the intuition potion
- Find all the keys:
- Book office key – repeat the order of the flashing lights
- Bird cage office key – get the fretsaw to the lower right of the desk where you found the first key. Use it to cut the bars and get the key.
- Cabinet office key – look in the open globe to get the missing horse head piece. Go to the box on top of the cabinet and replace the missing poece to open it and get the key.
- Take three keys to the office back door
- Use the keys:
- Bird key in red slot
- Spiral key in yellow slot
- Flower key in blue slot
Office Back Door Puzzle
- Solve the puzzle by clicking the buttons until they show the right symbols:
- Flower – bird
- Spiral – tree
- Bird – question mark
- Go through to the utility room
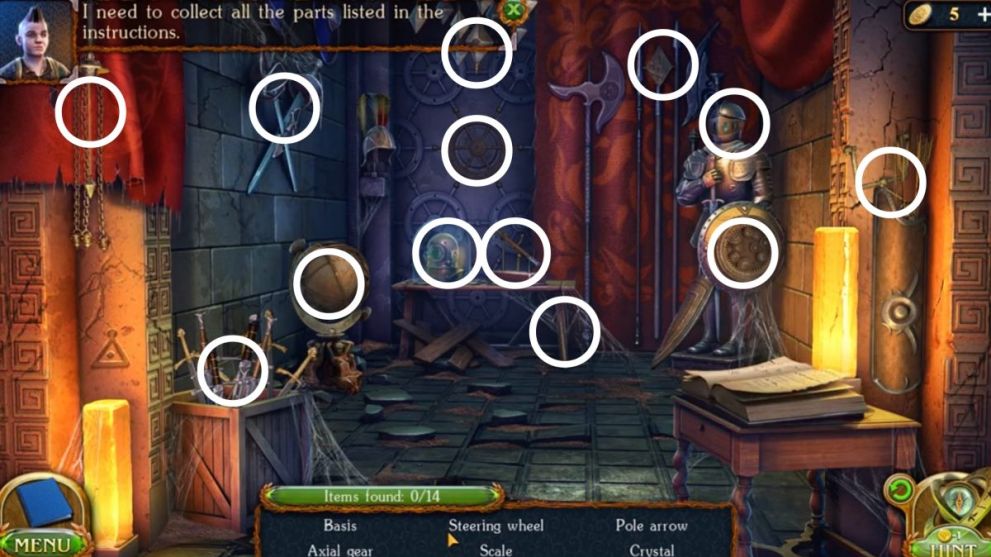
Hidden Object Puzzle 4

- Find all items in the utitlity room:
- Crossbow piece – bench
- Oiler – animal cabinet
- Crown – use the crossbow piece to move the brick from behind the tapestry on the left. Use the broom to dust the cobwebs.
- Broom – chest cabinet by door
- Lockpick – use corkscrew to open the ship in the bottle
- Spider – with the crown
- Pincers – with the broom
- Corkscrew – use the chips and complete animal cabinet puzzle
- Chip – use the sword to get it from the candelabra
- Chip – put crown on vase on the chest cabinet
Animal Cabinet Puzzle

- Solve the puzzle by moving the pieces until the are correct and show the image above
- Use the pincers to get nails from the boards on the office door
- Use the lockpick to unlock
- Check the wardrobe to the left
- Get the lamp from the table on the right
- Use the lamp to see into the wardrobe
- Find the leaf pattern pieces.
Leaf Pattern Pieces
- In the book on the desk
- Use the first piece to loosen the lamp on the table at the back of the room
- Use the second piece to open the filter lamp to the right
- Use the third piece to unlock the bottom drawer in the desk
- Combine the pieces and put them in the wardrobe.
Wardrobe Figure Puzzle

- Arrange the figures so their hands touch by selecting one and then selecting the place you want it to go. When they are in the correct space, their hands glow.
- Take the hyperstone.

- Put the rune hyperstone on the map
- Get the quill from the filter lamp table to the right
- Use the quill to mark the symbols you recognize from the map and hyperstone (rotate the hyperstone to find them all)
- Find the missing symbol
- Draw it on the canyons
- Go to the archives
- Find the glass case
- Get the rune stone that matches the canyon
- Go to the academy backyard
- Find portal pedastal two to the right with the matching symbol
- Put the rune stone on it
- Solve the puzzle
Canyon Portal Puzzle
- Solve the puzzle by matching the patterns on the left by moving the symbols on the right with the arrows. Use the gray circles to lock rows into place so you don’t have to move too many symbols.
- Put the hyperstone into the pedestal.
- Look at the crack in the ground
- Use your pickaxe to open
- Get the crystal
- Find a well tile on the floor by the tower
- Go to the castle tower portal
- Get the dead crow
- Give the dead crow to the vulture
- Get the well tile
Well Tile Puzzle
- Put the tiles on the well
- Use the seeing scope to see the symbols in the village hillside
- Press the symbols on the well
- Check out the hanging net and stairs in Dungeon City
- Go back to canyons portal
- Check the tower
- Use the sickle to cut down rope
- Take the pole from the right
- Combine the pole and rope to make an elongated sickle
- Go to Dungeon City and use the elongated sickle to get the block from the hanging net.
- Go into the temple through the left side door
- Check the sarcophagus
- Get the block and medallion
- Look closer at the prayer altar
- Go back to the city.
Tower Steps Puzzle

- Solve the puzzle by clicking the stairs until they are all equal lengths. This puzzle is randomized, so there is no set solution. Just remember to watch how each block moves and changes other blocks.
- Go up to the Tower
- Take the manuscript
- Solve the puzzle.
Tower Rings Puzzle
- Solve the puzzle by moving the rings into their right place until they look like the museum door pattern.
- Go through the door.
- Check out the display case
- Take the shard of text
- Look at the statue and click the symbols
- Check the crystal podium
- Go to the temple.
Crystal Podium Puzzle
- Put the crystal on the podium
- Find the text shards:
- Display case
- Pile of rubble
- By the tower rings
- Bottom of podium
- Place all text shards on the podium and press the button
- Put crystals in correct positions:
- Pink – top left
- Green – middle left
- Orange – bottom left
- Yellow – top middle
- Blue – top right
- Red – middle right
- Cyan – bottom right
- Look at the book in the display case
- Turn the page
- Get the Soul Catcher book.
Museum Door Lock Puzzle
- Find the code to the door in the Soul Catcher book.
Hidden Object Puzzle 5
- Find all 14 objects:
- Base – shield on the armor
- Axial Gear – table to the back of the room
- Steering Wheel – on the wall
- Scale – take the piece from the right and put on top to open
- Pole Arrow – on the crossed swords
- Crystal – use mace to open armor helmet
- Prism Bracket – in crate of swords
- Prism – click where the wheel hung, get from the chandelier
- Pendulum – on the chains to the left
- Mirror Bracket – with the arrows to the right
- Mirror – spear to the right at the back
- Flask – on the diving helmet
- Lens Bracket – by the diving helmet, move the arrow on the table to loosen
- Lens – on the diving helmet (solve the puzzle)
Diving Helmet Puzzle

- Solve the puzzle by pressing the buttons on the outer ring that have the symbols seen in the room:
- Square
- Triangle
- Triangle with line
- Take the lens.
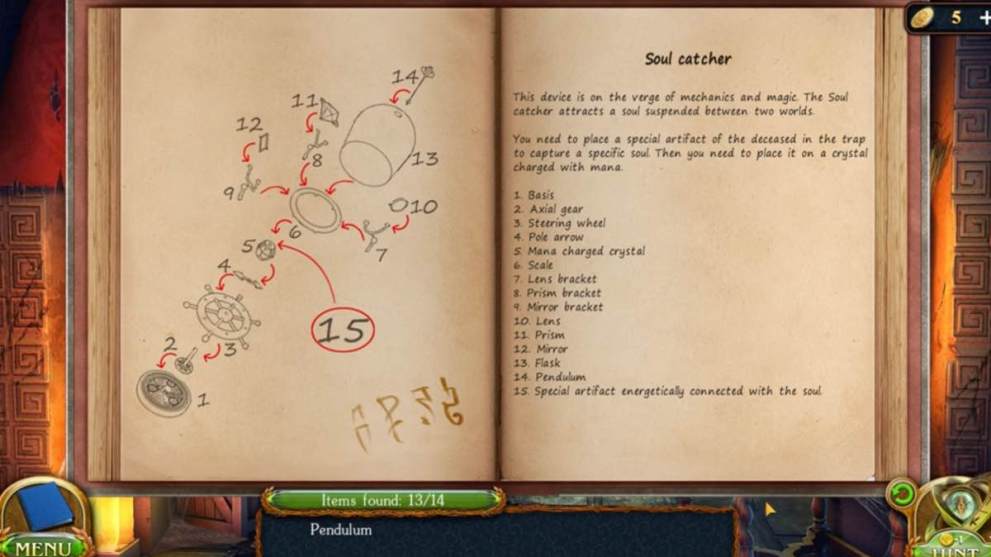
- Assemble the trap by checking the instructions in the book.
Powering the Generator
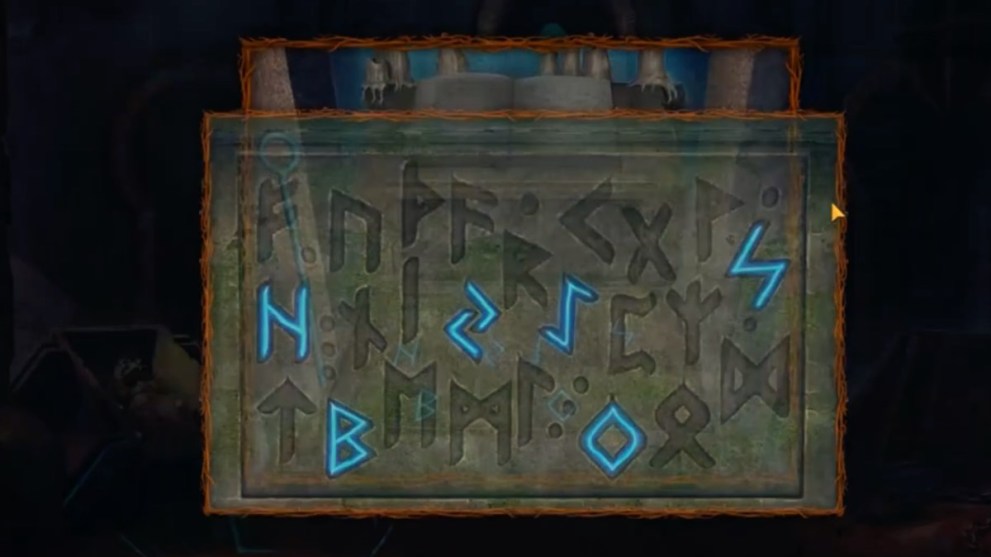
- Look at the symbols on the statue in the museum
- Complete the prayer on the altar in the temple
- Go to the city
- Take a stone floor piece from the pile of rubble
- Go to the temple and place it in the missing spot
- Go to the sarcophagus and get the amulet
- Go to the generator
- Put the trap near the generator
- Remove the glass cover
- Put the crystal inside
- Put the cover back
- Take the charged trap
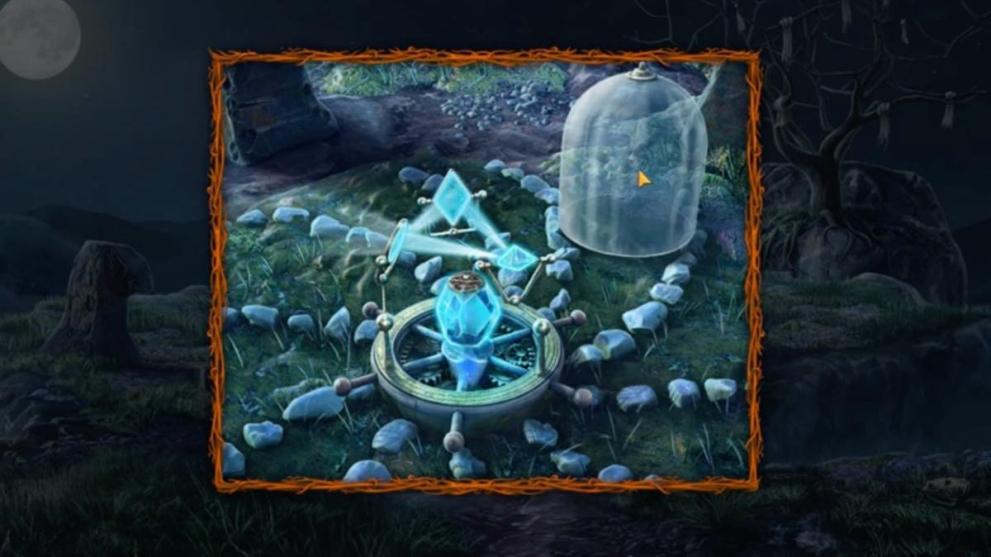
- Go to castle hill
- Put the trap in the middle of the animal pillars
- Remove the cover
- Place the medallion inside
- Move the lens so the light is reflected
- Put the cover back.
- Get the mask
- Click the cloud
- Find the skulls
- Eagle skull at canyon portal by the vulture nest
- Wolf skull in Maaron’s hideout
- Ram skull at the castle camp
- Horse skull at castle ruins
- Go back to the pillars
- Solve the puzzle.
Animal Ritual Puzzle
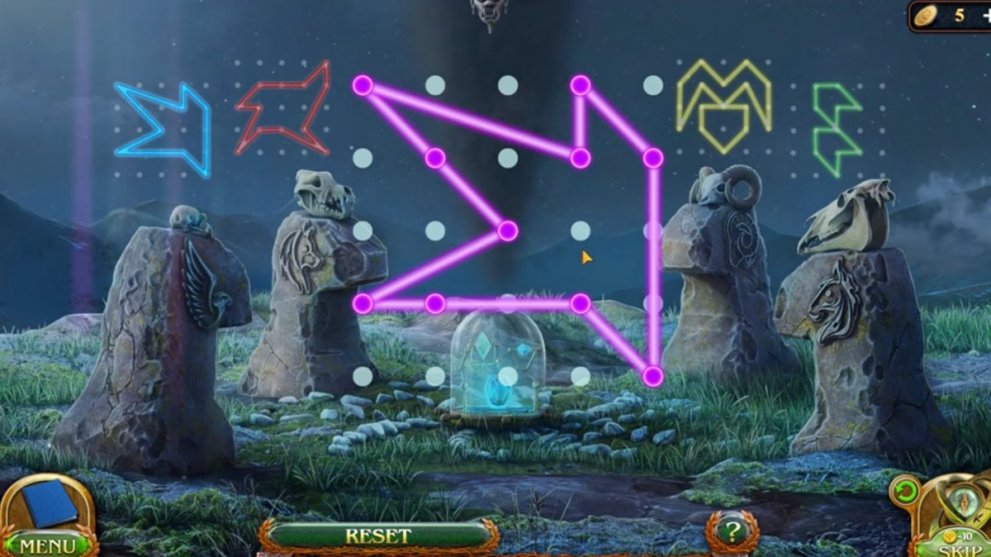
- Solve the puzzle by connecting the dots to create the four images.
With that final puzzle, you have completed Lost Lands 9 and helped Maaron and Folly bring peace to the land.
Twinfinite is supported by our audience. When you purchase through links on our site, we may earn a small affiliate commission. Learn more about our Affiliate Policy


Updated: Aug 4, 2025 08:26 am