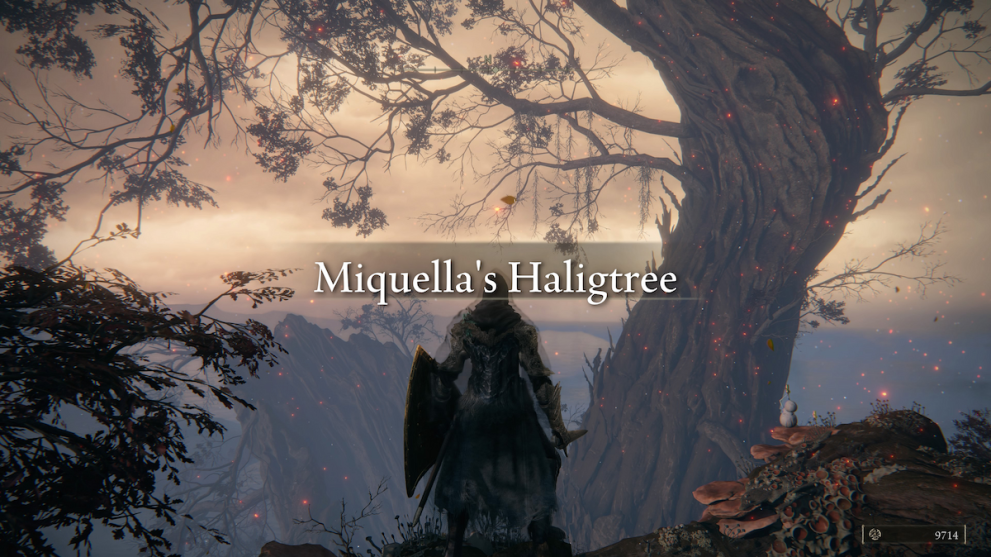
Elden Ring contains some of the most awe-inspiring locations in any Fromsoft game, and Miquella’s Haligtree is near the top of that list. Merely getting to Miquella’s Haligtree is no walk in the park either; it requires multiple steps, secret items, and tricky puzzles to find. Here’s our step-by-step guide on how to get to Miquella’s Haligtree in Elden Ring.
Getting to Haligtree in Elden Ring Step 1: Right Half of Secret Medallion
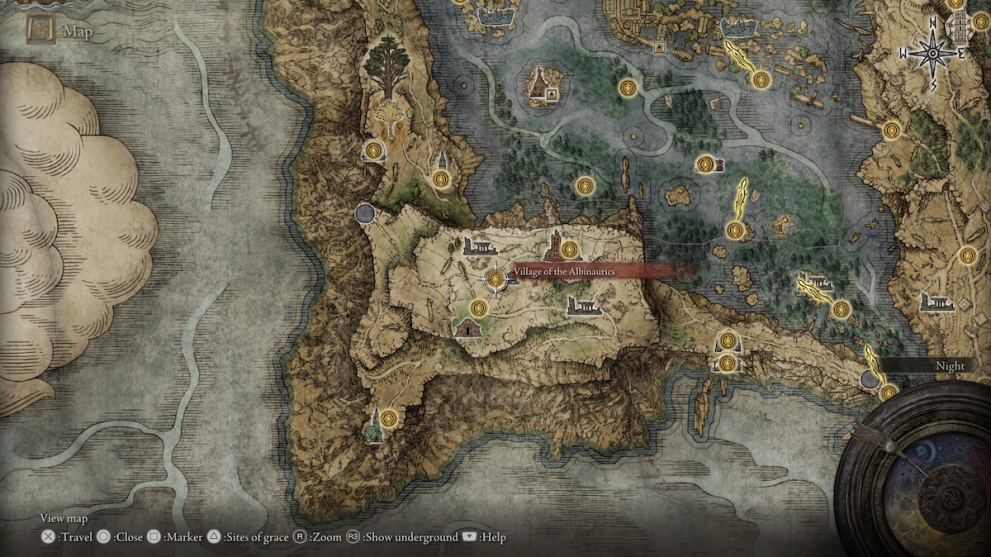
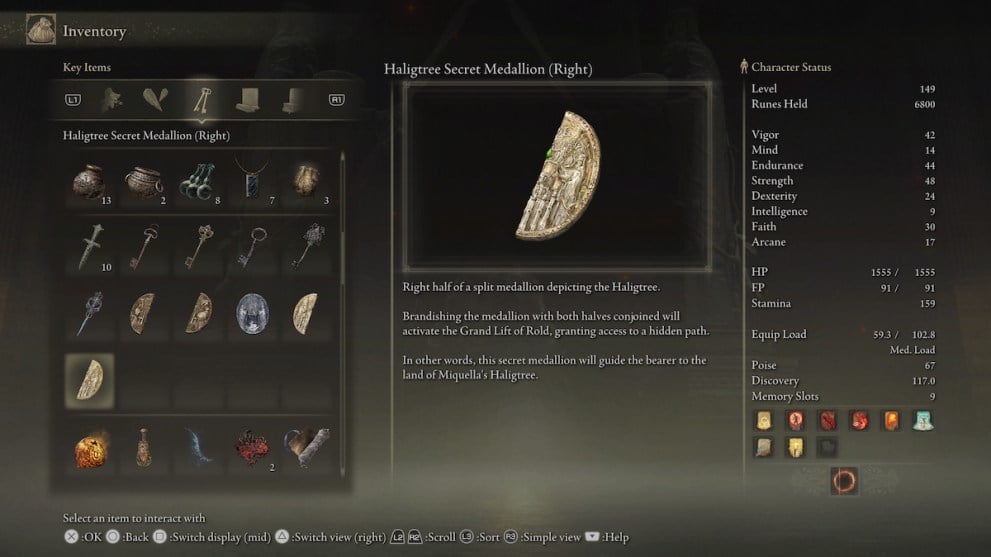
You can complete the first step of your journey to the Haligtree once you unlock the Liurnia of the Lakes region. This step will get you the first half of the Haligtree Secret Medallion; both halves of this medallion are needed to take the Grand Lift of Rold to the secret Consecrated Snowfield (further leading to the Haligtree).
First, head toward the southern end of Liurnia near the Folly on the Lake Site of Grace. Your destination is the Village of the Albanaurics nestled within the murky shaded swamp south of Folly on the Lake.
Fight your way up to a hill with a well and some ruined buildings nearby.

There’s a peculiar jar with the lone surviving Albanauric chief, Albus, inside of it. Crack the jar with your weapon and talk to Albus; he’ll give you the Right Half of the Haligtree Secret Medallion.
You must wait to get the other half of the medallion until you access the Mountaintop of the Giants area far later in the game.
But in the meantime, there’s an adjacent NPC quest you can get a head start with now if you desire. Albanauric Latenna’s quest can begin now that you have met with Albus and received a half of the medallion. Keep in mind that this quest is not mandatory in order to get to the Haligtree itself.
Doing Latenna’s quest gives you her spirit ashes and a valuable Somber Ancient Dragon Smithing Stone. Our guide goes through every step of Latenna’s questline, so check it out if you want some really good rewards.
After defeating the boss of the cave, you’ll come across the Slumbering Wolf Shack Site of Grace. You can show Latenna that you received the Haligtree Secret Medallion (Right) from Albus, and can continue her quest from here.
Step 2: Left Half of Secret Medallion
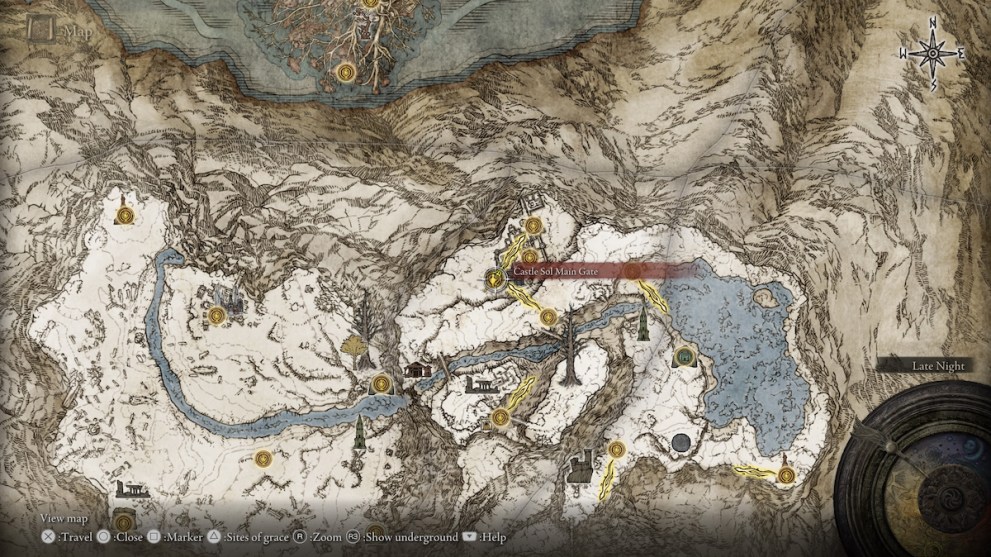
The final half of the Haligtree Secret Medallion is located at the end of the Castle Sol dungeon in the Mountaintop of the Giants. You unlock Mountaintop of the Giants near the end of the game, after accessing the Grand Lift of Rold on the edge of Leyndell.
The missing medallion half is located in Castle Sol, which is on the northernmost tip of the Mountaintop of the Giants map.
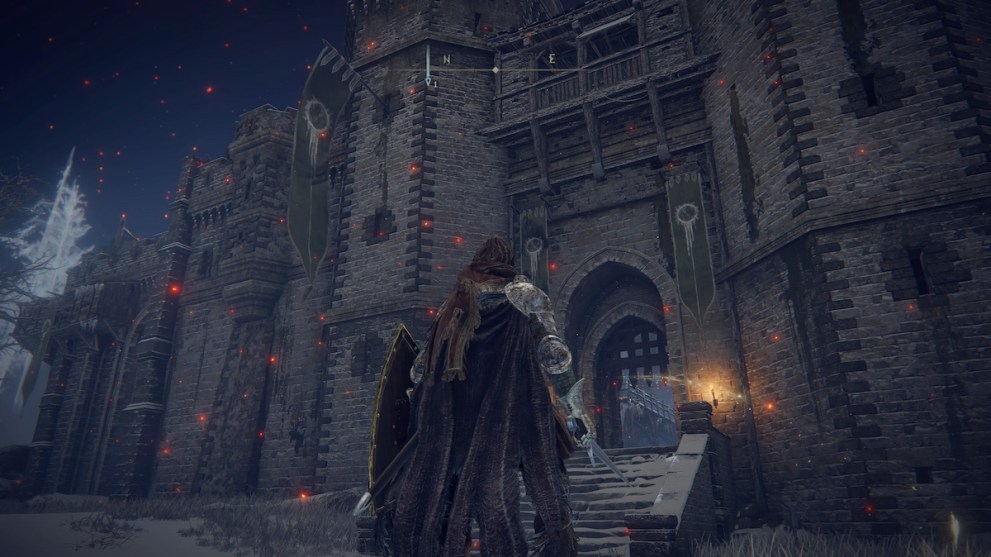
You can actually see the outline of the castle before unraveling the rest of the map.
There’s a Walking Mausoleum right next to Castle Sol, so feel free to take it out by attacking the debris on its legs so you don’t have to hear its constant ringing.
Castle Sol is a mid-sized dungeon with an intricate layout and a substantial boss fight at the end. Commander Niall is the boss waiting for you at the end of the castle, (ranked number 10 on our list of hardest bosses in the game).
Focus on taking out his two Banished Knights first before going one-on-one with Niall himself. Niall swings slow and strong, with lots of frost attacks and lightning attacks that stun you, doing critical damage to top it off. Focus on avoiding Niall’s brutal swings and only attack when he’s recovering from a swing or is otherwise open.
Once Commander Niall is bested, take the elevator up to the top. You’ll see a ghost who never made it to the Haligtree along with the Left half of the Haligtree Secret Medallion.
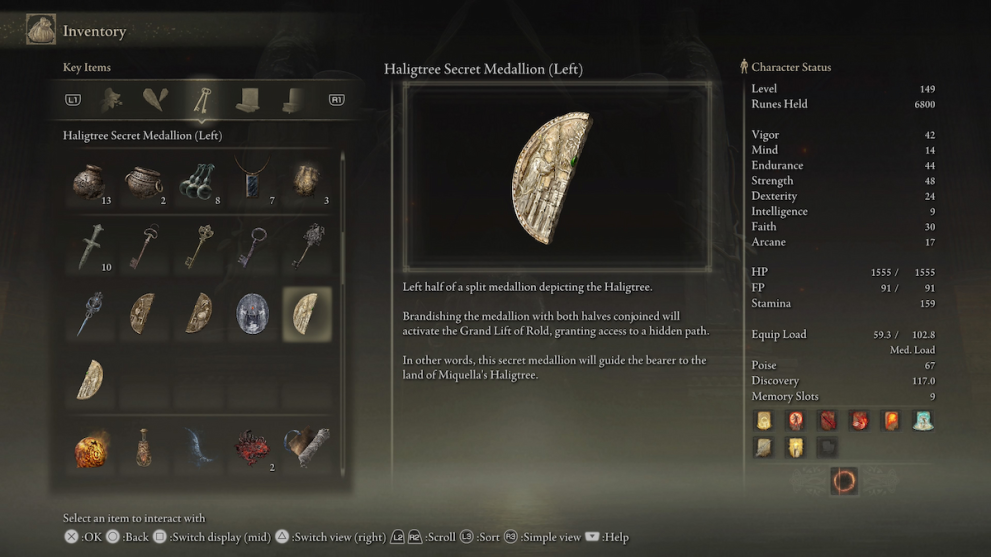
Now that you have both pieces of the medallion, head back to the Grand Lift of Rold.
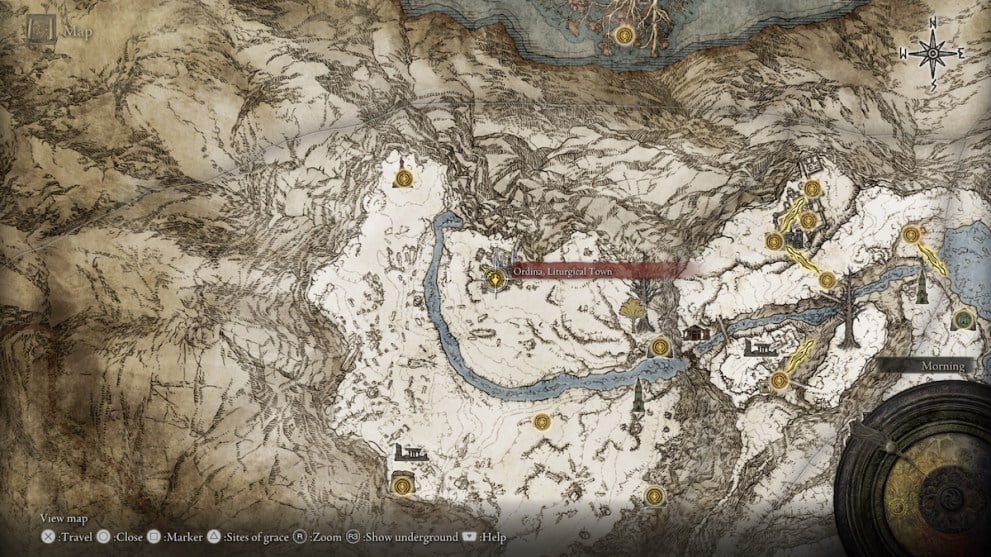
Step 3: Ordina, Liturgical Town
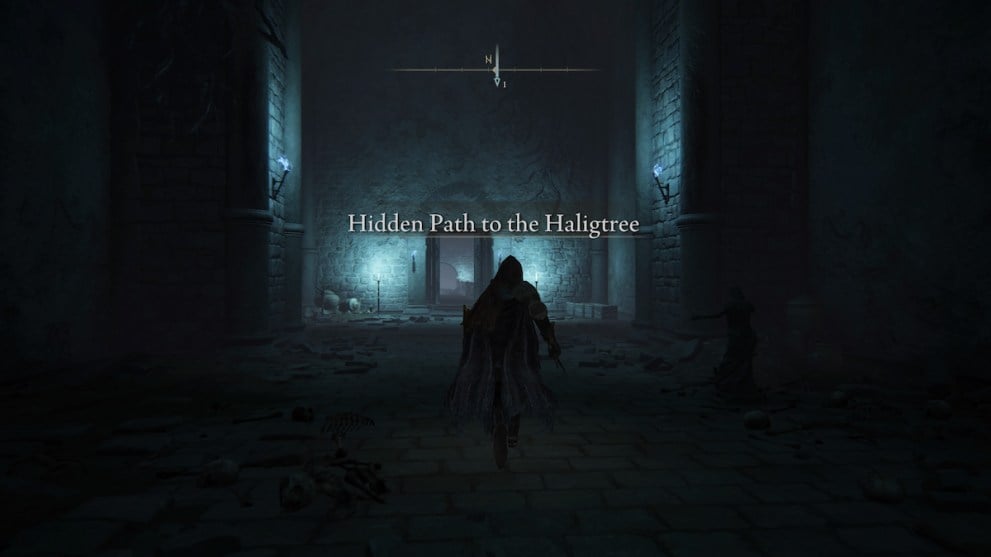
Hidden Path to the Haligtree
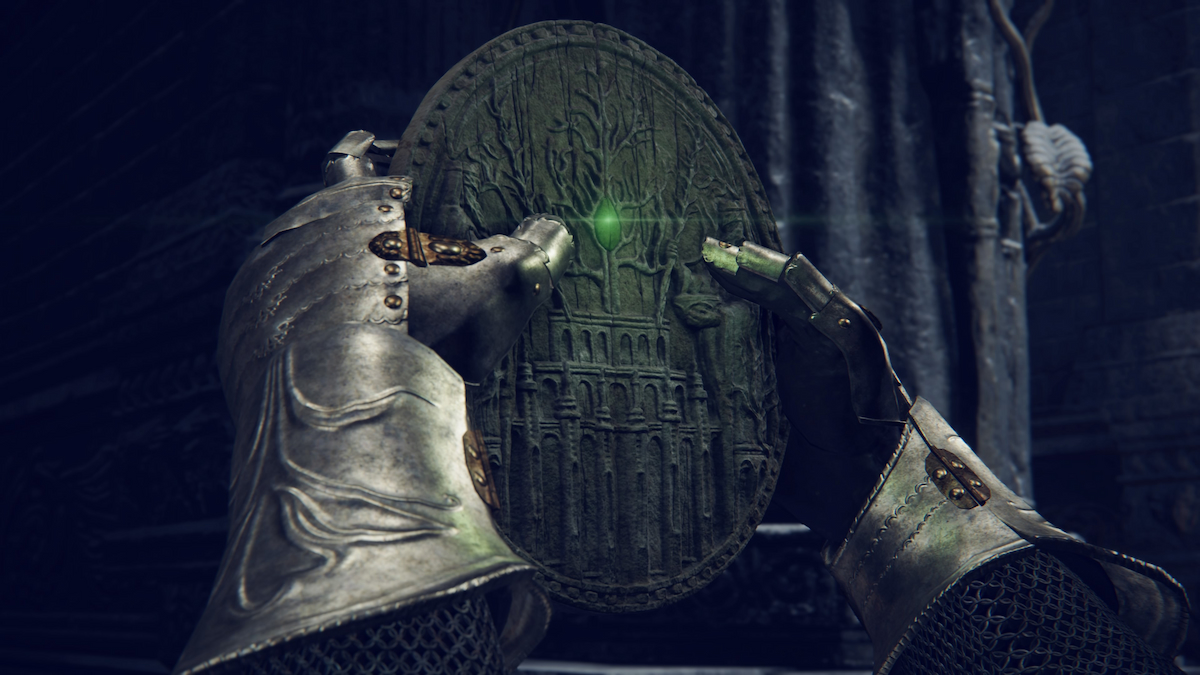
At the Grand Lift of Rold, you’ll see a prompt. Cycle the prompt using the left or right directional buttons to the “Hoist secret medallion” prompt. A cutscene will trigger activating the completed Haligtree Secret Medallion with the Grand Lift of Rold. This secret lift takes you to a previously closed-off section called the Consecrated Snowfield, which is left of the Mountaintop of the Giants .

Continue through the Hidden Path of the Haligtree and get past the small tomb area.
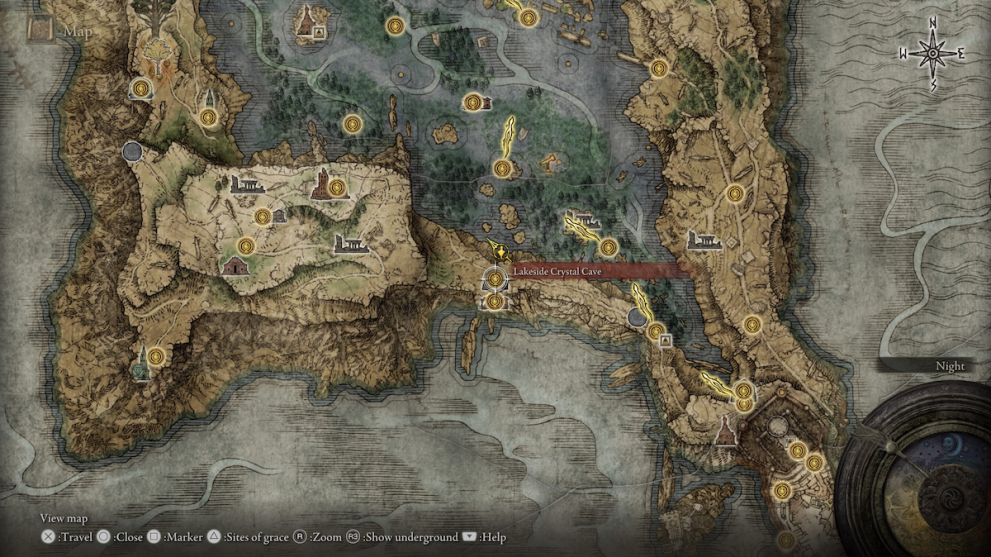
You’ll arrive in a snowy landscape called the Consecrated Snowfield. This previously blocked-off area is home to the teleport leading to the Haligtree, so you’re almost there! Go straight north to the Inner Consecrated Snowfield Site of Grace.
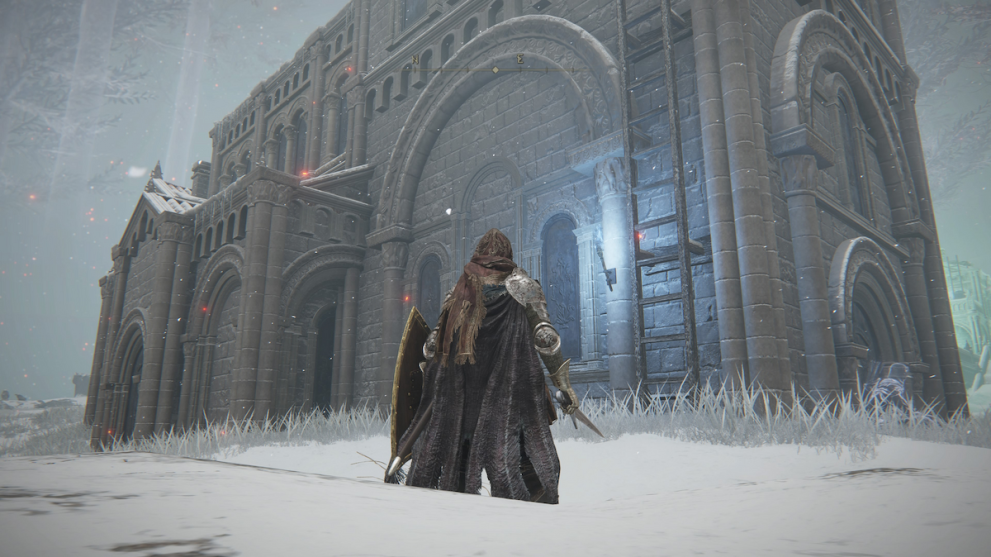
Past the ravine to the north is the liturgical town of Ordina; this is your destination. Head north to Ordina and rest at the Ordina, Liturgical Town Site of Grace.
Below is a list of prep items that will vastly aid you through the difficult trial through the ghostly liturgical town.
Ordina Preparation:
- Sentry’s Torch – Reveals the location of the otherwise invisible assassins. Sentry’s Torch can be purchased at the Hermit Merchant’s Shack over in the Capitol Outskirts.
- Black Knife Armor set – Softens footsteps and traversal noise, crucial for avoiding the assassins lurking throughout Ordina. Located under the bridge in Ordina.
The Black Knife armor is under the northern bridge in Ordina.
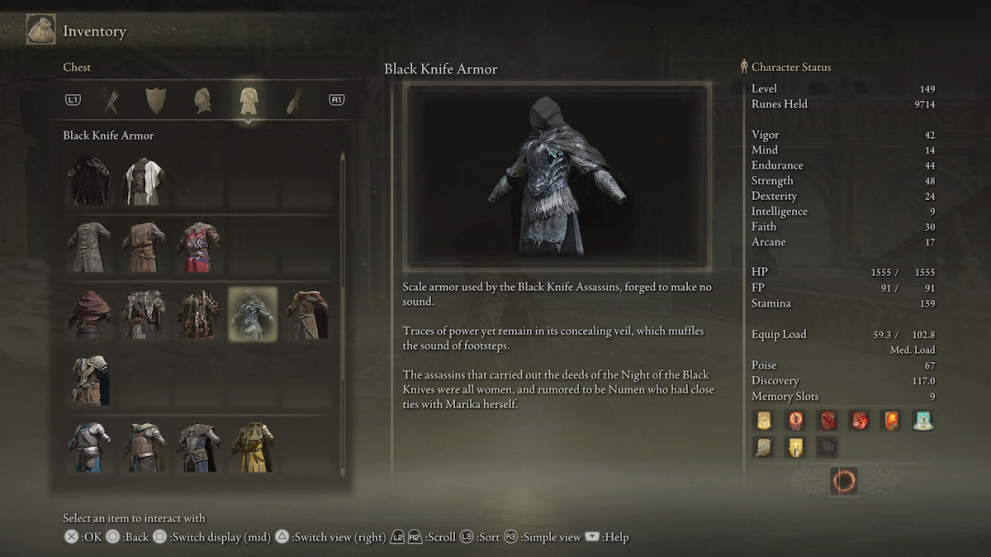
On top of looking really cool, the Black Knife set muffles the sounds you make, which will greatly ease your troubles breaking the Ordina Seal.
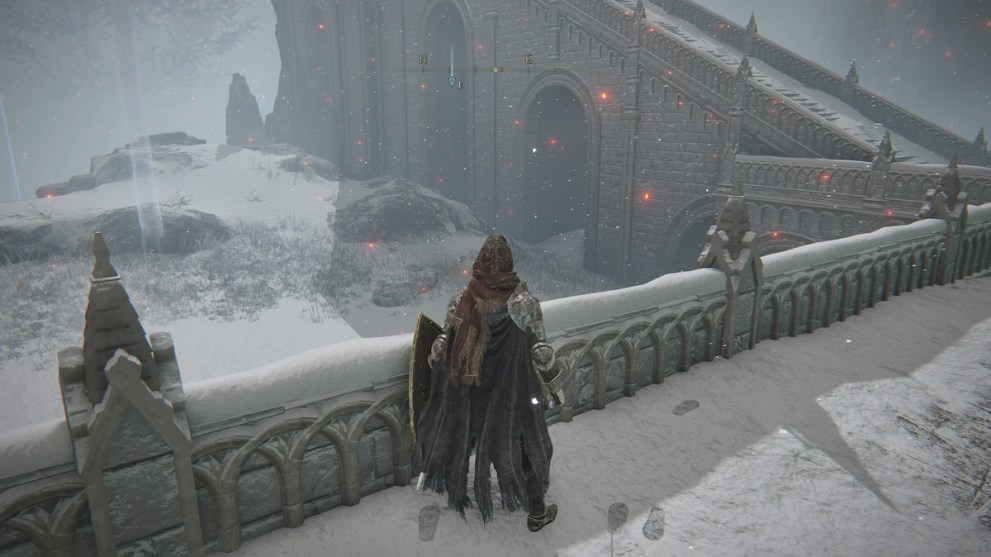
Step 4: Breaking the Ordina Seal
Go Through the Evergaol
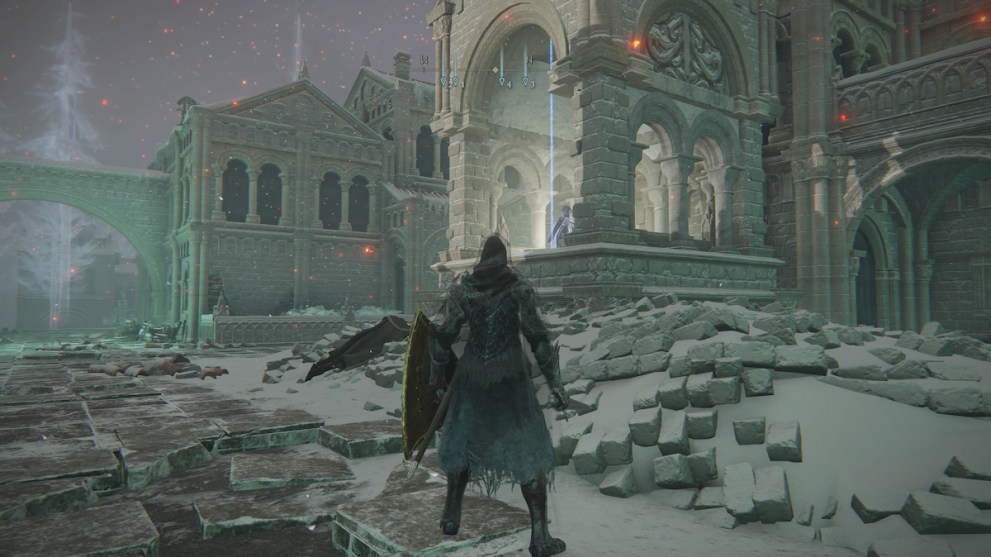
The teleporter leading to the Haligtree is sealed on top of the northern bridge, so the goal here is to break the seal. There’s an Evergaol with a hint about how to do this in a plaza to the northwest.
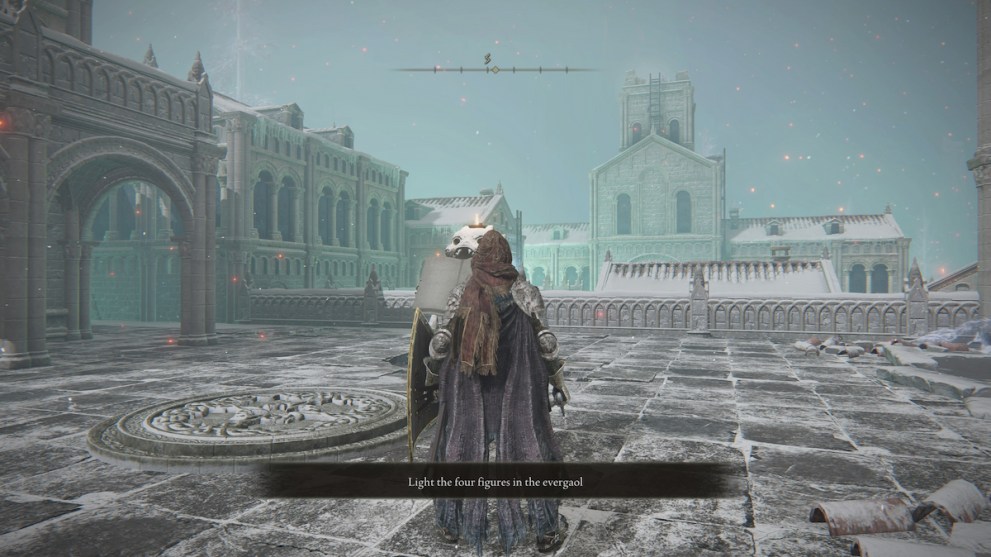
The Evergaol hint reads, “Light the four figures in the evergaol.” You can now enter the Evergaol here to initiate the puzzle required to open the seal on the bridge. As the hint says, you must light up four areas within Ordina. This is easier said than done considering all the Black Knife Assassins lurking in the streets and Albanauric Archers on the rooftops.
The goal is to light all four candles spread throughout Ordina. Here’s the recommended route and order we recommend you light the candles in, starting with the first candle on the left:
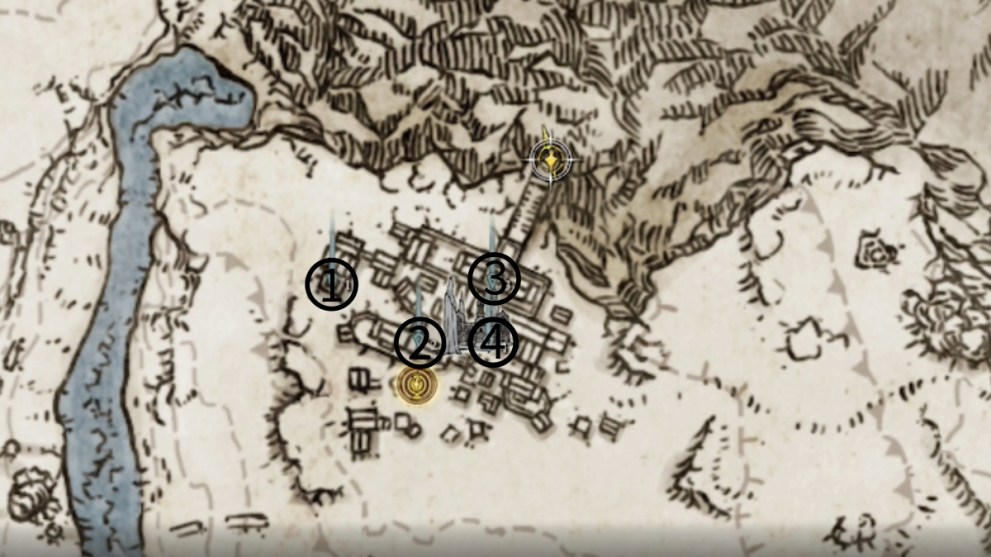
While there is no required order to light them, this particular path is the easiest to take. It’s also worth noting that you can light one candle and then leave the Evergaol and that candle will remain lit when returning. Feel free to light one at a time if you wish.
First Candle
Sneak your way around all the buildings on the western edge of Ordina. Two assassins are hiding in the western streets here, so carefully sneaking around the perimeter is your best bet. The tower on the western edge has a ladder that you can climb. Climb up to light the first candle.
Second Candle
Once again, sneak your way around the perimeter of Ordina, this time around the southern border. There will be some archers on rooftops that may spot you, but there aren’t any assassins here since they’re tucked in the streets instead. Once you approach the middle street near the Site of Grace, head up and turn left, avoiding the assassin to the right.
You’ll see some stairs and a railing surrounding a ladder.
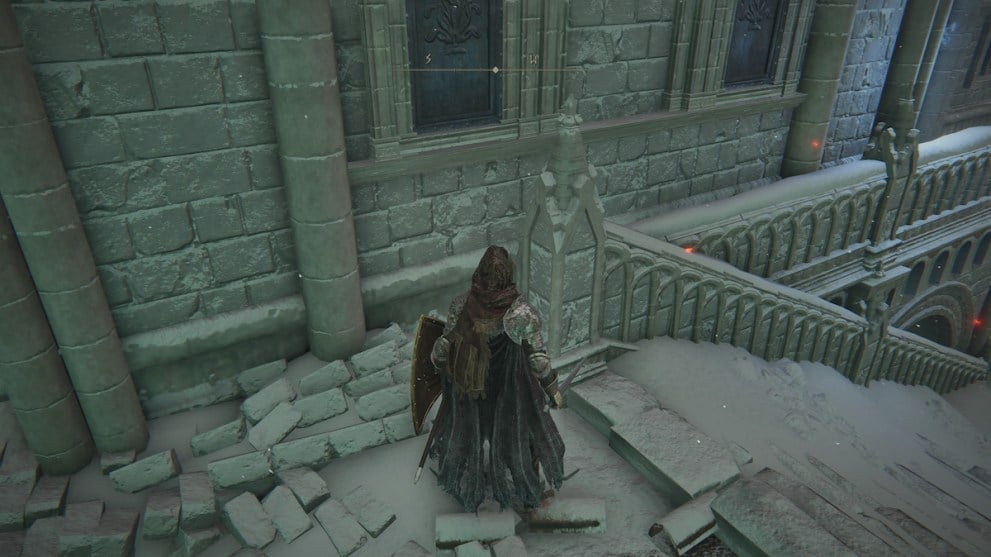
The candle is up this ladder, so jump up on the railing and climb up the ladder.
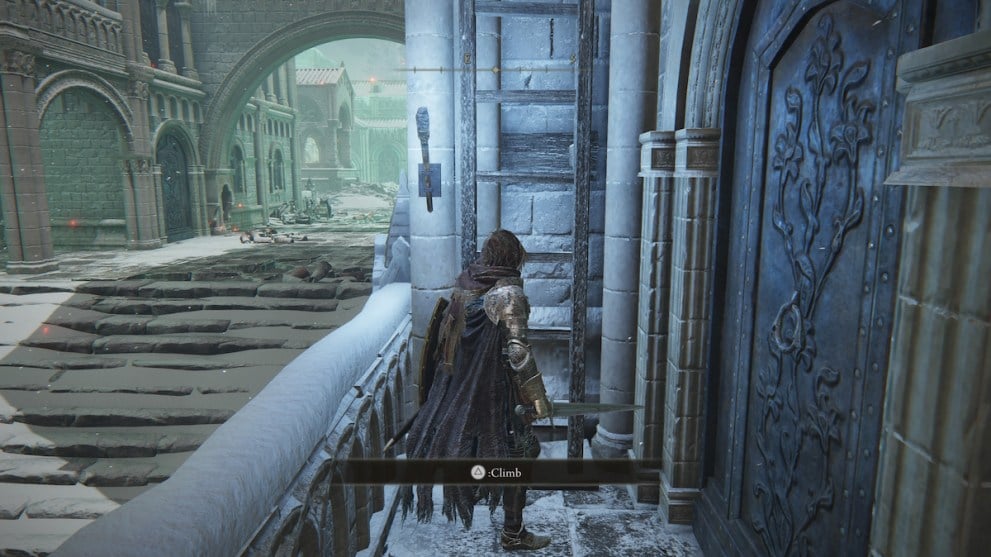
Once you make it to the top and light the second candle, archers will have their radar on you, so be careful.
Third Candle
Jump across the rooftops to the northern tower. Usually, these rooftops are occupied by archers, but these screenshots were taken outside of the evergaol.
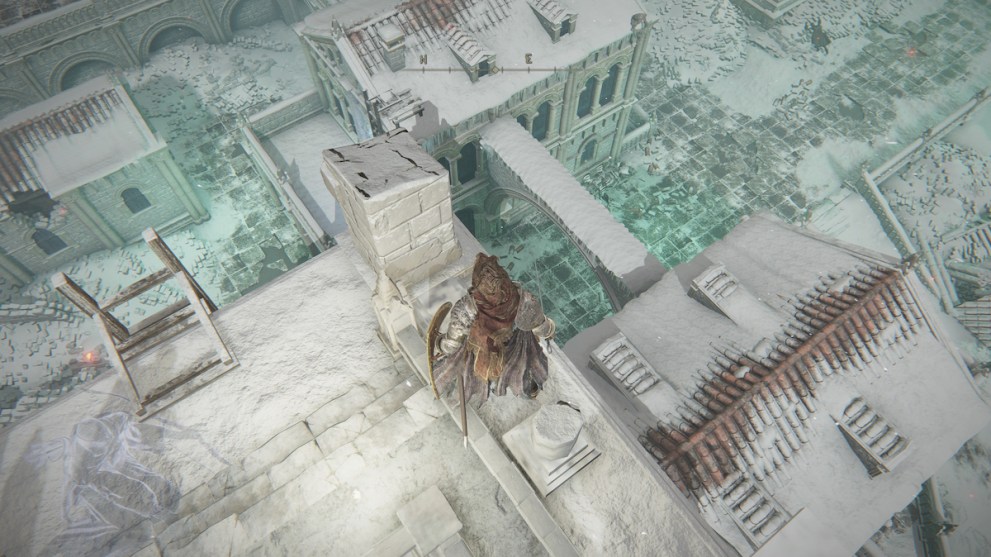
You will contend with archers at this point, so dodge their shots and take them down. Climb the ladder at the northern tower and light the third candle up on top.

Fourth Candle
The final candle is actually on the ground level near the southern portion of Ordina. There’s an assassin guarding the entrance to this candle, so it’s best to come from behind. Avoid arrows from the rooftop archers and carefully climb down to the ground.
Sneak up to the assassin and then light the final candle behind him.
Lifting the Seal
Once you’ve lit all four candles, the seal on the northern bridge will be lifted. Exit the assassin-infested Evergaol and head to the bridge. There’s a portal leading to the place you’ve been trying to get to this whole time: Miquella’s Haligtree.
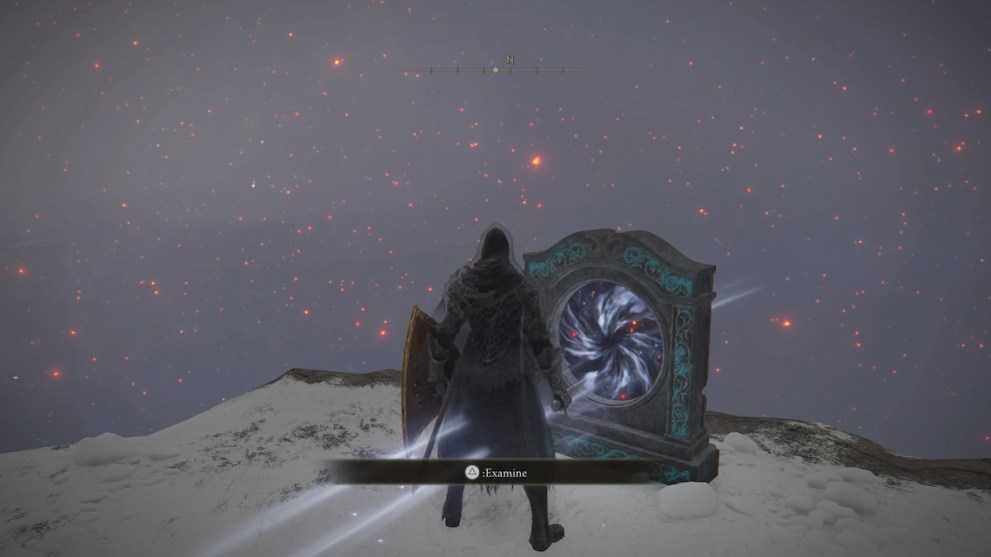
Just use the portal and you’ll be transported on top of one of the branches of the majestic Haligtree, congrats!
That covers how to get to Miquella’s Haligtree. But there’s much more where that came from; check out our numerous Elden Ring guides and other fascinating gaming features here on Twinfinite.


Updated: Jan 26, 2024 10:56 am