
How to Get and Complete All Exotic Quests in Destiny 2
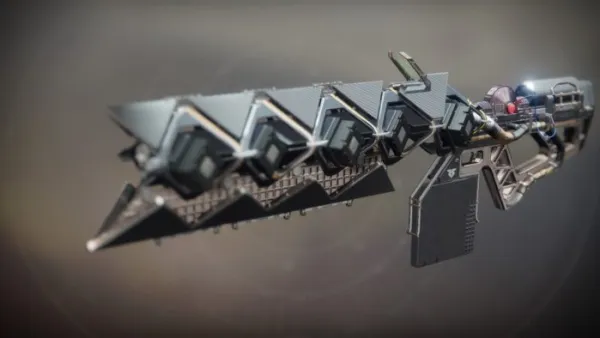
Destiny 2: Shadowkeep – Deathbringer

Looking for Destiny 2 exotic quests? We have all of them right here as of the most recent Destiny 2 expansion, Shadowkeep and the Season of the Undying. If you’re looking for a specific one, we have them all organized by which expansion and/or season they released in.
Let’s start with the most recent expansion, and then return back to vanilla Destiny 2 in chronological order.
First up, Deathbringer.
Step 1: Your first step for getting Deathbringer, the new exotic rocket launcher added in Shadowkeep is to complete the main campaign. Yeah.. just go do that! Easy one!
Step 2: After you’ve done that, go to Eris Morn and complete the memory of Sai Mota bounty. This will have you go to each moon lost sector ending with K1 Revelation via the Firewall Data Fragment step.
At the end of K1 Revelation, instead of exiting out of the back near the cache, there’s an area to your right if you’re facing the cache. In that small hallway, there will be a door that will open if you completed all the previous steps. Interact with the pedestal in that room to progress the quest.
Step 3: After this, return to Eris Morn and receive the Symphony of Death quest. Now we’re getting somewhere. You’ll need to collect three items.
- Collect Festering Bone – Compete a public event at the Hellmouth.
- Collect Ritualistic Bone – Complete the K1 Revelation Lost Sector and loot the cache.
- Acquire Bone Collector’s Marrow – Kill the Trove Guardian. Its location changes weekly.
Step 4: Next, you’ll need to kill Sulmakta, the High Conductor, a yellow major enemy that can be found towards the end of the Scarlet Keep strike.
When the elevator ride near the end of the strike stops for a second time go towards the right side of the room to find Sulmakta. Kill it and then you’re onto the next step.
Step 5: Next you’ll need to fill a progress bar of enemy kills. The first bar correlates with minors, the next majors, and the last bosses. Doing these in Moon locations will speed up the progress.
Step 6: Finally, head to the Circle of Bones (directions if you need them), and straight to the area where you fight Phogoth. There will be a short mission for you there. It’s not too hard and very soloable.
After you’re done with this return to Eris Morn and you’ll have Deathbringer.
Destiny 2: Shadowkeep – Divinity
Now we arrive to Divinity. Divinity is arguably the most complicated and difficult exotic quest in the game as it requires coordination from six different people and the ability to clear Garden of Salvation.
We’ll provide the steps that lead to the portion of the exotic quest takes place in Garden of Salvation. From there we highly suggest using a visual video guide, such as this one from Datto we’ll link below to complete the final and most difficult step. It’s a bear and trying to describe what to do in words will not be all that helpful.
Step 1: To start Divinity, go to the raid entrance from the Moon’s patrol area (see video below). Kill the enemies that spawn from the gate until an exotic engram drops. This will be the Divinity quest step.
Step 2: Then go to the following three lost sectors on Nessus and examine the Oracle that is hidden there. An enemy will spawn each time you try to examine it. Kill it, and then reexamine the Oracle.
- The first Oracle is found in the Conflux Lost Sector in the Cistern area.
- The second Oracle is found in the Orrey Lost Sector in the Artifact’s Edge area.
- The third and finale Oracle is found in the Ancient Haunt Lost Sector in the Tangle area.
Step 3: Then after that, you’ll need to kill enough Vex around the system to obtain 120 Decryption Core Fragments.
Step 4: Finally, you’ll need to purchase an Empowered Decryption Core from Eris Morn for 30 phantasmal fragments. This will bring you to a step doesn’t provide and further clear instructions.
Step 5: You’ll need to enter the Garden of Salvation and complete a series of tether puzzle objectives that will unlock a secret chest next to the chest for the final boss of Garden of Salvation.
Check out the video below for how you can most easily complete these tether puzzles.
Destiny 2: Season of the Undying – Leviathan’s Breath
Compared to Divinity, the quest for Leviathan’s Breath, a new exotic power Bow as of Season of the Undying, is a walk in the park. Make sure that you own Season of the Undying, first and foremost, as you won’t have access to the exotic quest, Make Bows, Not War, otherwise.
After that, talk to Banshee-44 to begin and complete the following quest steps in this order:
Step 1: You are tasked with finding a hidden entrance to Banshee’s Weapon Workshop. This step is a bit complicated if you’re going at it blind and requires a guide all in itself. You can check that out here if you’re having trouble finding it on your own, complete with visual aids.
Step 2: Complete Vanguard Strikes or Gambit Matches until the progress bar is filled. Gambit Prime in particular works very well, about three of those will knock this step out.
Step 3: Land precision final blows with a Bow against Vex or Cabal.
Step 4: Complete an epic reprisal of the strike, The Arms Dealer, now located via the director on Earth. This can be pretty tough, make sure to bring your best PvE weapons and supers for survival.
Step 5: Return to Banshee-44 to complete the quest and gain the new exotic heavy bow, Leviathan’s Breath.
How to Get and Complete All Exotic Quests in Destiny 2
Vanilla Destiny 2 – Sturm

Sturm is a powerful hand cannon that happens to be one of Destiny 2’s new exotic sets (an exotic/legendary combination that provides added perks). It’s also one of the few weapons locked behind a quest that you must complete if you want to nab it for yourself.
The first thing you will need to do is beat the story. This unlocks world quests on each of the planets, including one called “O Captain” on Nessus. Complete that quest, and its follow-up “My Captain,” to be given the Drang legendary sidearm and a piece of paper for Master Rahool. Take the paper to Rahool to begin the Relics of the Golden Age exotic quest.
The first part of the quest can be time-consuming. You must complete the following objectives:
- Decrypt five legendary engrams (leveling up vendors counts).
- Decrypt one exotic engram
- Kill 10 Fallen on Nessus using Drang.
After completing that, return to Master Rahool and he’ll give you a note for Tyra Karn on the Farm. Go to her to get your next set of objectives:
- Get 10 Fallen multi-kills on Nessus with Drang (kill at least three enemies without reloading for it to count. Doesn’t have to be fast).
- Defeat 10 Fallen Majors with Drang on Nessus.
Afterwards, return to Tyra Karn and she’ll give you the final step. Head into the Exodus Crash strike and look for a servitor called Kendricks-7 and kill it. After that, simply return to Tyra Karn and collect your Sturm exotic hand cannon in Destiny 2.
How to Get and Complete All Exotic Quests in Destiny 2
Vanilla Destiny 2 – MIDA Multi-Tool
The MIDA Multi-Tool was a very well-liked weapon in the first Destiny… at least it was well-liked by those who used it. Anyone caught on the business end of this potent scout rifle often found themselves staring at their ghost since they were just quickly killed. Thanks to an exotic quest, you can get this weapon again in Destiny 2.
First, as is the case with all exotic quests in Destiny 2, you must beat the story. After that, get as close as you can to 260 Power Level and head on over to the EDZ to do the “Enhance” quest. You’ll have to track down some Fallen but it’s not a tough quest. At the end, Devrim Kay will give you the MIDA Mini-Tool, a legendary submachine gun that pairs with the MIDA Multi-Tool.
When you’re all done with Devrim on Earth, head to the Tower and talk to Banshee-44. He’ll have a quest for you called “Sigh, Shoot, Repeat.” It’s not challenging or anything, just a bit time-consuming. The first step requires you to:
- Kill 50 enemies using precision shots from a scout rifle.
- Get 25 multi-kills with a scout rifle. (Kill 3 or more enemies without reloading).
The following step after completing the above objectives is called “Under the Hood.” For that one, you’ll have to dismantle five rare or legendary scout rifles. Once done you’ll have one more step, “The Fall Will Kill You.” Simply get 50 submachine gun kills while you’re in the air.
When all is done, go back to Banshee and claim your shiny new MIDA Multi-Tool to finish off another of Destiny 2’s exotic quests.
How to Get and Complete All Exotic Quests in Destiny 2
Vanilla Destiny 2 – Rat King
The Rat King is an interesting exotic hand cannon in Destiny 2 that rewards fireteams that have multiple wielders of the weapon. Of course, that means its exotic quest requires multiple people as well, so let’s get started.
First, of course, beat the story. After that, head to Titan and Talk to Sloane for the “Enemy of My Enemy” quest. You’ll need to hunt down this Fallen Captain. Don’t worry, you’ll be guided through the whole thing, and it’s not difficult at all. When done you’ll get an item and quest called “Rat King’s Crew.” The quest consists of four riddles which each depict challenges that increase in difficulty. Also, you must do the quest with other rats. So either play with at least one other who has the quest, or a player who already has the weapon.
- Riddle One Solution: Complete three patrols with your fireteam.
- Riddle Two Solution: Complete two public events with your fireteam.
- Riddle Three Solution: Win two Crucible matches with your fireteam.
- Riddle Four: Complete a Nightfall Strike with five minutes or more left on the clock.
This quest can also be randomly triggered at the end of a Strike it seems. While running Strike playlist, some players have gotten the Rat King’s Crew item to appear as a reward.
How to Get and Complete All Exotic Quests in Destiny 2
Vanilla Destiny 2 – Legend of Acrius
After completing the game and you continue to explore the world of Destiny 2, you will get a mysterious item randomly in your Power Slot. The item tasks the player with heading to Nessus and collecting some items from Cabal. Once that’s done, you get the next, mysterious step: Await the World-Eater. The step comes with the following text:
The decrypted communications indicate something is coming. Look for the arrival of the “World-Eater.”
Now that the Leviathan raid is live, the Await the World Eater Step becomes Destroyer of Worlds which simply requires that you complete the raid. After that, it’s time to take on a very tough version of the Arms Dealer Striker. It’s pretty much a Prestige Nightfall with only 7 minutes to start. You must destroy anomalies that appear in order to get more time. When you beat the strike you’ll actually get the weapon, though it will only have a single perk, you’ll need to complete some more steps to have the full weapon.
Back to the Bazaar is the next step in the quest to acquire the Legend of Acrius, and it requires to speak to Benedict 99-40 who has a few objectives for you:
- Kill 25 Cabal
- Kill 15 Cabal at Close Range
- Get 10 multi-kills on Cabal with the Legend of Acrius. Since the weapon only carries one slug in the magazine, you’ll have to work at grouping them up.
When you’re all done, return to Benedict 99-40. The next step is His Highness’s Seal. You must eliminate bosses and complete the Leviathan raid to earn 10 Emperor Seals.
Vanilla Destiny 2 – Riskrunner
Kind of randomly and surprisingly alongside the release of New Light with Shadowkeep, Bungie added an exotic quest for Riskrunner, an exotic energy SMG perfect for killing Fallen (and to a lesser extent Hive). Sure, why not! It’s pretty easy, it just takes a little bit of a time commitment.
First, go to Banshee-44 in the Tower. He’ll have the quest for you to take. All you need to do for the first part is: complete a lost sector on the EDZ, complete a heroic public event, and complete a Nightfall Strike.
Then after you’ve done that, you’ll get a new mission on the EDZ known as Risk/Reward. Go ahead and fire it up.
We won’t spoil the surprise that awaits you there, but Destiny 1 fans will be in for a treat.
There will be a three Dusk Captains and a Fallen Walker in the area you arrive it. Kill them all to move the quest along. In fact, you should kill the Fallen Walker a few more times until you get all three of its special rewards while you’re there.
After that, simply follow the markers along until you reach your prize. You’ll just need to do some light platforming from this point on. When you’re all done you’ll have Risk Runner and its exotic catalyst.
How to Get and Complete All Exotic Quests in Destiny 2
Destiny 2: Warmind – Sleeper Simulant
Once you complete the main campaign of Destiny 2: Warmind, you’ll be rewarded with the IKELOS Hand Cannon, this is going to be your buddy for a while as you’ll have to complete a lot of objectives with it.
First, visit Ana Bray to begin the quest, and then you’ll need kill Cabal and Hive with the IKELOS. Next, kill powerful enemies with the IKELOS equipped. These are any enemies that have an orange health bar, or bosses. Then, you need to complete strikes with the hand cannon equipped. Just hop into the Vanguard Strike playlist and bang them out. After that it gets a bit tricker.
You’ll need to complete through level 3 of escalation protocol, which can be tricky if your team isn’t very good. Keep lurking around Mars and you’ll eventually get it.
Then, you need to find 15 sleeper nodes and use the correct override frequencies to crack them open. You will need four Resonate Stems to create each individual override frequencies which are best farmed by completing patrols on Mars. This is by far the most time consuming part of the exotic quest.
Finally, you’ll unlock a 360 version of the final mission of the Warmind campaign, beat it, and the Sleeper Simulant is finally yours.
How to Get and Complete All Exotic Quests in Destiny 2
Destiny 2: Warmind – Worldline Zero
Aside from the Sleeper Simulant, there are two other Exotics you can get your hands on in Warmind. One is an Exotic sword called the Worldline Zero. To get the Worldline zero, you need to collect Lost Memory Fragments on Mars. It is a bear to complete and will take you a boatload of time and effort. We’ve got a guide to help you out with all the Fragment locations, if you’re going to truck on through for the sword anyway.
When you get to each Fragment, you’ll need to shoot it with different elemental weapons, depending on what color it’s glowing. White = Kinetic, orange = Solar, purple = Void, blue = Arc, and red = Valkyrie javelin. You need to get at least 35 Fragments to unlock the Exotic sword Worldline Zero. If you get all 45, you’ll get the Sparrow.
How to Get and Complete All Exotic Quests in Destiny 2
Destiny 2: Warmind – Polaris Lance
To get started on the Polaris Lance exotic quest, Nascent Dawn, you will need to have completed the Warmind campaign and the world quests as well. This will begin the exotic quest after talking to Ana Bray after doing all that.
Nascent Dawn is split up into five different parts, here is how to complete all of the steps for it.
Step 1: Complete three patrol missions, one lost sector, and locate the sleeper node in Dynamo Approach (you will hear Rasputin’s classical music when you’re close). Do all that and return to Ana Bray for part 2.
Step 2: Get 25 kills with the Javelin, complete the Psionic Potential Heroic Adventure, find the sleeper node in the Ma’adim Subterrane Lost Sector. Go back to Ana Bray again for another task.
Step 3: Complete 10 total levels of Escalation Protocol. Unlike the Sleeper Simulant quest, just clearing the first wave over and over will suffice. Complete three Vanguard Strike playlist strikes. Find the sleeper node in Olympus Descent. Back to Ana!
Step 4: Using the new scout rifle you have as a reward from Ana, get five precision multi-kills without reloading as well as 20 total scout rifle kills. Then, complete the now reappeared Fury mission on Io. Finally, find the sleeper node in Mindlab Rasputin.
After completing these four steps and returning to Ana one last time, you’ll have your Polaris Lance finally.
However, an optional step 5 will grant you its catalyst and complete the exotic quest. Here’s how to do that final step
Step 5: Get 15 Javelin multi-kills. Complete three matches in the Crucible, beat the now reappeared Strange Terrain mission, and find the sleeper node in Alton Dynamo.
Destiny 2: Warmind – Whisper of the Worm

Whisper of the Worm is an exotic Sniper Rifle that consumes power ammo and is in the power ammo slot and will pull ammo from reserves on consecutive precision shots to allow you to continue firing.
The Whisper of the Worm exotic quest is tipped off via The Whisper legendary quest that will appear in your inventory.
What you need to do is go to Io’s landing zone in the Lost Oasis and wait for a public event to spawn.
After this event is over, a Taken boss enemy will appear near the Grove of Ulan-Tan Lost Sector. Defeat it, and a Taken portal will appear. Going through it will take you into a new area and a timer will begin.
You have 20 minutes to complete a difficult encounter that will challenge you with challenging platforming and combat sections. If you can complete the challenge in time, you’ll be rewarded with Whisper of the Worm.
We highly suggest bringing a team of three and watching a video guide from your favorite YouTuber/Streamer of choice. If you can find a Sherpa that knows what they are doing that’s even better, but going in blind and/or solo will certainly lead to failure unless you’re a Destiny 2 god. So hit up the LFG app and find a group.
How to Get and Complete All Exotic Quests in Destiny 2
Destiny 2: Forsaken – Ace of Spades

The quest to get Ace of Spades, Cayde-6’s old Hand Cannon, is quite straight forward, but it can be difficult depending on how good you are at PvP. First things first, beat the Forsaken campaign and then talk to Banshee-44. Then, follow these steps:
- Get kills with a Hand Cannon in Gambit, if you kill an Invader it counts for a lot extra..
- Get 250 kills in Strikes using a Hand Cannon.
- Get 25 precision kills in the Crucible using a Hand Cannon.
- Complete the ‘Ace in the Hole’ mission on Titan.
- Bring the weapon back to Banshee, to get your fancy new Hand Cannon which is a beast in PvP.
How to Get and Complete All Exotic Quests in Destiny 2
Destiny 2: Forsaken – Malfeasance
To start the exotic quest for Malfeasance, you must first head into Gambit and pray to the RNG gods that when you get to the Primeval phase, that a rare Servitor boss appears. Kill it, and the quest will begin. Return to the Drifter in the tower, this will start the Seething Heart quest.
After that, you’ll need to kill difficult Taken enemies. These are orange bar Taken enemies or bosses. We suggest running through The Corrupted a few times to get this done.
That will prepare you for the next step, clearing a 580 power level version of The Corrupted strike. Try to at least be in the 550s and bring some friends, because it will be very rough otherwise.
Next, the Drifter wants you to bank motes in Gambit, and get wins. If you lost motes, you lose progress. So be careful.
The final step requires you to get 25 kills as an invader and as a team, kill four invading players. Once you have completed that final step, return to the Drifter and get the Malfeasance hand cannon.
How to Get and Complete All Exotic Quests in Destiny 2
Destiny 2: Forsaken – Wish Ender
To start the Wish Ender quest, first complete the main story of Forsaken and have in your possession the Balanced Awoken Talisman. Then wait until a full curse week in The Dreaming City. AKA the point where the Taken spread is at its highest possible level.
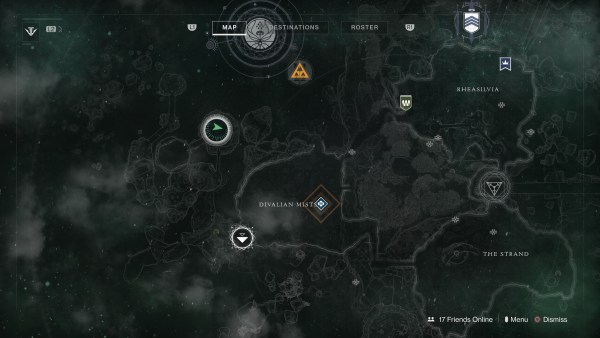
If the curse week is active, usually signified by the giant Taken blights all over the city, your first objective to get the Wish Ender exotic quest going will be to complete secret dungeon, The Shattered Throne, located in the Spine of Keris. Go to the location marked on the map above, and drop to the lower level. You should see a portal.
The portal will take you to a location off the map. Follow the path and enter and complete The Shattered Throne. You only have until the reset to complete it, so get it done to be able to progress in time to finish the quest. This is a difficult mission that you should bring along a fireteam to help you complete.
After doing that, go to The Tangled Shore and go to Four-Horn Gulch. Your ghost will reveal another secret mission for you that you will need to complete in order to progress.
From this point on, it gets a bit confusing to explain. We’ll let our old pal Datto, go ahead and walk you through step by step how to complete the final part of the Wish Ender quest so you can obtain that sweet exotic Bow.
Destiny 2: Forsaken – The Chaperone
The Chaperone returns in Destiny 2 via another exotic quest which is similar to the first game’s AKA you’ll need to get some work done in the Crucible.
You’ll start the quest through a RNG drop from completing Crucible matches. Just play and you’ll eventually get the quest. People have reported getting it through other events, but we recommend Crucible not only because it’s fast, but because we can 100% confirm it does drop from there.
After you have it, the quest will direct you to Amanda Holliday in the Hangar. Here are the steps required:
- Get 20 shotgun kills in the Crucible.
- Get 20 kills in each energy element (Solar, Arc, Void) in the Crucible. Death sets your progress back.
- Get 15 guardian kills in Gambit. Kills either as an invader or stopping invaders count.
The toughest step is getting 15 guardian kills in Gambit. You don’t have to use a shotgun, but that doesn’t make it any less tricky. Truth would be our recommendation for getting the kills as it’s quite OP in Gambit right now.
After you do that, you’ll be all done. Return to Amanda Holliday and claim The Chaperone. An exotic primary shotgun known for its precision slugs.
How to Get and Complete All Exotic Quests in Destiny 2
Destiny 2: Black Armory – The Last Word

Kick off The Last Word’s exotic quest in Destiny 2 by visiting the Drifter down in the Annex.
The Last Word is a bit more straight forward than some of the other exotic quests in Destiny 2. You won’t need to do anything too crazy like say in Whisper of the Worm or Wish Ender. You’re just going to run down the following the steps until you complete ’em all and get your exotic weapon.
Step 1: After speaking with the Drifter, defeat Hive with Solar Damage, Collect 75 Hive Tablets and defeat 3 Hive bosses. If you go to Escalation Protocol you’ll knock all of this out in no time.
Step 2: Return to the Drifter, then defeat Guardians in the Crucible until you fill up the progress bar. You can use any gun you like, but keep in mind deaths erase progress, so try to keep at least a 1:1 KDA ratio to keep the progress moving briskly.
Step 3: A mission will now appear on Titan. It’s soloable at power level 500, but it will get a bit hectic. You’ll need to progress until you’re in a large room of Hive and an invincible acolyte. Defeat the three Major wizards that are in the room to bring down the acolyte’s shield. You’ll need to do this three times.
Step 4: Return to the Drifter again, and you’ll kick off the next multi-part step: Collect 15 Etched Crystals which are dropped by Wanted enemies in Lost Sectors, earn Best Served Cold and Blood for Blood medals 25 times in Crucible, defeat Hive with precision damage for a chance to drop Hive Larvae which you’ll need to collect, and then complete three heroic versions of the Hive Ritual on either Mars or Titan.
Step 5: Finally, you’ll have one more mission that you can also solo: defeat Enkaar a hive weapon master that’s in the Hellrise Canyon on the Tangled Shore.
You’ll work your way down to Broodhold and then go up against Enkaar in a western style draw. The goal is the shoot the gun out of Enkaar’s hand.
You’ll need to navigate some other Hive along the way but do this three times to kill him and then you’ll have The Last Word. Make use of the Last Word’s exotic perk, the accurate hip fire fanning, to easily complete the mission as the difficulty will ramp up each time.
Destiny 2: Black Armory – Izanagi’s Burden

Izanagi’s Burden is one of the longest and most taxing exotic quests in the game but the rewards are worth it. With the change in how forges work as of Shadowkeep (each forge rotates every day, it unfortunately will take a little bit longer even.
Step 1-3: First, wait until it’s Volundr Forge day on Earth. When you’re in the forge area, go up to the ledge of the nearby bridge and then onto a lower ledge on your right. Then you’ll see a small cave across the gap. Go ahead and jump over to it and the box is located there. If you’re having trouble finding it, this video from Esoterickk should help.
Then you’ll need to get all four keys to stick in this box, three of which can be found in each of the first three forges using a similar method.
Essentially in between the first and second rounds two small shield drones will spawn in two different locations on the map. You need to quickly get to these drones and kill them before they disappear. If you take too long you’ll need to start over.
You’ll know that you did it correctly if you get a buff called Maximum Temper in the bottom left of your screen. Finish the Forge Ignition successfully, and you’ll get the key for each of the three forges. You can do this with multiple people to make it easier to get the drones killed in time.
For the locations of the shield drones, you can check out these video guides from YouTuber Ninja Pups for each forge: Volundr, Gofannon, Izanami.
After this, if you haven’t already, Ada-1 will give you the instructions to forge the fourth and final key.
Step 4: First you need to get 24 Watcher Eyes from Watcher kills in the Underbelly of the Leviathan. Once again, a video is the best way to show how to get to the Leviathan’s Underbelly. You can check that out here courtesy of YouTuber Ehroar.
The best way to farm these is to find a Watcher room, kill as many as you can but leave one alive so that the alarm goes off. Clear the room, including all the Watchers, leave the room, and then reenter to let everything reset and rinse and repeat until you have enough Watcher Eyes. It shouldn’t take you very long.
Step 5: Next you’ll need to collect Glimmering Amethyst which drops from chests from strikes and public events, strikes count double towards your progress.
The fast way to get this material is to either burn through a quick strike over and over, or do a public event loop around the EDZ. If you want to multi-task with the weekly strike objectives, you can just run them from the director via the Vanguard Strike playlist.
Step 6: Then after that, you’ll need to kill the shield drones at Bergusia Forge. Once again, here’s a Ninja Pups video for visual help on that step.
We’re still just getting started unfortunately. After this is done you’ll need complete a Rare Black Armory Bounty. The only way to get these bounties is through RNG from completing a regular bounty from Ada-1.
Keep completing bounties until you get a rare bounty, then complete that one to move onto the next step.
Step 7: Then after that you’ll need to run through the Shattered Throne and defeat the final boss at the end. You’ll likely need a team for this but fortunately for you, as of Shadowkeep you don’t need to wait for a high-curse week. You can select this dungeon from the director. Bring two friends or LFG it.
Step 8: After you’ve done this, you need to do a hard version of the Pyramdion Strike. Even at a lower power level, it’s not designed to be solo’d. You can try, but it’s going to be unforgiving since if you die, you need to start back at the last checkpoint and all the enemies are going to be focused on you. We recommend bringing the same team that you completed The Shattered Throne with.
Step 9: Finally, after completing all of the above you’ll have access to a new mission on Earth. Go to its location, fire it up, and take out Siviks, the boss of this little mini-mission. This one can be solo’d if needed.
Return to Ada-1, and you’ll finally have Izanagi’s Burden. Trust us, it was worth the effort.
Destiny 2: Black Armory – Jotuun
As of Shadowkeep, Jotuun has been moved from its original RNG drop to a questable exotic. It’s very straightforward but it will possibly take a few weeks.
You you need to grab the exotic quest from Ada-1, A Giant’s Might, and then do the following:
- Forge 10 Legendary Frames
- Defeat Vex
Keep in mind, Bungie has stated recently that the legendary frames portion of the quest is bugged. We believe that it’s Ballistic Logs frames that count, but other legendary frames using Module Reports may also count. Also people are reporting that it’s bugged where they aren’t getting progress for anything. So experiment with both and see what happens.
In any event, once both those steps are complete, turn it in for Jotuun, an exotic fusion rifle.
Destiny 2: Black Armory – Le Monarque
As of Shadowkeep, Le Monarque has been moved from its original RNG status from Volundr Forge to an exotic quest. It’s very straightforward but it will take some time potentially.
You you need to grab the exotic quest from Ada-1, A Butterfly’s Grace, and then complete the following:
- Forge 10 Legendary Frames
- Defeat Fallen
Keep in mind, Bungie has stated recently that the legendary frames portion of the quest is bugged. We believe that it’s Ballistic Logs frames that count, but other legendary frames using Module Reports may also count. Also people are reporting that it’s bugged where they aren’t getting progress for anything. So experiment with both and see what happens.
In any event, once both those steps are complete, turn it in for Le Monarque, an exotic bow.
How to Get and Complete All Exotic Quests in Destiny 2
Destiny 2: Season of the Drifter – Thorn
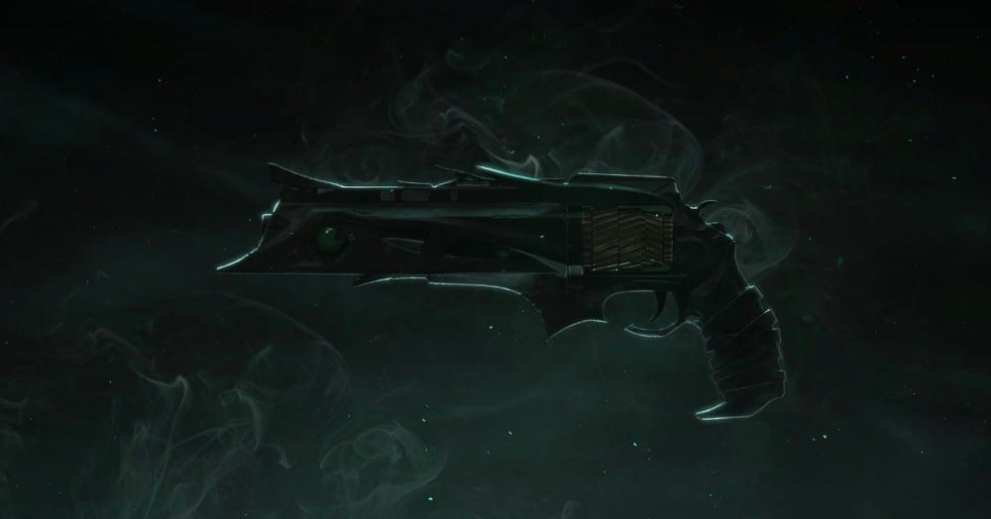
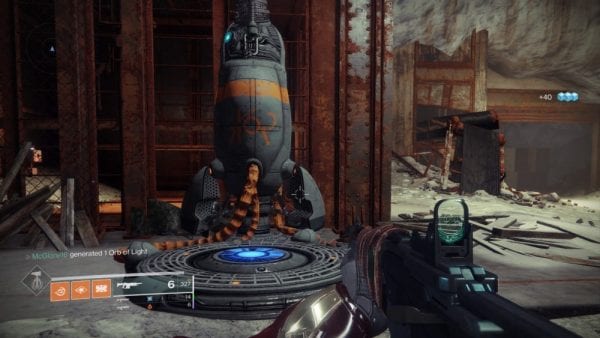
To start Thorn, you’ll need to go to a very specific, and hidden area of the Salt Mines. It requires a whole guide in of itself, that we recommend you check out here so we’re not reiterating an entire guide’s worth of content in this one section.
But if you really don’t feel like clicking onto another page, the TLDR version is to look for the device below [see photo] in the Salt Mines, interact with it, which will bring you to an outdoor area and then go to the very back of this area to find a camp site which which in the fire will contain the burnt of remains of Thorn, which when you collect, will begin this exotic quest.
Below are all the steps you’ll need to follow to complete the exotic quest for Destiny 2’s version of Thorn.
Step 1: Return to Banshee after completing the above, and then collect Hadronic Essence by either doing bounties for Asher Mir on Io, defeating Warlocks in Crucible, or completing Nightfalls.
Step 2: Now you need Plasteel Plating which you’ll get by completing bounties for Sloane on Titan, by defeating Titans in the Crucible, or by completing encounters at the Blind Well.
Step 3: Next is, you guessed it, the Hunter version, Sapphire Wire. You can get Sapphire Wire by completing bounties for Ana Bray on Mars, defeating Hunters in the Crucible, or by completing Escalation Protocol Waves.
Step 4: Next you’ll need to get Void kills in Crucible. This can take a very long time as the progress is slow. You get bonus progress for Hand Cannon kills and Competitive matches. So the quickest way is to use a Void Hand Cannon while playing on the Competitive Playlist. Deaths will set your progress back, so ultimately use what you’re best with to get it done.
Step 5: You’ll need to visit Tyra Karn on the Farm and she’ll send you off to do a special version of the Savathun’s Song strike. This is a difficult encounter even at 750, and we recommend that you bring a full fireteam. Complete this strike, and you’ll be able to finally obtain Thorn.
Destiny 2: Season of the Drifter – Outbreak Perfected
Outbreak Perfected surprised players when it released towards the end of the Season of the Drifter. Like Thorn, it’s a bit of a pain to even get started, and we have a guide for that if you want to speed things up. But if you prefer, below is the TLDR version of starting Outbreak Perfected.
This one is a bit more complicated than most exotic quests in Destiny 2. First, you’ll need to start up the Heroic Adventure, Bad Neighbors available from Sloan on Titan.
After kicking it off make your way through the first few steps of this mission as you normally would until you run into a Shrieker that is guarding a narrow hallway.
Don’t proceed forward as you normally would. Instead open the unlocked door to the left and you’ll gain access to a new area.
On a table near the center of the room you’ll find a fallen device that looks like some kind of datapad.
Interact with it and you’ll obtain the Fallen Transponder. This will unlock the pursuit for the Outbreak Prime exotic quest in your inventory.
You’ll need to visit specific Fallen lost sectors around Destiny 2 and locate fallen transponders which are hidden in each one the six Lost Sectors are:
- The Drain – Earth
- Atrium – Earth
- Widow’s Walk – Earth
- Whispered Falls – Earth
- The Carrion Pit – Nessus
- The Rift – Nessus
If you’re having trouble finding the datapads, Datto once again has a great video that you can check out below which breaks down where to find each one.
After completing that step, you’re going to visit our pal Tyra Karn again, and then you’re going to need to find a hidden Fallen NPC that’s at the Farm.
The NPC is in an underground basement area near the large warehouse. Note though, that once you speak to this Fallen NPC, the Zero Hour mission to get Outbreak Perfected will begin.
Zero Hour is one of the most difficult non-raid activities in the game, harder than Whisper of the Worm, and harder than some raid encounters.
We highly suggest bringing a full fireteam, and going through some practice runs to figure out the quickest way to run through Zero Hour to ensure you complete it in time as it’s a mix of platforming and combat again.
The Datto video above also goes into completing Zero Hour, so definitely give that a look before attempting it. Once you complete Zero Hour, you’ll have the exotic pulse rifle Outbreak Perfected in Destiny 2.
How to Get and Complete All Exotic Quests in Destiny 2
Destiny 2: Season of Opulence – Lumina

Lumina is the counter to Thorn, a hand cannon forged in light. We have a detailed step by step guide for how to get Lumina right here if you’d like to just give that a read if that’s what you’re after. We’ll give you the quick version below though.
- First, return to where you found Thorn, past the campfire a little further back you’ll find a chest. Open it to begin the Lumina exotic quest.
- Your quest marker will point you in the direction of a specific Lost Sector that’s going to be unique to you, and it’s going to change every hour. In that lost sector will be a unique looking chest that you’ll need to open to proceed.
- Generate 250 Orbs of Light doing whatever you like in order to proceed and then earn the legendary version of Lumina, Rose. Run Blind Well for easy orbs.
- The next step is a three parter: run a Nightfall and get at least 50k points, complete waves of either EP, Blind Well, and/or Black Armory forges, and then kill 100 enemies without reloading.
- Complete any team-based activity with Rose equipped. You can do anything that matchmakes you, but the more teammates that also have Rose equipped, the fast the progress goes.
- Run a modified version of the Will of the Thousands strike which now feature purple crystals that you’ll need to track down and destroy in order to progress the mission. Check out this helpful video from YouTuber xHOUNDISHx for help on where to locate the crystals.
- Finally, you’ll need to get Hand Cannon kills in the Crucible, generate even more Orbs of Light, and kill invaders in Gambit before they kill anyone on your team. Once you complete this final step, you’ll have Lumina.
Destiny 2: Season of Opulence – Truth
Truth is the next exotic quest you can obtain via Season of Opulence. Fortunately, it’s not nearly as difficult as some of the other exotic quests in this guide, and is arguably one of the easiest ones released in recent memory, it just takes time is all.
First, to start the exotic quest, you’ll need to complete a run of the Menagerie. Very easy as it’s literally impossible on normal mode. Just complete and loot the final chest to gain the pursuit.
Your first stop will be Petra in The Dreaming City, who will be your point person from this point on.
You’ll need to first complete an Ascendant Challenge bounty. Pretty easy if you’re all caught up on your power level, which by the time Shadowkeep rolls around, everyone will be.
Return to Petra. As of the time of this writing, Petra offered us all of the four map pieces where normally, you’d have to look for them. If this is fixed by the time you are reading this, then this video from YouTuber 360GameTV does a good job of showing you where to go.
The map pieces each have a task that needs to be completed in order to move the Truth exotic quest along. None are overwhelmingly difficult. These are the four steps:
- Kill 50 enemies on Nessus while Ascendant. If you need more Tinctures of Queensfoil, check out this guide for how to get more.
- Kill 100 Hive in the Tangled Shore.
- Complete three Nightfall Strikes and get 60 rocket launcher kills in Nightfall Strikes.
- Complete a Corsair Badge quest. These are obtained randomly while completing activities in The Dreaming City and require you to go to a specific location to kill some enemies to complete them.
After that, you’ll need to complete the Warden of Nothing strike, while Ascendant in order collect five out of ten hidden artifacts in the strike and then open a secret chest after beating the boss.
Once again YouTuber 360GameTV has another helpful video to help you walkthrough where the artifacts are easier than I could explain them here. Just note that you only need five, and anyone in your fireteam can interact with them, it doesn’t have to be you.
After beating the Servitor to a pulp, walk behind where the chest spawns and you’ll see secret floating pathways. Follow them around to a hidden area which will have a chest. That chest will contain Truth and your work is done!
Destiny 2: Season of Opulence – Bad Juju
The quest for Bad Juju, the famed exotic pulse rifle from Destiny 1, is actually quite straightforward, it’s just expensive.
Step 1: You must first unlock the Tribute Hall on Nessus. Simply go to the Barge on Nessus and speak to Werner 99-40 and open the chest that’s right next to him. This will grant you the exotic quest Invitation from the Emperor, and the Tribute Hall will be accessible via the director on Nessus.
Step 2: Arrive there, speak to the large Calus statue and you’ll be tasked with placing tribute in the hall. You do this by purchasing them from the Calus statue. You need to place a total of 18 to progress the quest.
However, initially these Tributes are extremely expensive costing large amounts of glimmer, planetary materials, bright dust, and/or legendary shards.
If you’re loaded or don’t mind farming/dealing with Spider, go ahead and just purchase them until you progress the quest. It can take you all of a minute or two in that case.
However, if you want to lower the cost, you’ll need to do as many daily bounties from the Visage of Calus as you can. Turn in the completed bounties to the statue, return each day after the reset for new bounties and you can eventually lower the price to a fraction of its original cost. It’s up to you.
Step 3: Once you’ve placed 18, the chest in the center of the room will now become a mission marker for a mission called The Other Side. This can be solo’d. It’s not particularly difficult but be ready to kill, a lot of stuff. Bring your best add clearing super.
After you complete the mission, you’ll have Bad Juju.
That’s all for how to get and complete every exotic quest in Destiny 2. For more FAQs answered on Destiny 2’s latest expansion, Shadowkeep, definitely check out our year 3 wiki guide.


Published: Sep 3, 2019 04:30 pm