One of the most exciting new challenges to undertake in Final Fantasy 16 are the Notorious Marks. A popular tradition throughout the Final Fantasy franchise as endgame content has made its return once again, and there are plenty of hunts for Clive to take on this time around. However, some of them can be a tad difficult to track down, and if you’re having a hard time finding one or more of them, we’ve put together a nifty list of all Final Fantasy 16 Notorious Hunts and their locations.
What is a Notorious Mark in FF16?
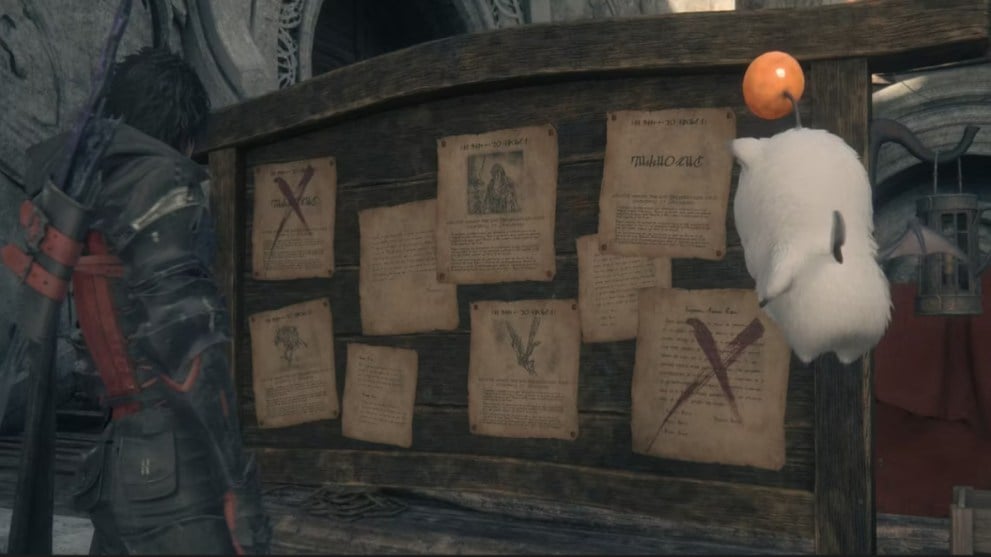
In Final Fantasy 16, Notorious Hunt Marks are essentially bounty hunts, given that you find each of them at what’s called a Bounty Hunt board. It can be seen as a fun recall to any Final Fantasy XII fan, as that game featured virtually the same thing with the toughest hunt and superboss in the entire franchise (at least in terms of HP).
Notorious Hunts are not available from the get-go in FF16, however, as you must meet a certain degree of story progression first. To unlock it, you’ll need to first complete the main story quest titled “The Gathering Storm.” After that, the Hunt Board will become available at the Hideaway, with Nektar the Moogle in charge of the whole operation.
Note that while a good portion of the Notorious Marks will become automatically available via more story progression, others need to be unlocked by completing other side quests or obligations.
Also, some of the hunts you get starting out may not be as challenging as you’d expect, but a select few of them later on will truly test your limits and are considered the most difficult content in the game. They range from C Rank to S Rank difficulty.
Rewards for defeating these hunts include various amounts of Gil and Renown, both of which are essential for powering up Clive throughout the game.
An added perk to vanquishing as many of these hunts as you can is that they qualify for two of the FF16 PlayStation trophies, including:
- Think, Mark! – Defeat 10 Notorious Marks (Bronze Trophy)
- Hunter, Hunted – Clear the Hunt Board (Silver Trophy)
How to Best Prepare For Notorious Mark Hunts in FF16
As we mentioned before, the hunts you get earlier on, usually in the C Rank range, are quite manageable and don’t necessarily need much preparation if you have a decent enough build and level. However, the A and S Rank hunts in particular do require some careful planning. Here are some tips we recommend before diving in on those nastier hunts:
- Bring Your Best Gear – When it comes to taking the hardest monsters in the game head-on, you’ll definitely want to have the best equipment you can get. Be sure to visit Blackthorne the blacksmith in the Hideaway, and boost your attack and defense stats as high as you can.
- Also Upgrade Your Abilities – Just as much as you need the best gear possible, you need the strongest abilities as well in your arsenal. Any spare Ability Points you have on hand need to be spent wisely, and you can always refund the points you’ve used at no cost if you need a different build for a particular challenge.
- Stock Up on Healing Items – While healing abilities can be very useful on their own, when it comes to fighting something that can knock down your health bar in a blink, you’ll want all means of recovery at your disposal. So pay a visit to Charon’s shop and stock up on as many potions and elixirs as you can for such occasions.
- Have Patience – A number of these hunts will truly test your might and patience, more than the foes you face in the main story. The S Rank hunts, which will typically wipe out your health bar in two hits max, require the utmost attention to strategy and understanding of their attack patterns. This means you’ll likely be dying over and over, so take that opportunity to learn, and before you know it you’ll be able to triumph over the fiercest of them.
- Save Your Progress – Should you happen to die at some point in FF16, you will return to the nearest Obelisk, which in some cases can be far away from your current location. Given that you may very well get blown away by a higher rank hunt the first time, you’ll want to save yourself travel time and save your game right before the fight.
All Notorious Mark Locations in Final Fantasy 16
Ahriman (C Rank) – Rewards: 5,000 Gil & 10 Renown
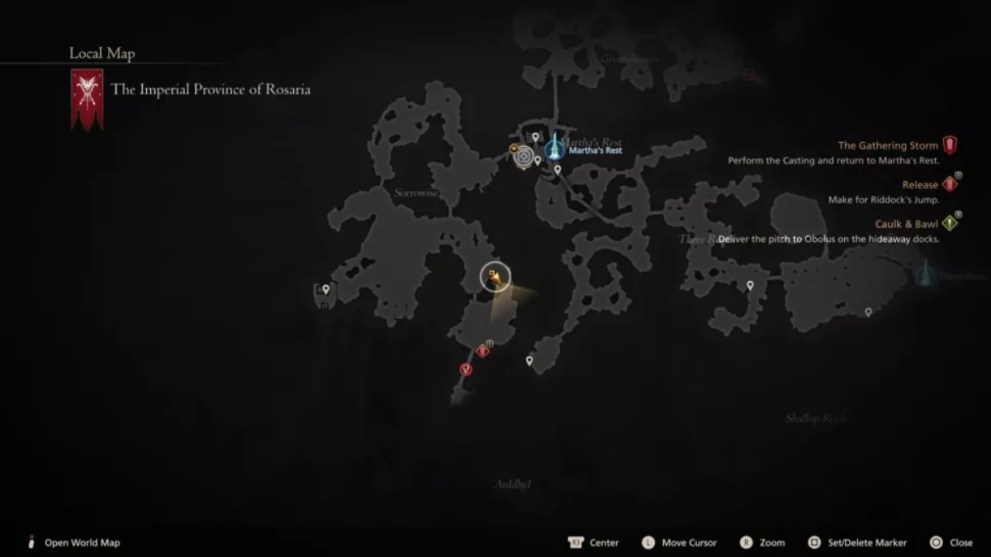
Location: This is the very first mark you’ll run into during the story. It’ll be found southwest of Martha’s Rest, south of Sorrowise.
Battle Tips: Ahriman likes to do plenty of AoE attacks that need to be dodged accordingly. It also teleports when under pressure, so you have to be diligent in keeping an eye (aha) out for it.
The most notable attack it uses is Doom, which will kill you in one hit if you’re not careful. The initial cast is unavoidable, but as the 4 circles above Clive’s head vanish and a circle appears beneath his feet, you need to dodge out of it before it one-shots you.
Aruna (The Angel of Death) (C Rank) – Rewards: 6,200 Gil & 10 Renown
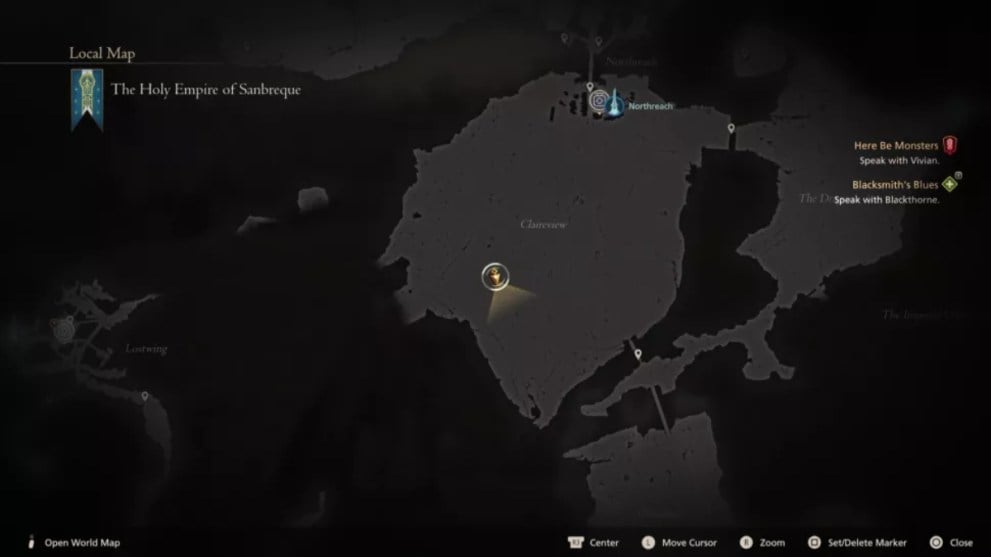
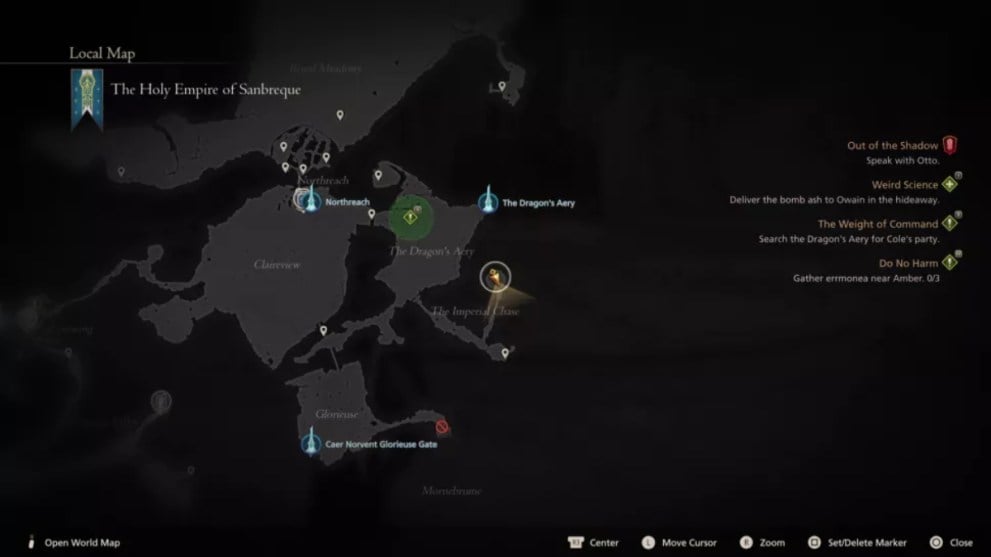
Location: Aruna is on the west side of Claireview, Sanbreque. You’ll easily see her flying around as you approach.
Battle Tips: Given their appearance, you could guess that Aruna uses similar air-elemental attacks as other harpy-type enemies, and you’d be right. They’re essentially a more difficult version, and it all comes down to dodging their telegraphed attacks.
If you want to wear Aruna down faster, stay in close proximity and time your dodges well, that way you can consistently deal physical damage.
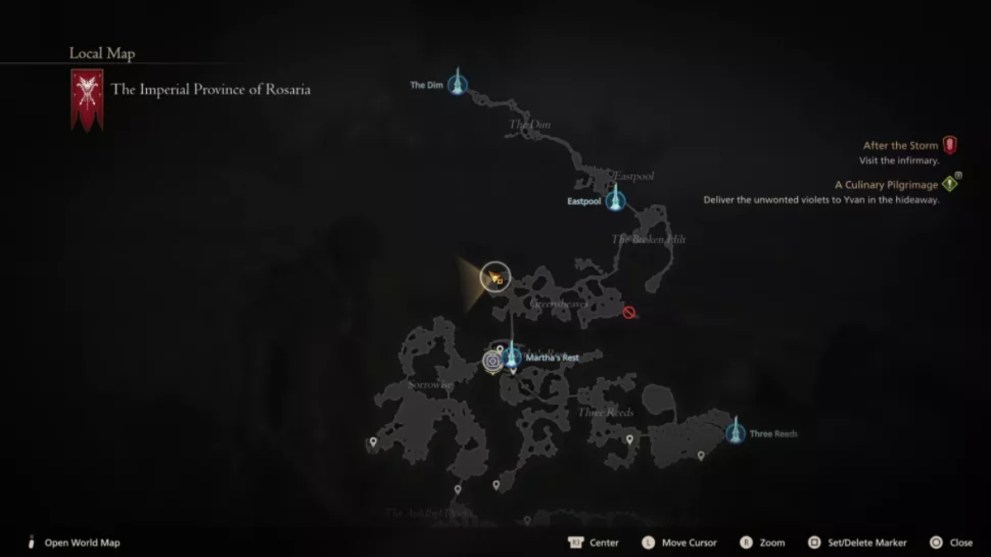
Belphegor (B Rank) – Rewards: 8,000 Gil & 20 Renown
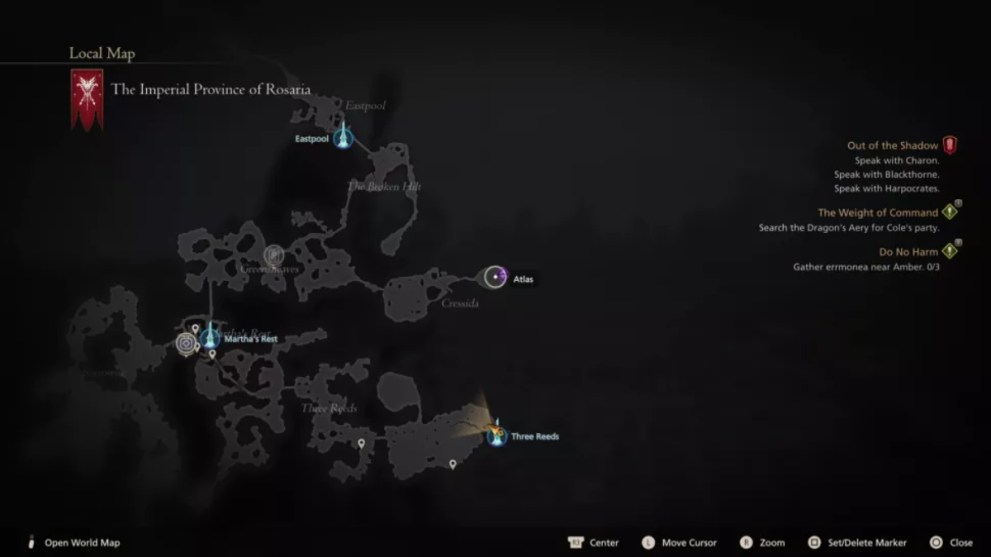
Location: This mark is found south of Eastpool; head to the Broken Hilt and turn East to head down the long path that leads to a dead end near a cliff.
Battle Tips: Belphegor is essentially a more powerful, more aggressive version of a drake-type enemy, though with some additional moves to watch out for. Its ‘Fireball’ attack consists of three hits in quick succession. Also, when it swipes with its claws twice, it’ll follow-up with a swing of its tail.
It’s biggest attack will happen when it falls under half health, and it’s basically a flamethrower attack with a wide range that you definitely don’t want to stand in the way of. Either keep your distance, or if you’re feeling extra brave try to make your way behind them during the attack to deal some extra physical damage.
Dozmare (B Rank) – Rewards: 8,500 Gil & 20 Renown
Note: This mark is only unlocked by doing the ‘Blackthorne Blues’ quest at the Hideaway.
Location: Getting to this mark is a bit of a trek. Fast travel to Lostwing and then follow the winding road south all the way down until you reach the Caer Norvent River Gate at the end. Just south of that is an opening in front of the fortress wall. Approach it and Dozmare will appear.
Battle Tips: Dozmare is a griffin, so its attacks are mostly a variety of lunges and wind-elemental spells. The lunges are easy enough to dodge and counter. Eikonic attacks are a good choice in those moments. It will conjure up tornadoes that need to be dodged before you get tossed up and become more vulnerable to subsequent attacks.
Its biggest attack is an elemental divebomb that it will start doing after a certain amount of its health is depleted. Dodge the initial impact, then either jump over or dodge through the shockwave that follows. It can be tricky so watch your timing with it.
Severian (B Rank) – Rewards: 8,500 Gil & 20 Renown
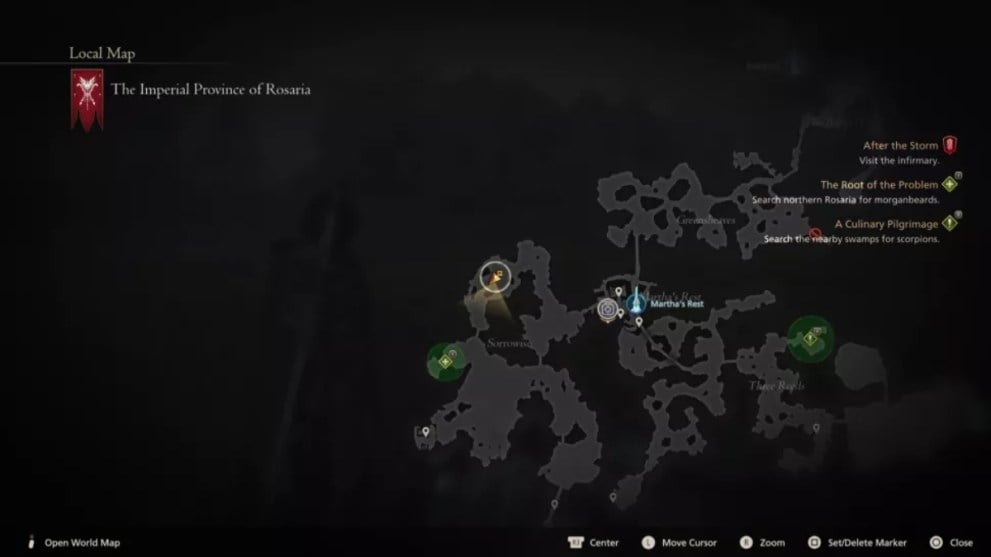
Location: This hunt is found at the northernmost point of Sorrowise, Rosaria, to the west of Martha’s Rest. Leave the town by the west gate and hug the right hand path until you see it. It’ll be curled up until you approach it.
Battle Tips: Severian is a Fallen Construct-type enemy, similar to the ones you fought at the Phoenix Gate earlier on. It’s a more powerful version of those, with its attacks dealing more damage and reaching further.
Severian hits really hard, so we suggest playing more defensively at the start until you learn their attack patterns. There is mainly one big attack to watch out for.
“Annihilation” is a three-part attack that consists of a spin, followed by a barrage of tracking projectiles, and finally a big thrust attack meant to catch you off-guard while dodging those projectiles. Time your evasion carefully during all of this, otherwise this move can wipe you out.
Sekhret (B Rank) – Rewards: 8,200 Gil & 20 Renown
Location: This mark is found north of Martha’s Rest, the closest fast travel point. Make your way to Greensheaves and you’ll find him stomping around the western side of the area.
Battle Tips: Sekhret is a Minotaur-type enemy, similar to the ones you’ve fought already, and their attack patterns are relatively basic. They use no magic, so it’s all physical attacks that are rather slow and easy to evade once you’ve got the timing.
Sekhret’s biggest attack happens when they’re below half health, and it’s a powerful combo attack that can stun Clive and leave him vulnerable to follow-up blows if you’re not careful. Either keep your distance as the combo plays out, or if you’re caught up close, dodge just as they’re about to swing each time to avoid serious damage.
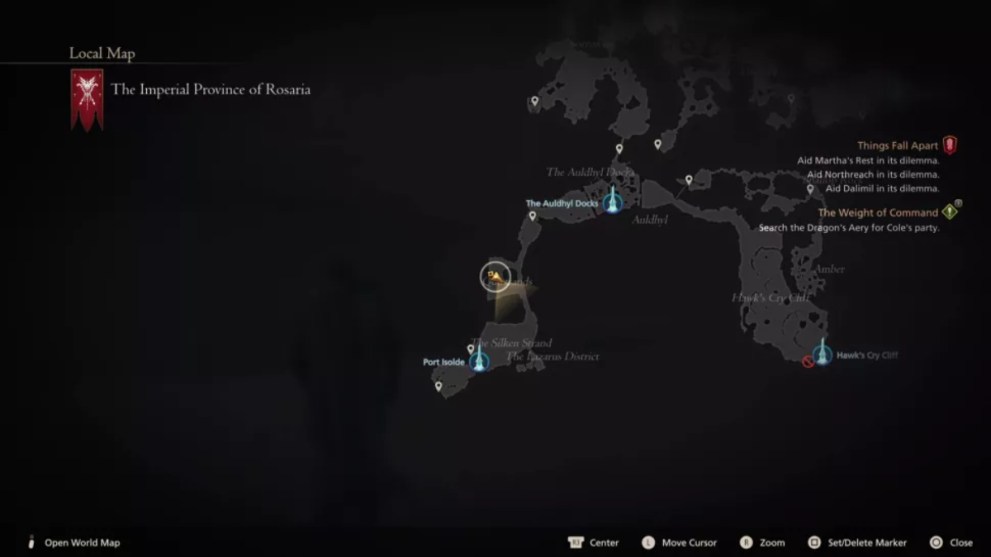
Flan Prince (Muddy Murder) (A Rank) – Rewards: 12,000 Gil & 30 Renown
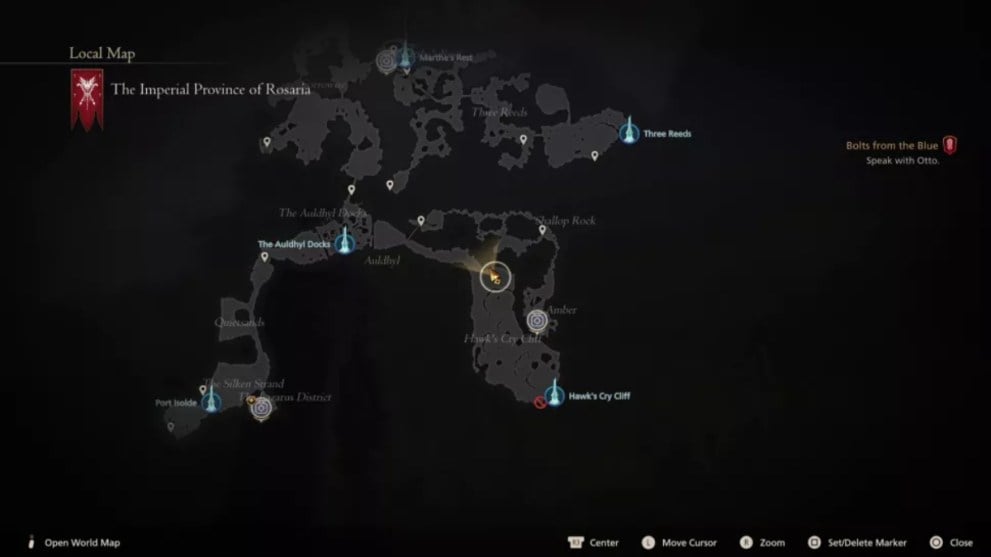
Location: This mark is found at the northernmost point of Hawk’s Cry Cliff, west of the village of Amber. It’ll be hidden in the ground until you approach the east side wall of the area, then it’ll leap out and attack.
Battle Tips: As its name suggests, this is a Flan-type enemy. Just like in previous FF titles, Flans can be a real pain if you’re not careful, as they excel in both magic and physical attacks. The Flan Prince is no exception, and they have a variety of elemental attacks to contend with.
They’ll unleash an assortment of fire, ice, lightning, earth, and and wind attacks, most of which can be dodged with relative ease. Watch out for the tornadoes that spawn with their wind attacks though.
The Flan Prince typically tries to lock Clive down with an elemental attack before closing in and unleashing a physical blow. Watch whenever they plan to leap towards you and dodge out of the way.
As their health decreases they will start doing combo spells with different elements, so you need to stay on your toes. The best time to deal damage on Flan Prince is while dodging their physical attacks, as they leave the monster open to a good counter for a few seconds. Be patient through the fight and soon you’ll see victory.
Fastitocalon (A Hill to Die On) (B Rank) – Rewards: 10,000 Gil & 20 Renown
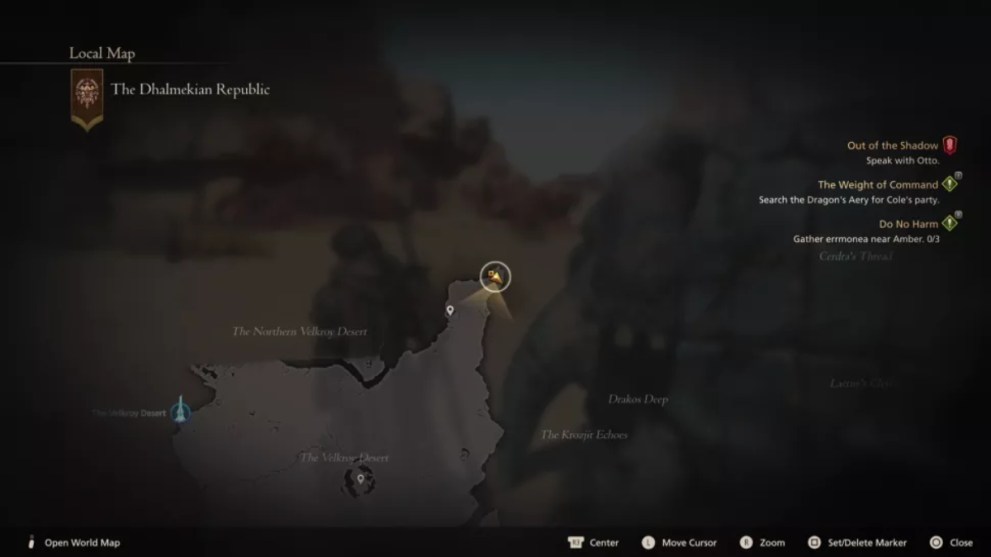
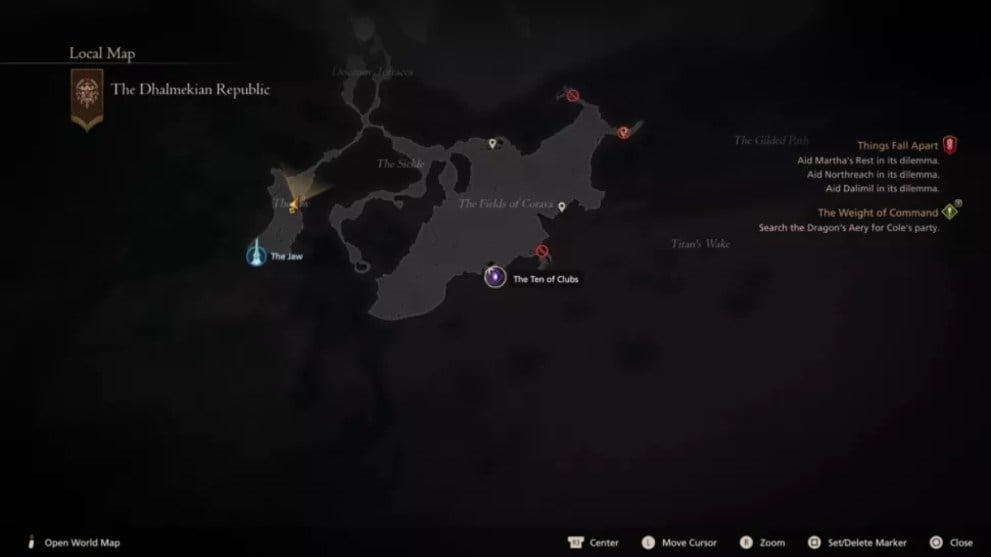
Location: This hunt is nestled in the very top right corner of the Velkroy Desert in Dhalmekia, past the Bandit’s Bed ruins. Just fast travel to the Velkroy Desert and make your way east along the northern border.
Battle Tips: Fastitocalon is an Adamantoise-type enemy as seen earlier on around Martha’s Rest. Its slow movement masquerades its basic but powerful attacks, so you don’t want to underestimate it. Given its high defense, you’ll want to quickly make note of their main weak point, which is its head.
Most of Fastitocalon’s attacks are either water-elemental ones, or spinning attacks. They do a bubble burst stream attack that is easily dodged. Their spinning attacks hurt quite a lot, so don’t wander too close when they do those.
Once the monster hits half health, their biggest attack will be a huge spin that launches them into the air, spawning water vortexes around the area. While you dodge those, be sure not to be underneath the giant turtle when it falls back down.
Soul Stingers (Rank C) – Rewards: 5,500 Gil & 10 Renown
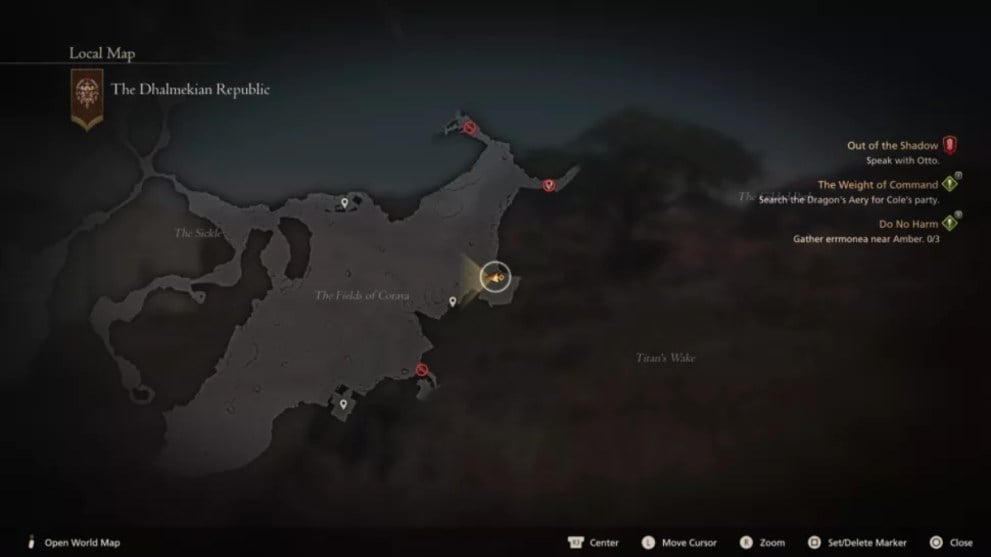
Location: This group hunt mark is located at the far east side of the Fields of Corava in Dhalmekia, in the open space north of the Empty Hovel.
Battle Tips: The Soul Stingers are flying insects, and this is the first hunt that consists of a group of enemies rather than one. They don’t have any significant or unique attacks to watch for, rather it’s mostly about not getting literally swarmed by them.
They do have one group attack that’s easily dodged, otherwise keep them all in your line of sight so they can’t surround you. Focus on a mixture of ranged magic and physical attacks until you bring them all down.
Grimalkin (C Rank) – Rewards: 6,100 Gil & 10 Renown
Location: This next hunt is hidden back in the Cattery, which is in a long, winding dead-end area in Dhalmekia, south of the Sickle.
Battle Tips: Grimalkin is a panther-type enemy, and it’ll be flanked by a group of smaller wolf minions. It’ll force you to fight those first, in an attempt to wear you down. Make sure you don’t get surrounded and take them them all out in diligent succession before you lose too much HP.
Grimalkin will then approach you and use a rather simple cycle of basic attacks. Most of them are easily dodged, the main one to watch out for is Savage. It’ll use this combo attack once under half HP, and you want to make sure its flurry of combo attacks don’t connect, as they’ll whittle your health down quickly.
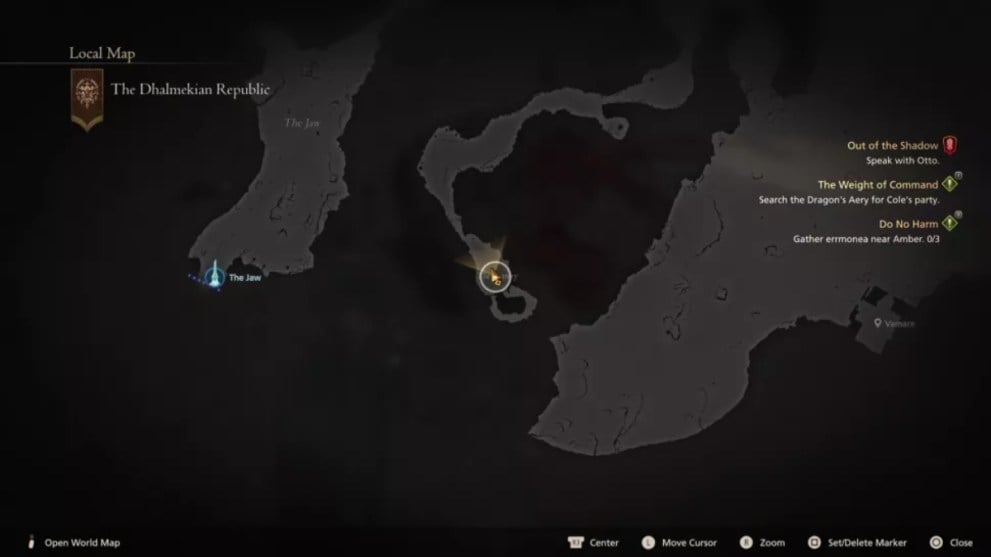
The Nine of Knives (Rank A) – Rewards: 10,500 Gil & 30 Renown
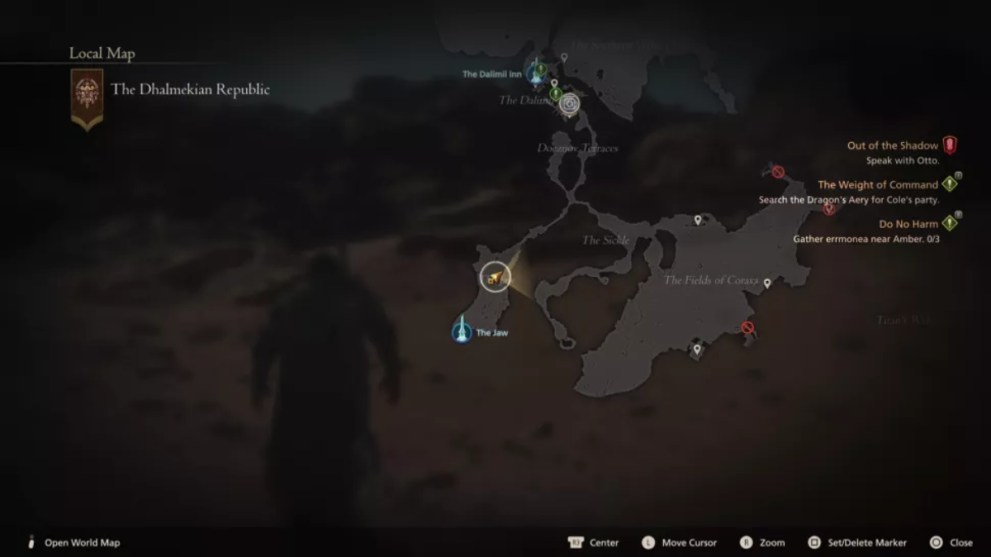
Location: This mark isn’t too far out of the way, as you just need to fast travel to The Jaw in South Dhalmekia and then head northward until you see him standing on the path.
Battle Tips: This guy is a very agile rogue-type bandit enemy, therefore he’s fast and seldom leaves himself open to counterattacks, meaning defense is key here.
He does combinations of close and ranged attacks, the latter of which includes poison breath and a smokescreen. Those are easily avoided, but don’t leave yourself open after dodging them as he’ll try to follow up with another attack.
He has a multi-combo melee move that is relatively easy to evade with proper timing, but if you get clipped be warned that you’ll take every hit that follows.
His biggest attack is a curved spinning leap that he’ll start from a distance, so it can be hard to judge how quick it comes at you. Be ready to dodge this, otherwise it’ll hurt.
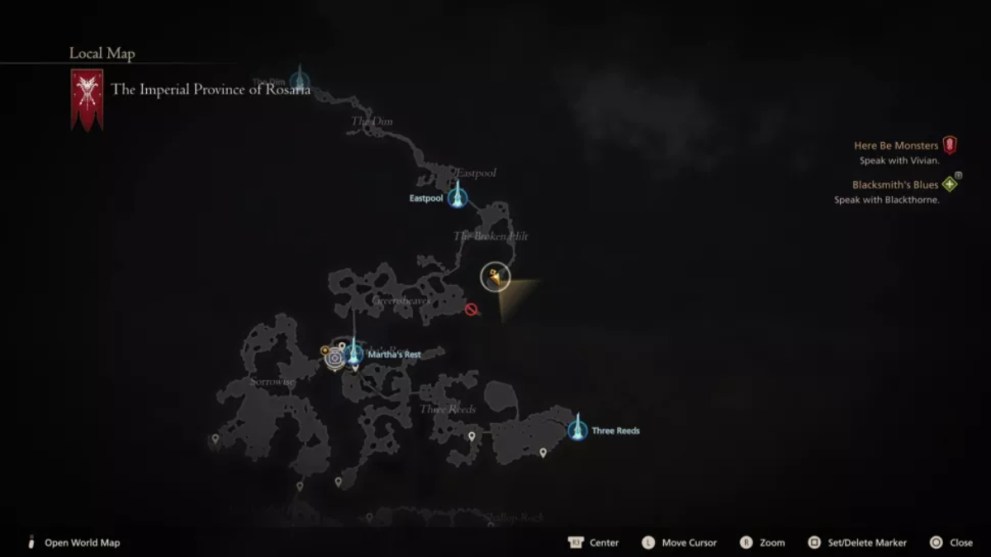
Atlas (Breaker of Worlds) (S Rank) – Rewards: 20,000 Gil & 50 Renown
Note: You get access to this mark fairly early, but as he’s a Level 45 S Rank, we DON’T recommend attempting this fight until you’re max level and very well-geared and stocked on items.
Location: When you receive this hunt, its location isn’t clearly marked. However, he can be found in Rosaria, in the most eastern point of Cressida south of Eastpool. It’ll be a circular area surrounded by fallen ruins, so they’re hard to miss.
Battle Tips: Atlas is a dual-wielding Fallen Construct-type enemy with a lot of HP and some very dangerous attacks. As mentioned before, you need to be well-prepared for this fight or this monster will knock you around like a rag doll.
Even Atlas’s basic attacks hurt, and they can be hard to dodge because of the delay before they execute them, and they often come in quick succession. We recommend a strong defensive move like Titanic Block, which will absorb Atlas’s basic attacks, but not their higher-powered energy-based ones.
When Atlas falls below half health, they’ll start unleashing a monstrous sword attack, swinging a huge energy sword attack across the field that will end you if it hits. Either you need to retreat far enough to avoid it, or perform a perfectly timed dodge just before it connects.
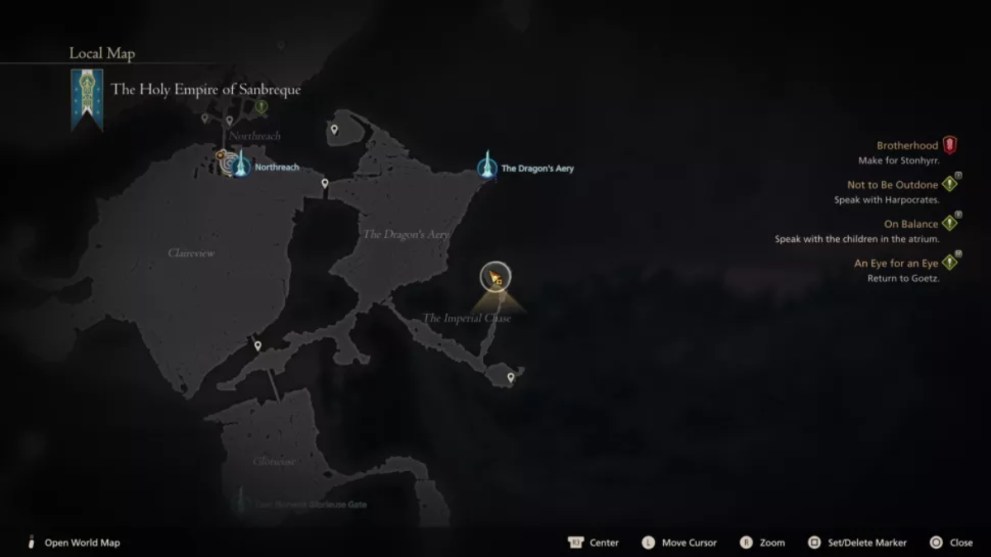
Bomb King (Rank B) – Rewards: 9,000 Gil & 20 Renown
Note: This hunt mark is only unlocked by undertaking the quest ‘Weird Science’ at Hideaway after fixing Mid’s engine.
Location: You find this explosive mark at The Imperial Chase, a small path south of The Dragon’s Aery near Northreach in Sanbreque.
Battle Tips: As you can guess, this is an upgraded version of the bomb enemies you’ve previously encountered. Most of its attacks are straightforward, though watch out when it launches flurries of fire spells.
The main thing to watch out for in this fight is when it summons small bomb enemies to keep you busy. You’ll want to avoid engaging these altogether and simply dodge their annoying attacks, as soon after they’ll self-destruct one by one, dealing big area damage.
The Ten of Clubs (Rank B) – Reward: 9,200 Gil & 20 Renown
Location: This mark is stationed at Varmare in Dhalmekia, in the southern area of the Fields of Corova, not far from where the Soul Stingers hunt also was. He’ll be standing in a ruined village.
Battle Tips: Similar to the Nine of Knives, this guy is another bandit, though this time a big brute with an axe. His attacks with it resemble those of other axe-wielding soldiers, but they reach further and do more damage. Thankfully they’re often slow enough to allow for some hearty Eikonic counterattacks.
He has an Earth-based magic attack that’s easy enough to dodge, though its cast will become more random the lower his HP gets.
His biggest attack is Execution, which consists of four swings of his axe, each which are uniquely timed so dodging can be tough. You want to be sure to avoid the fourth strike, if any, as it hurts the most. He’ll jump back and then dive forward with a final, brutal axe swing, so dodge just before it hits.
The Mageth Brothers (A Rank) – Rewards: 13,000 Gil & 30 Renown
Location: This mark is found in the Quietsands Beach of Rosaria’s Port Isolde, standing right in the middle of the beach.
Battle Tips: You might think by the name that these three brothers deal in magic, but in fact they’re just a trio of axe-wielding soldiers, albeit stronger variants. Thankfully they mostly attack one at a time, just make sure you don’t get caught between them.
Overall, you’ll want to play it safe here, keeping your distance and bridging the gap with Eikonic attacks when you get the opportunity. They’re obviously most dangerous when all three of them are up, and they have one big move to watch out for. All three brothers will charge at the same time for a deadly combo attack that can kill Clive if he’s caught in it, so evade it at the earliest possible chance.
The fight will get substantially easier as you knock them down one by one, though the remaining brothers will start performing stronger attacks in response, with double swings and full combos, so use Clive’s speed to your advantage there.
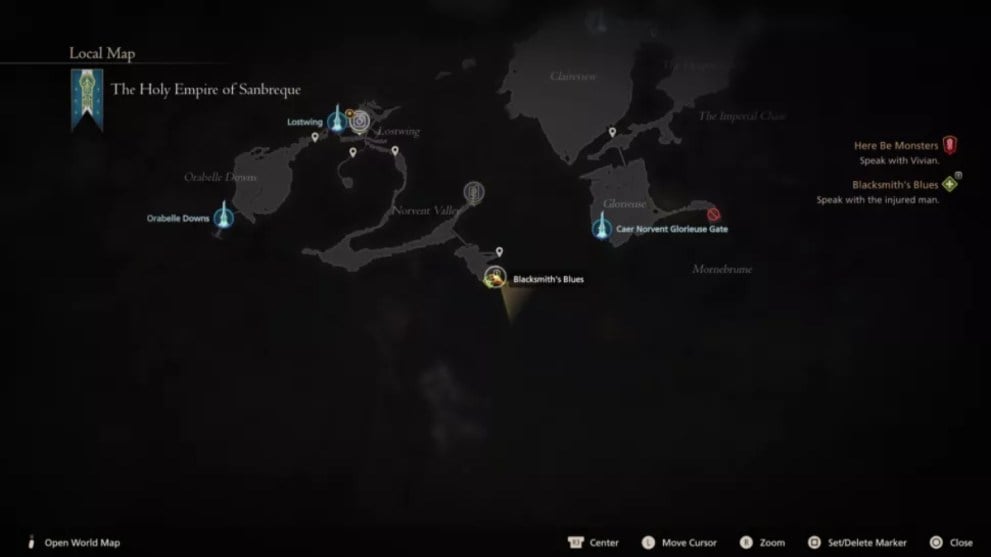
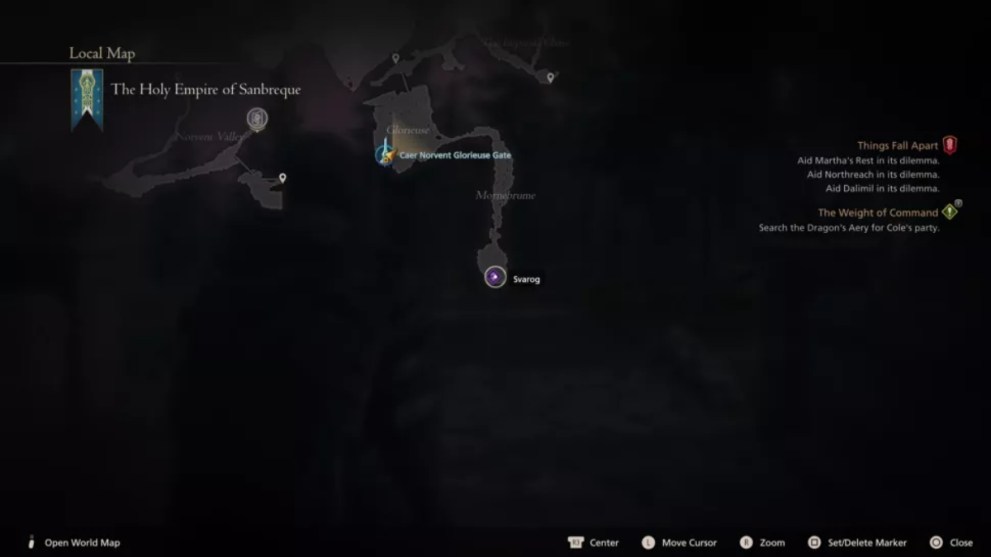
Svarog (Ruin Reawakened) (S Rank) – Rewards: 30,000 Gil & 60 Renown
Note: This is another exceptionally difficult mark, and we highly recommend leaving it until the end of the game as it is a Level 50 monster.
Location: This mark’s location will also be vague, but he can be found at the end of the forest path in Mornebrume in Sanbreque, which is east of the Caer Norvent Glorieuse Gate south of Northreach. Make sure you save your game right before the fight, otherwise you’ll have a long walk back from the nearest Obelisk.
Battle Tips: Svarog is a gigantic Level 50 dragon that you definitely don’t want to approach unprepared. It’s considered arguably the most difficult enemy in the game, so again, go through the list of buffing your gear to the highest extent, mapping out your desired abilities, stocking up on every item you could possibly need, and have serious patience when taking on this fight.
Svarog is a behemoth superboss that has no clear weaknesses, and plenty of fearsome attacks, many fire-based, that can quickly end you if you’re careless. Its huge HP pool means that the fight will be a long one, so at least in your first attempt or so it’s best to focus on learning their moves and patterns, and keeping your health topped off.
Svarog will start the battle with an attack called Red Legion, which summons rows of fireballs that slowly move across the arena. These can effectively pin you down and leave you vulnerable to Svarog’s ground eruption attacks, so be mindful of everything going on around you.
The most powerful attack to watch for is a flaming charge, which Svarog typically does at the end of their spell-casting cycles. If you don’t dodge this, it’ll take half your HP bar or more in one hit, depending on your level.
Our biggest tip is to summon Shiva, as her dodge ability can help you more easily evade Svarog’s ground traps and the previously mentioned charge attack.
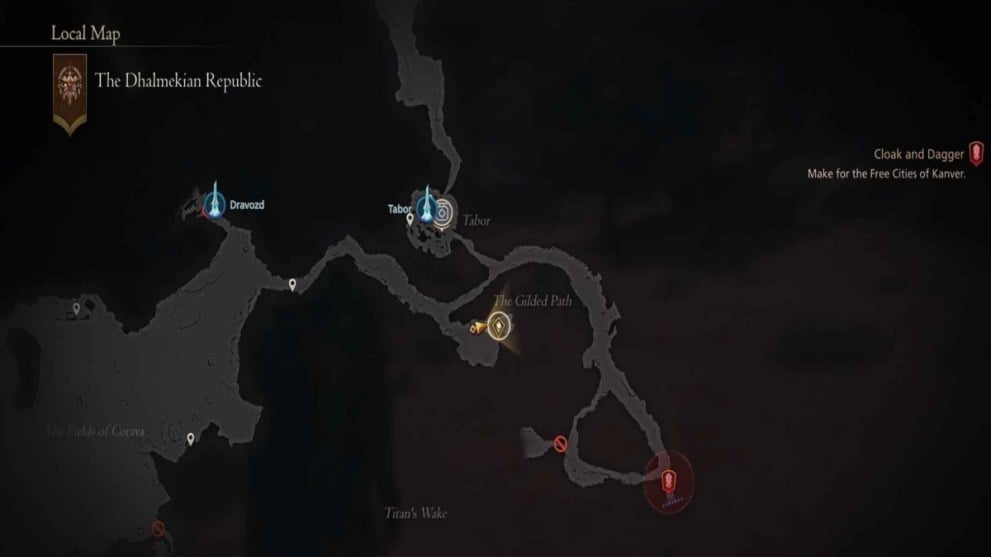
The Pack (C Rank) – Rewards: 5,800 Gil & 10 Renown
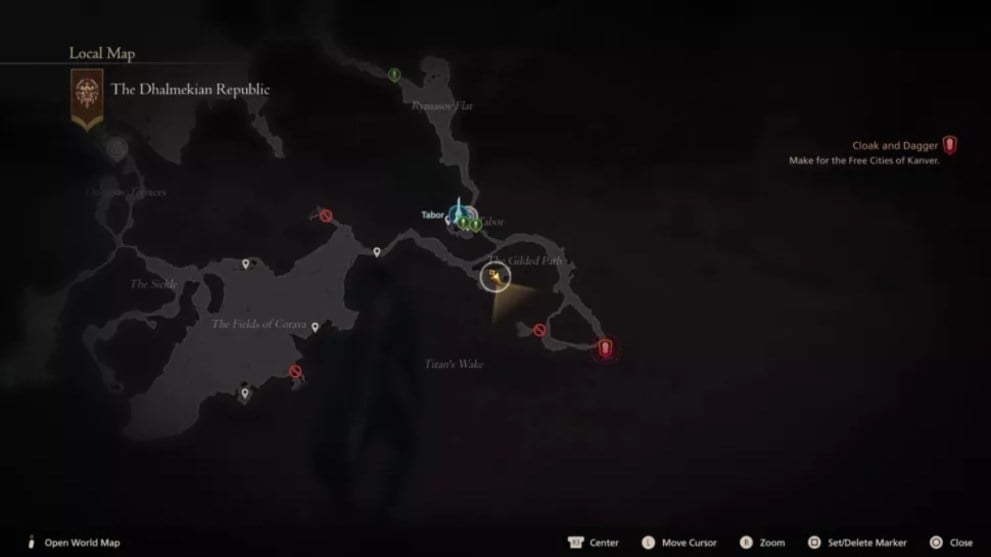
Location: To find this mark, head south of Tabor in Dhalmekia to the Gilded Path, then head down the west path at the crossroads before taking the first left while heading south. This will lead you to a dead end where the mark will be waiting.
Battle Tips: As its name suggests, this mark is a group of five wolf enemies, much like Grimalkin earlier. Thankfully at this point in the game, they’re not that much to deal with, but as with any group enemy situation, don’t get yourself surrounded.
Eikonic attacks are your best friend here, as the wolves tend to not stray far and don’t have any ranged attacks, so it’s easy to bait them close together. Whittle the pack down one by one, and watch for their one notable combo move, which is a sequence of lunge attacks. This is easily averted with Titan’s blocking ability.
Dread Comet (Rank A) – Rewards: 13,000 Gil & 30 Renown
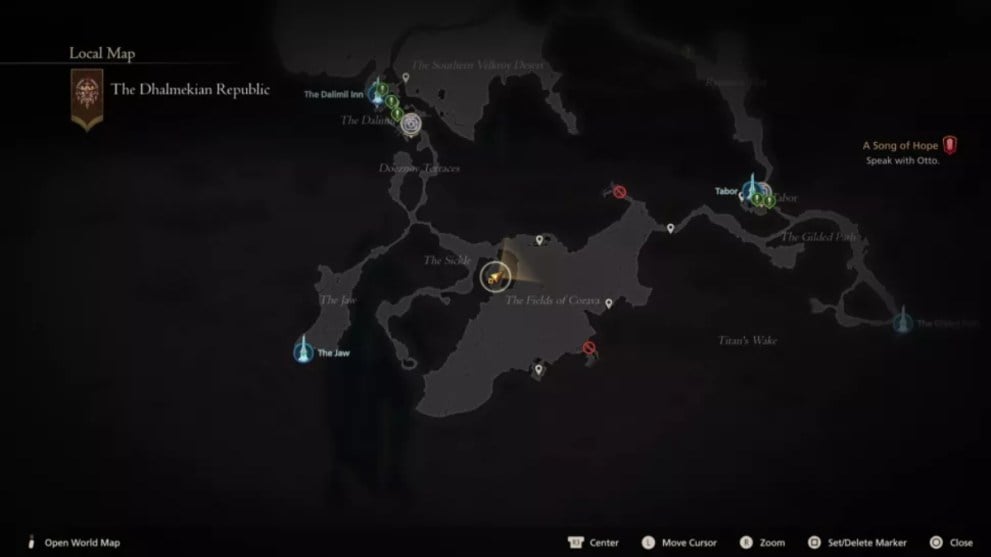
Location: This mark is found in the Sickle of South Dhalmekia, the crossroads between The Jaw and the Fields of Corova.
Battle Tips: Final Fantasy certainly seems to like throwing menacing chocobos at its protagonists more and more, and that’s what’s happening here. The Dread Comet is a big, vibrant red chocobo that isn’t to be underestimated.
While its physical attacks are simple enough to learn and dodge, its ability to summon meteors is the crux of this fight. Each meteor that plummets to the ground will release a shockwave that needs to be dodged, and they’ll increase in number as the fight goes on. Clive will go down if he gets hit by too many of them.
To break its meteor shower attacks, it’s a matter of weakening the chocobo enough to where it becomes susceptible to combo attacks and Eikonic moves. Like regular chocobos, Dread Comet doesn’t have a stagger meter, so this battle of attrition is key to bringing the bird down.
Carrot (Rank B) – Rewards: 10,000 Gil & 20 Renown
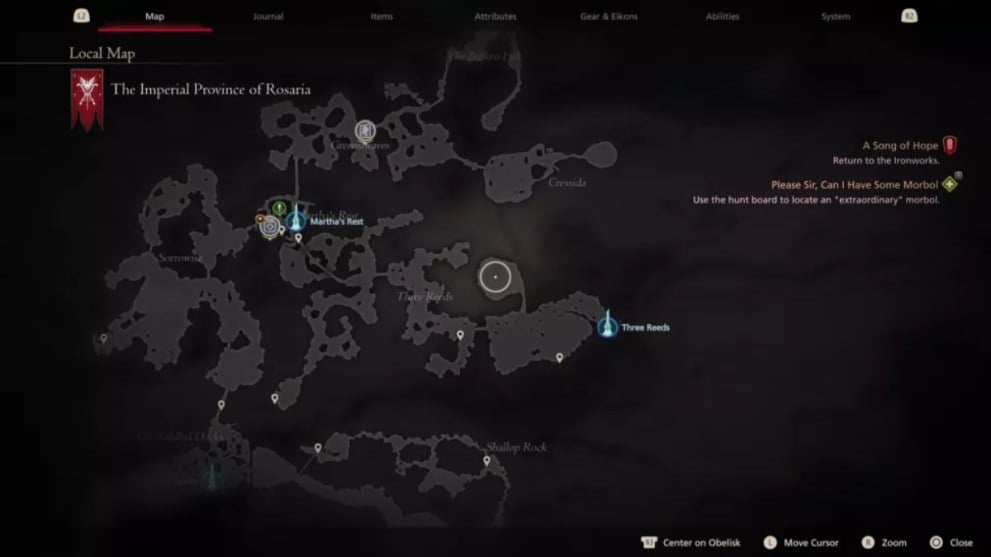
Note: This hunt doesn’t become available until you undertake the ‘Please Sir, Can I Have Some Morbol’ quest, which requires you to bring back a piece of this monster.
Location: This mark is found by fast traveling to Three Reeds in Rosaria and following the main path until you see an opening on the right that leads to the Whispering Waters. As you approach the center of the large area, the monster will appear.
Battle Tips: While its name may not be quite as intimidating, Carrot is a stronger variant of the already menacing Morbol monster. If you’re familiar with other FF titles and this classic monster, you’ll have a leg up on what to expect with its attacks.
As with other Morbols, Carrot has a harrowing breath attack of its own, called “Worse Breath.” It’s more noxious and covers nearly the entire area, so you’ll need to keep your distance to avoid it.
Carrot will at times burrow underground and then launch back out at Clive with a dive attack, so keep a close eye on its movements and dodge accordingly.
Also make note that its Acid Rain attacks will cover the area in sticky puddles that will do continuous damage if Clive stumbles into them, so watch your step after that attack happens.
Holy Trumpitour (The Man In Black) (B Rank) – Rewards: 9,800 Gil & 20 Renown
Location: This mark is located at Lostwing in Sanbreque of Dhalmekia. Head through the cellar passage from The Gilded Path and head into the clearing where you fought a boss from earlier in the game.
Battle Tips: The Holy Trumpitour is a cannoneer-type enemy who deals heavy damage, but is slow in contrast. His standard melee attack is slow but deadly, so delay your dodges a bit so you don’t evade too soon and get caught in his crosshairs.
Like other cannoneer enemies, his flamethrower is rather tricky to dodge as it covers a wide area and lasts several seconds. We suggest just keeping your distance when this goes off, or use Titan’s blocking ability to tank the blows.
His most unique attack will involve him leaping around the area, leaving three large impact explosions that deal earth magic damage. Watch out for these and wait for the attack to finish before re-engaging him.
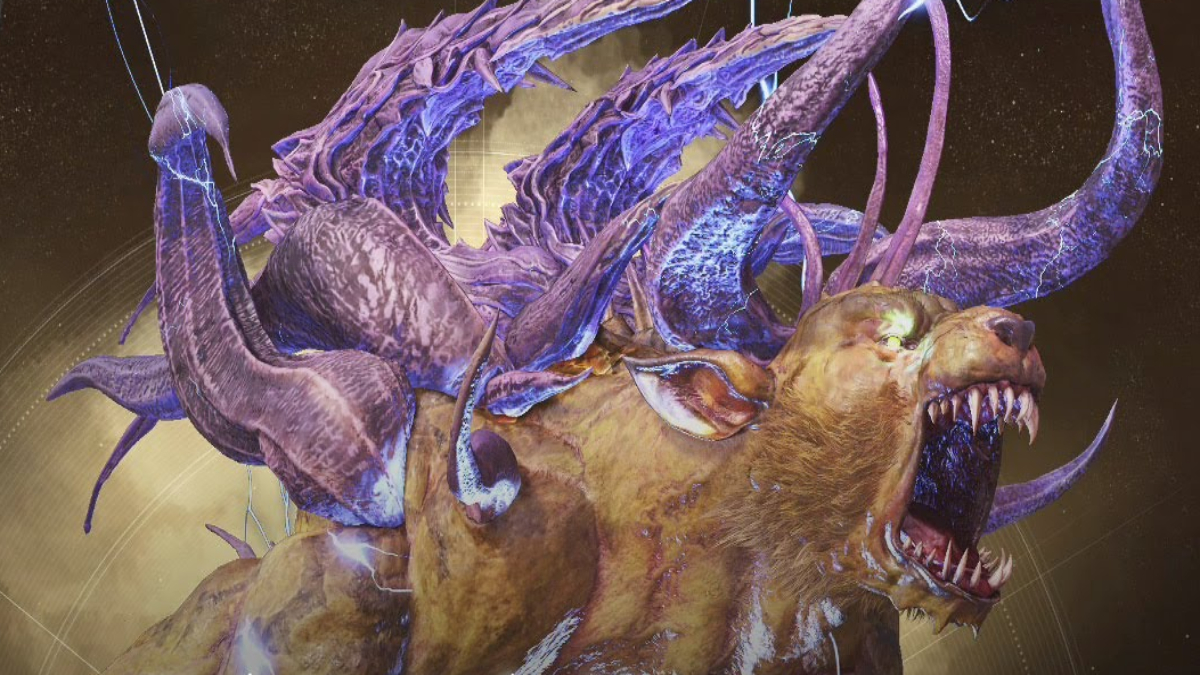
Gorgimera (The Tricephalic Terror) (S Rank) – Rewards: 20,000 Gil & 50 Renown

Location: This hunt will be prowling among the dunes on the west side of the Velkroy Desert in Dhalmekia. Simply fast travel to the Velkroy Desert Obelisk and make your way south.
Battle Tips: Gorgimera is a menacing S Rank chimera monster, but it’s still considered probably the weakest of them. Their attacks will still hit very hard, so don’t get careless at any point.
Gorgimera favors magic spells above all else, and their Delta attack summons multiple elements around the field that can ensnare Clive if he’s caught within a sigil. Dodge the beams and stay out of the blast radius as they go off.
Otherwise, Gorgimera does fairly standard magic spells and physical attacks that are surprisingly simple to dodge. Just stay nimble and you’ll bring the beast down at a reasonable pace.
Pandemonium (S Rank) – Rewards: 20,000 Gil & 50 Renown
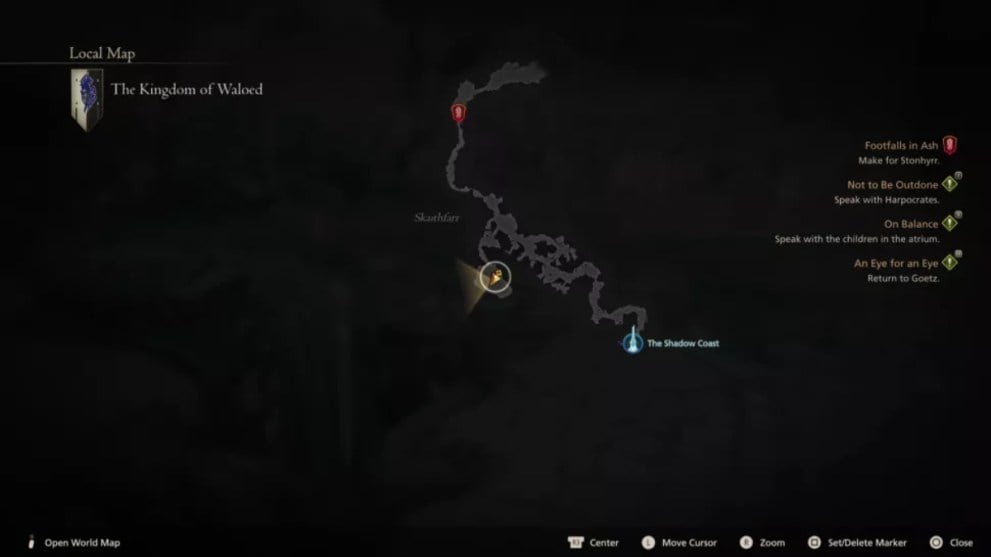
Location: This hunt’s location is vaguely described, but it can be found in the Kingdom of Waloed, at the castle in Skaithfarr. Simply fast travel to the Shadow Coast, make your way north up through the dangerous village and then take the southwest road as seen above.
Battle Tips: Pandemonium is an enormous and terrifying orc and one the hardest S Ranks, again not to be trifled with. Prepare Clive well before daring to approach them. It’s a fiendish warlock that likes to drown the arena in dark magicks, and they’ll often come at Clive in rapid succession, so your dodging skills will need to be truly on point in this fight. If you get caught by them, you’ll get staggered literally to death.
Weaving through all of Pandemonium’s magic attacks and dealing damage when possible is key to overcoming this fight, and it undoubtedly will take a few attempts to get it right. It also can be difficult to keep your eye on the orc through all the puff and smoke of their magic attacks, so you need to be as patient and attentive as possible through this entire fight.
Pandemonium’s melee club attacks are deceptively slow, so make sure you don’t dodge too quickly.
Finally, the orc’s biggest and most fearsome attack is a giant beam of dark magic, which will kill Clive immediately if he isn’t topped up on HP. Dodge this attack to the left or right. Later in the fight Pandemonium will teleport after the incantation to throw you off, so keep your eyes peeled.
Bygul (A Rank) – Rewards: 16,000 Gil & 35 Renown
Location: This mark is also found in the Kingdom of Waloed, to the north in Kritten Hollow. Head down the central path from the fortress and it’ll be on the left hand side.
Battle Tips: Bygul is a supercharged variant of the Coeurl monster that likes to augment its classic lightning magic with additional spells.
Distance is key in this fight as it will continuously summon electric sigils you need to avoid along with the projectile lightning attacks it hurls at you. Note that unlike regular coeurls, it’ll fire off one quick one, followed by two slower projectiles, so be ready.
Its biggest attack is Whipcrack, which it will engage once the ground is covered in sigils. Needless to say, you’ll need to be ready to dodge back-to-back.
Gobermouch (A Rank) – Rewards: 15,000 Gil & 30 Renown
Location: This mark is hiding out in the town of Eistla in the Kingdom of Waloed. Head up to the higher section of the town up the ladder, and it’ll ambush you.
Battle Tips: Gobermouch is a stronger variant of the goblins, and their attacks are pretty straightforward. However, because you’re gonna be in tight quarters it’ll be pretty hard to dodge much at all, so be careful.
Gobermouch’s main attacks to watch out for are Little Swing and Goblin Punch. The latter is a three-part combo attack that hits quickly, so you’ll have to be as nimble as you can. Shiva’s dodge ability can help out a lot in this fight.
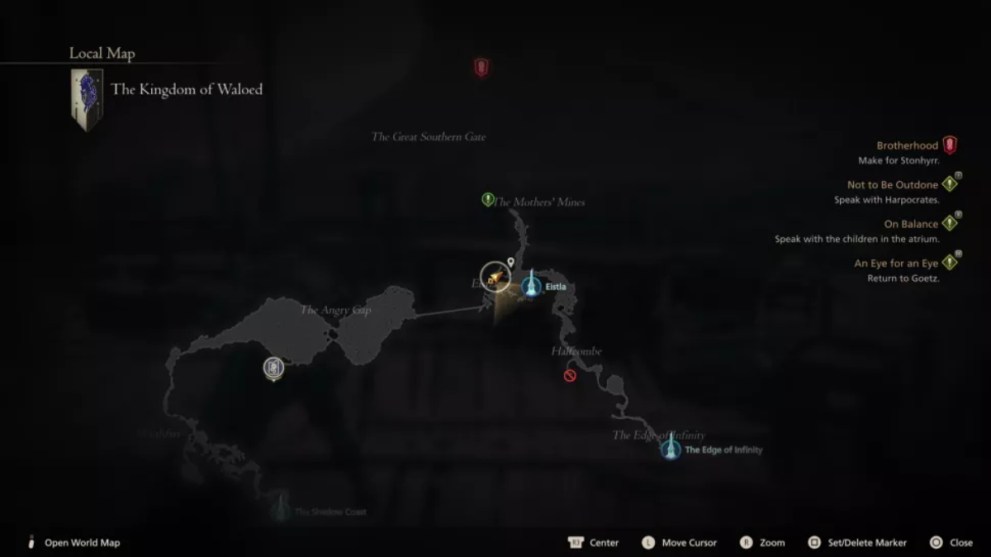
Agni (A Rank) – Rewards: 15,500 Gil & 35 Renown
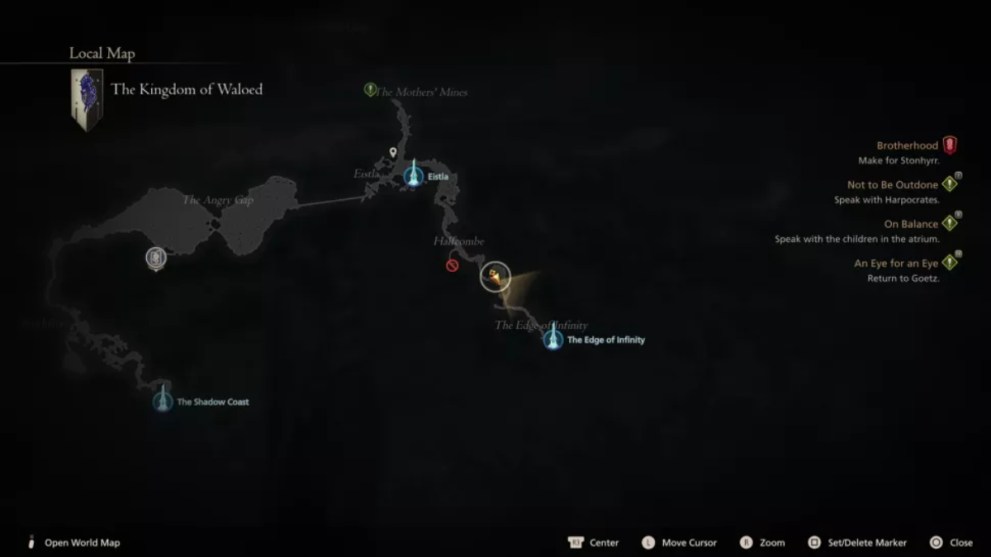
Location: This hunt is lurking on the winding path between Eistla and The Edge of Infinity in Waloed, in the area of Halfcombe.
Battle Tips: Agni is essentially a more powerful version of Fafnir, whom you faced way earlier in the game. A lizard-type enemy that focuses on melee attacks, so dodging is once again key to avoiding unnecessary damage.
Agni’s main attack to watch out for is the giant body slam that they perform after spinning several times around the area. Time your precision dodge right for this one if anything, or it’ll hurt a lot.
Thanatos (Usher to the Underworld) (A Rank) – Rewards: 17,000 Gil & 45 Renown

Location: This mark is found in the area of Titan’s Wake in Southern Dhalmekia. Follow the Gilded Path from Tabor South, and then hang a left into Titan’s Wake and he’ll be waiting ominously on the northern path.
Battle Tips: Thanatos is another Fallen Construct-type golem enemy, who focuses on ranged beam attacks that can be tricky to deal with.
Said beam attacks are typically shot three times in a row here, and timing is key to dodging them without getting hit. You can either stay super close to Thanatos and dodge behind every time they shoot one, but they tend to very quickly redirect towards you with every shot. Otherwise, you can strafe and bait the beam by dodging towards it then to the side. Either way, this fight is yet another unique test of your reflexes.
Later when Thanatos’ HP is lower they’ll start summoning blue sigils all over the ground, which you’ll also have to avoid. Don’t get too distracted by them, as they’ll try to throw additional attacks your way while you’re dodging.
Terminus (The Blood Moon) (A Rank) – Rewards: 9,800 Gil & 35 Renown
Location: This unique mark is floating right in the middle of the Crock in Sanbreque, where you fought the Bomb King. Fast travel from The Dragon’s Aery and make your way through the Imperial Chase until you see it at the dead end.
Battle Tips: This atypical enemy is an upgraded Fallen Control Node, but don’t underestimate its appearance as its attacks are plenty powerful and can easily catch you off guard.
For example, Terminus will start with a giant clamping attack where its two halves split open and it’ll attempt to capture Clive by slamming them together. This happens three times in a row, so be ready to dodge them all and avoid becoming an early lunch.
It’ll use some electric attacks, followed by a charging attack that has a substantial delay. So don’t dodge too early or you’ll end up splattered by it.
Eventually it’ll start shooting multiple beams at you in a rotating fashion, so it’s best to evade them by running in the same direction around it, or dodge them if they come too close.
Gizamaluk (The Wailing Banshee) (A Rank) – Rewards: 9,700 Gil & 45 Renown
Note: You need to first complete the “An Inconvenient Truth” quest at the Hideway for this mark to unlock.
Location: Head to Garnick Village in the Kingdom of Waloed, where that same side quest took place. As soon as you enter the area the fight will commence.
Battle Tips: Gizamaluk is an elemental harpy similar to Garuda, as it likes to cover the area in explosive wind magic. You need to dodge and weave around their wind spells, as getting caught by just one will open you to follow-up magic and melee attacks from them.
Gizamaluk physical attacks usually come in three’s that are quick in execution, so in a sense they’re easier to dodge once you figure out their timing.
The strongest attack will happen when Gizamaluk gets low on HP, as they’ll start laying down sigils all over the area as traps. As you evade them the monster repeatedly attempt to swoop at you, so you’ll have to be incredibly nimble during this phase until they’re finally down.
Prince of Death (The Grim Reaper) (A Rank) – Rewards: 15,000 Gil & 45 Renown
Note: You first need to complete the “Payback” quest for Gaute at the Hideaway for this hunt to unlock.
Location: This mark will be lurking at Cape Orsiere, to the west of Northreach atop a hill.
Battle Tips: With a name so foreboding, it only makes sense that this mark would be a sinister-looking Lich monster. A stronger variant of that enemy type, this monster brandishes a scythe that can do some serious damage.
As opposed to regular reapers, this variant can do up to three projectile slashes in a row, so don’t get caught off-guard by that.
When the Prince of Death falls below half HP, they’ll start to do a combo attack that can make quick work of your own HP if a few hits connect. It’ll involve multiple swipes and hits from them, and creating distance is the best suggestion to avoiding it. However, note that they can cover a lot of ground while doing this attack, so you may need to precision dodge at times.
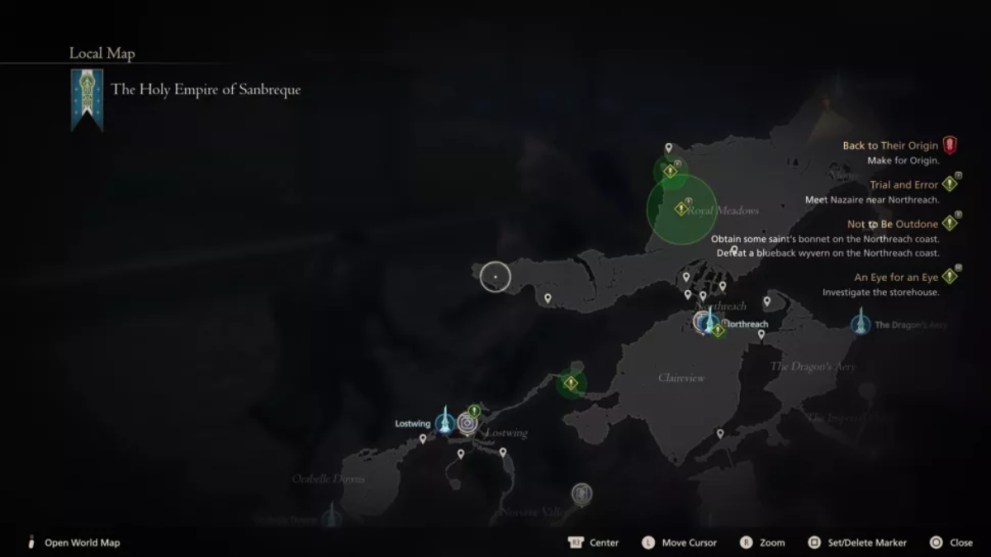
Knight of the Splendent Heart (A Rank) – Rewards: 17,000 Gil & 35 Renown
Note: For this hunt to unlock you first need to complete the “Payback” quest from Gaute in the Hideaway.
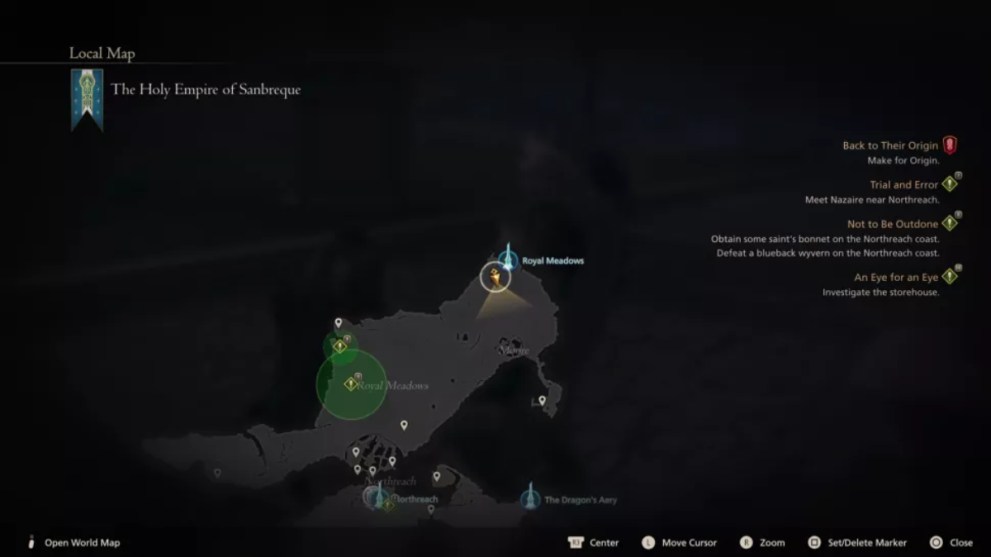
Location: Head to the Penitent’s Gate in North Sanbreque, north of the town of Moore next to the Royal Meadows fast travel point. He’ll be standing right outside the gate, so you can’t miss him.
Battle Tips: The Knight of the Splendent Heart is the game’s strongest dragoon, boasting fast and dangerous attacks, including ones not seen from regular dragoons.
He has one big jump technique, which will fill the area with dragoon illusions that all slam into the ground for impact damage, before the Knight himself comes in for the final blow. The best way to avoid this is by running in the same direction, and only dodging if you think one of the mirages will connect a blow. Then of course watch out for his final attack.
His other main move is composed of two fast thrusting attacks, and they’re easy enough to dodge if you see them coming.
Kuza Beast (A Rank) – Rewards: 15,000 Gil & 35 Renown
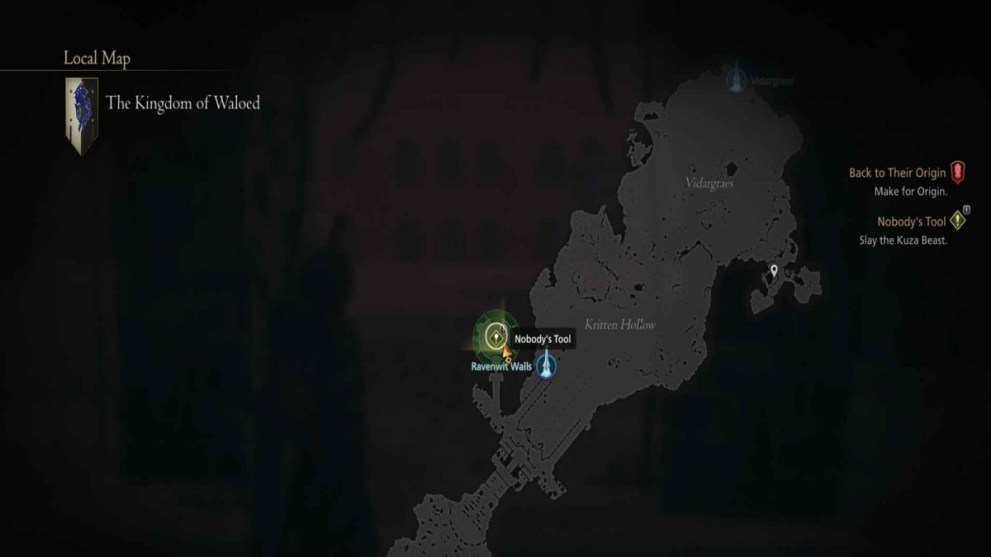
Note: For this hunt to unlock you must undertake the quest “Nobody’s Tool” from Dorys in the Hideaway.
Location: This mark is lurking in the Balmung Dark in Waloed. Fast travel to Ravenwit Walls and then make your way west to find it waiting for you.
Battle Tips: This behemoth-type enemy is actually a weaker variant of the one from the main story, but it’s still plenty powerful with comet magic that it’ll use multiple times over and over, more than enough to make the fight a challenge.
Each of those comet attacks will create shockwaves that you need to be mindful of and dodge as well as you can.
Kuza also loves to use dangerous physical attacks, which often come in twos, with the second one usually having a slight delay.
Kuza’s charge attack when it lowers his shoulders is the main one to watch out for, as it is probably the hardest to avoid due to the monster’s sheer size. Either keep your distance as much as possible or use Shiva’s ability to make things easier.
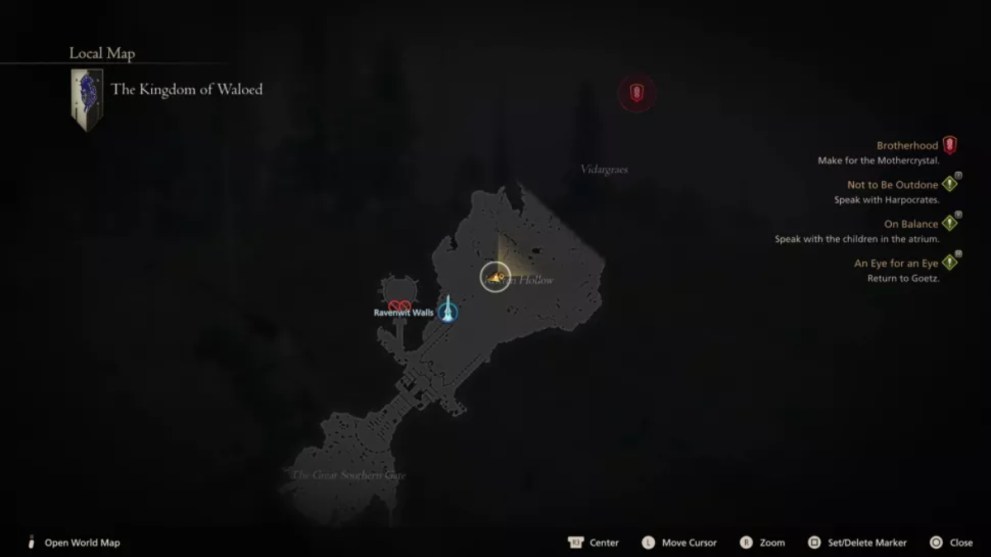
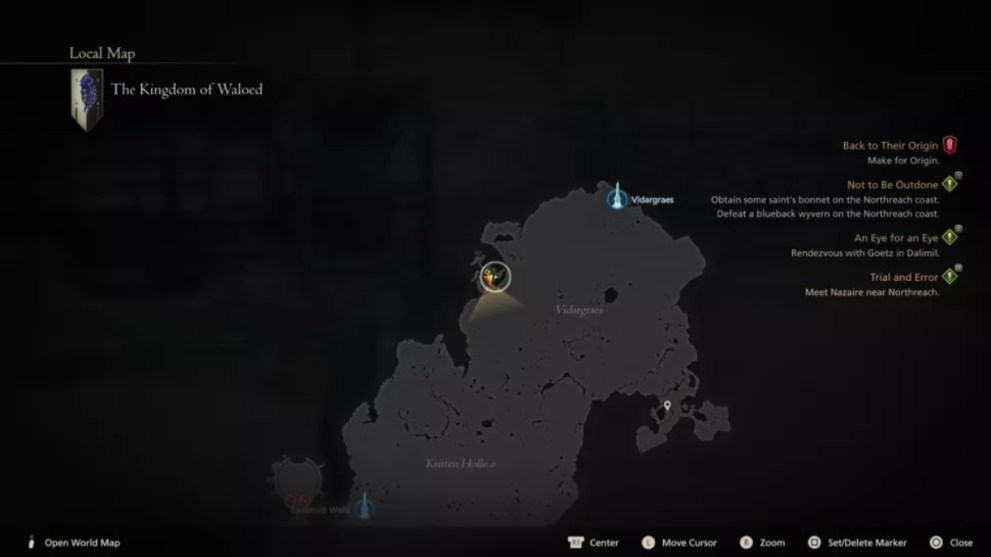
Behemoth King (The Masterless Marauder) (S Rank) – Rewards: 20,000 Gil & 55 Renown
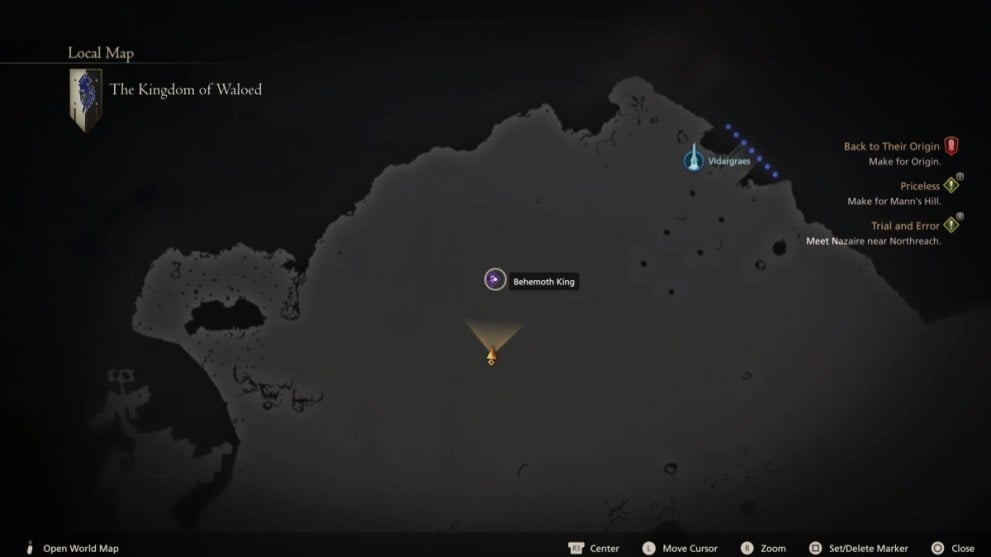
Location: Again given a vague location description; this terrifying mark will be found in the fields just southwest of Vidargraes. Fast travel to the Obelisk there and then head in that direction.
Battle Tips: This particular behemoth is as nasty as it looks, and is fitting to be the last entry on our list. Thankfully your previous tussle with Kuza Beast will give some insight into some of their attacks, as since they’re also a behemoth-type.
Behemoth King also loves comet magic, and these casts will consist of four dangerous attacks that all deal very high damage if you’re not careful. Dodge the comets and their subsequent shockwaves just as before, ideally by jumping and/or using Shiva’s ability.
Its physical attacks are essentially the same as well, so watch out for that notorious shoulder charge attack.
The first of its two biggest moves is Maelstrom, which summons a huge tornado to the field. While you can dodge that well enough, Behemoth King will also summon electric sigils along the ground to give you a harder time, and they can and likely will charge at you from behind the tornado, making them hard to see before they do.
Their second and biggest attack of all is Apocalypse, and it will take up much of the entire battlefield, so brace yourself. It’ll consist of two back-to-back comet rains, followed by one huge meteor at the end. This will kill you outright if you don’t get out of the blast radius in time, so be quick.
Once Apocalypse is over, Behemoth King will be more susceptible to attacks, so bide your time until then.
That concludes our guide to all Notorious Marks in Final Fantasy 16, including their locations and some tips for how to defeat each of them. We hope you find this helpful as you go through the list, and let us know which one you found most challenging.
Be sure to check out all of our other guides, and our official review of Final Fantasy 16 as well.


Updated: Jun 26, 2023 01:12 pm