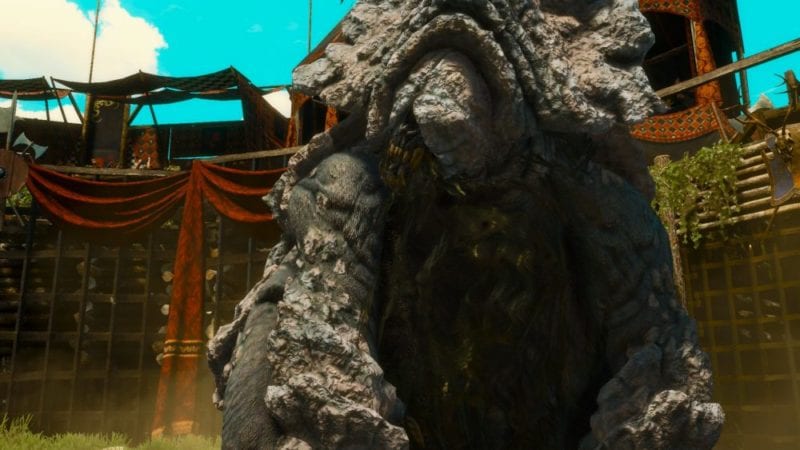
The Shaelmaar is quite possibly the toughest boss in Blood and Wine. It can deal out an incredible amount of damage, and, if you don’t know what you’re doing, you can break your weapon on this beast without even breaking a sweat. It’s incredibly high defense is no joke, and unrivaled in the entire game, and the ferocity of its attacks are enough to completely remove Quen’s protection. To make matters worse, you’re protecting another fighter throughout the match, one who can no longer defend himself.

Luckily, you’re given a clue as to how to beat Shaelmaar during the cutscene leading up to the fight. The beast initially has huge bells attached to its tail in order to confuse it. Since it can’t see, it relies on sound, meaning you can lead it to where you want during the battle (and that’s exactly what you need to do).
As far as attacks go, there are only three that you really need to watch out for. You’ll be keeping your distance during the fight, as it makes your job a lot easier, but Shaelmaar isn’t without ranged ability. One attack is a sort of ground pound that sends an explosive line through the earth. Rock and dirt will shoot up, breaking your guard and knocking you to the ground. You can easily sidestep this, so don’t worry too much.

The second attack involves the Shaelmaar burrowing into the ground and then beginning to violently rotate. This creates a large area of effect attack that is very similar to the previous ground pound. It lasts a lot longer, though, and takes up a large section of the arena. As long as you stand at the opposite side, you should be perfectly fine.
The last attack is the one you will utilize to actually beat Shaelmaar. It will roll itself into an armored ball and charge at you with high speed. You can dodge with a well-timed roll to the side (you’ll need to actually roll not just dodge since Shaelmaar is quite large).
This boss is weak to Relict Oil (which you’ll want to use to save some time) and Axii (which you’ll definitely want to use to save yourself). You should note that Axii will only stop Shaelmaar in its tracks, causing it to huddle for a few seconds. You can’t attack it in this state, but it’s a great way to catch a breather and re-position yourself on the opposite end of the arena.
Now that we have all of that out of the way, it’s much easier to figure out how to actually beat the huge, shelled monstrosity.
While keeping away, you’ll want to position Geralt against a wall after activating Quen and proceed to roll into it. This sound will draw in the Shaelmaar, but you want to do it from long range. That will cause it to use its rolling attack to close the distance. It may start with its ground pound at first, so be ready to sidestep if need be, but stay in the same general area. The beast will then charge at you at full speed.
As we mentioned before, you can dodge this attack with a roll to either side, but you need to time it well since the Shaelmaar can steer slightly during this attack. Don’t get scared too early, though, as you want the boss to slam into the wall. This will knock the creature onto it’s back for a few seconds, allowing you to go crazy on its soft underbelly.

Sometimes, you can’t help but be hit, which is why you should keep Quen active. You’ll get knocked down, but you won’t take damage from the attack. And you’ll still be able to get in some hits before it turns over.
When it does finally turn over, just rinse and repeat, until the fight is over. Use your crossbow to draw attention whenever you feel it just isn’t focused on you. Take your time, and dodge. Before you know it, you’ll be crowned the victor.


Updated: Aug 2, 2016 06:03 pm