If you aren’t thinking outside the box, Tricky Doors can and will trip you up. Solutions aren’t immediately apparent, and often bizarre. It’s okay to ask for help if you’re stuck, so use our complete walkthrough for level 1 of Tricky Doors.
Complete Tricky Doors Magic World Walkthrough: Level 1
Part 1: Should’ve Brought a Keyring
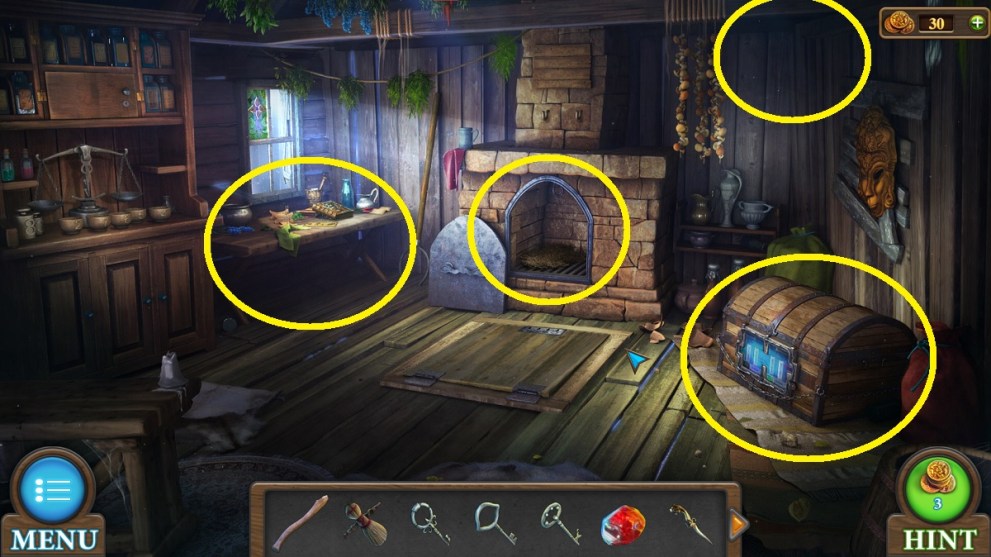
First up on your agenda in Tricky Doors is to collect a series of keys. There are four in total, the same number of keys needed to unlock the trapdoor.
- Examine the table at the back, to the right of the chimney. You’ll see a scrap of paper to your right. Lift it up to reveal Key #1. Pick up the doll on the left while you’re at it.
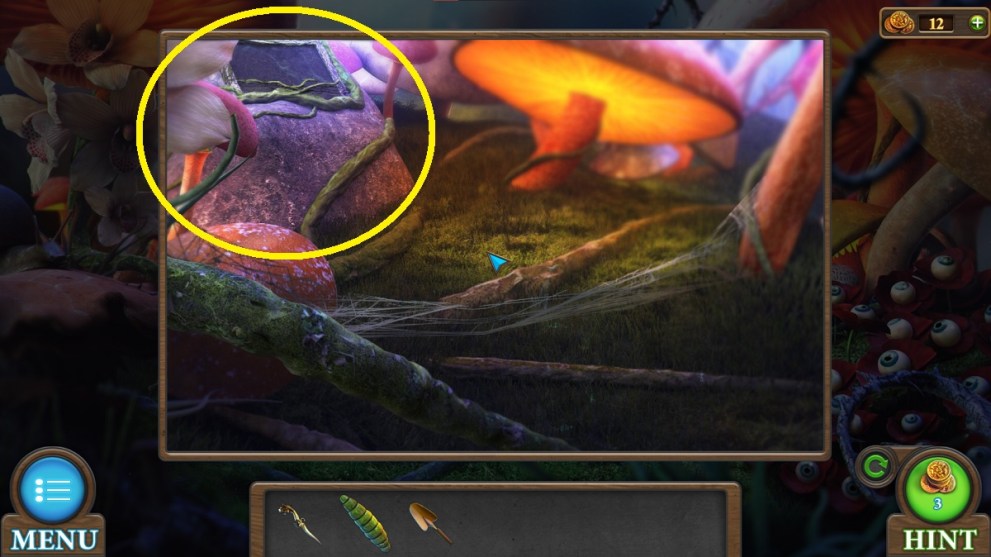
- Key #2 is located in the chimney, at the back. You’ll also want to grab the dagger hanging over the chimney, as well as the potion recipe hanging above it.
- Now, see the broom on the right, next to the chest? Grab it and use it to sweep the cobweb located in the top-right corner for Key #3.
- Examine the chest now. Key #4 is on the floor.
- Before you leave, pluck the ruby from the golden mask hanging on the wall, the candle in the lower left corner, and the wooden handle on the floor, next to the trapdoor.
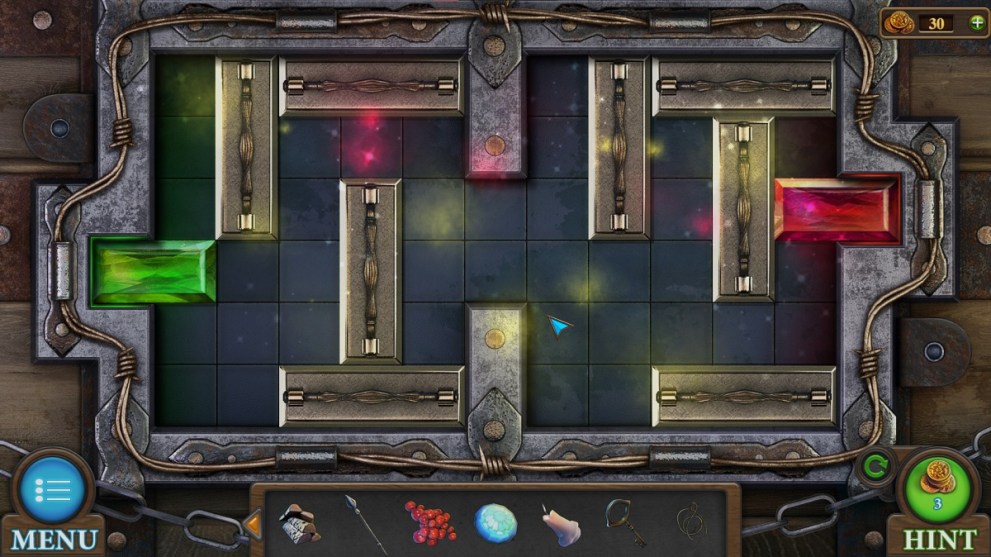
With all four keys at your disposal, examine the trapdoor, insert each one into the four locks, and move on through.
Part 2: What Is This, Minecraft?
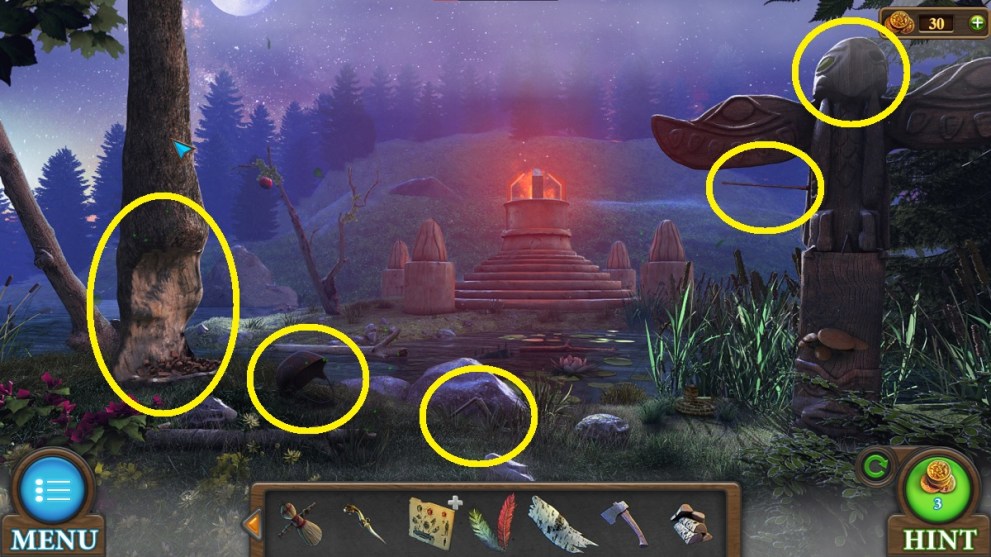
Take in the scenery. You can see on the left, in the distance, the cabin you just left. To the right, there’s a path that takes you to a bonfire. Immediately to your left and right are a caged bird and a well, respectively. Lastly, there are four owls in the top-right corner and a tree stump in front of you.
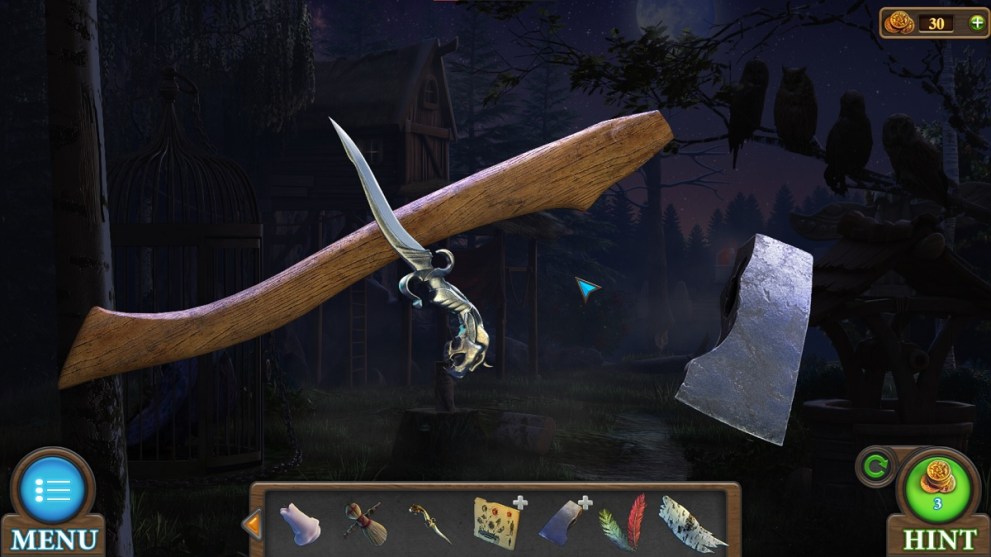
- Examine the tree stump. Grab the axe head, then place a log on the stump for later. Before you leave, in the top-left corner, there are feathers in the grass.
- With your knife, you can scrape away some bark on the tree to your left.
- Take the axe head in your inventory and combine it with the wooden handle. To your disappointment, it doesn’t fit, at least not yet.
- Using your knife, carve the wooden handle into shape and the two will fit together. Now you can cut the logs for firewood.
- Before you leave, click on the bushes in the background and pluck some berries from the bush.
With that said and done, you can move on to the next part. Travel to the bonfire in the distance.
Part 3: Crossing the River
To get closer to the bonfire, you need to create a bridge. This is a lot easier than you think, thanks to nature.
- First, pluck the arrow from the totem on the right.
- Pick up the handle and the empty cauldron on the ground right in front of you. The handle is hard to see; it’s by the rock.
- Head back to where the owls were, in the previous area. Click on each owl to make its eyes glow, then head back to the next area.
- Now examine the totem’s face (by clicking on it). Insert the ruby into its other eye. Click each gem in this order: ruby, ruby, topaz, topaz, ruby, topaz, topaz, ruby. Take the blue crystal.
- Use the axe on the tree to your left. Beavers have gnawed part of the tree away, making it easy to create a bridge.
You’ve done all you can for now. Let’s move on to the bonfire. To cross the bridge, simply click on it and you’ll get a better view of the bonfire.
Part 4: Fire is Hot

You can ignore the structures around the bonfire for now. Instead, click on the bonfire to get a closer look.
- Take both the doll and the candle and light them each on fire. Using the smoking doll, you can scare away the snake that was coiled up at the base of the totem. Grab the ruby.
- Double back to where the well was. You couldn’t do anything with it before, but now you can! Use the handle on the well and attach the empty cauldron.
- Give the handle a crank, then examine the cauldron to find another key.
Short and sweet, right? We aren’t done just yet. We need to double back once again to the cabin you started in.
Part 5: Crafting a Bow
This is really starting to feel like Minecraft because now we need to craft a bow. Back at the cabin, we’re going to focus on the chest.
- Start by cutting the rope in the top left corner, using your knife. You’ll see some green herbs hanging from it. This will come in handy when you craft your bow.
- Examine the chest. If you click on the part where it’s glowing blue, you can examine the chest even closer. Slot the ruby into the lower left corner.
- Now, the red and green gems can be moved up, down, left, and right; the blocks only either move up and down or left and right.
- Slide the blocks around to get the red gem on the right side, then do the same for the green gem, but it needs to be on the left.
In the chest, you’ll find a nest and another stick. Starting with the stick, combine the rope, arrow, and feathers to craft a bow and arrow.
Part 6: How Good is Your Aim?
Leave the cabin and head back to the bonfire, but don’t cross your makeshift bridge. Stop short of crossing. If you look just above the bridge, you’ll see a tree with an apple at the top.
- Examine the apple. Using your bow and arrow, shoot it down.
- Now, see the river in front of you? Examine the lilies in the river. Using your knife, cut the flower off the lilypad.
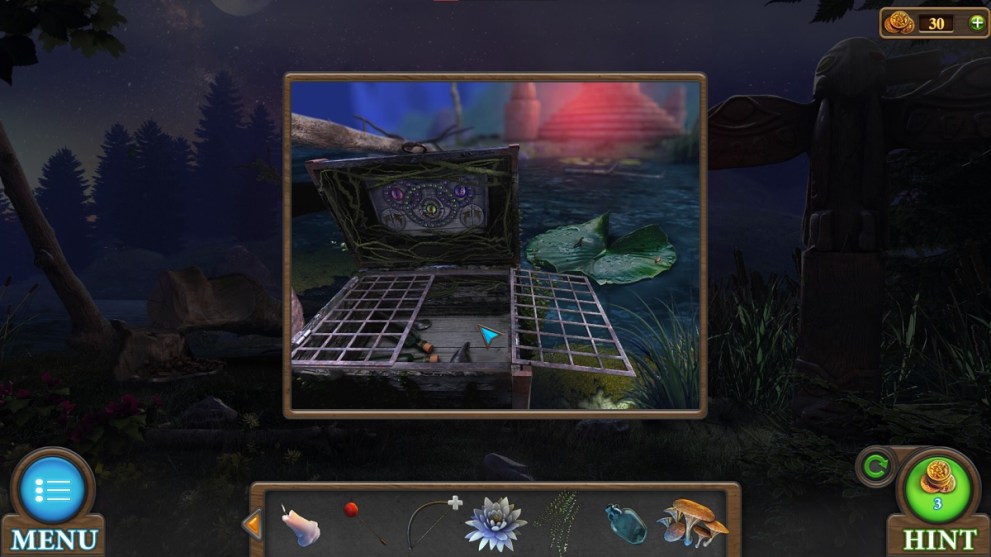
- Now take your net and catch the chest in the background. The chest is just barely peeking out from the river.
- Using the knife again, cut the seaweed from the chest. That key you found in the well will unlock the chest, and the bounty is a dingy-looking bottle.
The glass bottle isn’t without its uses, but not here. Let’s mosey on back to the cabin!
Part 7: Sugar, Spice, and Everything Nice
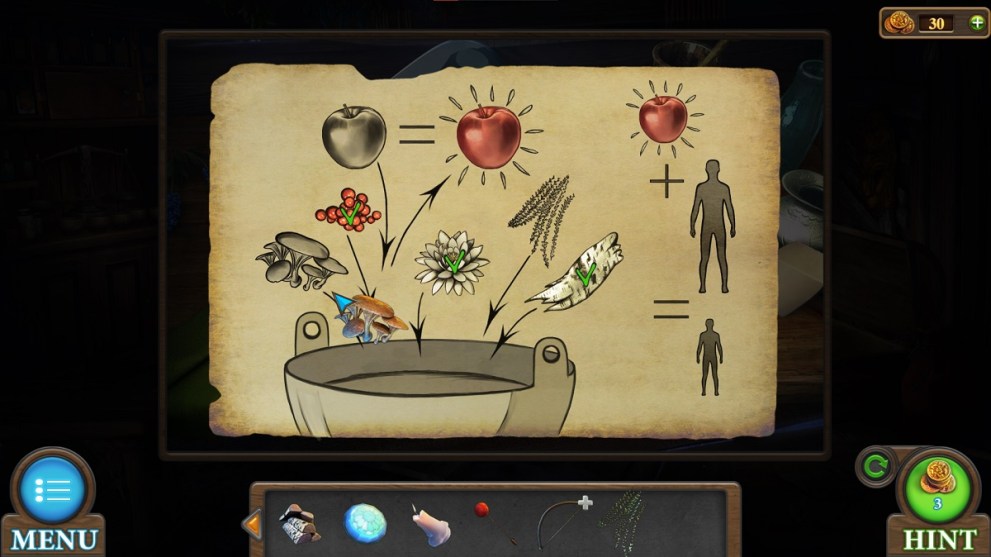
In the cabin, revisit the table at the back. You’ll find a little wooden stand where you can place your newly found glass bottle. Do that, then find the potion recipe in your inventory:
- Take each of these ingredients and mix them, while reading the potion recipe: berries, mushroom, bark, lily flower, and seaweed. You’ll receive “Ingredients” in return.
- Back away from the table and revisit the fireplace. Add the firewood, light it with the candle, then place the cauldron of water on the hook.
- Dump your clump of ingredients into the water, then place the arrow-pierced apple into the cauldron, creating a magic apple.
With your magic apple, we’re going to take a trip to another land. Prepare yourself, because it’s going to get a little trippy in level 1 of Tricky Doors.
Part 8: Honey, I Shrunk Myself
Before you leave, examine the window in the cabin. Take that blue gem you got from the totem and insert it into the empty socket, right in the middle of the flower. A beam of light will shine onto the glass bottle on the table.
- Pick up your magic apple and click on the glowing bottle. Nothing like a change of scenery, right?
- Start by cutting the string from your bow. Examine the bow, click on your knife, then click on the rope.
- At the back, to the left of the praying mantis, you’ll see a web. Take your axe and try to cut it down. You’ll lose the axe head but keep the handle.
- Examine the dead three-horned rhino beetle. If you click on its horn, it’ll break off. Drag the axe handle onto the ground, next to the horn, then combine them with the rope to create a sharp tool.
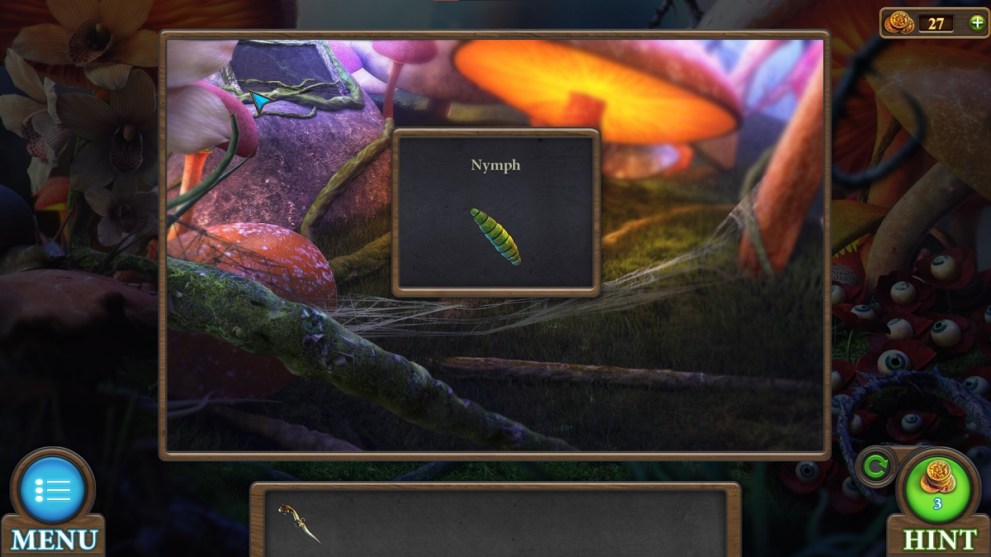
- Use your newly crafted sharp tool on the web and pick up the nymph.
Your inventory is looking pretty empty now. You should be left with the nymph and knife at this point. Hang in there—we’re almost finished with our Tricky Doors level 1 walkthrough!
Before you step away from the webs, examine the boulder in the background. Click on the darker section, entangled in vines, to reveal a bug puzzle. The top section, where it’s blue, should match the line of bugs in the top-left; the bottom section, where it’s red, should match the line of bugs in the top-right.
It’s easier to finish the top first, and then work on the bottom. If you’re having trouble, you can use the skip button in the bottom-right. Unfortunately, the puzzle is slightly different for everyone. Upon completion, a hidden compartment in the rock will open. Read the note and take the Golden Spatula.
Part 9: The Bonfire Puzzle Solution

The praying mantis looks hungry, but he doesn’t seem all that interested in you. What you can do is give him the nymph in your inventory for a magic stamp.
- Examine the eyeball flowers on the right. Using the golden spatula, scoop out some earth to find a bulb. Now we can leave this strange place behind.
- Examine the table again. With the magic stamp, you can open the demonic book on the right. When it’s opened, click on the pages to reveal an ink recipe, amulet, and key.
- Go back to the bonfire. The four stone structures in each corner need to be activated in order (use our image for reference): top-left, bottom-right, bottom-left, top-right. This will extinguish the bonfire.
- Scoop out some of the ashes with the golden spatula, then plant the bulb. It’ll grow into the flower of insight, which you should pluck.
- Go back to where you saw the caged bird and examine the cage. You can free the bird with the amulet. Feed the bird the flower of insight and it’ll leave behind a feather.
With the blind bird’s feather in your inventory, you’re on the final stretch of our Tricky Doors walkthrough.
Part 10: Gathering Ingredients
Back at the cabin, it’s now time to use the scales we’ve ignored for so long. They’re on the left, placed on the cabinet. Examine the cabinet door above the scale. The key that you’ve been keeping warm will unlock the door. Grab the three jars inside.
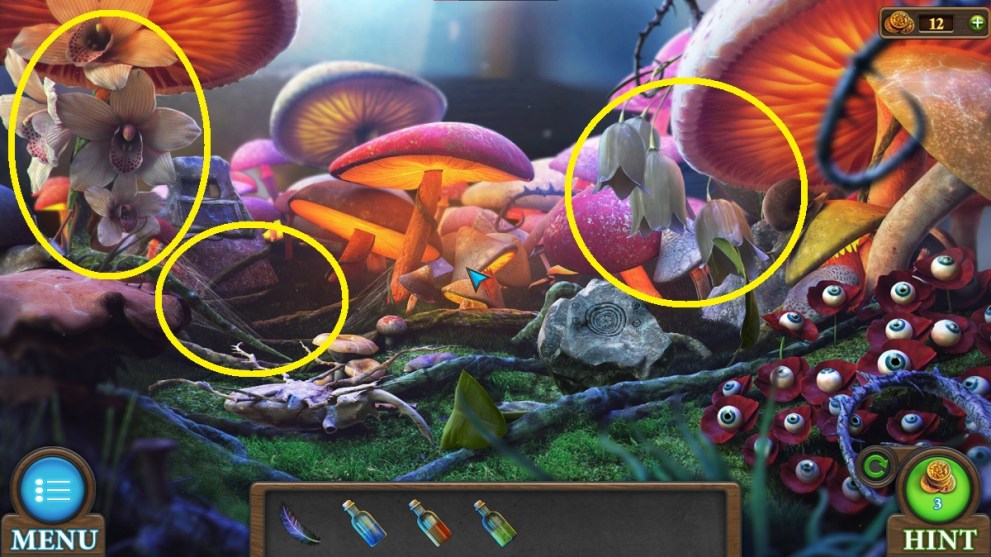
- Re-enter the bottle on the table. See the white orchids on the left? Use one of your bottles to fill it with dew.
- Re-examine the spot where you cut the web. You’ll see a stem in the lower-left corner. Using your knife, stab the stem and collect the orchid juice.
- Examine the bell flowers on the right-hand side, above the small boulder. Use your remaining jar to collect the pollen. Return to the scale.
When you’re at the scales, select each bottle so that they’re placed on the shelves on the left and right sides. These will act as your ingredients showcased in the magic ink recipe.
Part 11: Escaping the Escape Room
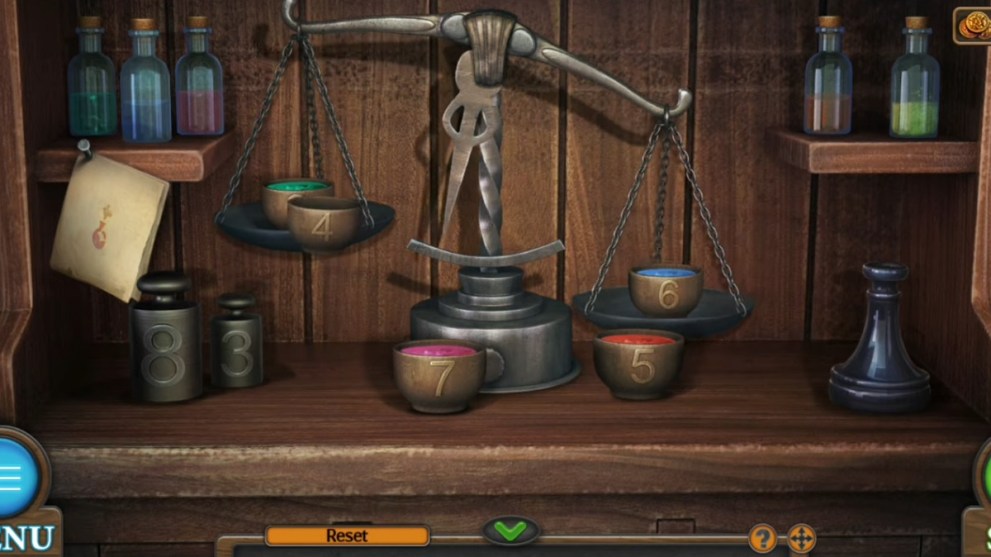
To escape, you need to craft a bottle of magic ink, but it requires a very specific amount of each ingredient you have.
- Place the 8lb weight on the left scale, and the 3lb weight and the #5 bowl on the right scale. Fill it with the orange-colored ingredient, then remove everything but the number #5 bowl.
- Place the 3lb weight on the left scale along with the #2 bowl. Fill it with the green-colored ingredient, then remove everything but the #5 bowl.
- Place the #2 bowl on the right scale, with the #5 bowl. Place the #7 bowl on the left scale and fill it with the pink-colored ingredient, then clear the scale.
- Place the #2 and #6 bowls on the left scale and the 8lb weight on the right scale. Fill the #6 bowl with the blue-colored ingredient, then clear the scale.
- Place the #2 and #4 bowl on the left scale and the #6 bowl on the right scale. Fill the #4 bowl with the yellow-colored ingredient. Pick up the magic ink when it’s finished mixing.
Now, back away from the scales and revisit the table one last time. Place the magic ink on the table, then dip the feather into the ink. Click on the glowing book and away you go!
And now we can close the book on our level 1 Tricky Doors walkthrough. The Magic World was truly whimsical in its own weird way, but that isn’t the last escape room you’ll see. If you enjoy sci-fi, Trace is a lovely combination of space and escape rooms. For a trippy experience, try Superliminal!


Updated: Mar 13, 2024 11:50 am