
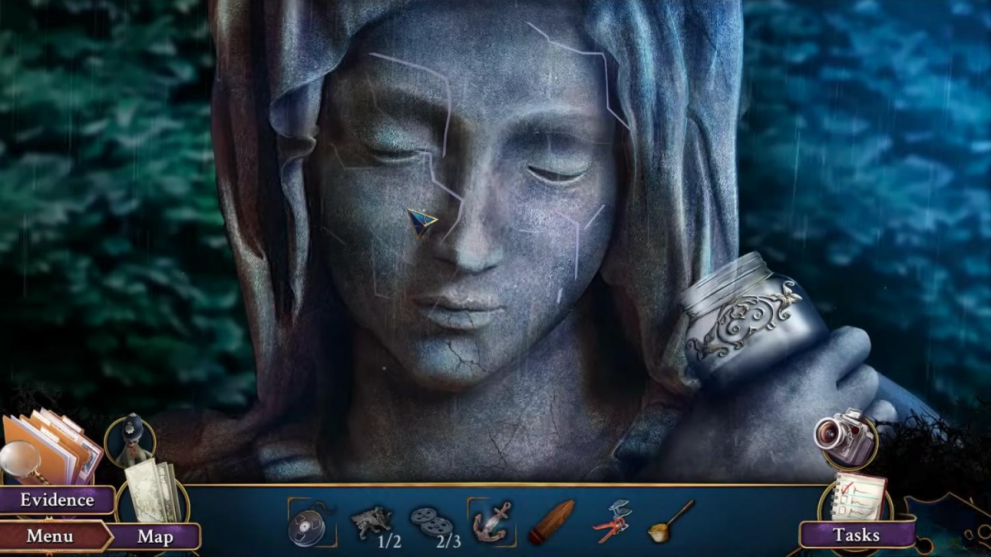
Path of Sin: Greed is one of the trickier titles from Artifex Mundi due to its timed trophies. So, if you want to complete this game with a perfect score you can find all the solutions and tips in our Path of Sin: Greed complete walkthrough guide below.
Path of Sin: Greed General Tips
Before you begin Path of Sin: Greed, you need to decide how tough of a challenge you can handle. Choose between Casual, Advance, Expert, or Custom by checking the details on each mode before tapping OK. Try to complete the hidden object puzzles as quickly as possible to earn special trophy achievements.
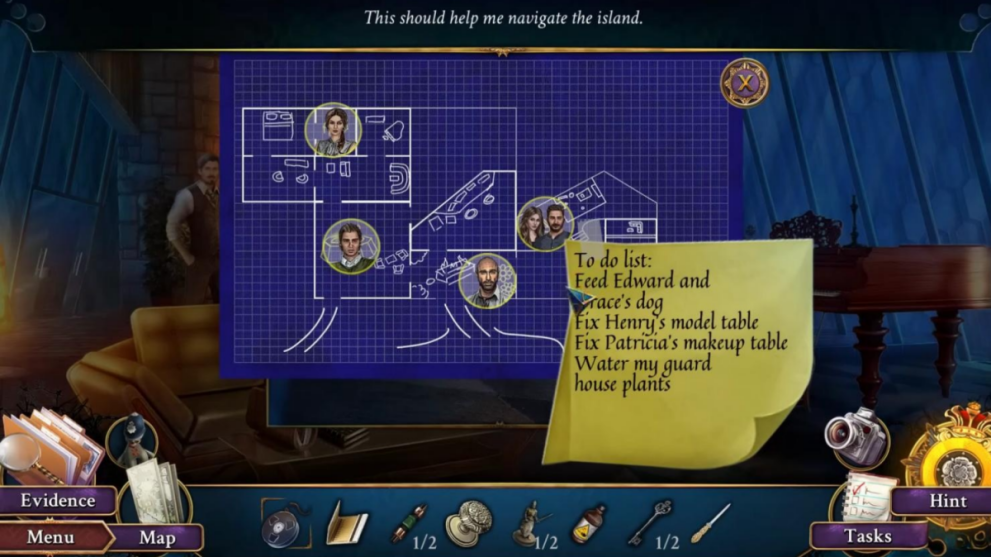
Every trophy will be highlighted in this guide in BOLD. You can find a list of all achievements and collectibles via the Main Menu. Lastly, remember to use your map to fast travel to different locations!
Path of Sin Greed Chapter 1: Investigating the Guard Room
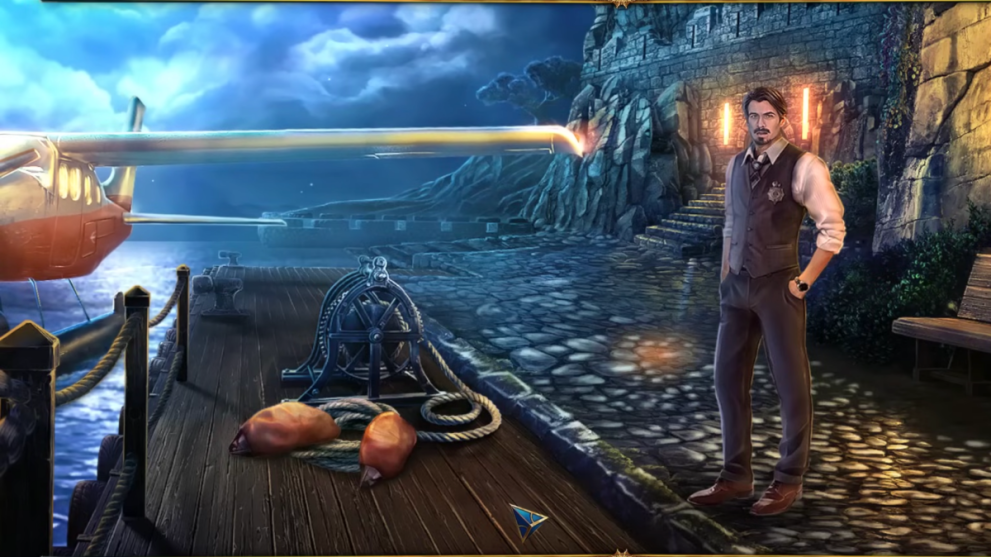
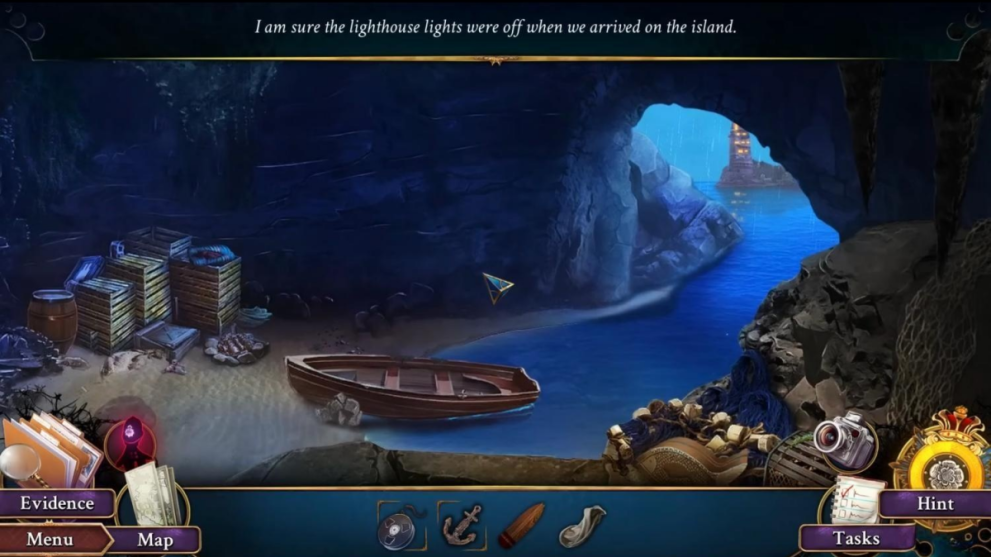
Chapter 1 of the Path of Sin: Greed walkthrough begins outside as you start your investigation. Speak to your new partner who will see if anyone will answer the door. Search for clues outside:
- Take the buoy and rope from the pier;
- Take the trophy from the pier edge;
- Use the rope on the plane to secure it;
- Look closer at the plane and open the compartment;
- Take the shoulder bag;
- Open the shoulder bag and take the pliers and case files;
- Give the case file to your partner;
- Reassemble the pictures (tap to rotate each piece);
- Go to the door;
- Use the pliers to open the door buzzer;
- Take the batteries;
- Click the wire on the left and close the buzzer compartment;
- Use the buzzer and enter the Foyer;
- Speak to the men inside before making your way to the Backyard;
- Take the camera from your partner;
- Take the trophy doll from the wall on the right;
- The camera flashes red when there is evidence to photograph;
- Look closer at the gate (it is locked);
- Take the air pump;
- Look closely at the area on the right through the flowery arch;
- Take a picture of the scene for evidence;
- Take the ashtray;
- Look closer at the fire pit;
- Click the bottle;
- Take the pruning shears from the chair;
- Go to the cliffs.

- Take the trophy doll as it appears on the rocks;
- Grab the Fleu de Lys from the step;
- Head back to the yard;
- Tap the fire pit;
- Put the Fleur de Lys in the space;
- Take the pyramid and flashlight;
- Go to the cliffs;
- Select the flashlight and open it up;
- Put the batteries inside before closing it up;
- Give the flashlight to your partner;
- Check out the boat on the right;
- Use the buoy and the air pump to lift the boat;
- Take the wallet;
- Open the wallet and take the suicide note and card;
- Look closer at the bushes behind the body;
- Use the pruning shears to clear the way;
- Take the pyramid;
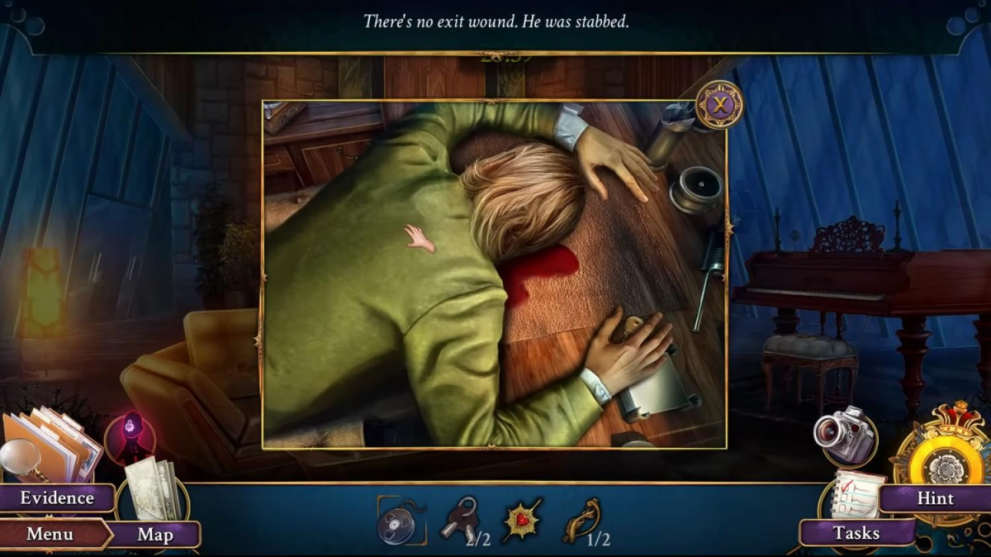
- Look at the body and use the camera to take a photo of the footprint;
- Remove the sheet from the face and take a photo of his bruised eye;
- Take the watch from the body;
- Open his jacket and take the code pattern.
- Go back to the backyard;
- Look at the plaque on the lower door;
- Use the card to open the door;
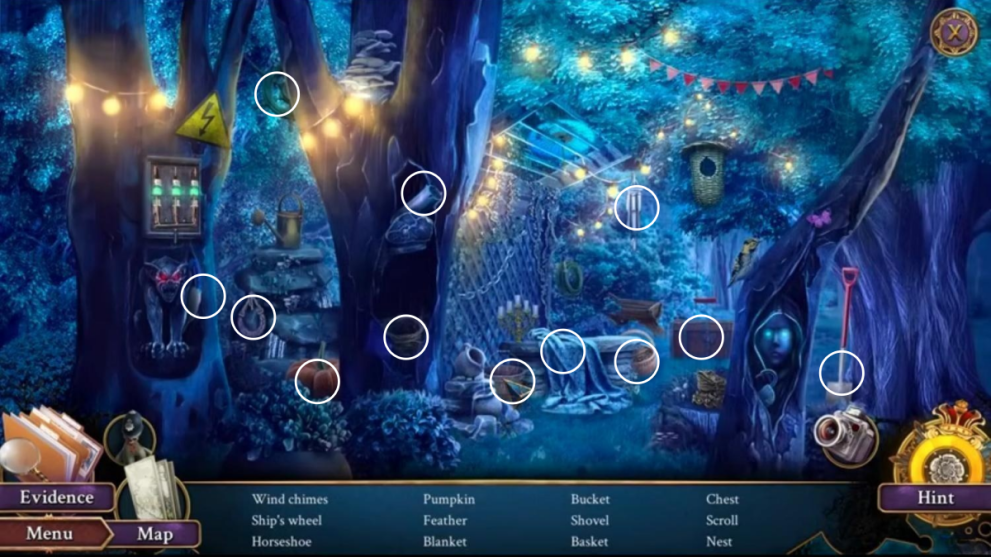
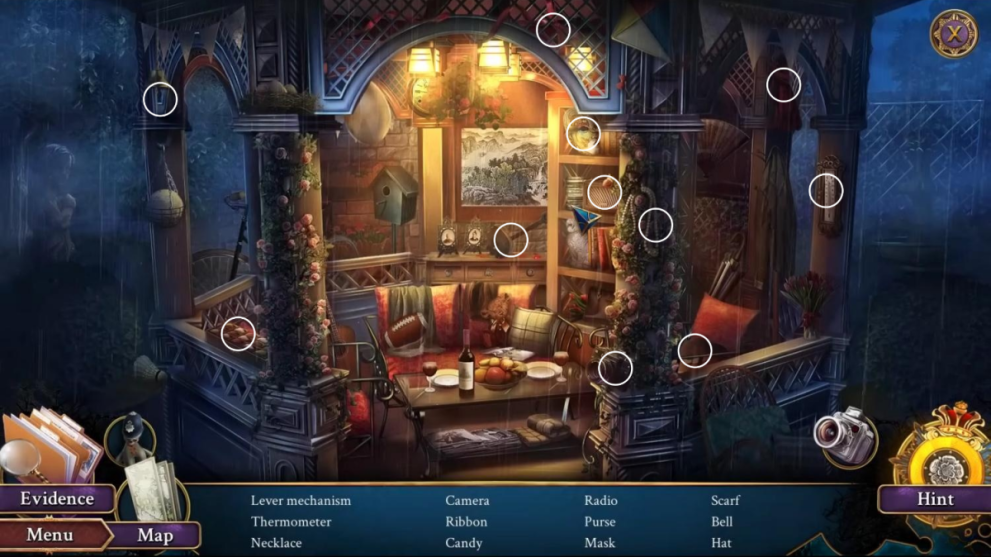
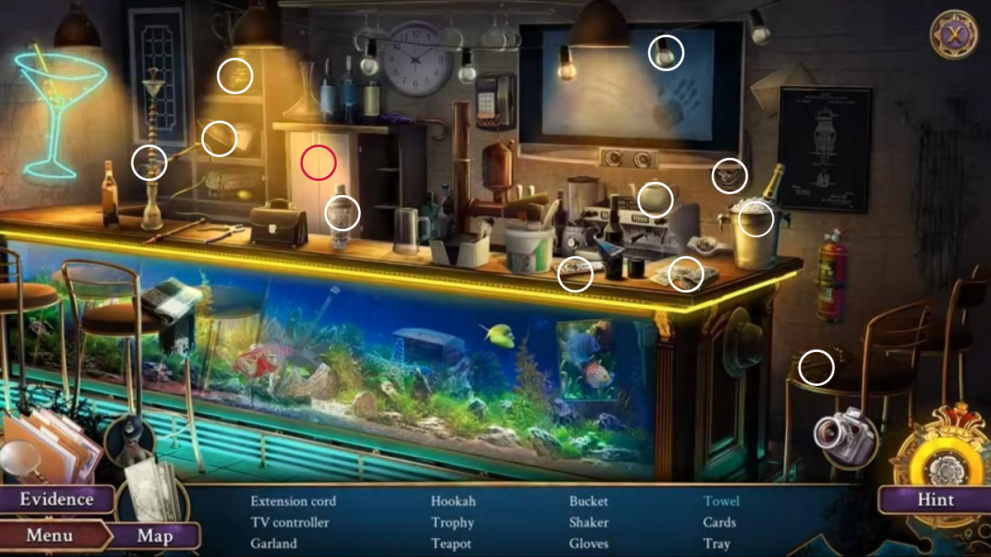
- Find the hidden objects in the room.
Hidden Object Puzzle Room 1
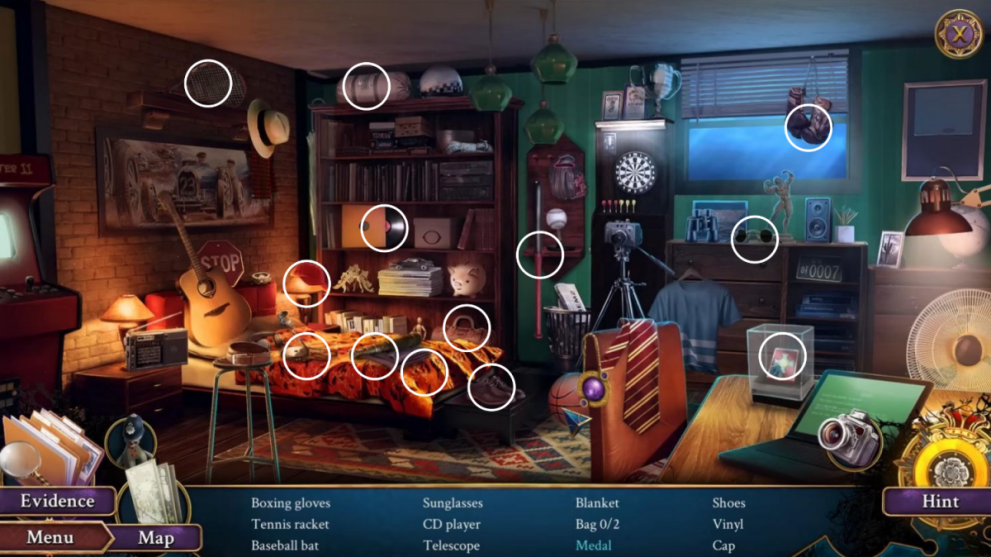
- Open the medal to find the picture evidence;
- Use the card to open the door at the top and enter;
- Enter the guard room;
- Use the camera to take a photo of the room before touching anything;
- Take the evidence from the pile of papers;
- Look at the tape boxes under the computer;
- Photograph the missing tapes for evidence;
- Take the polo mallet;
- Use the medal to open the box and take the rose shape;
- Look at the monitors and check the footage;
- Take a photo for evidence;
- Look at the VCR and remove the pin;
- Check the notice board and collect the photos;
- Head back to the yard;
- Take the earring from your partner;
- Go to the fire pit and place the rose shape;
- Take the screwdriver;
- Head back to the guard room;
- Use the screwdriver on the VCR;
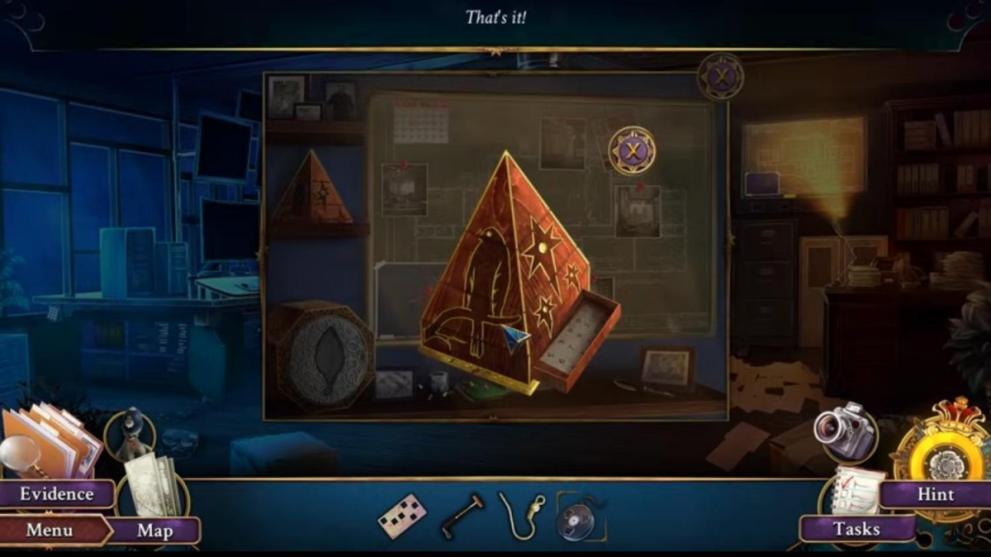
- Take the tape and pyramid piece;
- Go to the board on the right again and place the pyramid pieces on the stand;
- Arrange the pyramid pieces and take the code decryptor.
Pyramid Puzzle Solution
- Put the code pattern and decryptor together to get the archive login;
- At the screen to the right use the archive login: 392799;
- Complete the sequence puzzle;
- Take the clock ornament and letters as evidence.
Sequence Puzzle Solution
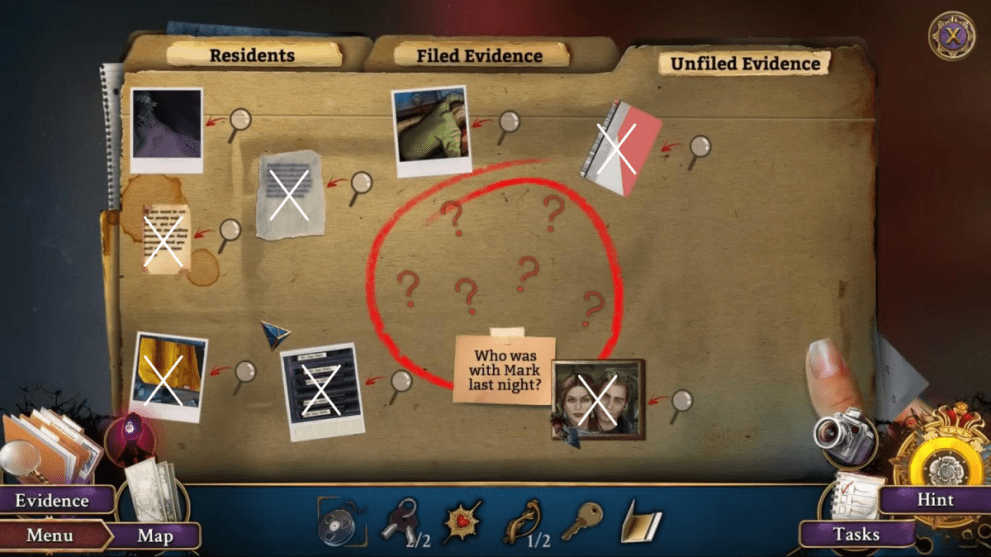
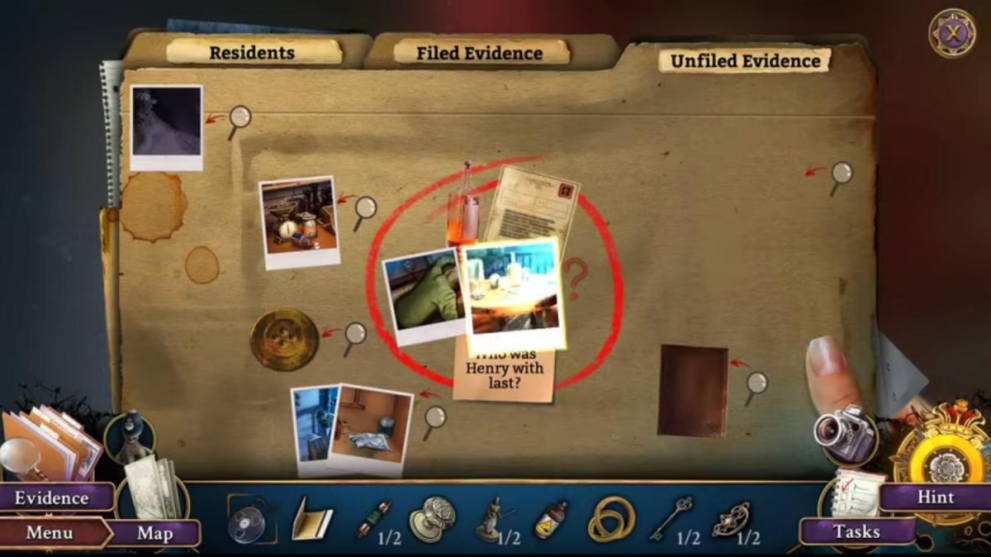
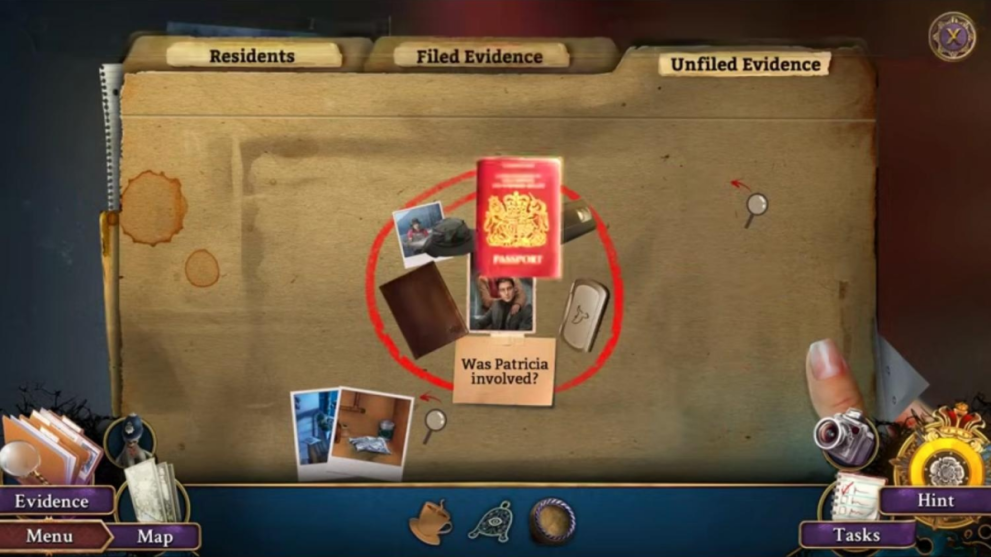
- Open your Evidence folder and drag evidence into the center;
- Take the time of death;
- Choose the conclusions: “Mark was smoking next to the arch”, “Mark met with someone and sat with them by the fire pit”, and “Mark was pushed off the edge”.
- Give the time of death to your partner.
That concludes chapter 1 of Path of Sin: Greed! You are one step closer to finding out what happened to Mark on that fateful night. Continue for more solutions and hints in our Path of Sin: Greed walkthrough.
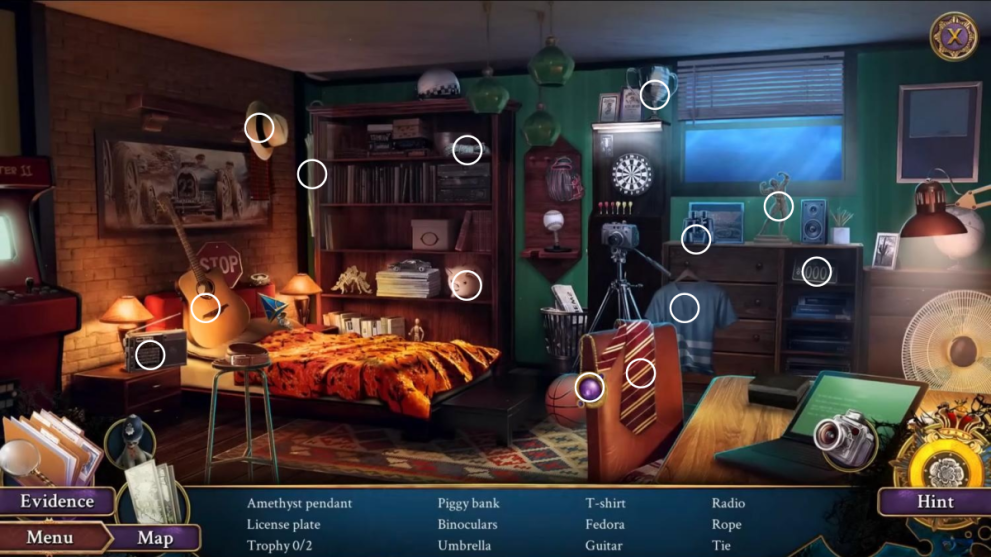
Path of Sin Greed Chapter 2: Interrogations in the Guest Wing
Our walkthrough for Path of Sin: Greed continues with chapter 2. You and your partner must interrogate the rest of the guests. Everyone is a suspect now…
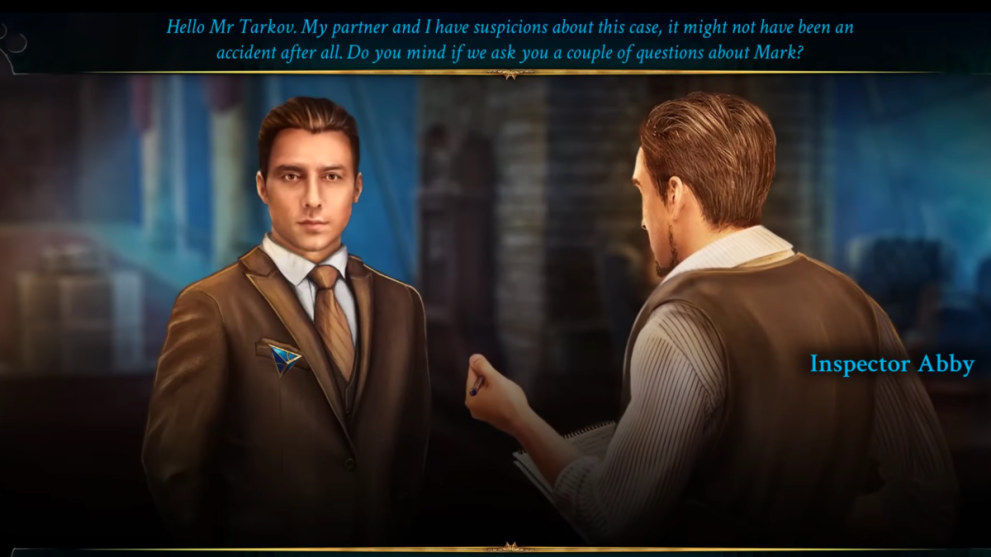
- Talk to Tarkov and ask him all three questions;
- Take the trophy doll from the table on the left;
- Open the clock;
- Take the override key;
- Put the clock ornament in the clock face;
- Take the ladder wheel;
- Look closer at the chairs by the fireplace;
- Take the glasses and the book;
- Click on the miniature scene display in the middle of the hall and take the pin;
- Go ahead to the lobby;
- Take the trophy doll on the railing;
- Talk to Richard Jones and ask all three questions;
- Click the ladder and add the wheel;
- Click the ladder again and look at the books;
- Place the book with the others and a secret compartment will open;
- Take the letter as evidence and the base to a miniature lighthouse;
- Click on the snake tank and use the pin and polo mallet to open the drawer;
- Take the clock weight;
- Check out the table to the right;
- Click on the camcorder;
- Take the decorative piece;
- Head through to the study;
- Talk to Henry Bradford and ask all three questions;
- Head upstairs to the guest wing;
- Take the trophy doll from the very top of the banisters;
- Ask Grace Anderson and Edward Bradford the questions;
- Open the TV cabinet and turn the TV on;
- Check all of the alibis:
- Richard Jones: stargazed/camera footage/signed legal documents
- Alexi Tarkov: finished chores/worked on legal paperwork/fed the snakes
- Henry Bradford: watched rugby match with Edward and Grace/worked in the study
- Edward and Grace: TV channels history/watched rugby match with Henry
- Patricia Bradford: Left the island – but when?
- Click the area under the fire and take the decorative piece;
- Go back to the secret compartment in the books;
- Put the decorative piece in the right space and take the second clock weight;
- Go back to the clock and place the weights inside;
- Take the blue gem;
- Go to the fireplace and click on the decorative box;
- Put the decorative piece on the box and take the thread;
- Place the thread on the hook pin;
- Go to the snake tank and use the thread and pin to get the lighthouse top;
Mini Hidden Object Puzzle Solution
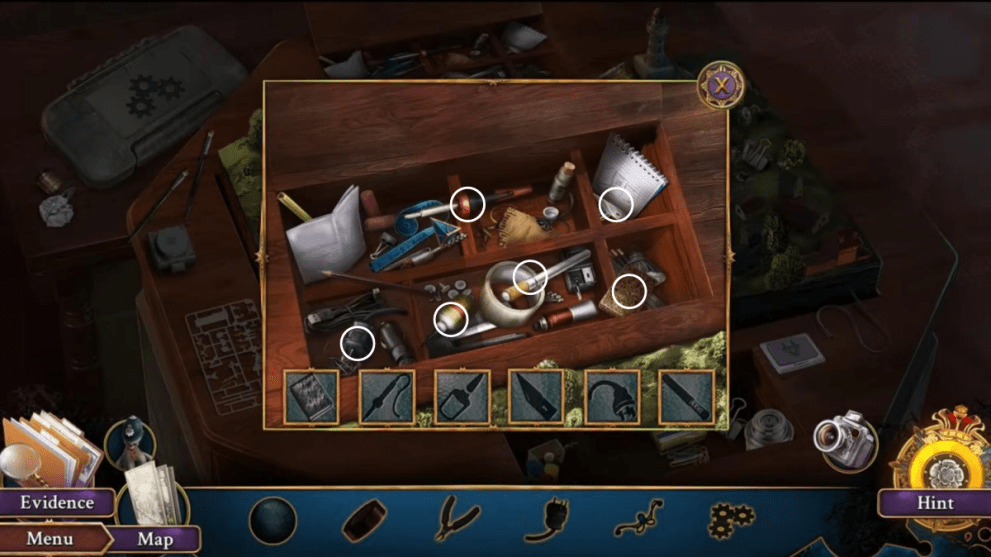
- Take the ruler and use it to open the drawer;
- Grab the dental hook;
- Use the hook to open the lock at the back;
- Find all the pieces in the mini hidden object puzzle (see image above);
- Take the cable plug;
- Take the cog piece;
- Use the cog piece on the case to the left;
- Pick up the electrical tape and cutters;
- Use the cable plug and electrical tape on the loose wire on the bottom right;
- Use the cutters to cut up the plastic pieces;
- Place the plastic piece on the symbol by the newly designed cable;
- Take the drawer handle;
- Place the drawer handle on the symbol and take the silicone utility pole;
- Melt the silicone utility pole at the blowtorch;
- Place the power pole on the tabletop so the lighthouse lights up;
- Read the magazine and take the globe.
Head back to the lobby and look at the table with the camcorder and telescope again.
- Place the globe and take the keycard and can;
- Go through to the guest wing;
- Click on the glass table to the left;
- Look at the metal latch and use the oil can to loosen it;
- Open it up and take the gem and decorative piece;
- Check out the space on the right and place the blue and red gems in the spaces;
- Rearrange the triangles into the correct pattern.
Bird Puzzle Solution
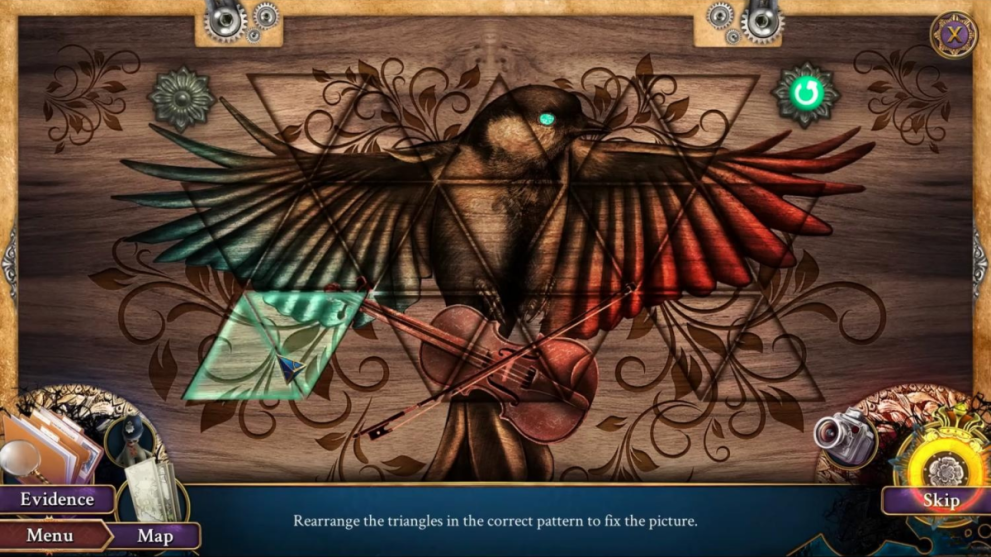
- Take the note and the snake;
- Go back to the snake case and place the snake piece in the slot;
- Take the mural piece;
- Back at the Guest Wing, place the mural piece in the slot on the glass table on the left;
- Take the brass token and the bellows;
- Go back to the fireplace with the chairs and use the bellows on the fire;
- Take the sword token;
- In the lobby, look closer at the suit of armor;
- Place the sword token in place.
Hidden Object Puzzle Room 2
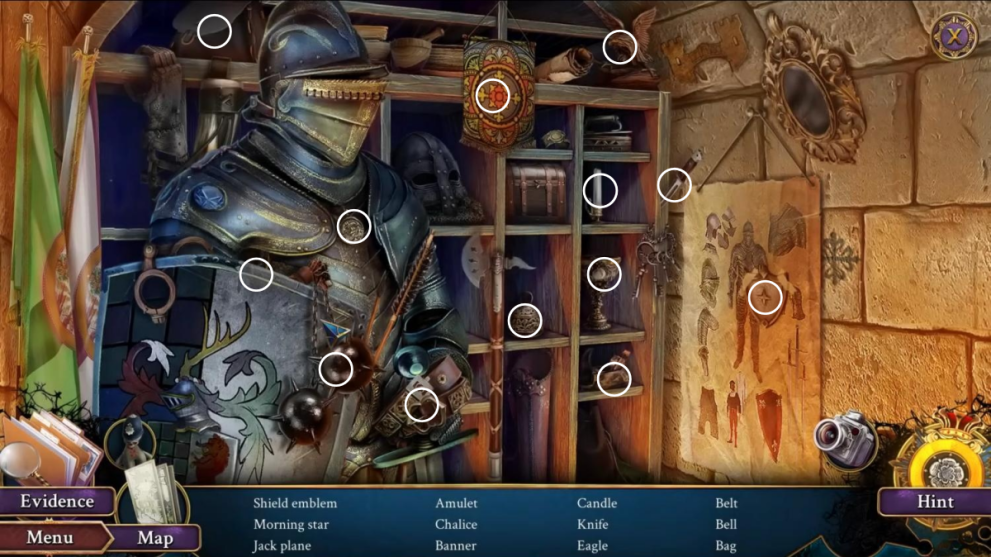
- Take the shield emblem;
- Back at the guest wing, look under the TV;
- Place the shield emblem in the space;
- Take the key and look at the picture to collect evidence;
- Go to the study to talk to Henry.
And so chapter 2 draws to a close. We continue below with Path of Sin: Greed as the detectives discover another body.
Path of Sin Greed Chapter 3: Death in the Study
- Take the trophy doll from the sofa;
- Check the dead body;
- Take photo evidence with the camera;
- Move his hand to get the key;
- Click the glowing security panel;
- Take the ransom note;
- Click the piano and take the matchbook;
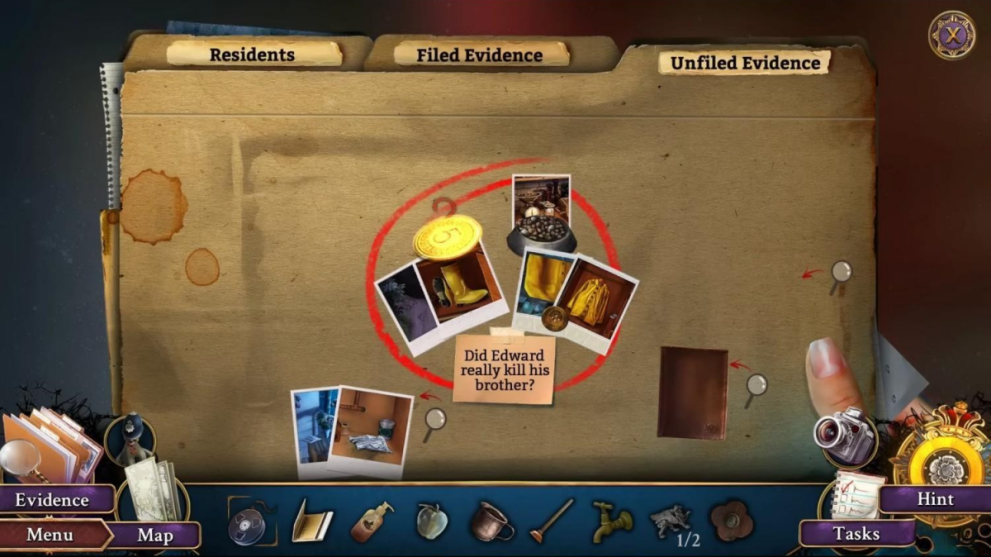
- Open your evidence and place the pieces of evidence in the circle;
- Give your partner in the lobby the evidence from witness statements.
Evidence 1
- Look closer at the table with the camcorder;
- Place the override key in the case;
- Take the tobacco leaf and the evidence;
- Go back to the guest wing;
- Look at the balcony upstairs and take a photo;
- Pick up the scale pan;
- Go back and click on the door behind the spiral staircase;
- Use the key on the lock;
- Take the trophy doll on the left;
- Click on the window seat to the left;
- Take the bird insignia;
- Click the desk on the right;
- Take the divider;
- Click on the foot of the bed and take the remote;
- Go through to the dressing room;
- Take the trophy doll in the center of the room;
- Look at the white footstool;
- Check the bottom and use the heart locket;
- Take the wallet;
- Look closer at the orange couch;
- Take the switch button;
- Look closer at the drawer under the couch;
- Use the divider on the bolt;
- Take the leather bag;
- Click on the paper on the floor;
- Use the remote on the suitcase;
- Click on the books and take the treble clef buckle;
- Use the bird insignia to open the dressing table drawer;
- Take the clippers;
- Go back to the bedroom and click on the window seat;
- Place the treble clef in the music case;
- Take the tuning wrench and look at the evidence;
- Head back to the guest wing and click on the top of the spiral stairs;
- Use the leather bag to catch the snake;
- Take the knight buckle;
- Go to the bedroom and click on the puzzle to the left.
Knight Puzzle Solution
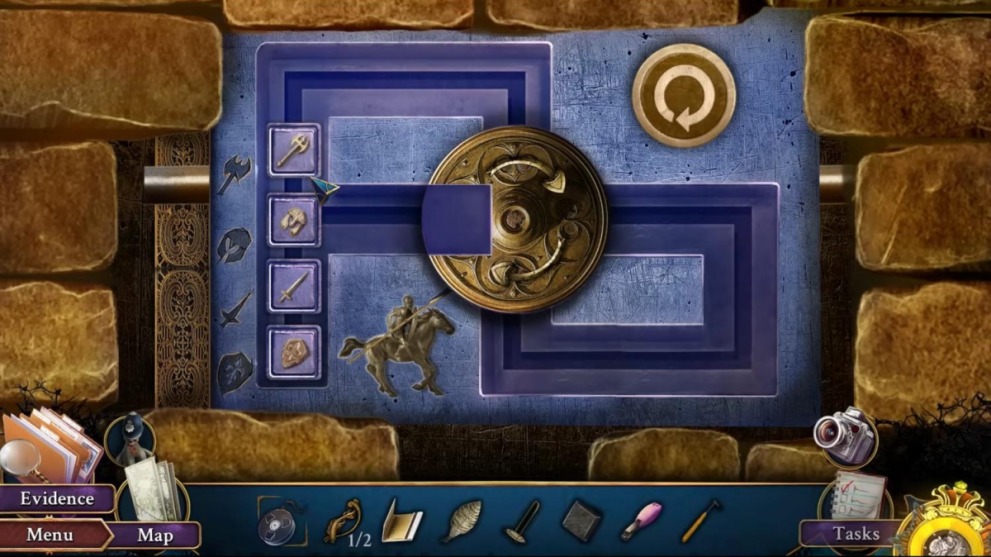
- Put the knight buckle in place, solve the puzzle and take the ornamented lever;
- The trick to this puzzle is to use the wheel in the middle to turn each shape so they match the icon on the left exactly. It is tricky and takes some time but be patient. Keep in mind how the piece sits in the wheel and how it ends up when it exits the wheel. Unfortunately, this is not a puzzle where we can show you a specific solution; just take your time and do each piece in turn. If you get too frustrated with it then use the skip option!
- Head to the dressing room and look at the dressing table on the left;
- Use the tuning wrench on the panel to the left of the red curtain;
- Click on the note and take the fuse and brass token;
- Go back to the bedroom;
- Use the brass token on the box at the foot of the bed;
- Back in the guest wing go to the top of the stairs again;
- Place the ornamented lever and click it so it opens the door downstairs;
- Head behind the red curtains upstairs and place the handle tool on the binocular stand;
- Take the brass piece;
- Go through the newly opened door to the kitchen cellar;
- Take the trophy doll to the left of the stacked barrels;
- Look closer at the shelves above the three barrels;
- Take the silver knob;
- Use the scale pan on the scales;
- Click the weights and put them on the scale;
- Look closely at the archway;
- Take a photo of the table;
- Take the knight figure;
- Use the brass clover in the slot;
- Click the box and take the magnet;
- Look at the stove;
- Use the nail clippers and take the bottle;
- Head to the bedroom via the guest wing;
- Look at the right side of the bed and click the blue note;
- Click the mirror;
- Place the switch with the others in the panel;
- Use the magnet to move the mechanism;
- Take the bottle and hex key;
- Head back to the kitchen;
- Put the bottle on the scales;
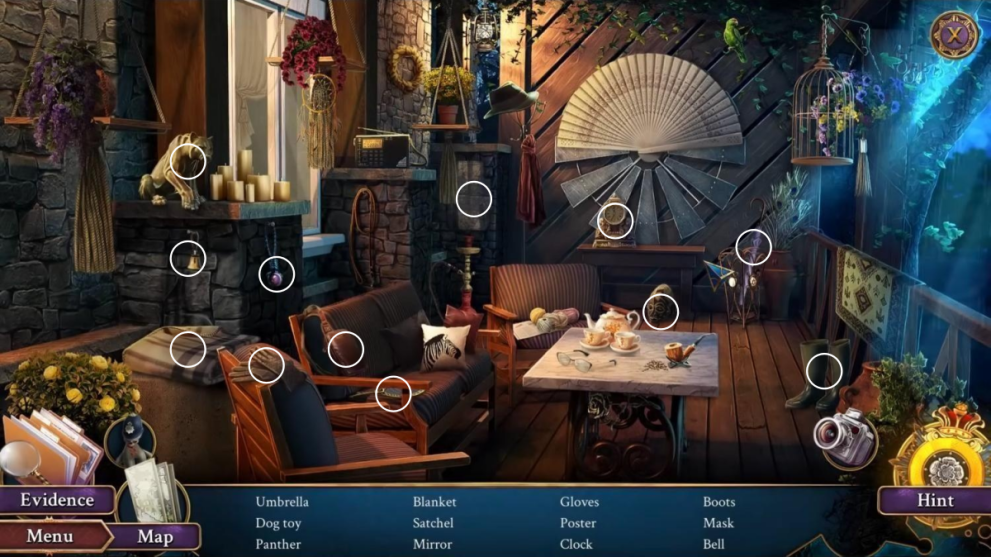
- Go through the door to solve the hidden object puzzle.
Hidden Object Puzzle Room 3
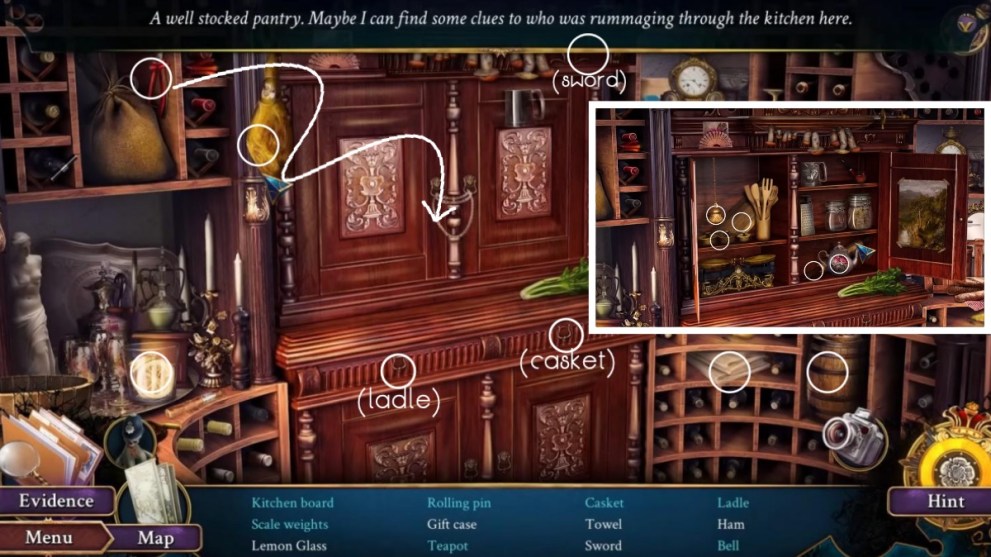
- Take the gift case and open it up;
- Get the decorated wheel and bottle for evidence;
- Look closer at the stove and the garbage disposal inside;
- Use the hex key;
- Use the camera on the cloth;
- Click the cloth and take the wedding rings;
- Fast travel via your map to the guard room;
- Look closer at the bulletin board;
- Put the tobacco leaf in place;
- Take the cigar cutter;
- Look at the monitors and then at the tape player;
- Use the cigar cutter on the wires and take the wires;
- Head to the backyard;
- Look at the fire pit;
- Place the valve on to turn off the gas;
- Use the wires to get the button and key;
- Fast travel to the dressing room;
- Look closer at the white footstool;
- Use the decorative wheel in the slot;
- Take the token;
- Fast travel to the study;
- Look at the table on the balcony to the left;
- Take a photo of the table for evidence;
- Collate the evidence to receive ‘Brothers Meeting’ deduction.
Evidence 2
- Go to the study and give your partner the deduction;
- Take the plaque and place it on the piano;
- Use the wedding rings on the plaque;
- Take the token;
- Put the token in the table on the balcony;
- Take the letter opener and stool lever;
- Use the lever on the piano seat and take the paper;
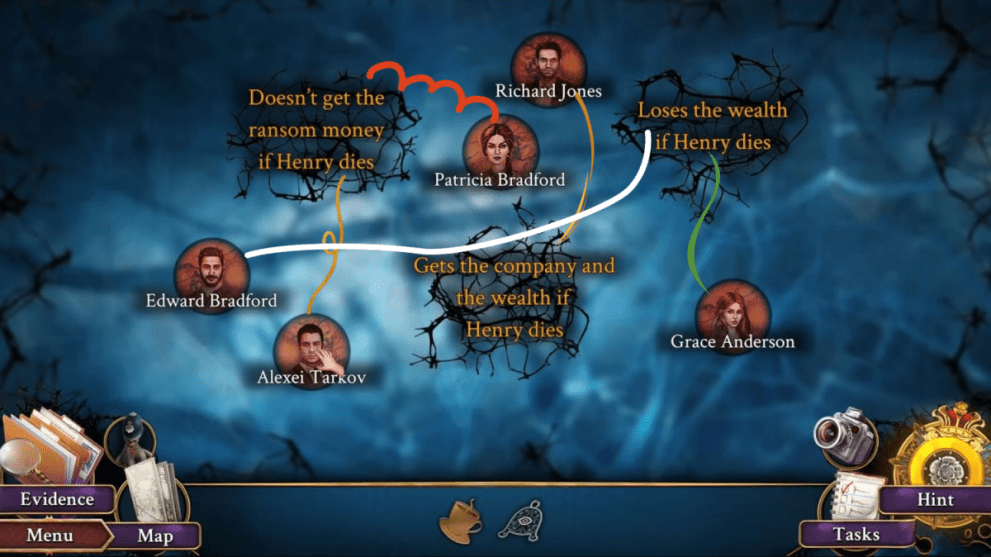
- Place the people in the right spaces and take the gate key.
Suspect Placement Solution
- Use the keys in the backyard to open the wrought iron gate;
- Go up the stairs;
- Find the trophy doll in the tree on the right;
- Head up to the patio;
- Look closer at the window and use the letter opener to make a gap;
- Take the gloves;
- Take the trophy doll on the right;
- Click on the central lamp and take the bolt cutters;
- Look at the pillar on the left of the house;
- Click the red bricks and take the gold decorative piece;
- Go back to the stairs and find the briefcase on the bench;
- Use acid on the case and the gloves to open it;
- Take the chisel;
- Go back upstairs and use the chisel on the barrel;
- Take the grabber;
- Enter the apartment.
And so that concludes chapter 3 of Path of Sin: Greed! Read on to continue the walkthrough with every solution for chapter 4!
Path of Sin Greed Chapter 4: Apartment
- Take the hand sanitizer from the table beside the sofa;
- Put the silver knob on the drawer;
- Open to get the evidence and knight figure;
- Take the corkscrew from the space above the ladder;
- Look closer at the plaque behind the sofa on the left;
- Use the reacher grabber to get the brooch to the left of the plaque;
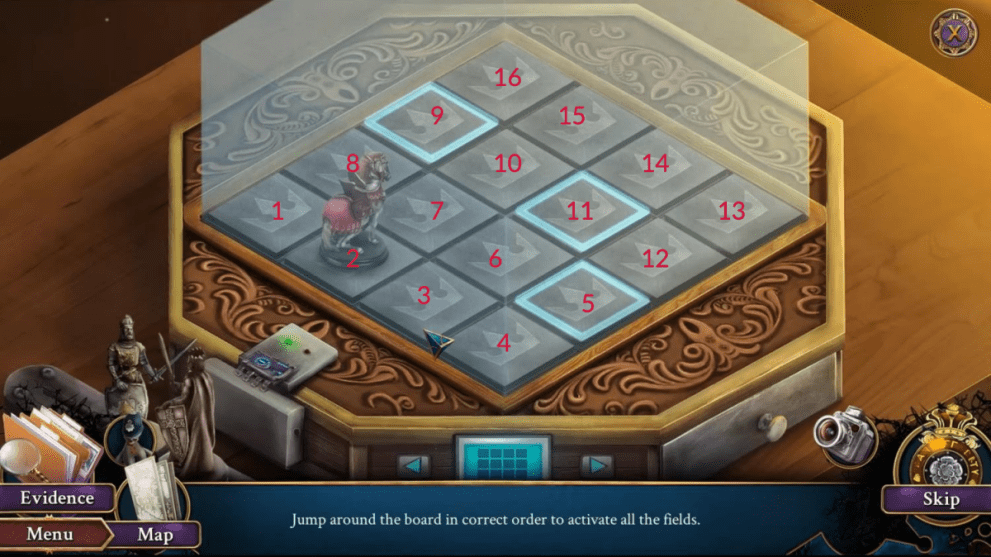
- Look at the puzzle by the sofa and place the knight figures;
- Solve the puzzle by moving the piece around the board until all buttons are pressed. Press in this order: 9, 14, 7, 16, 11, 8, 15, 6, 13, 10, 3, 12, 7, 4, 11, 2, 5, 10, 1.
Knight Puzzle Box Solution
- Take the orchid badge;
- Head back outside to the stairs;
- Look closer at the door on the left;
- Put the orchid badge in place on the chained-up door;
- Take the trowel;
- Go up the stairs again to the patio;
- Use the trowel on the earth next to the hosepipe;
- Find the lightbulb buried there;
- Go back into the apartment;
- Use the bulb on the plaque;
- Get the fuses;
- Head back again to the stairs;
- Click on the tree on the left with the electrical sign;
- Put the fuses in place under that sign;
- Play the hidden object puzzle.
Hidden Object Puzzle Room 4
- Take the ship wheel;
- Head up to the patio;
- Place the ship wheel on one of the barrels in the center of the patio;
- Take the skeleton hand;
- Go back down the stairs;
- Place the skeleton hand on the bones in the tree to the right;
- Take the silicone apple and miniature Saturn;
- Go back upstairs and into the apartment;
- Place the Saturn in the space above the ladder;
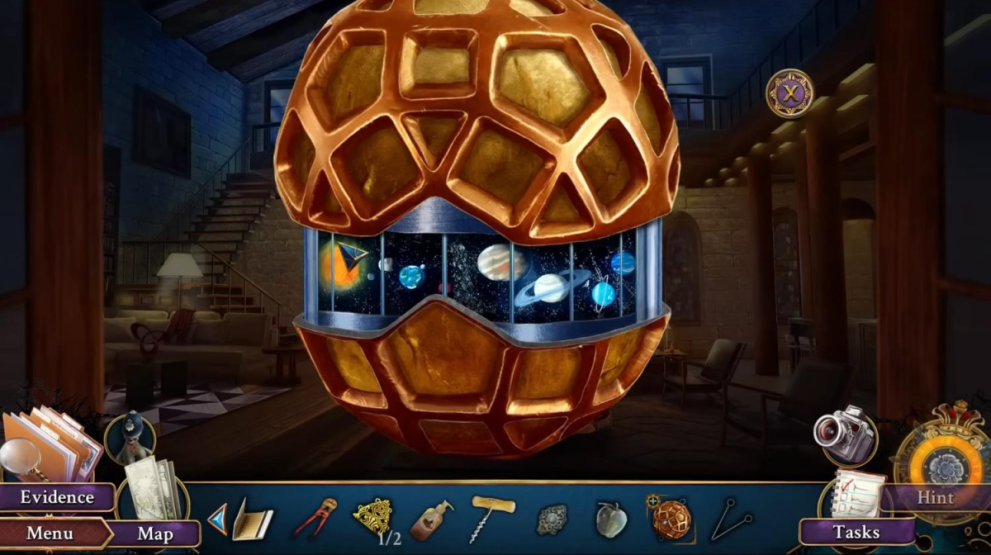
- Take the sun puzzle and then select it;
- Solve the sun puzzle so it looks like the picture below by moving slots (if numbered 1-5 from left to right) in this order: 2, 3, 5, 4, 1.
Sun Orb Puzzle Solution
- Take the star token and metal pins;
- Look closer at the table beside the sofa;
- Place the star and take the mechanism chain;
- Go back to the stairs;
- Use the metal pins to open the lock;
- Take the webbing link;
- Head back up to the patio;
- Look closer at the space to the right of the apartment door;
- Place the mechanism chain and webbing link to open;
- Solve the hidden object puzzle.
Hidden Object Puzzle Room 5
- Take the dog toy;
- Head back to the stairs;
- Use the bolt cutters on the dog cage and give the dog the toy;
- Take the evidence and the workshop key;
- Head up to the patio;
- Use the key on the locked door to the left and enter;
- Take the trophy doll that appears on the stool;
- Look at the diploma stuck in the cupboard door;
- Take the bird carving;
- Look closer at the statue busts to the left;
- Place the brooch and take the frame part;
- Click the books;
- Take the tiara part;
- Go back to the patio;
- Click the window on the left;
- Place the bird carving;
- Take the tiara part;
- Enter the apartment;
- Look at the space above the ladder again;
- Place the frame part and take the decorative ornament;
- Go back to the workshop;
- Place the decorative ornaments on the cupboard door;
- Use your camera to take a picture of the evidence;
- Open it up and take a picture of the inside;
- Take the pot;
- Open the cupboard to reveal the shoes and boots;
- Take another picture;
- Use the corkscrew on the lock above the boots;
- Take the plunger;
- Look at the statue busts again and place the tiara on the right bust;
- Take the gryphon symbol and woodcarving token;
- Open your evidence and place the correct pieces inside the circle:
Evidence 3
- Take the deduction;
- Go back to the patio;
- Click to the left of the apartment entrance and place the faucet;
- Place the pot under the tap to get water;
- Go to the apartment;
- Give your partner the deduction;
- Ask the three questions;
- Take the password;
- Head back to the workshop;
- Click the table with the book and vessels.
Chemical Puzzle in the Workshop
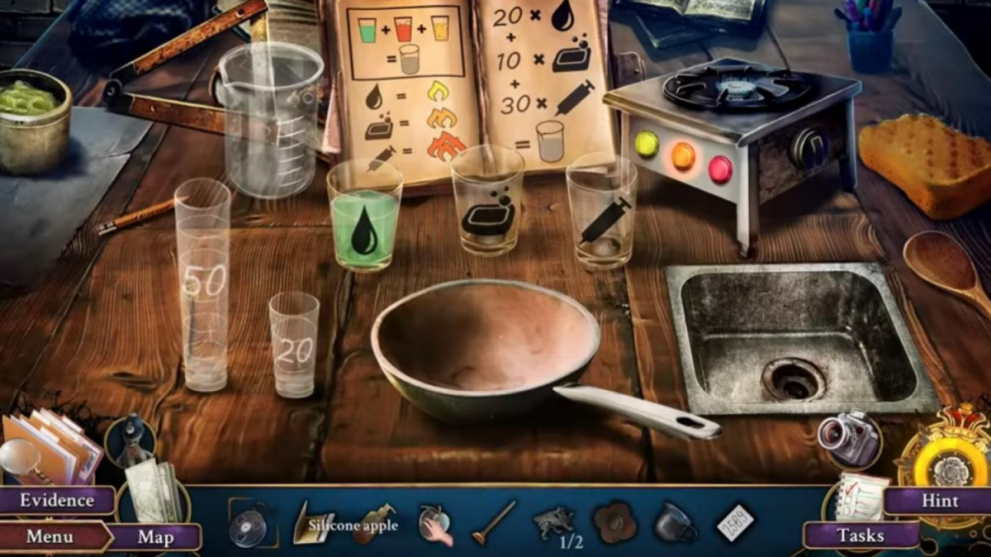
Follow these steps to create the correct liquids:
- Add hand santizer to vessel 2 (with soap icon)
- Use matches to light stove top
- Add water to stove top
- Place silicone apple in water pot to create liquid silicone
- Put liquid silicone in vessel 3 (with syringe icon)
- Take vessel 1 (with green liquid) and measure 20ml
- Place the green liquid in the pan
- Press yellow button for low heat and heat the green liquid
- Place in large beaker
- Take vessel 2 and measure 50ml
- Pour from 50ml into 20ml to leave 30ml and discard the 20ml down the sink
- Repeat above step so only 10ml is left in the 50ml cylinder
- Discard the 20ml down the sink
- Pour the remaining 10ml into the pan
- Press orange button for medium heat and heat the red liquid
- Pour into the large beaker
- Take vessel 3 and measure 50ml
- Pour from 50ml into 20ml to leave you with 30ml
- Discard the 20ml down the sink
- Pour the 30ml into the pan
- Press red button for high heat and heat the yellow liquid
- Pour into the large beaker
- Take the casting mold
- Head back to the stairs;
- Inside the room on the left place the woodcarving token in the space provided;
- Take the silicone gun;
- Head to the backyard and into the door under the stairs for another hidden object puzzle.
Hidden Object Puzzle Room 6
- Take the amethyst pendant;
- Go to the lobby;
- Place the amethyst pendant in the clock;
- Get the quick set silicone;
- Head to the study;
- Use the casting mold on the body to get a handprint mold;
- Combine quick set silicone and the silicone gun;
- Add silicone to the handprint mold to make a hand mold;
- Use the hand mold on the panel;
- Enter the safe password (2569);
- Play the hidden object puzzle (the red circles marked below are safes you must open to find the object).
Hidden Object Puzzle 7
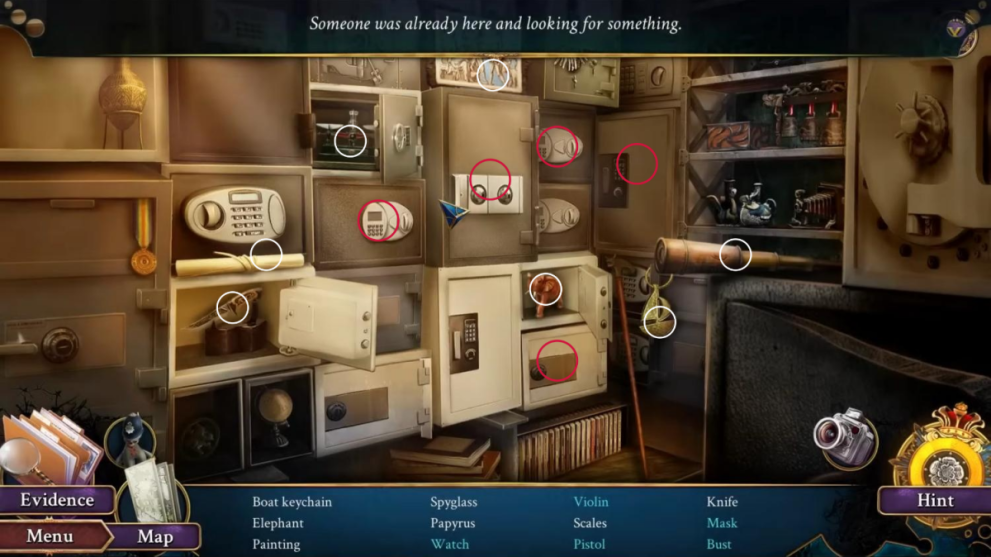
- Take the boat keychain and look at it;
- Give the boat keychain to your partner who will then give it back;
- Go to the foyer;
- Look closer at the door to the right of the blue chairs;
- Use the boat keychain on the slot;
- Go out to the garden.
That concludes chapter 4 of Path of Sin: Greed. Our walkthrough continues with chapter 5 below.
Path of Sin Greed Chapter 5: Into the Garden
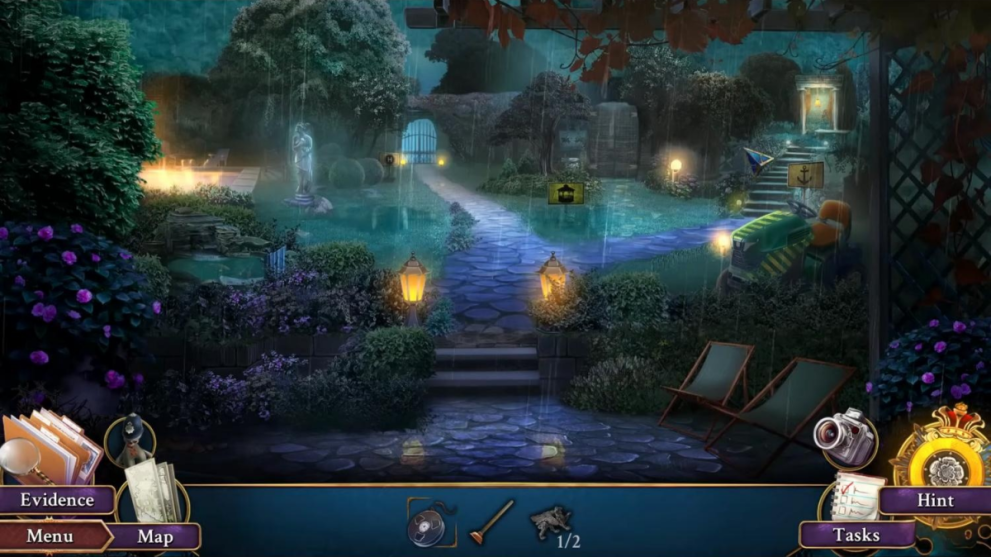
- Take the trophy doll sat on the lawn chair;
- Look at the pond to the left and take the cog;
- Look at the area with the gazebo sign;
- Use the plunger on the pot to remove the lid;
- Take the anchor emblem and iron spike;
- Remove the vines to reveal the gryphons;
- Look at the tractor on the right;
- Take the water bottle;
- Open the fuel cap and the seat compartment;
- Head to the docks;
- Take the doll trophy from the low wall;
- Look at the boathouse to the left;
- Take the broken oar;
- Select the lever;
- Look at the stone wall to the back;
- Use the iron spike to remove the loose stones and take the statue chunk;
- Go through to the warehouse;
- Take the trophy doll from the beam on the ceiling;
- Look at the work table at the back by the stairs;
- Take the ladle and the photo evidence;
- Look closer at the mixer on the wall to the right;
- Take the spreading tool;
- In the room to the right, use the water bottle on the bucket in the wheelbarrow;
- Take the statue chunk;
- Take the gear from the cupboard;
- Go back to the dock;
- Look at the left-side boathouse again;
- Use the ladle in the bucket to get fish food;
- Go to the garden;
- Place the statue chunks in the statue behind the pond.
Statue Puzzle Solution
- Take the decorated jar;
- Put the fish food ladle in the pond;
- Use the jar to get fish in a jar;
- Head back to the docks;
- Give the fish in a jar to the owl by the stone wall;
- Take the tommy bar;
- Go to the warehouse;
- Use the tommy bar on the work table to loosen it and take the gryphon symbol;
- Go to the garden and place the gryphon symbols in the space behind the vines;
- Complete the hidden object puzzle.
Hidden Object Puzzle Room 8
- Take the lever mechanism;
- Go back to the dock;
- Use the lever mechanism on the door to the boathouse;
- Go inside;
- Take the jerry can from the generator;
- Take the hook pole from the wall;
- Go back to the docks;
- Use the hook pole on the stone wall and get the crane symbol;
- Head to the warehouse;
- In the storeroom to the right put the crane symbol in the space on the bottom drawer;
- Take the crane control and engine grease;
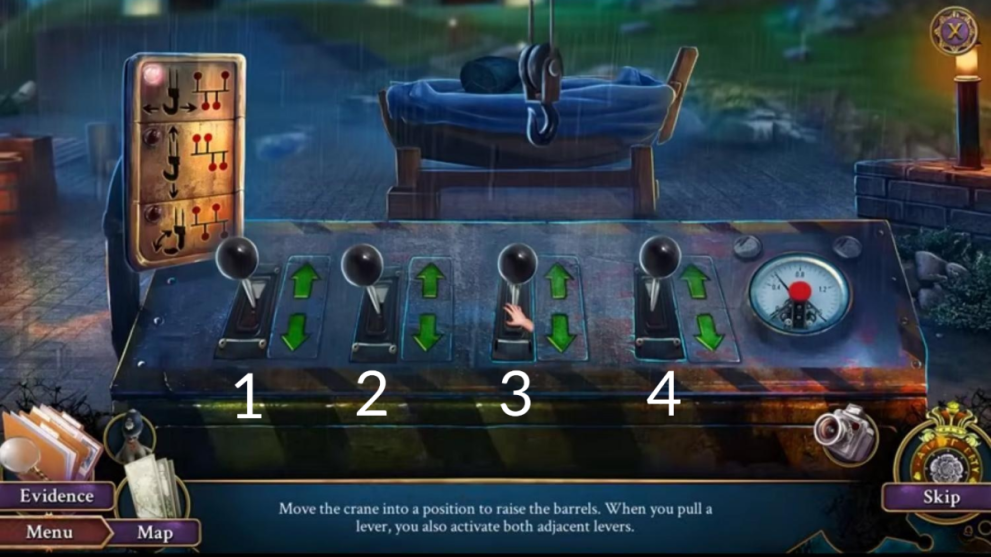
- Go to the dock again and look closer at the crane on the left;
- Use the crane controller and pull the handles in this order: 1, 4, 3, 2, 3, 2, 1, 4, 2, 1, 3.
Crane Lever Puzzle Solution
- Look closer at the boat and remove the tarp;
- Take the ratcheting cutter;
- Use the spreading tool to cut it open and take the pull cord;
- Go to the garden;
- Use the ratcheting cutter on the hose;
- Combine the jerry can and hose piece to get fuel from the tractor on the right;
- Head to the dock and into the boathouse;
- Use the engine grease on the generator;
- Take the cloth;
- Put fuel inside;
- Use the pull cord to start the generator;
- Take the iron bolts from the mechanism on the railings;
- Head to the warehouse;
- Go to the top of the wall;
- Put the iron bolts on the scissor lift;
- Press the button and take the maintenance token and wrench;
- Go to the garden;
- Put the mechanism token on the tractor;
- Take the gears and electrical tape;
- Head to the dock and go to the boathouse;
- Look at the panel on the left and use the electrical tape;
- Pull the lever;
- Look at the mechanism on the railing;
- Use the gears and tap wrench then press the button;
- Complete the hidden object puzzle.
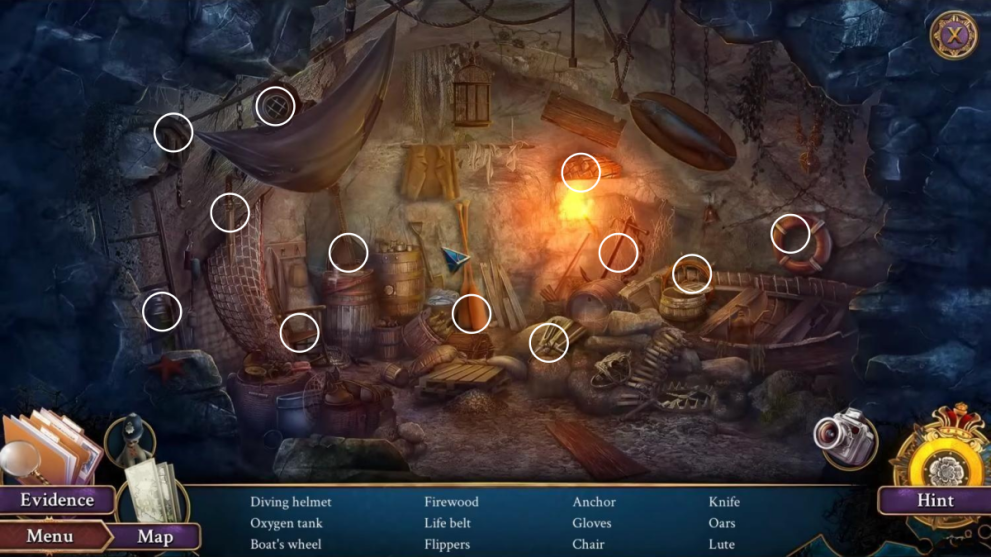
Hidden Object Puzzle Room 9
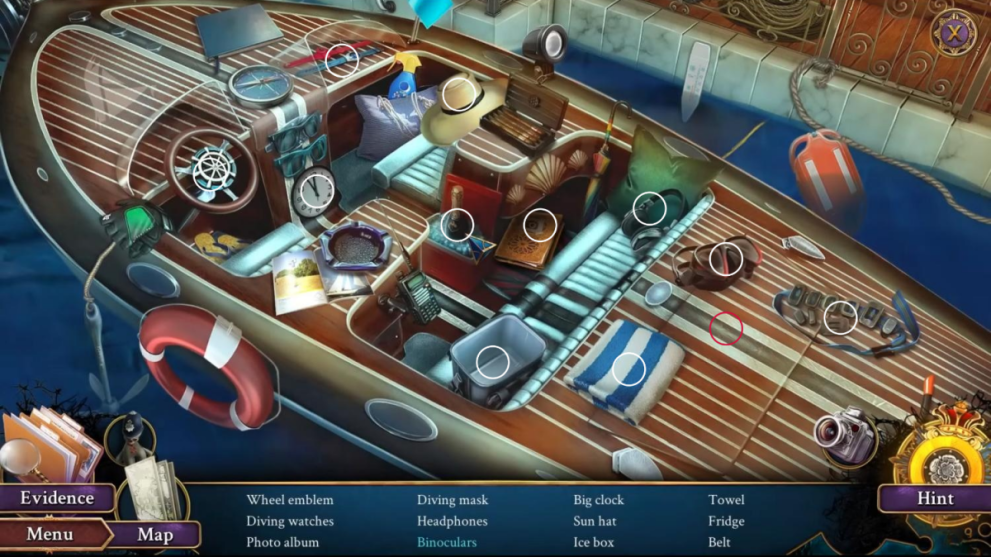
Image Source: Artifex Mundi via Twinfinite
- Take the photo album;
- Open the photo album and take the skeletal mark and evidence;
- Use the skeletal mark on the door at the right;
- Head through the door.
Chapter 5 of Path of Sin: Greed is over but there is so much more to come! Keep reading for more solutions in our walkthrough.
Path of Sin Greed Chapter 6: Lagoon
- Take the trophy doll from the center left of the screen;
- Look closer at the crates;
- Take the passport evidence and metal brush;
- Use the broken oar on the crate;
- Take the chalk;
- Combine the rusty anchor emblem and metal brush;
- Look at the crate to the right;
- Take the fisherman knife;
- Look closer at the boat;
- Take the hat and the paddle drill;
- Use the anchor emblem in the slot;
- Take the stethoscope;
- Head to the docks and look at the boat;
- Use the fisherman knife on the ring;
- Take the fence slippers;
- Enter the warehouse;
- Look closer at the area to the left at the top of the stairs;
- Use the stethoscope and chalk on the dial;
- Turn the dial four times until you hear it click;
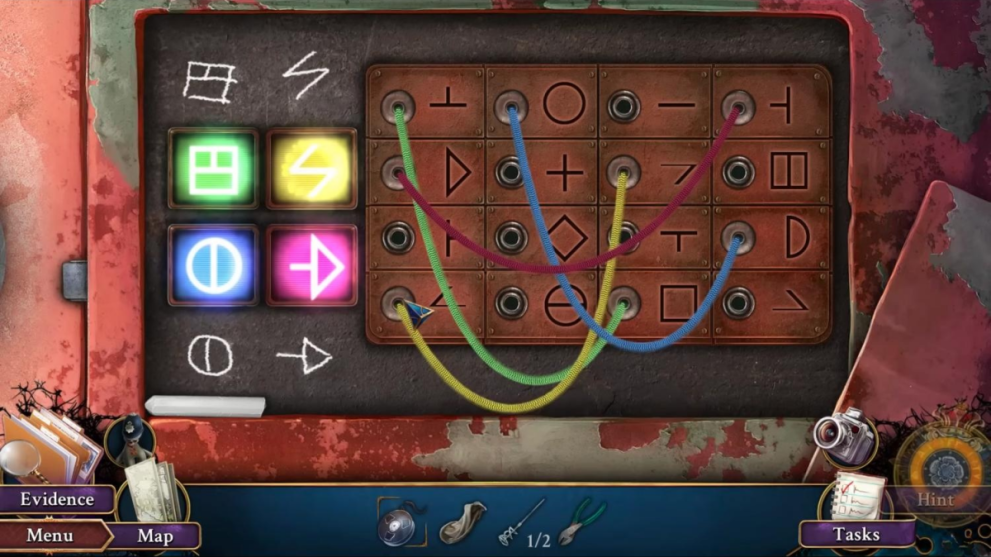
- Connect the cables to make up the symbols on the left.
Connecting Cables Puzzle Solution
- Take the fish seal and the blow torch;
- Head back to the lagoon;
- Look at the fishing baskets on the right;
- Place the fish seal and take the hook remover;
- Use the fence snippers on the basket;
- Take the brick trowel and mixer handle;
- Go to the dock and enter the boathouse;
- Use the hook remover on the levers to the left;
- Take the extension cable;
- Go to the warehouse;
- Go up to the scissor lift on the right;
- Place the mixer handle and extension cable on the mixer;
- Select the plug and the handle;
- Take the pipe;
- Go back to the lagoon;
- Combine the cloth and pipe and blow torch to make an improvised torch;
- Click the dark area at the back to the left;
- Use the torch to light the area;
- Solve the hidden object puzzle.
Hidden Object Puzzle Room 10
- Take the oars;
- Place the oars in the boat;
- Go over to the lighthouse;
- Take the trophy doll from the bottom of the stairs;
- Look at the desk on the left;
- Take the evidence and the empty stapler;
- Look at the paints under the staircase;
- Take the projector insignia;
- Head through the door on the left;
- Take the trophy doll from the table to the left;
- Look at the meeting table;
- Place the projector insignia;
- Take the acetone, the VHS frame, and staples;
- Place the staples in the stapler;
- Click the area to the left to find a motor;
- Use the stapler on the motor;
- Press the button;
- Take the paint roller and phosphorescent powder;
- Click the toolbox and take the coins;
- Go back to the lighthouse entrance area;
- Use the acetone to clear the glue;
- Take the paperclips;
- Go through to the meeting room again;
- Use the paperclips to open the briefcase;
- Read the note and take the vending machine key;
- Go back and use the vending machine key to open the machine on the right.
Vending Machine Puzzle Solution
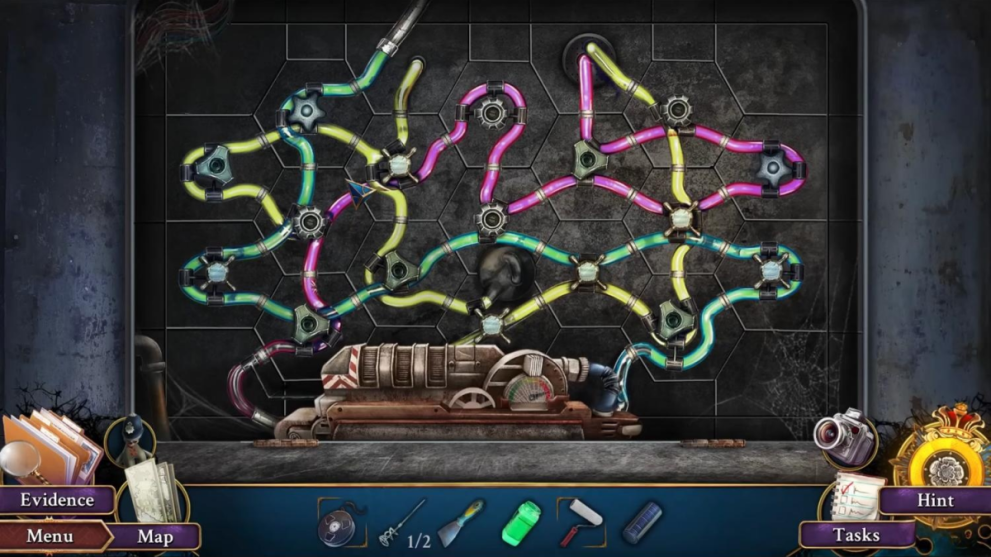
- Arrange the cables so they look like the image above;
- Insert coins;
- Use the brick trowel and take the card;
- Use the card at the door to the top of the spiral staircase and go through to the rock office;
- Look at the desk and take the unsharpened pencil and glue tube;
- Go back to the main area and click the desk;
- Use the unsharpened pencil on the pencil sharpener;
- Go to the rock office;
- Look at the boxes at the top right;
- Take the glue;
- Use the pencil on the boxes to open them;
- Take the paddle drill, UV lamp, and spray token;
- Combine the glue and tape reel to get a VHS;
- Go back through to the meeting room;
- Look closer at the door on the left;
- Use the spray token on the toolbox;
- Take the lighthouse light and paddle mixer;
- Combine the paddle drills and paddle mixer;
- Go back to the main lighthouse area;
- Click on the paints under the stairs;
- Add phosphorescent powder to white paint and mix with the paddle mixer;
- Take the luminescent paint;
- Combine the luminescent paint and roller;
- Go to the meeting room;
- Look at the panel on the right;
- Use the paint roller and paint on the keypad;
- Shine the UV light;
- Enter to complete the hidden object puzzle.
Hidden Object Puzzle Room 11
- Take the TV controller;
- Go to the rock office;
- Take the trophy doll from under the TV;
- Use the TV controller on the TV;
- Take the coffee emblem;
- Combine VHS cassette frame, glue tube, and tape reel to get a video tape;
- Insert video tape;
- Click on the monitor and take the evidence;
- Look at the desk;
- Place the lighthouse light on the base;
- Take the stone eye and wardrobe knob;
- Open your evidence and combine the pieces in the center.
Evidence 4
- Take the accomplices deduction;
- Use the wardrobe knob on the door beside the ladder;
- Give Patricia the accomplices deduction;
- Ask all three questions;
- Place the suspect tokens in the right places according to motive.
Evidence 4
- Take the castle medallion;
- Enter the room to play the next hidden object puzzle.
Hidden Object Puzzle Room 12
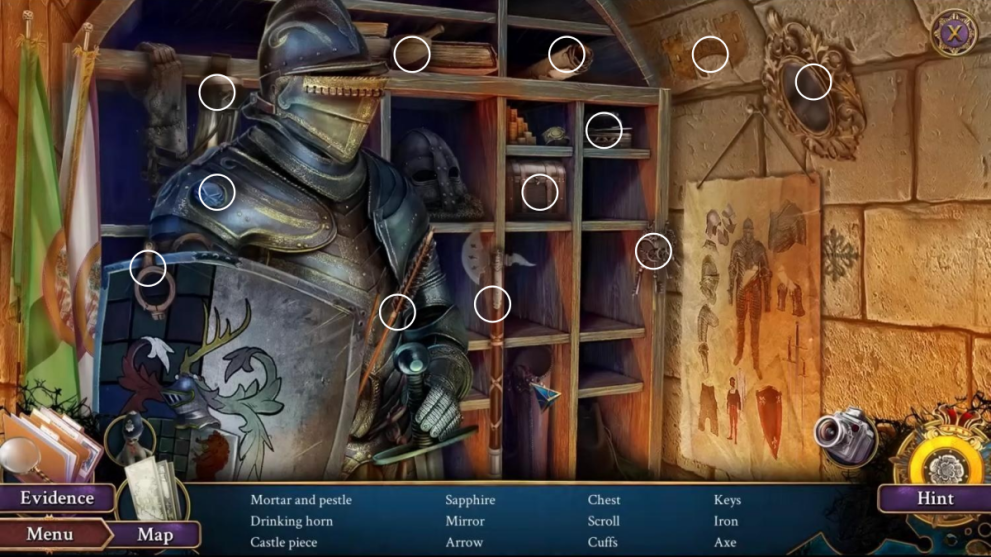
- Take the castle piece;
- Add the castle medallion to the castle piece;
- Head up to the guest wing and to the top of the spiral staircase to the salon library;
- Take the trophy doll from the harp;
- Look closer at the bookshelf on the right;
- Take the vase ornament;
- Go upstairs to the attic;
- Take the trophy doll from the chair;
- Look closer at the statues behind the chair;
- Use the vase ornament on the vase;
- Take the stone heart;
- Look closer at the items on the area above the ladder;
- Take the horseshoe and golf club;
- Use the stone eye on the slot;
- Take the compass token and exit to the salon library again;
- Go to the window;
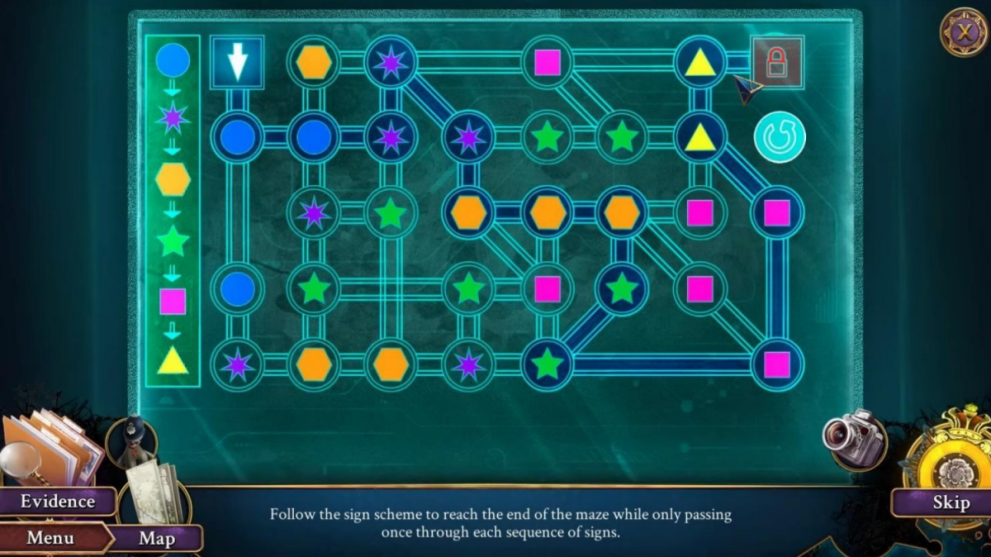
- Use the compass token on the slot;
- Solve the puzzle by spinning each wheel until all pieces are in the correct position:
- Each wheel is labeled A, B, or C and each turn is (L)eft (counterclockwise) or (R)ight (clockwise) for this number of turns in this sequence: B4L, A2L, C8L, B7L, A1R, C8L, B1L, A1R, C4L, A4L, C4R, B5L, A3L, C4R, A4L, C4R, B6L, A4L, B4R, C4R, B4R, C4L.
- Go through the door to the balcony.
Compass Puzzle Solution
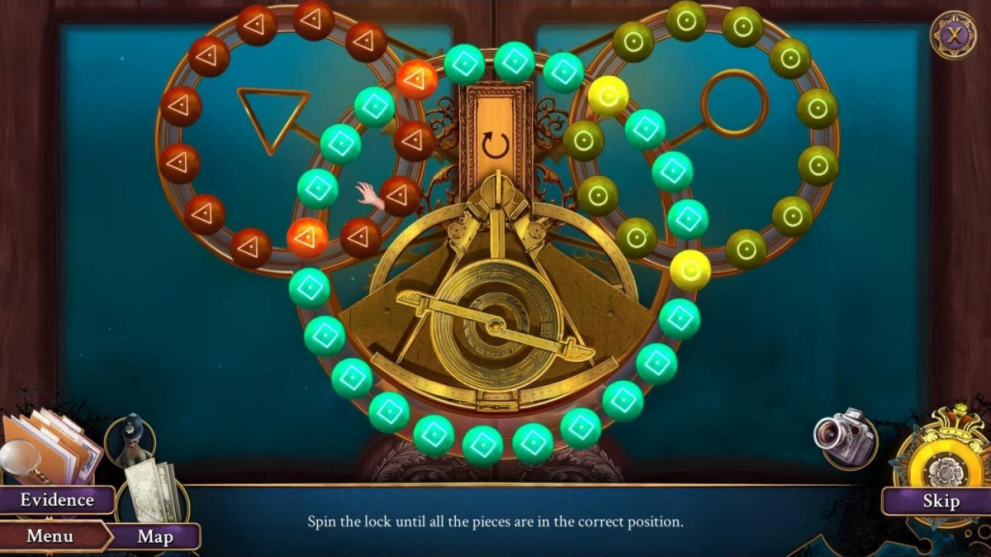
Image Source: Artifex Mundi via Twinfinite
And so chapter 6 of Path of Sin: Greed ends, and we come nearer to the thrilling conclusion. Read on to find the last chapter of our walkthrough.
Path of Sin Greed Chapter 7: Out on the Balcony
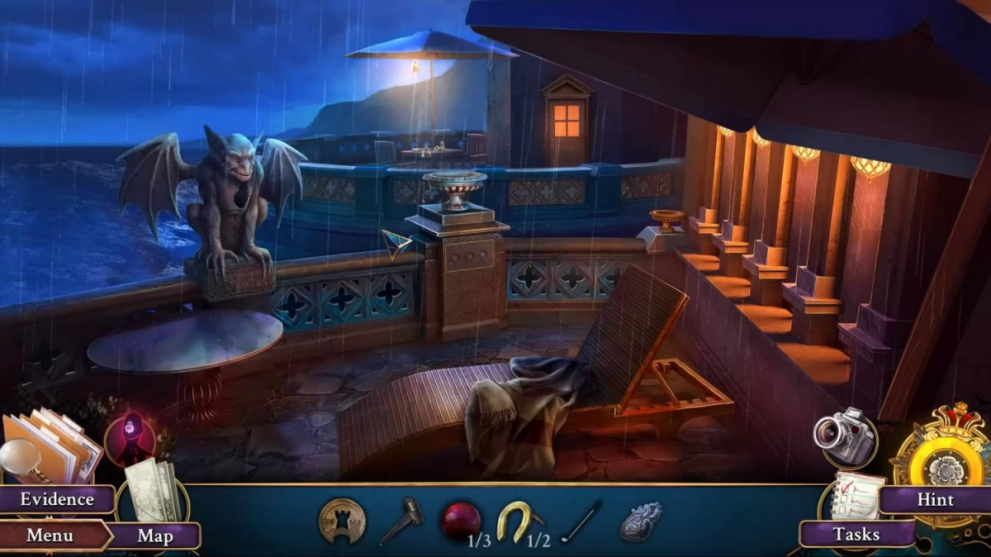
- Take the trophy doll from the wall behind the chair;
- Put the stone heart in the gargoyle and take the head;
- Go back to the salon library;
- Look at the alcove in the back wall;
- Click on the note;
- Use the castle token on the slot;
- Take the drill handle;
- Place the wooden shelf;
- Take the gargoyle nose and go up to the attic;
- Place the nose on the gargoyle;
- Take the iron chisel;
- Use the gargoyle head on the gargoyle;
- Take the wooden hammer;
- Go back to the balcony;
- Use the chisel and then the hammer on the gargoyle base;
- Take the mural part;
- Go to the attic again;
- Look closer at the mural;
- Place the mural part;
- Complete the hidden object mini-puzzle.
Mini Hidden Object Puzzle Solution
- Take the snow globe;
- Go back to the salon library;
- Look closer at the bookshelf;
- Put the snowglobe with the other snowglobes;
- Take the drill bit and then combine it with the drill;
- Go back to the attic;
- Look at the window and take the horseshoe;
- Use the drill on the window;
- Use the golf club on the gargoyle and get the pliers;
- Take the blue gem;
- Go back to the salon library;
- Look at the table;
- Take the parasol handle;
- Place the coffee emblem in the slot;
- Take the red gem;
- Use the pliers to get in the box;
- Take the spring;
- Go to the attic;
- Check the top of the ladder;
- Use the spring on the object at the wall;
- Take the retractable ladder;
- Go to the balcony through the salon library;
- Place the retractable ladder on the door at the other balcony;
- Look closer at the umbrella;
- Click on the magazine and take the map piece;
- Take the glass cutter blade;
- Use the parasol handle on the table pole;
- Take the purple gem;
- At the first balcony, click the plinth with the vase;
- Place the gems;
- Arrange the gargoyles from largest to smallest.
Gargoyle Puzzle Solution
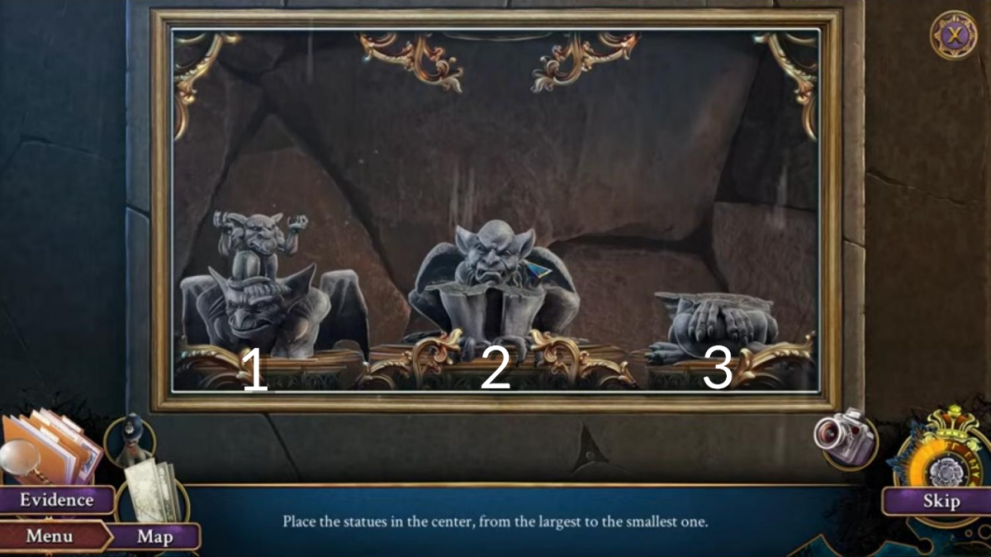
- Move the gargoyles in this order: 2-3, 1-3, 1-2, 3-2, 3-1, 2-1, 3-2, 1-3, 1-2, 3-2
- Take the winged badge;
- Go to the balcony and look at the second balcony;
- Place the winged badge in the space;
- Go through to the guest room;
- Take the trophy doll from the chair;
- Look at the desk;
- Take the owl token;
- Go back to the salon library;
- Look at the bookshelf on the right;
- Use the owl token in the slot;
- Take the iron quill and lantern handle;
- Go out to the balcony;
- Look closer at the umbrella;
- Place the lantern handle on the lantern;
- Take the flame sigil;
- Go to the guest room;
- Look above the fireplace;
- Take the suction cup;
- Use the flame sigil in the slot;
- Take the horseshoe;
- Look at the desk;
- Use the iron quill in the slot;
- Take the crystal key;
- Go back to the salon library;
- Check the right bookshelf again;
- Use the crystal key in the keyhole;
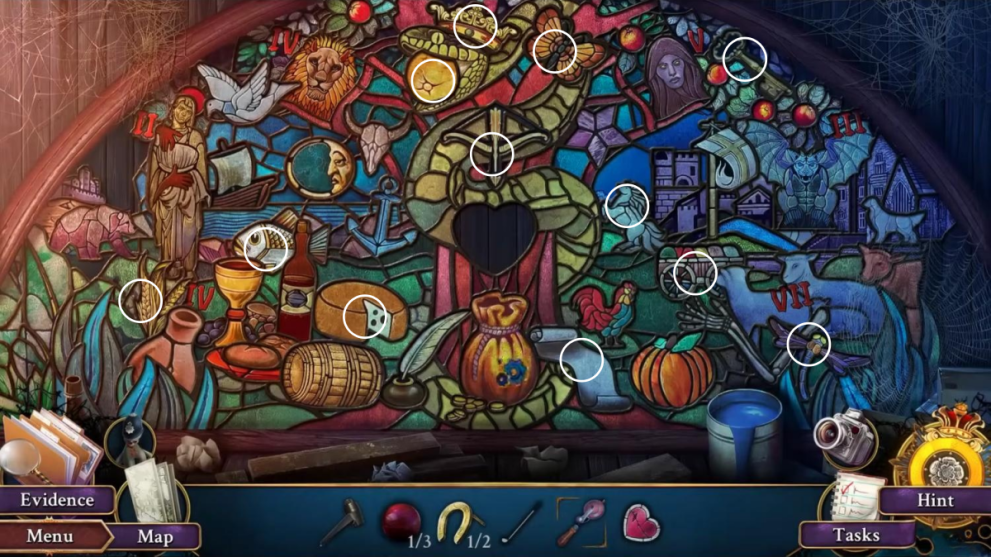
- Solve the hidden object puzzle.
Hidden Object Puzzle Room 13
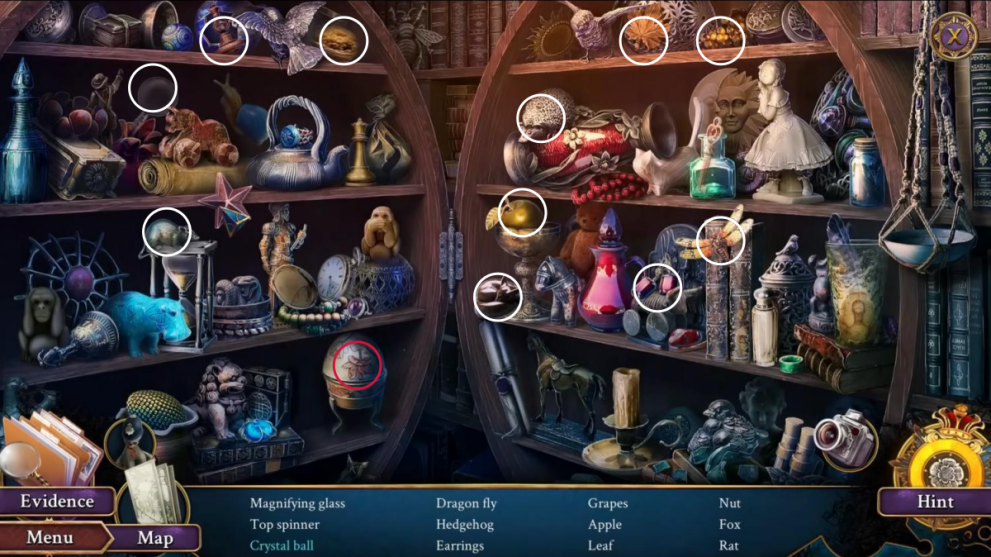
Image Source: Artifex Mundi via Twinfinite
- Take the crystal ball;
- Look closely at the alcove at the back;
- Use the horseshoes in the slots;
- Take the winged winder;
- Combine the crystal ball with the winged winder;
- Take the sextant token and the clock hand;
- Go to the attic;
- Look closer at the top of the ladder;
- Check the box;
- Use the sextant token on the slot;
- Take the map piece;
- Head to the guest room;
- Look above the fireplace;
- Place the clock hand on the clock;
- Take the marble;
- Look closer at the desk;
- Read the note;
- Place both map pieces on the desk;
- Take the note and lighter;
- Look at the bed;
- Open the suitcase and take the recorder;
- Use the lighter on the zipper;
- Take a photo of the suitcase;
- Take the marble and glass cutter rail;
- Combine the glass cutter rail and glass cutter blade;
- Use the suction cup on the glass cutter combo;
- Click on the box under the bed;
- Place the marbles in the box and solve the puzzle by spinning the plate until each marble is in the colored hole. Focus on one colored marble at a time;
- Take the A token and the murder weapon;
- Check and sort your evidence.
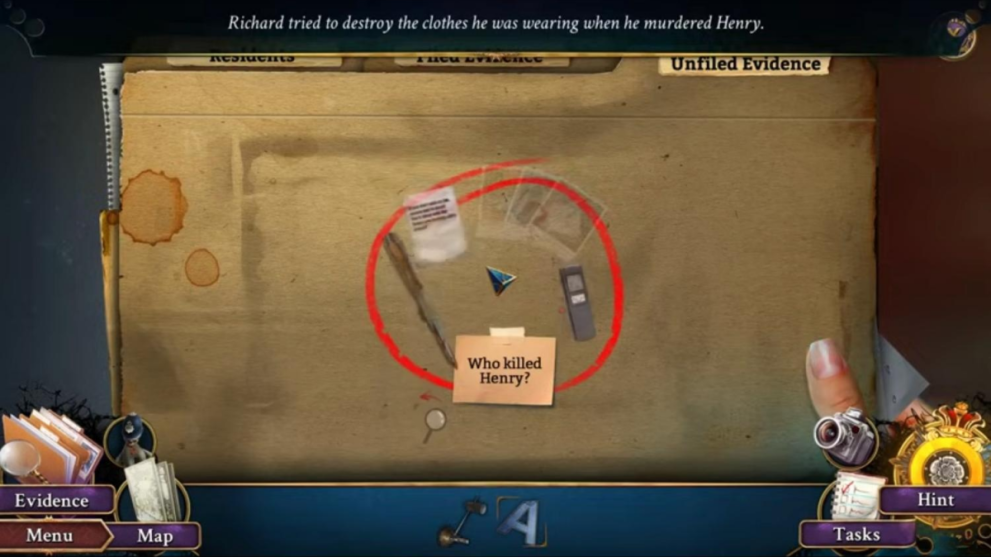
Image Source: Artifex Mundi via Twinfinite
- Take the guilty deduction;
- Select the following responses: Yellow, Red, Purple, Red;
- Go to the salon library;
- Give the guilty deduction to your partner;
- Take the token from Grace;
- Combine the token and the A piece to get the telescope seal;
- Go to the lobby (use your map!);
- Look closer at the sofa on the right;
- Use the telescope seal on the slot;
- Click the note and take the key;
- Go to the garden;
- Look closer at the gate to the center-back of the area;
- Use the helipad key in the keyhole;
- Go through to the hill path;
- Take the trophy doll from the stone wall on the right;
- Look closer at the house;
- Take the rope;
- Use the glass cutter on the window;
- Take the splitting wedge and serpentine;
- Look closer at the gate;
- Use the serpentine with the lever;
- Take the shed lever;
- Look at the house again;
- Use the shed lever with the lefthand pipe;
- Head up to the house and solve the hidden object puzzle.
Hidden Object Puzzle Room 14
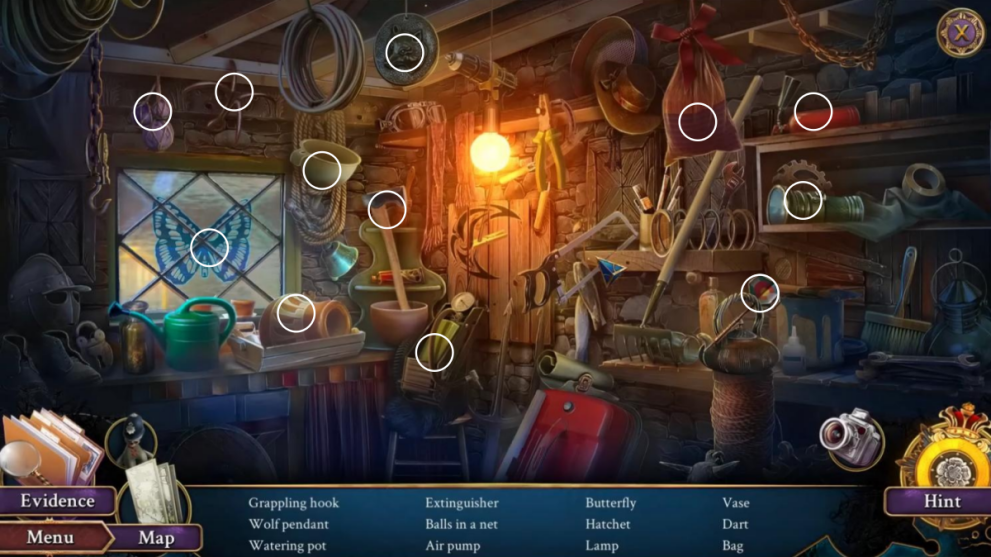
- Take the hatchet;
- Use the hatchet on the chains and go up;
- Use the hatchet on the roots;
- Check the first aid kit;
- Use the splitting wedge on the first aid kit;
- Take the grappling hook, bandages, and grappling hook;
- Use the rope and hook on the trailer;
- Use the bandages on your hands;
- Use the safety pins on the panel;
- Take the crowbar;
- Use the crowbar on the door;
- Go up;
- The lights on top of the helicopter will flash- click on the helicopter;
- Do that three times;
- Take the pipe wrench and throw it at the gunman.
Congratulations! You caught the murderer and completed Path of Sin: Greed. If you liked Path of Sin: Greed, why not try other mystery puzzle games like Murder Inn or Starstruck.


Updated: Mar 27, 2024 07:49 am