A group of old college friends gather at the Winter Inn for their regular reunion but something is amiss. What happened to Jay? Why was the body never recovered? Kate is intrigued by the whole story and then suddenly gunshots ring out at the inn! Someone has been murdered, and Kate must find out who did it. Find all the puzzle solutions you need in our AE Mysteries Murder Inn walkthrough.
Chapter 1: Murder Inn

The Murder Inn walkthrough begins with the arrival of Kate and Murphy at Winter Inn. The friends gather together for a reunion that will quickly become deadly. We have every solution below if you get stuck, but you should use the Stars to skip puzzles you don’t want to complete.
- Pick up the shovel.
- Use the shovel and then move the snow from the door.
- Look closer at the sticker on the window which reads: PROTECTED BY SNOW SECURITY.
- Check out the Winter Inn sign so you can see the snowflakes each show letters from the word SNOW.
- Count the number of each letter on each snowflake:
- S = 6
- N = 6
- O = 7
- W = 4
- Enter the code 6674 on the door keypad.
- Inside the inn, pick up six photos from around the room:
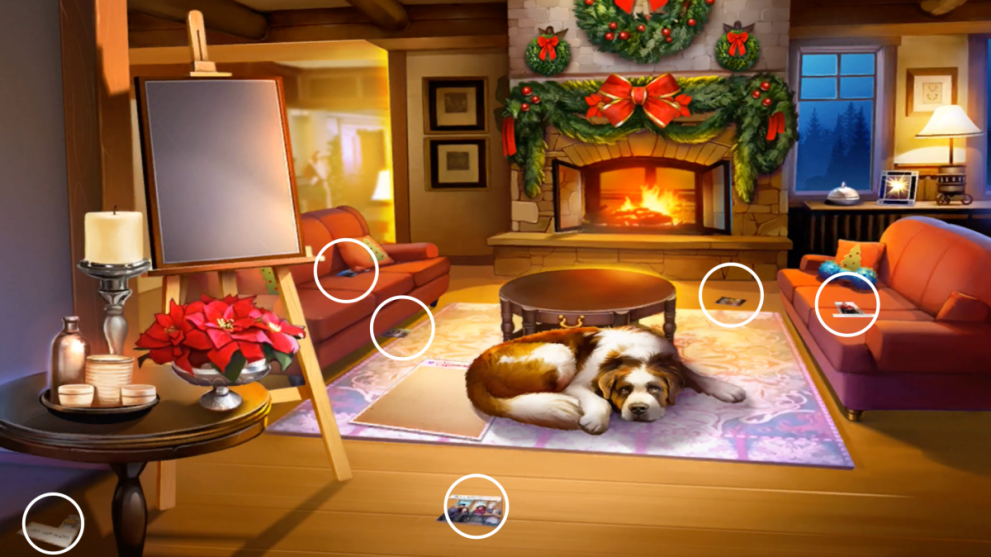
Image Credit: Haiku Games via Twinfinite
- Pick up the dog’s chew toy and then give it to the dog so he moves from the table.
- Get the matches from the table drawer.
- Tap the memorial photo board so you can add the photos in the right spaces:

- Take a match and then light it on the fireplace.
- Use the lit match to light the candle.
- Ring the bell and then move into the next room.
- Get the key, fish bowl, flowerpot, 2 x dinner plates, pot lid and 3 x napkins.
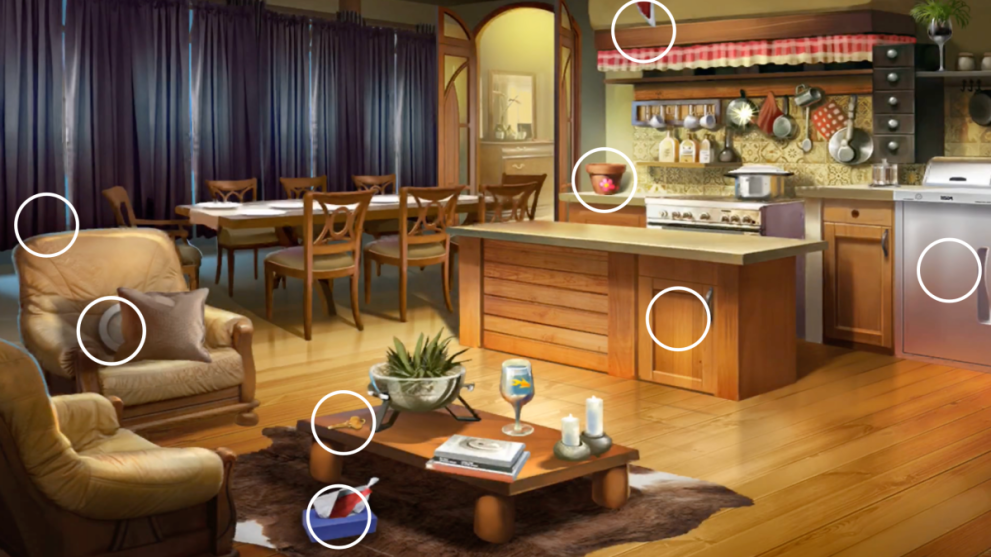
Image Credit: Haiku Games via Twinfinite
- Use the key to open the cabinet.
- Get the wine glass from the garbage.
- Put the plant in the flowerpot.
- Grab the other wine glass.
- Put the fish in the fishbowl and then take the next glass.
- Place the pot lid on the pot so you can find the dinner plate.
- Look closer at the dinner table and put all the napkins, glasses, and plates down.
- The puzzle asks you to serve food according to what everyone wants. Look at the food menu to see what each dish is and then give each person the following:
- Emma: Corn + broccoli
- Rohan: 2 x broccoli
- Kate: Hot dog + corn
- Frank: 3 x lasagna
- Linda: Corn, broccoli + potato
- Miki: 2 x potato + broccoli
- Murphy: 3 x hot dog + potato
Chapter 2: Emma is Missing
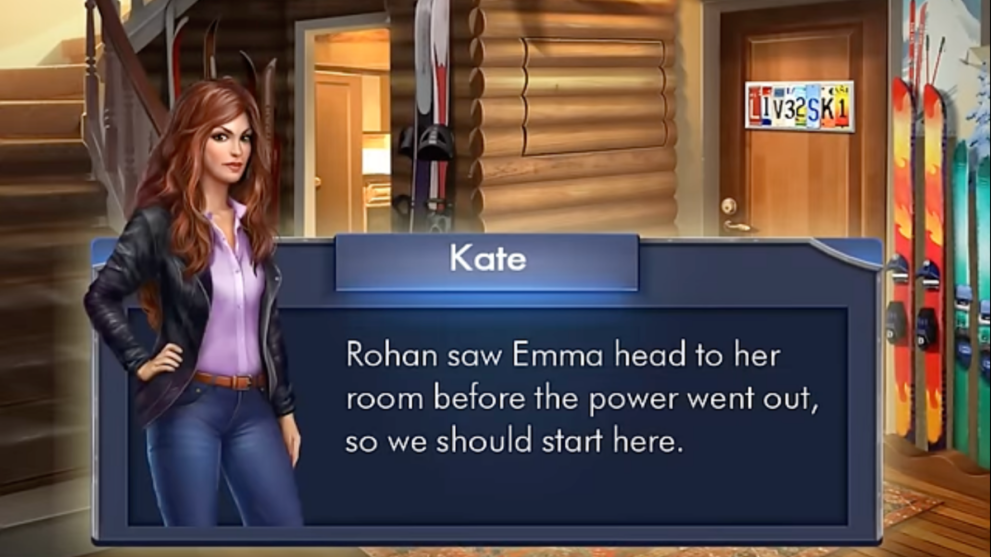
Murder Inn chapter 2 begins with gunshots and the subsequent discovery that Emma is missing. Kate goes to check her room but the door is locked. Enter through the left door instead.
- Move the shirts to see the sign, which reads: JUST PLAY.
- Open the drawer.
- Take the key.
- Open the closet.
- Get the vacuum cleaner.
- Use the vacuum to clear up the laundry powder.
- Use the key so you can open the cabinet.
- Pick up the laundry basket.
- Put the laundry in the machine. It reveals a note that says JAY but you can’t grab it.
- Exit the room to go back to the hallway.
- Check out the rug on the floor, which reads: WELCOME TO MOUNT WINTER with two mountains.
- Next, tap on the skis and arrange them to match the shape of the mountains:

The wall safe needs a code and the clues are in JAY and JUST PLAY. You want to look for the number placement of each letter like this: J = 1, A = 7, Y = 8. So the code is 178.
- Look at the sign on the door: L1V32SK1. It gives us the numbers 13 and 21.
- Inside the wall safe are keys. Take the keys 13 and 21.
- Use the keys to unlock the door to Emma’s room.
- Find five pieces of evidence, a knife, and three wood tiles:
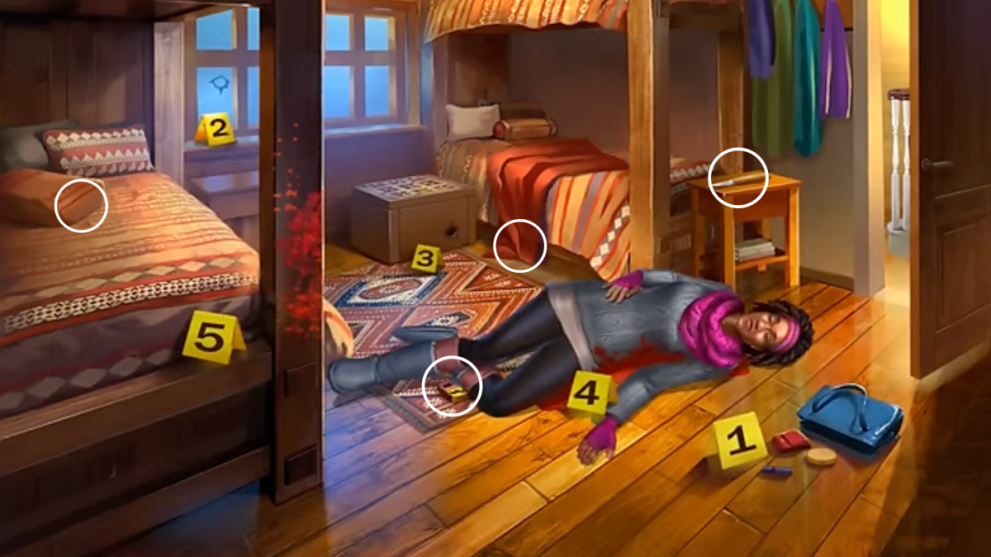
Image Credit: Haiku Games via Twinfinite
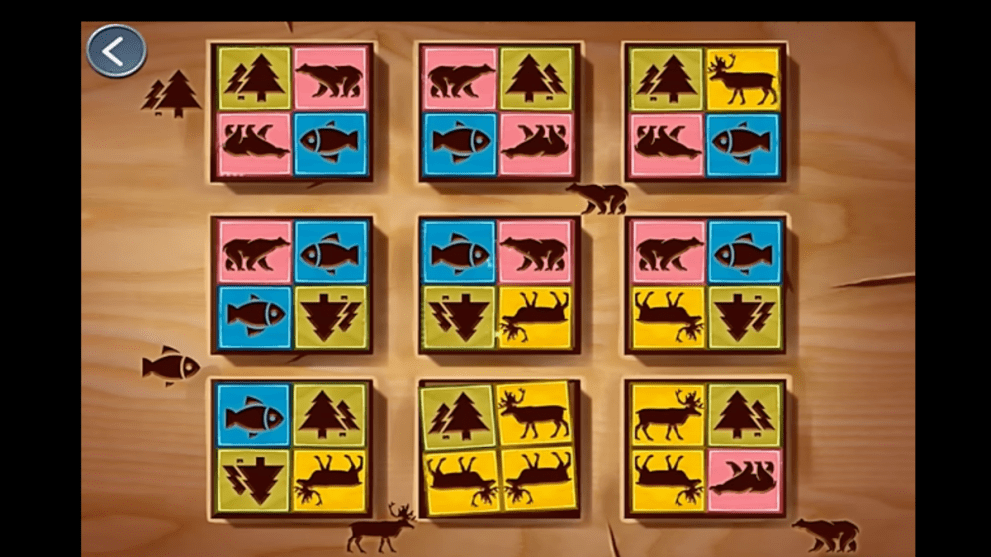
- Look closer at the puzzle top of the chest by the beds.
- Add the pieces to it and solve the puzzle by swapping and rotating the pieces to match the animal symbols carved into the chest:
- Use the vacuum so you can get rid of the spider.
- Use the knife to get to the bullet.
- Identify the bullet by taking its measurements.
- Search the database so you can find out it is a SlyHunter rifle bullet.
Chapter 3: Searching For Evidence
Murder Inn walkthrough continues with Chapter 3 and the search for Emma’s killer. Who could do such a thing? Kate must search for more evidence.
- Take the knitting needle.
- Open the drawer and then take the note containing the clues for the dials.
- Check the calendar, the photo frame, and the two clocks:
- Wall clock is set to 7:15
- Digital clock is set to 12:45
- Use the needle to reach the note stuck inside the mouse hole.
- The note explains that you need to use the four dials to sort out the system:
- The other notes show the dials need to show the shape of a square.
- Move the dials on the monitor: Up, Right, Down, Left.
- Now you can use the other clues to set the date, time and location on the security footage:
- Set the month to 12
- Next, set the day to 12
- Finally, set the time to 18:30
- Move the time back to 18:00 and the location to the hallway (4th dial)
- You will see the killer at 18:15
- Tap the killer to solve the puzzle and find out who has the black puffy coat.
- Take the blue ski pole on the left.
- Find the screwdriver on the floor.
- There is also a map piece in the right side cupboard.
- Use the ski pole to get another map piece from on top of the cupboard on the left.
- Add both pieces to the map on the right wall.
- Use the map so you can find out how to unlock the padlock.
- On the map numbers 2 and 6 are filled in, but the rest are just 1 – 7.
- Start at the top of the mountain and use the shapes on the lock to find each number. You end up with 4859.
- Open the lock and take the disc.
- Go through to the next room.
- Find two batteries under the middle couch cushion.
- Turn the photo frame and use the screwdriver to open it up.
- Place the batteries inside.
- Look at the picture displayed to see the word December in red and the number 26 in blue.
- Look at the shuffleboard and add your disc:
- Move the discs so the blue add up to 26 (10, 8, 8) and the red add up to 12 (8, 7, 7, -10)
- Take the checker piece
- Put the check piece and add it to the checkerboard and arrange them so no check is in the same row, column, or on the diagonal line.
- Take the key.
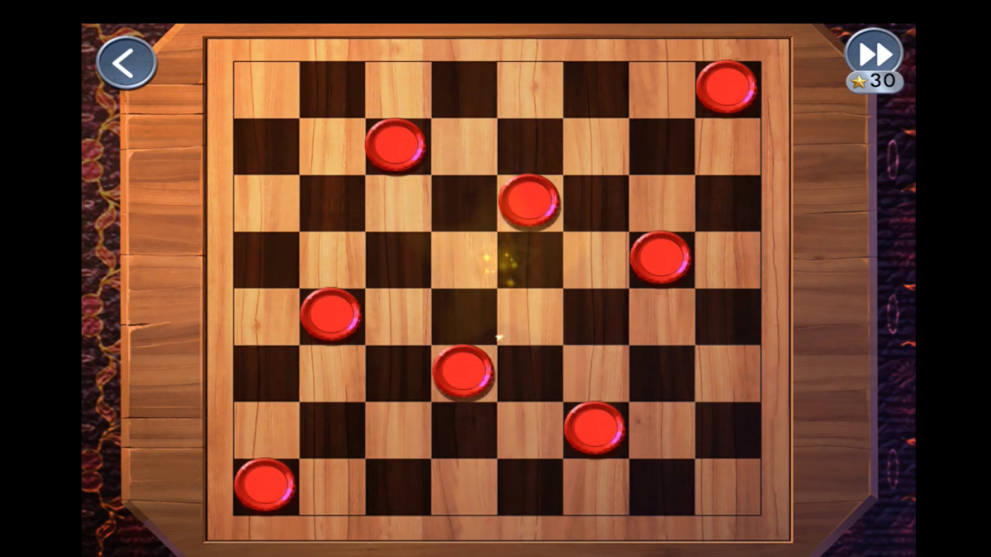
Image Credit: Haiku Games via Twinfinite
Head back to the locker room and use the key to open the locker so you can find the black puffy coat inside.
Chapter 4: Investigating Jay’s Room

This Murder Inn walkthrough continues with chapter 4 and an investigation of Jay’s old room. Can Kate find what she is looking for in Jay’s possessions?
- You can’t get into Jay’s room yet.
- Find the binoculars on the chair.
- Move the large plant to find a key under it.
- Open and read the Guest Book.
- Open the curtains so you can see the ski lift in the background.
- Look through the windows with the binoculars and find numbers on each ski lift chair:
- Green = 7
- Red = 9
- Orange = 3
- Yellow = 5
- The key will open the cabinet so you can find the controller.
- Take a closer look at the fruit bowl and count the fruits:
- Orange = 1
- Green Pears = 2
- Red Apples = 3
- Yellow Bananas = 4
- The number of fruits denotes the order of the numbers of the chairs:
- 1 Orange = 3
- 2 Green = 7
- 3 Red = 9
- 4 Yellow = 5
- That makes the code: 3795
- Enter that code on the controller.
- Go up to the attic via the ladder.
- Grab the game controller.
- Take the Christmas lights.
- Move the rug to show a power outlet.
- Look at the photo album which shows someone in a jersey with the number 9.
- Plug the lights in via the outlet and plug in the TV so you can turn it on.
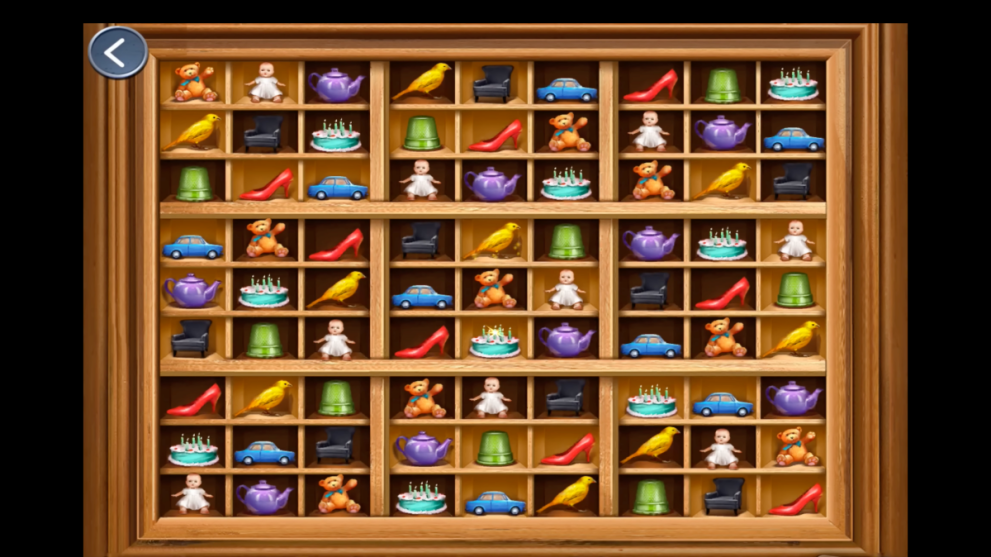
- Uncover the suitcase to find it is locked. To find the key you must solve the next puzzle on the back wall. It is like a game of sudoku so each block, horizontal and vertical line contains one of each miniature:
- Take the key and use it to open the suitcase.
- Move the jacket to find jerseys: one Polar Bears number 2 and one Leopards number 5.
- The guest book said Whale, Polar Bear, and then Leopards and each has a number now so put them in order: 925.
- Put the number 925 into the padlock to open it and go through.
- There is a lot to see in this room:
- Trophies that make the number IVX
- A note says LOSE = 3506 and SELL = 7735. The numbers look like the letters upside down!
- A clock
- Two combination locks with some stickers
- Set the clock so the small hand is on IV and the big hand is on X.
- Take the key and then use it to unlock the drawer.
- Take the game cartridge.
- Head back to the attic and put the game cartridge in the console.
- Put the controller in the console.
- Play the game:
- Move the two mice so they can get their cheese. The mice move in opposite directions of each other. Move the pink mouse up towards the blue cheese and then over to the pink cheese before moving the blue mouse to its cheese on the right.
- Go back to the locked drawer and the combination lock with stickers on and enter the number you saw for the game’s high score: 240.
- The note inside says I SEE LIES.
- Remember the note that says LOSE and SELL with numbers that look like the words upside down? You need to treat this phrase in the same way and create it out of numbers: 5317 335 1.
- Enter 53173351 into the locked briefcase.
- Read the note inside.
Chapter 5: Search the Deck

Chapter 5 of Murder Inn sees Kate investigating who the suspects may be. Is it Frank? Or maybe Greta, or Rohan? Let’s see how far they get in this part of the Murder Inn walkthrough.
- Pick up the towels.
- Open the cooler and take the ice block.
- Take a close look at the jacuzzi.
- Look at the controls and set the temperature to HI.
- Put the ice block in the water.
- Watch it melt and take the key!
- Use the key to unlock the door.
- Take the green towel from inside.
- Add the towels to where the rest are stacked and count the colors:
- 2 x Blue
- 2 x Green
- 2 x Yellow
- 3 x Purple
- 3 x Pink
- 2 x Orange
- Go back to the jacuzzi controls and press the buttons so the lights correspond with the number of colored towels.
- Follow the footprints to the frozen lake.
- Get the skates.
- Solve the ice cube puzzle:
- Move the numbered ice cubes to their respective spots
- Larger numbers can move over smaller numbers but small ones cannot pass over large ones

Image Source: Haiku Games via Twinfinite
- Take the tile from the roof.
- Use the skate to break the ice by the door.
- Look closer at the door and match the pattern on the snowflake to the pattern you saw in the jacuzzi.
- Pick up the basketball.
- Take the shovel.
- Use the basketball to loosen the plank on the ceiling.
- Take the key.
- Use the key on the snowblower so you can move it out of the way.
- Use the shovel to lift up the metal plate.
- Check out the tools on the wall which will act as a clue for the next puzzle:
- The tools look like letters
- The no. of tools shows which tile space that letter should be on that line:
- (Line 1) T = 3, O = 1, U = 2
- (Line 2) C = 2, I = 1, E = 3
- (Line 3) L = 3, C = 1, D = 4, O = 2
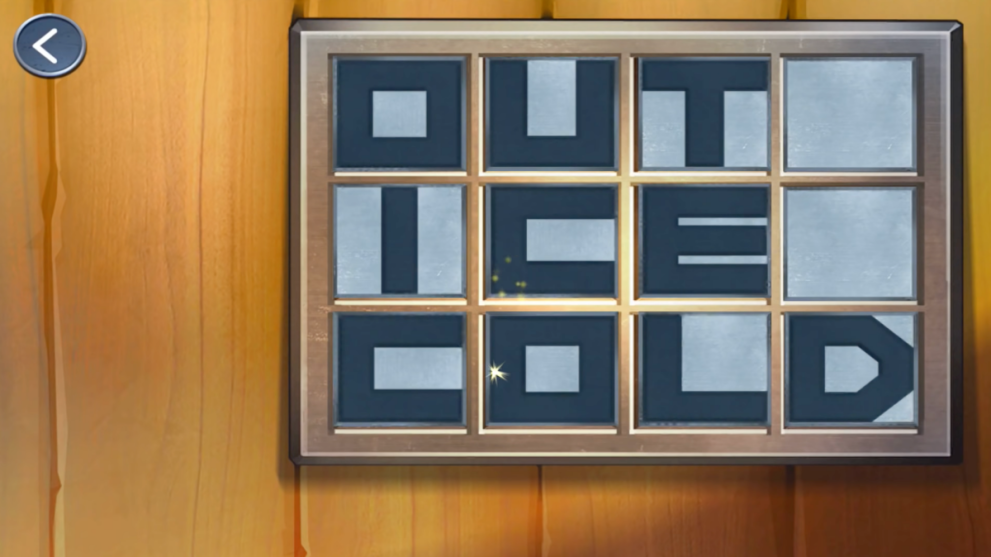
- Add the tile to the puzzle:
- Arrange the tiles until they spell out OUT ICE COLD
That concludes the walkthrough for chapter 5 of Murder Inn. The mystery continues below!
Chapter 6: Searching The Hunting Gear
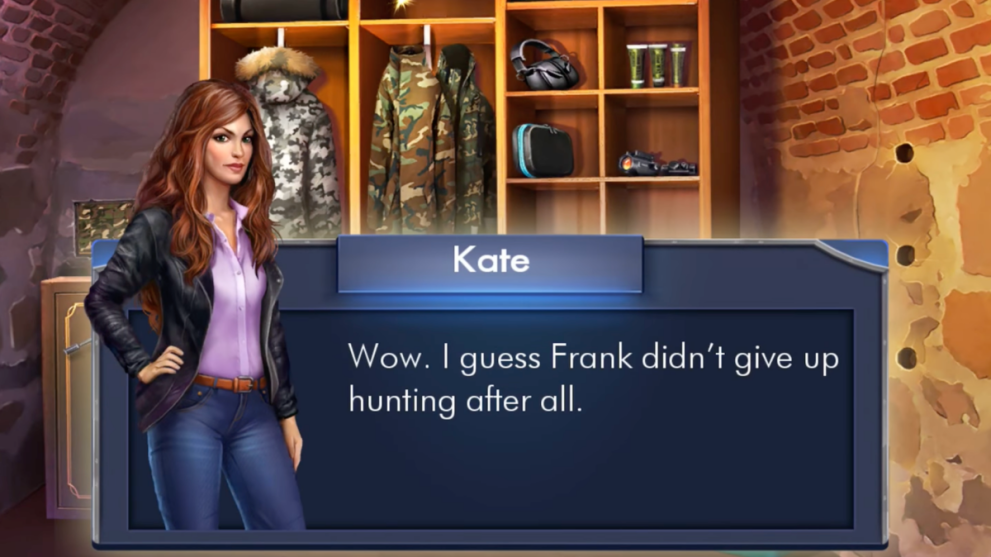
The Murder Inn walkthrough continues as Kate and Murphy search through Frank’s hunting gear. Why did Frank say he gave up hunting when all his stuff is still here..?
- Pick up the black camo paint.
- Take the stencil,
- Look at the note. It says a + b = c and b = c = d.
- Open the camera case.
- Move the photo so you can see three colored lenses.
- Put the stencil over the camo pattern on the gray camo jacket.
- Add the black spray paint to create a new pattern: a number 2 and a number 7 appear.
- Look closer at the framed camouflage in the left corner:
- Move the tiles until you see a 3 and a 5
- Go to the safe and crack the code with the numbers we just found plus the cryptic code on the note:
- a = 3
- b = 2
- c = 5
- d = 7
- This creates code 3257 to use on the safe.
- Take the four arrows.
- Place the arrows in the holes in the wall in the color order of the lenses you found earlier: Green, Blue, and Red.
- Enter the opening.
- Move the chair and grab the arrow.
- Read the target sheet: 10 POINT BUCK. ONLY THE HEART MATTERS.
- Check out the deer heads on the back wall:
- Count the antler points on each deer and the direction they are facing
- Left – 2
- Right – 3
- Down – 4
- Right – 6
- Up – 7
- Straight – 8
- Left 10
- Look at the cards on the table. Remember the target sheet said to focus on the HEARTS only and the 10 POINT BUCK:
- The hearts + the 10 give us the cards 6, 7, 10 3
- There is a lock at the back cupboard with directional buttons on it. Combine the card clues and the deer clues to get the solution for the lock: Right, Up, Left, Right
- Take the dial.
- Put the two arrows in the wall.
- Place the dial in the door handle and exit.
- Move the painting.
- Open the drawer.
- Take the key.
- Use the key to open the cabinet.
- Take the goggles.
- Use the goggles to see behind the painting. You will see the initials JS + EB.
- Use that clue to open the padlock with JSEB.
- Check out the target sheet inside: the deer has bullets going through each color:
- 1 Blue
- 2 Red
- 3 Yellow
- 4 Green
- Connect the dots in that order all the way around the board until each one is lit up.
Chapter 7: Frank’s Study
Now we are in Frank’s study for chapter 7 of Murder Inn and our walkthrough will show you exactly what you need to look for in this scene.
- Take the key from the table on the left.
- Pick up the paperclip from the box beside the key.
- Look at the clue in the typewriter. It says “Only coins in mint condition have real value”.
- Take the book from the lower left shelf.
- Grab the magnifying glass from the shelf at the back.
- Check for clues in the trash.
- Look under the rug for another clue.
- Check out the clues on the wine bottles.
- Use the key to unlock the drawers for the rest of the coin collection.
- Use the magnifying glass on the coin collections. Take note of which are in perfect condition without any details rubbed or scratched away:
- American Pennies = 4
- U.K. Pounds = 3
- Taiwan Panda Dollars = 6
- The clue on the note in the trash shows the order to place these coin clues in: 436.
- Enter that into the combination lock on the suitcase.
- Take the book.
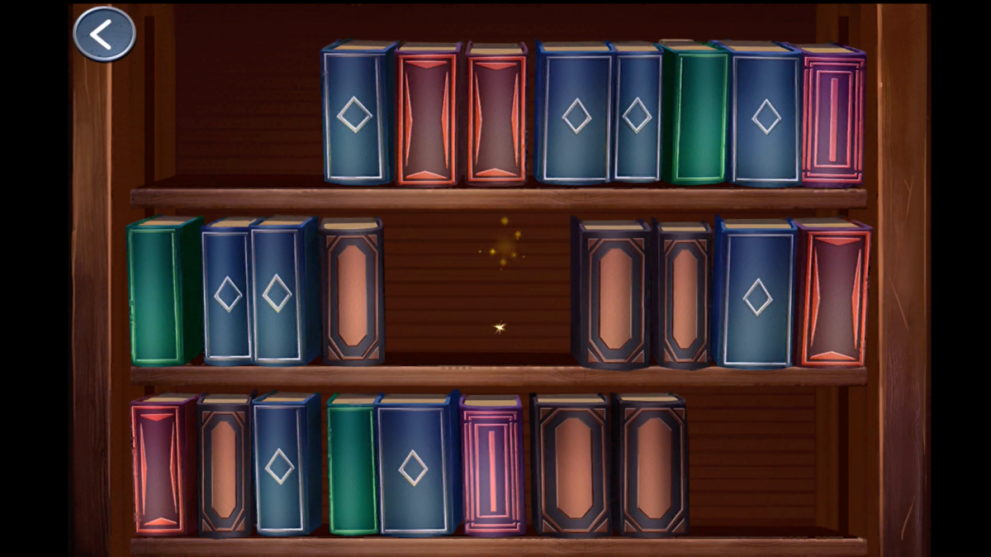
- Look at the bookcase on the right.
- Arrange the books so they match the clue on the note you found under the rug: the black spaces on the note represent empty spaces on the shelf.
- Take the book.
- Head through the door.
- Look at the trains on the shelves. Some have letters underlined:
- Count the lines under each letter: V 1, E 2, 3 R, A 4: VERA
- Enter VERA into the lock on the table and take the railway tracks.
- Put the tracks on the table.
- Use them to connect the tunnels in the next puzzle:
- Each row and column must have the same number of railway tracks as it shows on the sides.

- Take note of the color of the train carriages which appear: Green, Blue, Yellow, Red.
- Look closer at the control panel.
- Open the battery compartment.
- Place the paper clip inside.
- Look at the switches: the left two control the light position while the right two control the color of the light. Change the lights to Green, Blue, Yellow, and Red. The white button locks in your answer.
- Take the key from the train.
- Use the key to unlock the top part of the display case.
- Take the book.
- Go back to the previous room.
- Put all four books you have on the bookshelf on the left.
- Arrange these books according to the clue on the wine bottles when they are organized from full to almost empty: Split the books according to the wine vintage: 6 + 2, 3 + 5, 7 + 1, 4 + 4.
- A dead body is behind the bookcase and must be examined to complete this chapter!
That dramatically concludes chapter 7 and this section of the Murder Inn walkthrough. Follow on for more of the murder mystery.
Chapter 8: Another Death Discovered

Our walkthrough for Murder Inn is drawing to a close and chapter 8 begins with another death! Is this murder or did Frank have a guilty conscience?
- Take the clothes hanger.
- Pick up the two records from the chest and under Frank’s body.
- Grab the three tokens from the side table, the chair, and the ashtray.
- Tap to move the rifle and get the key from the body.
- Take a closer look at the painting at the back of the room.
- Use the clothes hanger to get the record from behind the player on the left.
- Use the key to unlock the drawer under the coffee table.
- Take the needle and thread.
- Use the needle and thread on the record player.
- Add the three records.
- Place one record on the turntable and use the arrow buttons to play each track:
- Find tracks referring to the three things in the dog painting: Dog, Beer, Truck
- Volume 1, Track 3 – “Sitting on the pitch with a beer in my hand.”
- Volume 2, Track 4 – “Ooh, my hound dog’s howlin’ at the moon tonight.”
- Volume 3, Track 2 – “Hop into my red truck, before we all get stuck.”
- The numbers from each track are the solution to the wall safe code: 342.
- Check out the cigar boxes inside the safe: Le Credito and Habanos.
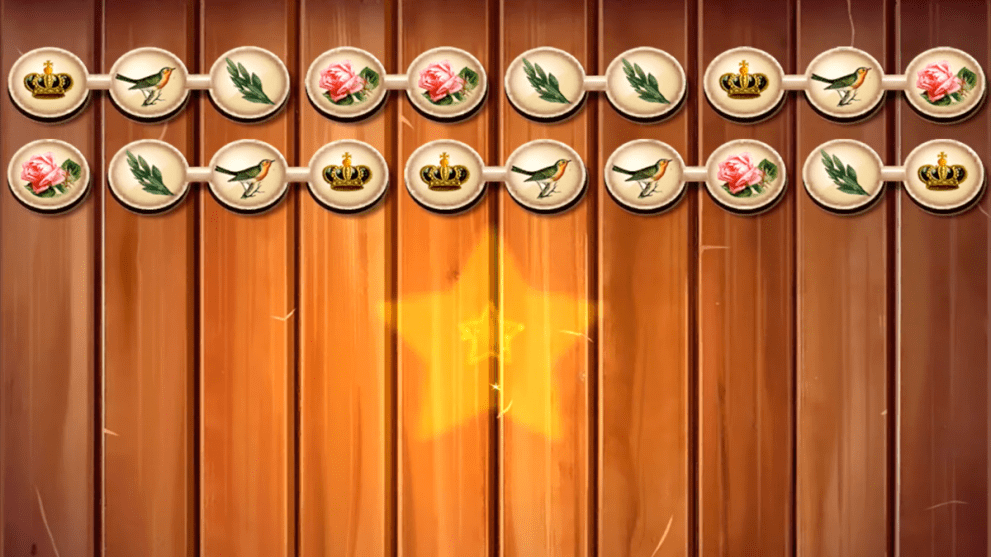
- Look closer at the holes on the wall and add the tokens:
- Organize the tokens according to the designs on the cigar boxes you found in the safe: Bird + Branch and Crown + Rose. The tokens must be placed in pairs one on the top row and one on the bottom row.
- Enter the next room.
- Get the key from the bottom drawer.
- Find three scraps of paper from the floor and bed.
- Go through to the bathroom.
- Drain the water in the bathtub.
- Get the next paper pieces.
- Take the bath oil.
- Check out the bubble bath with the number 3 on the bottle under the sink.
- Put oil on the rusty pipe under the sink.
- Take the key. Use the key to unlock the bathroom mirror.
- Take the glass tile and the nail scissors, and head back to the bedroom.
- Use the scissors on the chocolate box so you can see that there are six chocolates inside.
- Put the paper scraps on the bed and find the message: THE PERFECT FORMULA TO CELEBRATE OUR LOVE. White Roses. Chocolates + Champagne. Candles + Bubble Bath. Our Favorite Song.
- Go back to the room with Frank’s body.
- Use the key to unlock the cupboard beneath the record player.
- Find the record inside called ‘Favorite Love Songs’ and see the second track is worn out: this is their favorite song.
- Put the numbers together that you have found:
- No. of White Roses: 9
- No. of Chocolates (6) + Champagne (1) = 7
- No. of Candles (6) + Bubble Bath (3) = 9
- Favorite Song: 2
- This makes the code 9792
- Use the code on the locked chest by the bed and get the glass tile.
- Back in the bathroom add the glass tiles and rotate them until they match the pattern at the top.
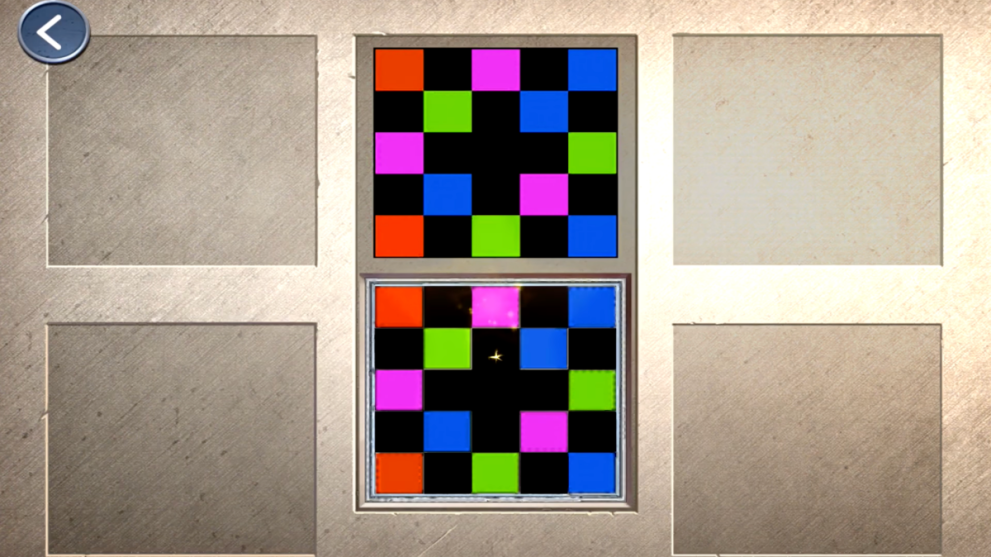
- Take the key and use it to open the door in the bedroom.
- Talk to Jay.
Chapter 9: The Investigation Ends

Murder Inn and this walkthrough come to a thrilling end with chapter 9. Jay has run off and Kate must track him down and finish this investigation! Murphy crashes the snowmobile into a tree, so you have to put it back together before you can go.
- Complete the hidden object game by finding every snowmobile part:
- Two gears
- Tow skis
- Treads
- Handlebar

- Open the garage door.
- Tap the dog.
- Tap the human footprints.
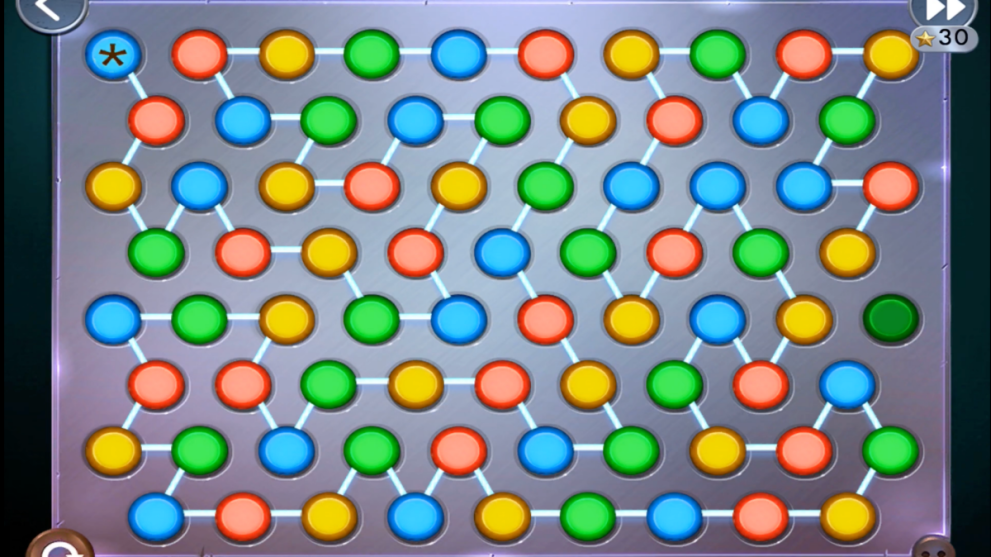
- Next is a puzzle involving hexagons and moving the four characters one at a time. You must surround Jay so he can’t get away. Don’t let Jay get to the edge of the puzzle! Every time Jay moves, you must move the character he is heading towards. This ensures he moves the other way and can’t get too close to an edge.
Congratulations! You have completed the investigation and this Murder Inn walkthrough. For more from AE Mysteries such as Starstruck, you can find more guides right here at Twinfinite.


Updated: Feb 29, 2024 08:01 am