While it’s not for everyone, making your own levels and sharing them with others is the focus of Super Mario Maker 2. You can let out all of your imagination and build the Mario levels that you’ve always wanted to play. A big part of some of the most fun levels is the secret rooms and areas that you can explore. To add them to the levels that you make, here’s everything you need to know about how to make secret rooms in Super Mario Maker 2.
Making Secret Rooms in Super Mario Maker 2
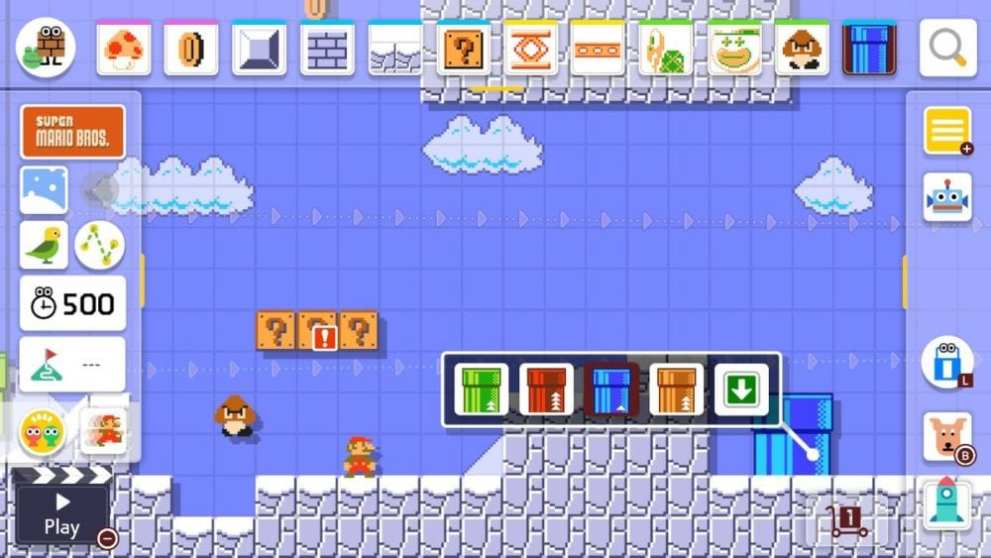
When making a level, you can place a pipe wherever you’d like on the map. The icon will likely be in the recently used bar at the top of the screen, but you find it in the items catalog by pressing the magnifying glass in the top right corner.
Then, once it is placed, press and hold on the pipe to bring up a small set of options. Select the down arrow option on the right of that little menu and that’ll see Mario travel through the pipe to the secret room that is created.
Then, you need to press in the place that you want the exit of the pipe to be. Once that’s set, you’ll be able to sort out what you want from the secret room.
You’ll be able to choose whether you want what happens there to be vertical or horizontal, among all of the usual options that come in Super Mario Maker 2’s creator mode.

Returning to the First Section
To go back to first area, press the icon in the bottom right that looks like a number in a cart. Then, press the number again and select the one to go back to the first place. You’ll then be able to carry on creating as you were, being safe in the knowledge that your secret room has saved.
That’s everything you need to know about how to make secret rooms in Super Mario Maker 2. For more tips and tricks on the game, be sure to search for Twinfinite. We have also listed some other helpful guides down below.
- How to Play Splitscreen & Online Multiplayer
- How to Change Character
- How to Place Enemies & Items in Blocks, Pipes, & More


Published: Jun 28, 2019 03:18 pm