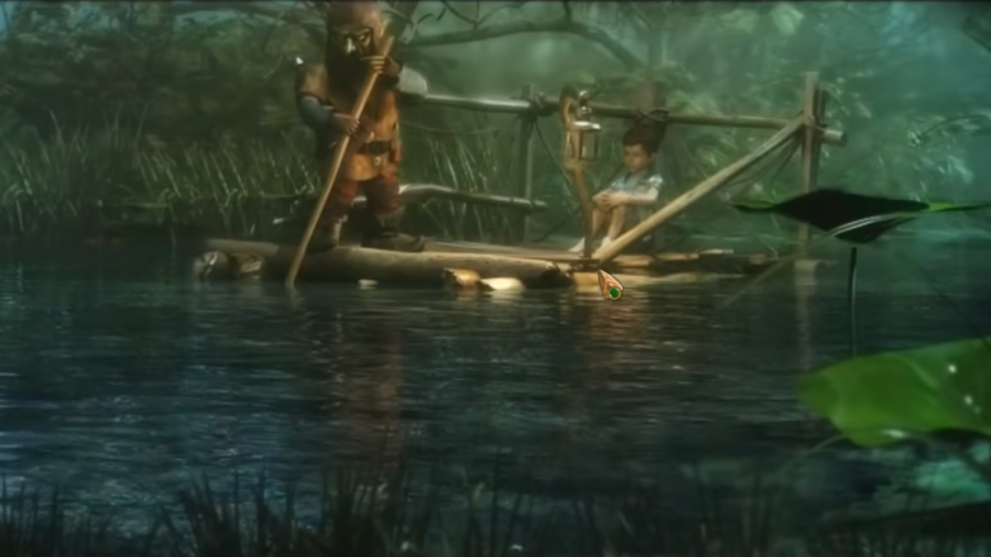
In Lost Lands: Dark Overlord you must save your child who has slipped through into a magical realm. Diving into the portal, you embark on a journey of solving puzzles and finding hidden items. Read on to find our Lost Lands: Dark Overlord complete walkthrough.
Lost Lands: Dark Overlord Beginners Tips
When you start Lost Lands: Dark Overlord you first choose the difficulty level (Easy, Normal, Hard). We recommend Normal or Easy for your first time playing. If you are a veteran player of these types of puzzle games you can always choose the harder option. Remember to check your Map to fast travel and to check objectives. Your Journal has clues and any story updates, while your Scroll includes your task list. If you get stuck you can find the answer to every puzzle below in our Lost Land: Dark Overlord walkthrough.
Chapter 1: The Portal
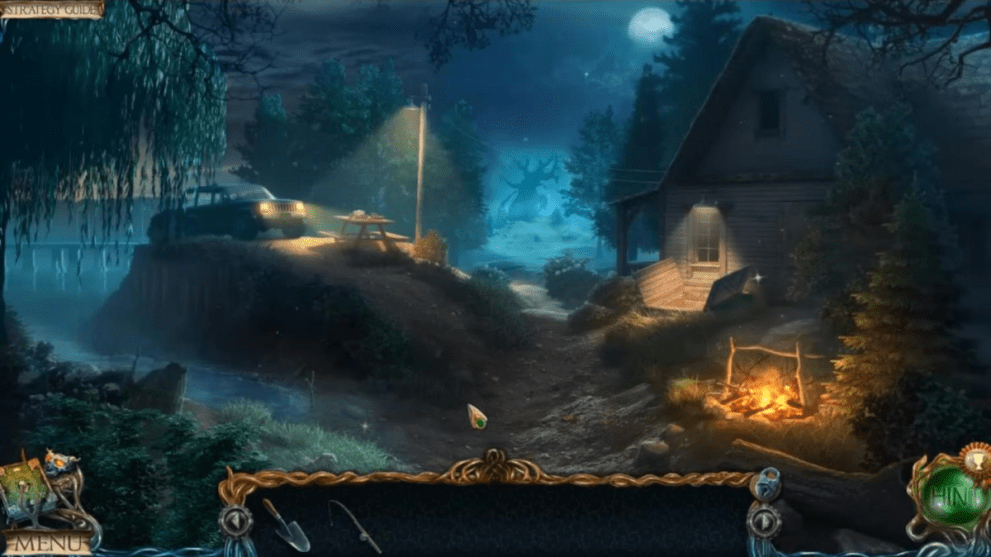
- Pick up the trowel from the campfire;
- Take the knife from the picnic table at the back;
- Use the knife to open the hatch to the right;
- Take the fishing rod;
- Place the rod in the holder by the stream and take the wooden disc;
- Head forward to the tree;
- Pick up the wooden disc at the base of the steps;
- Use the trowel to dig the dirt patch;
- Take the third wooden disc;
- Click to remove the tree bark.
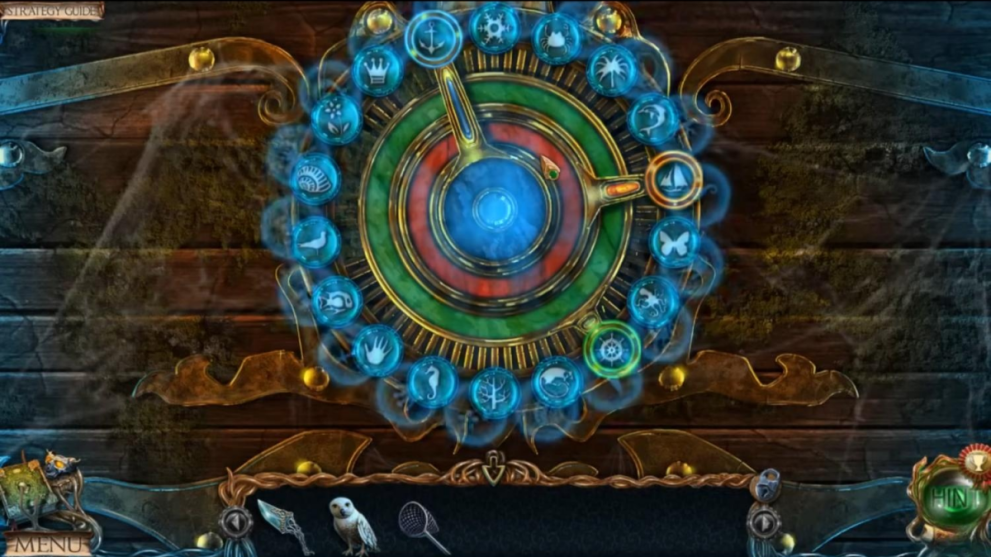
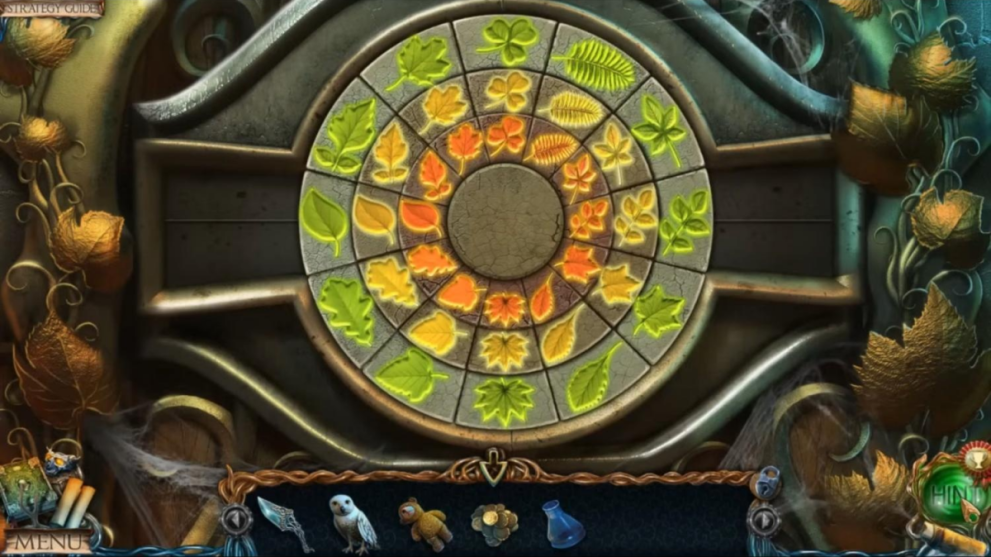
- Place the wooden discs and solve the puzzle by moving each disc to its rightful place and clicking to rotate.
Animal Puzzle Solution

As you are sucked into the portal, the first chapter of Lost Lands: Dark Overlord concludes. The story and walkthrough continue below in the Forest of Fireflies.
Chapter 2: The Forest
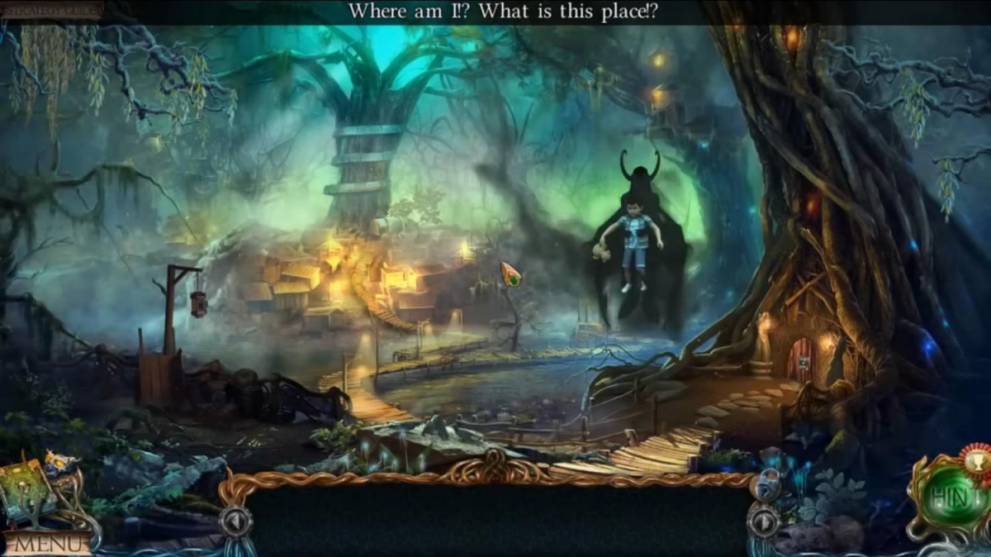
- Click on the boy;
- Pick up the twig from the right;
- Take the dagger from the lamp;
- Use the twig on the birds sitting on the path;
- Take the owl;
- Head onward;
- Use the owl to get the door knocker on the tree branch;
- Take the weight from the steps;
- Go back to the previous area;
- Place the door knocker on the door at the base of the tree;
- Go into the tree;
- Speak to the mysterious figure named Uri;
- Take the map which will now be found on the toolbar;
- Pick up the oil from near Uri;
- Take the butterfly net at the back of the room;
- Lift the rug and get the red disc;
- Read the recipe on the table;
- Get the second weight;
- Open the curtain to complete the hidden object puzzle;
- Place the lamp on the deer head;
- Light the lamp with the matches;
- Use the doorknob on the cupboard door;
- Fix the scissors with the screw;
- Use the scissors to cut the sack open;
- Place the ship’s wheel on the ship in the cupboard;
- Use the slingshot to hit the puzzle piece from the ceiling.
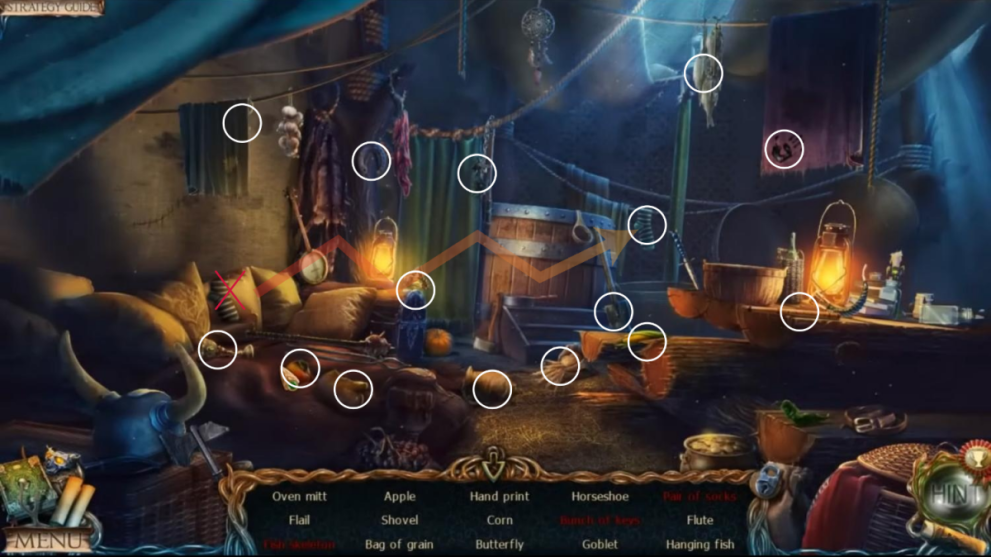
Hidden Object Puzzle 1
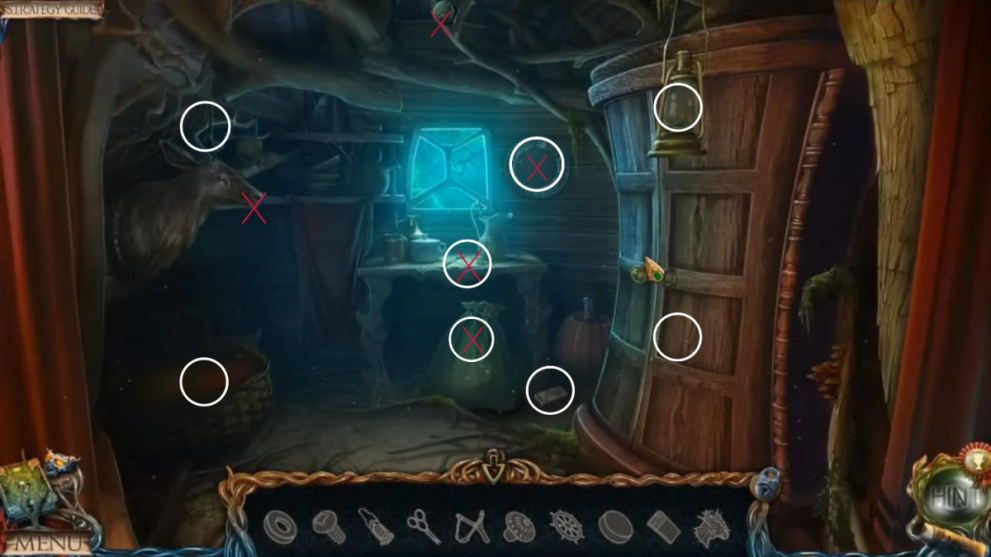
- Take the head;
- Go outside of the other tree again;
- Put the head on the door and click each head until the face the right way;
- Enter the tree;
- Take the weight and leave;
- Place the weights on the scale;
- Go across the bridge;
- Click on the boy;
- Take the pondweed from the anchor;
- Go through;
- Click on the boy again.
And so chapter 2 draws to a close and you are one step closer to saving Timmy. Read on for more of the magical story in our Lost Lands: Dark Overlord walkthrough.
Chapter 3: The Swamp
- Talk to Uri again;
- Take the tree bark from the log;
- Click on the flower;
- Use your dagger to take the flower root;
- Use the butterfly net and catch fireflies;
- Cut the purple lily flower with the dagger;
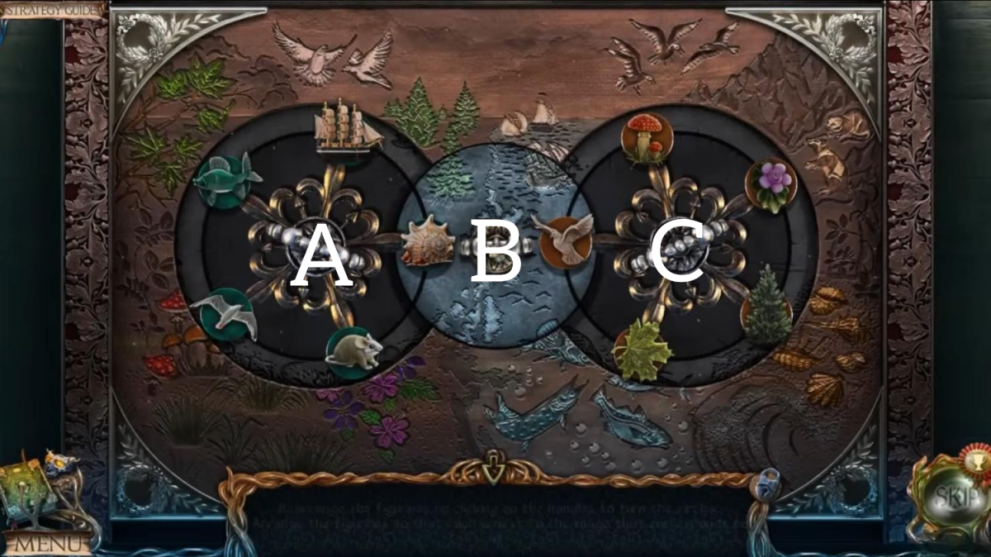
- Click the puzzle box to the left;
- Solve the puzzle: Cx3, B, A, Cx4, B, A, Cx4, B, A, Cx3, B, A, C, B, A.
Puzzle Box Solution
- Take the red disc;
- Head to the forest;
- Put fireflies in the lantern;
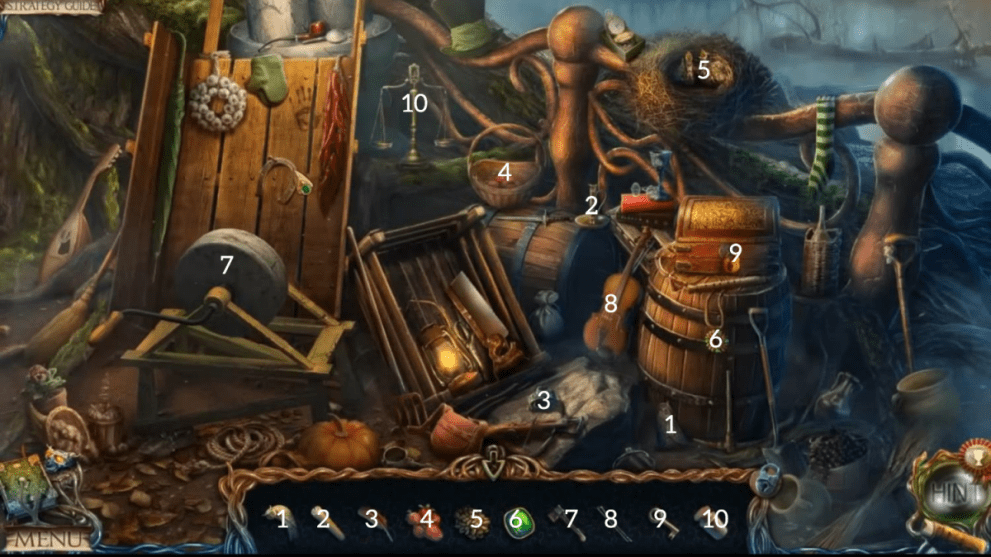
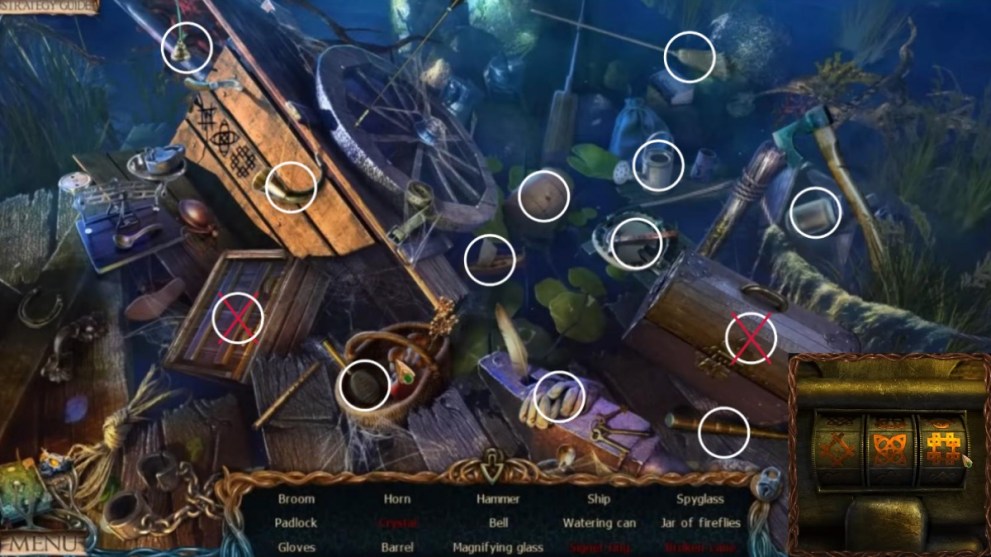
- Look closer at the junk to the left;
- Solve the hidden object puzzle.
Hidden Object Puzzle 2
- Take the claw hammer;
- Head to the swamp;
- Use the claw hammer on the bolts on the boat;
- Take the oar;
- Use the oar on the cage to open it;
- Take the empty bottle and constellation drawing;
- Use the dagger and the bottle to get sap from the tree;
- Use the dagger to get mushrooms from the tree;
- Go to Uri’s cottage;
- Look at the table;
- Place the pondweed, bark, flower root, and mushrooms in the bowl;
- Use the pestle;
- Put the waterlily flower in the holder;
- Use the bowl and tree sap on the lily;
- Take enchanted lily;
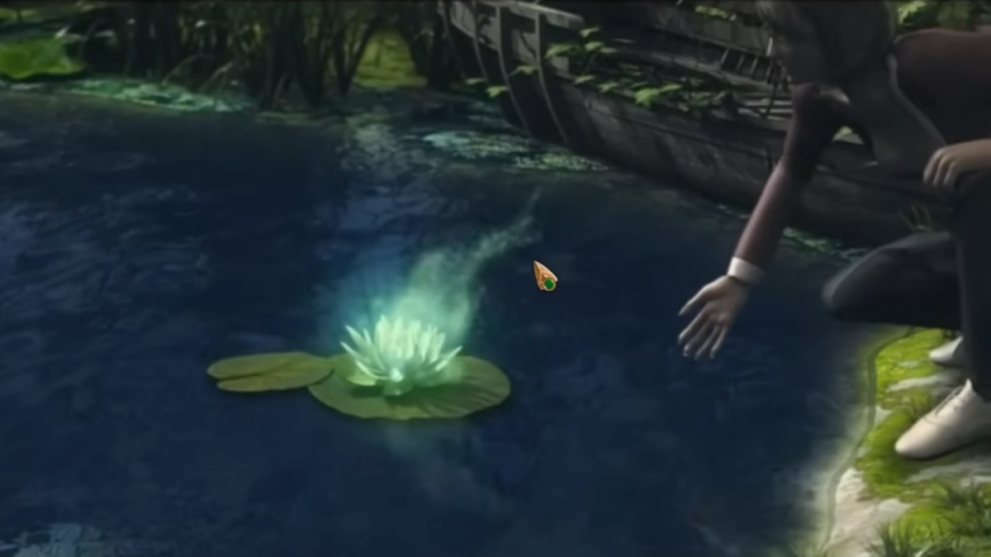
- Head to the swamp;
- Put the enchanted lily on the pad;
- Speak to the Lake Spirit.
- Take the arrow with the rope from the right side;
- Put the arrow and rope on the crossbow;
- Go back;
- Use the loaded crossbow on the gangplank and then enter the ship;
- Pick up the red octagon from the floor on the left;
- Take the brush from the floor on the right;
- Use the dagger on the rope on the cage and then open the door;
- Take the mechanism part;
- Go forward;
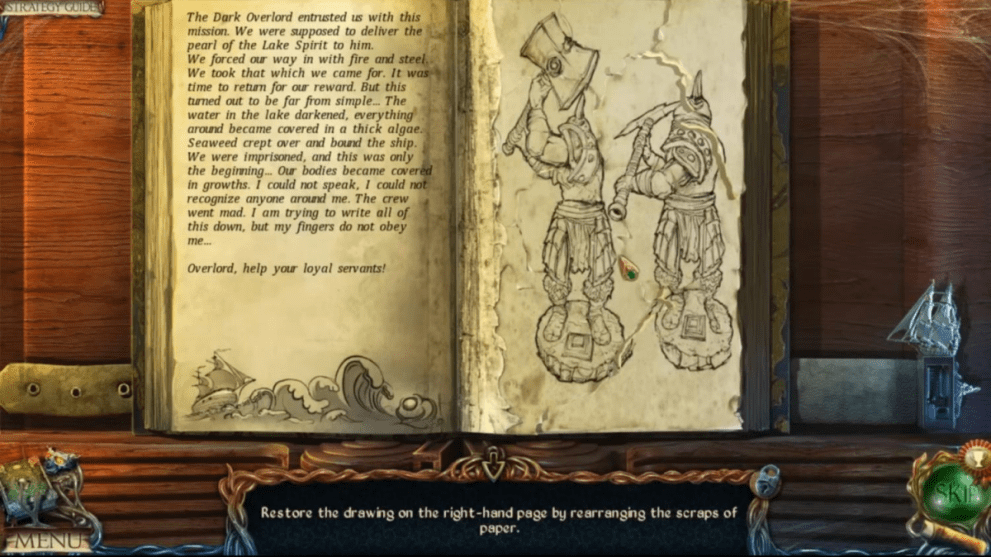
- Open the book and then put the constellation page on in order to see the solution.
Constellation Puzzle Solution
- Take the red disc;
- Head outside the tree;
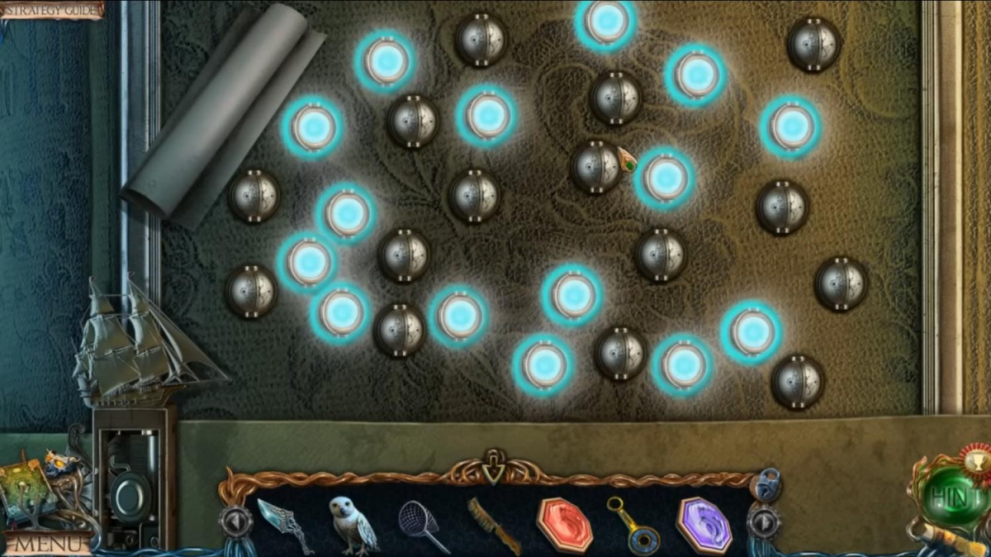
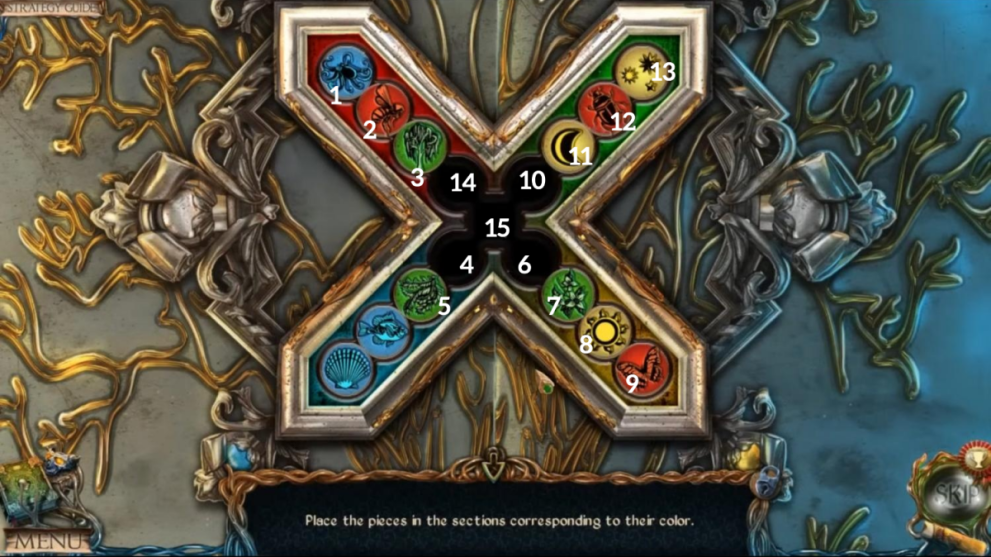
- Put the red discs on the door so you can then solve the puzzle by moving each piece into its matching slots.
- Use the solution with the image below with each space numbered.
- Whatever disc is in the numbered space, move them in this order: 3-10, 2-6, 1-4, 6-1, 4-15, 5-6, 15-5, 10-4, 11-2, 12-3, 13-15, 4-13, 6-12, 7-11, 8-10, 9-4, 14-9, 10-8, 3-10, 2-6, 10-2, 4-3.
Colored Disc Puzzle Solution
- Enter the passage;
- Get the stick;
- Go back;
- Use the stick on the rock and look at the clue;
- Head to the outside of the ship;
- Use the brush on the moss and look at the clue;
- Go through to the Captain’s Cabin;
- Move the cloth and take the clue;
- Get the purple octagon;
- Click the lock and place the mechanism;
- Use the clues in your journal to set the arrows.
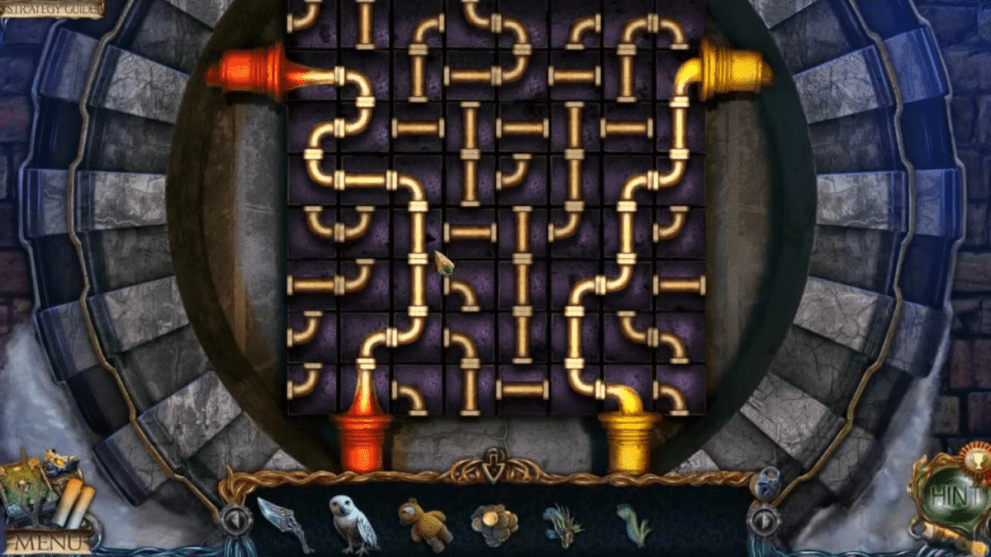
Symbol Puzzle Solution
- Open the shell and take the pearl;
- Head to the Swamp;
- Give the pearl to the Lake Spirit and go forward.
That marks the end of chapter 3 of Lost Lands: Dark Overlord. Find the next chapter of the walkthrough below!
Chapter 4: The Caves
- Pick up the stool leg;
- Head to the outside of the cottage by the water;
- Take the long planks;
- Look closer at the cart and solve the hidden object puzzle.
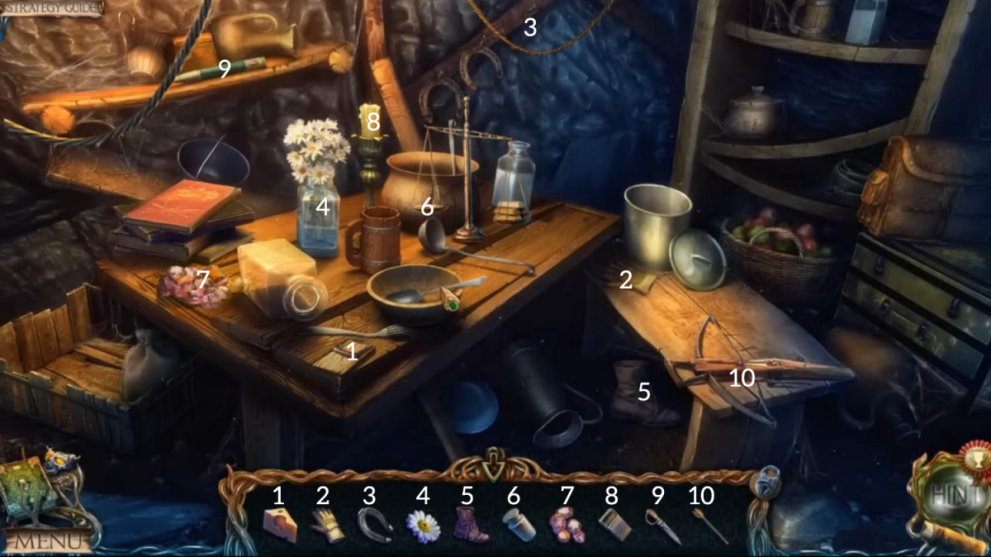
Hidden Object Puzzle 3
- Take the crystal;
- Bridge the gap with the long plank;
- Go up the steps;
- Speak to Uri;
- Use the owl to grab the sapphire;
- Take the bear and the emerald;
- Pick up the tongs;
- Pick up the breadcrumbs;
- Go back;
- Use the breadcrumbs and the net in the water to catch fish;
- Travel to the outside of the cottage by the water;
- Give the fish to the pelican;
- Take the key;
- Use the key in the lock and turn it;
- Go inside the cottage;
- Pick up the stool leg;
- Use the tongs to grab the gold octagon;
- Use the dagger on the cushion;
- Grab the mosaic piece;
- Pick up the clock hand and check the clue;
- Put the clock hand on the clock and set the time according to the clue (6:10);
- Take the fish;
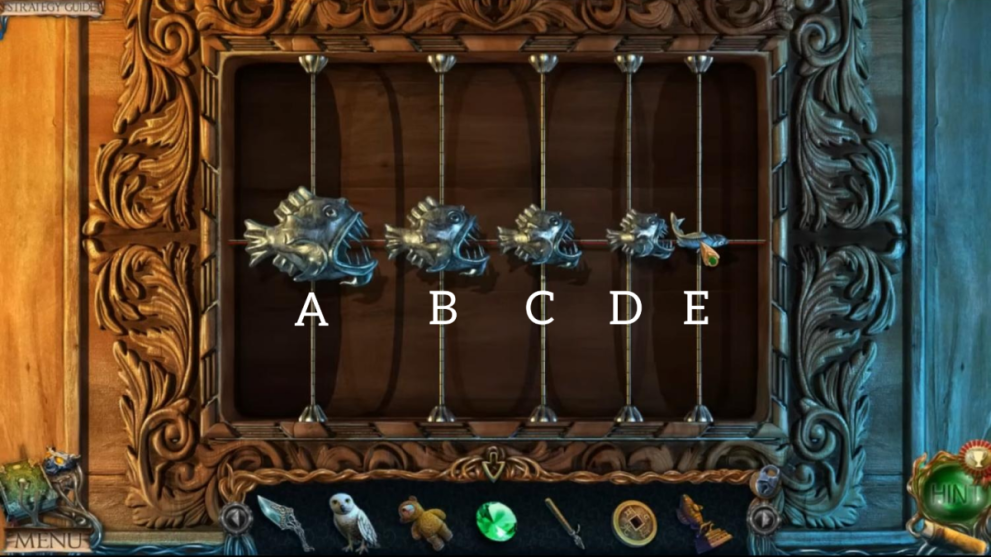
- Put the fish on the box and click to start the puzzle;
- Put all the fish in the spaces and move them in this order: A, B, C, D, E, A, C, E so they are arranged from big to small.
Fish Puzzle Solution
- Take the bird figurine;
- Go back;
- Put the stool legs on the stool;
- Take the stool;
- Go into the cottage;
- Place the stool on the floor;
- Take the picture;
- Pick up the stick;
- Go back;
- Put the stick in the hook and click it three times to take the boat hook;
- Travel to Uri’s cottage.
Mosaic Puzzle Solution
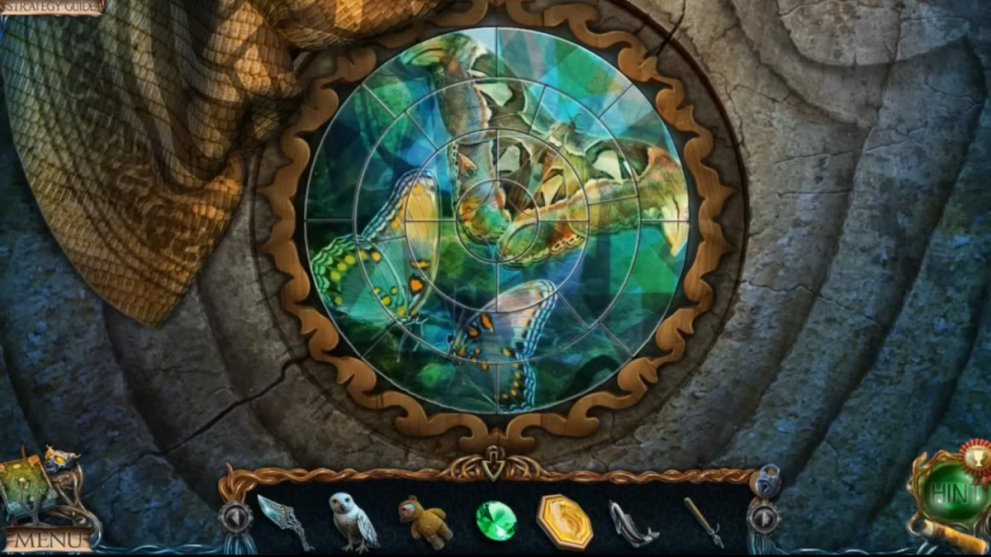
- Put the mosaic piece in the mosaic and solve the puzzle;
- Go into the entrance in the center of the room.
Hidden Object Puzzle 4
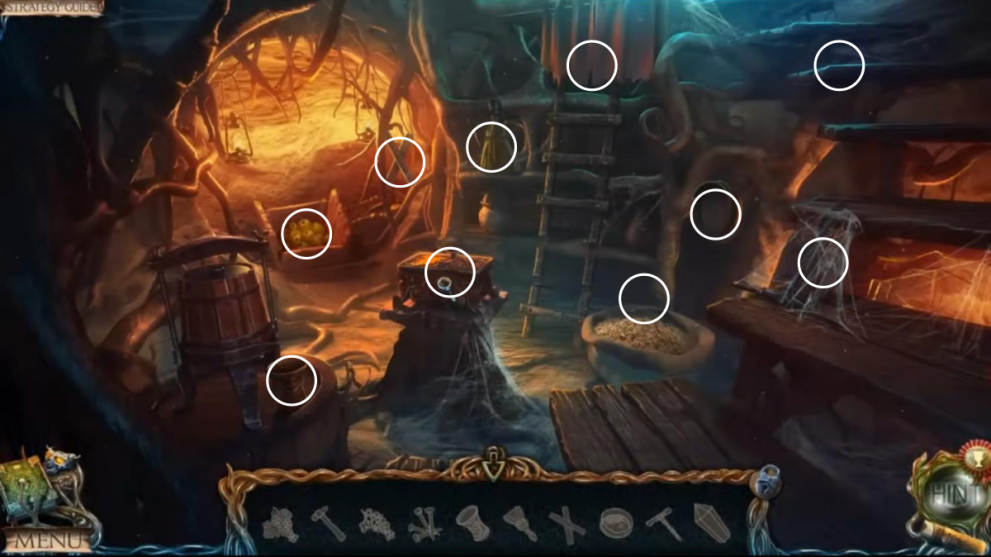
- Solve the hidden object puzzle;
- Use the sieve in the sack of grain to find nails;
- Find the hammer behind the sack;
- Move apples to get the glass grapes;
- Use the broom on the cobwebs;
- Use the handle on the press to get wine;
- Combine the steps, hammer, and nails on the ladder;
- Move the green bottles to get the glass grapes;
- Place the glass grapes on the box and pour in the wine;
- Take the crystal;
- Travel to the Captain’s Cabin;
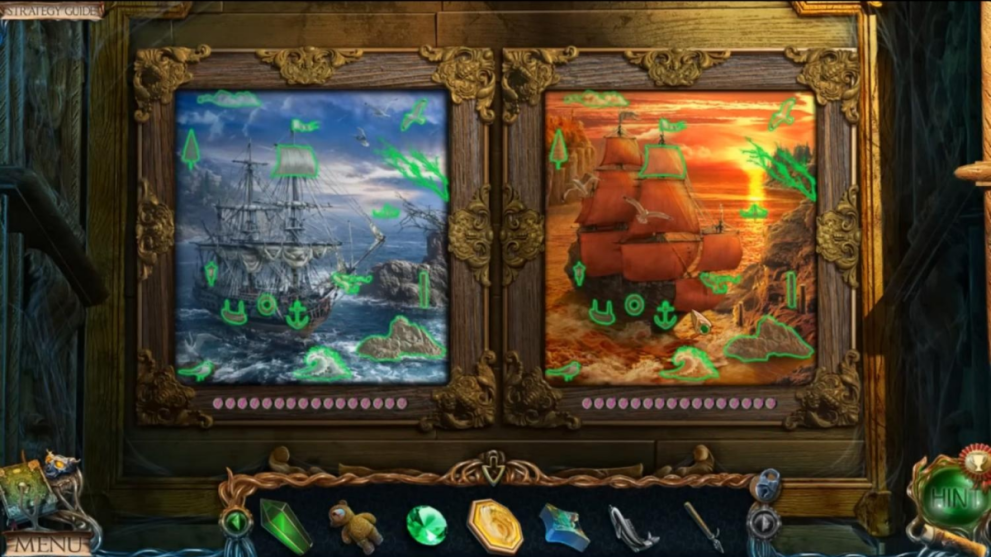
- Place the picture on the Captain’s Cabin;
- Find all the matching images.
Captain’s Picture Puzzle Solution
- Take the deer figurine;
- Travel to outside the tree;
- Put the crystals in the slots;
- Pull the lever;
- Enter the library;
- Take the coin;
- Use the dagger on the map;
- Take the fish figurine;
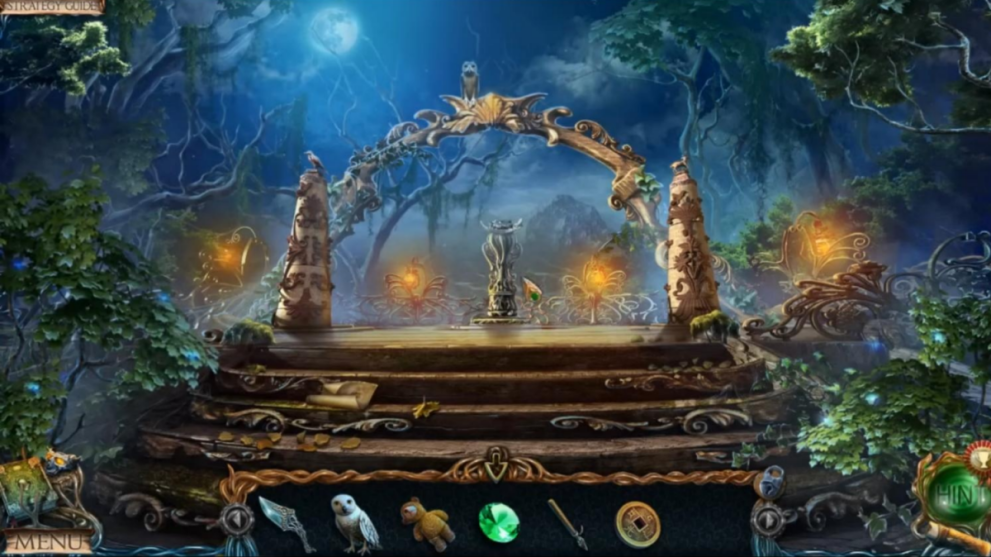
- Travel to the top of the tree;
- From the left to the right place each figurine on the pedestals: Bird, Fish, Deer.
- Solve the puzzle by rotating sections to complete the pattern.
Pedestal Puzzle Solution
- Take the gate key;
- Travel to the gates;
- Unlock the gate with the key and go through.
Chapter 5 of our Lost Lands: Dark Overlord walkthrough continues below!
Chapter 5: Underground
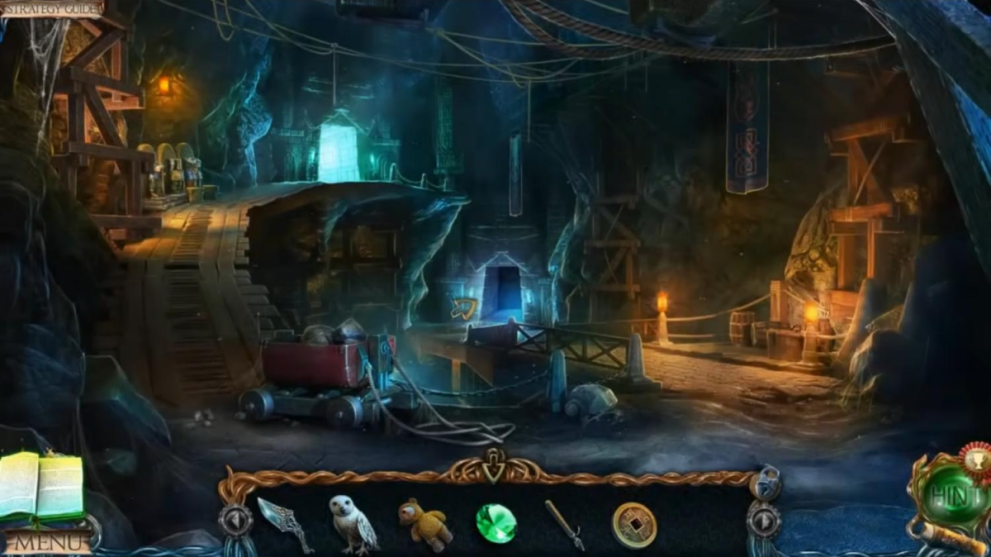
- Open the lid of the wooden barrel;
- Take the statue head;
- Click the torch three times to pick it up;
- Travel to the underground descent;
- Use the boat hook on the sack;
- Grab the lever and the sack;
- Go back;
- Put the lever in the slot;
- Pull two levers;
- Take the tar;
- Go back;
- Put the tar in the pot;
- Dip the torch in the pot of tar and take the torch;
- Travel to the underground descent;
- Put the torch in the holder;
- Click to start the hidden object puzzle.
Hidden Object Puzzle 5
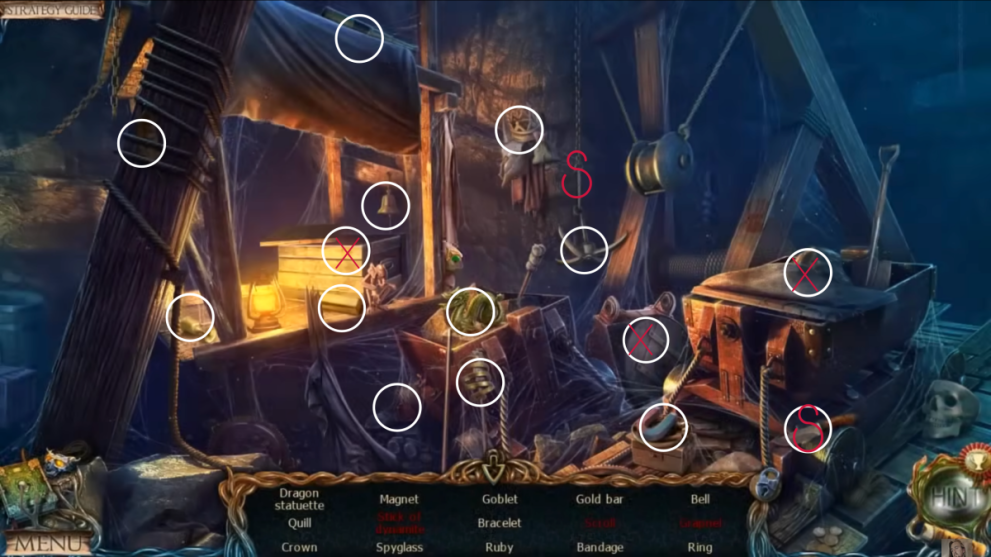
- Take the dynamite;
- Pick up the spade;
- Take the emerald;
- Travel to the underground lake;
- Take the handle;
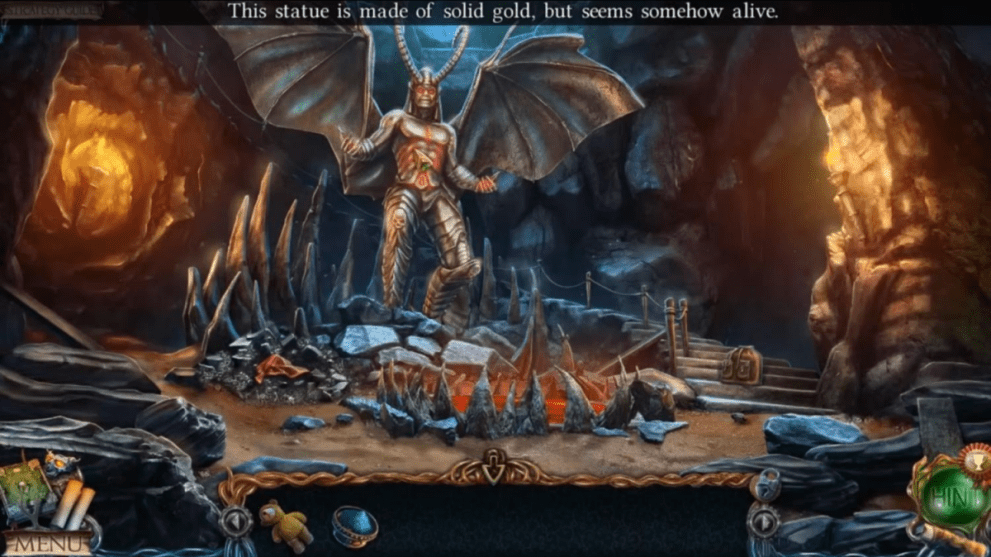
- Travel to the demon statue;
- Remove the broken handle and replace it with the new handle;
- Click the handle twice and take the pick;
- Use the spade on the rubble;
- Click the tapestry and take the cog;
- Use the dagger on the rope;
- Take the sapphire;
- Read the book;
- Go back;
- Use the pick on the grey section of the wall;
- Take the coin;
- Travel to the underground lake;
- Use the dynamite and torch on the hole;
- Put the cog on the winch;
- Go to the hanging bridges on the right;
- Grab the corkscrew;
- Travel to the ship;
- Use the corkscrew on the cork;
- Take the torn page;
- Use the sack with the powder;
- Take the gunpowder;
- Go forward;
- Put the torn page in the book to start the puzzle.
Torn Page Puzzle Solution
- Travel to the hanging bridges;
- Put a coin in the base of each statue;
- Arrange the statues according to the clues in the journal (both facing left);
- Remove the cover and take the head;
- Move the junk around the find the key;
- Look closer at the alcove.
Hidden Object Puzzle 6
- Take the sapphire;
- Travel to the lift;
- Take the broom;
- Grab the emerald and the stone horn;
- Use the key on the padlock;
- Enter the room;
- Use the broom to remove cobwebs;
- Grab the diagram;
- Travel to the underground lake;
- Put the stone horn on the helmet;
- Take the sapphire;
- Go forward;
- Take the emerald;
- Put all four sapphires in the slots;
- Put all four emeralds in the slots;
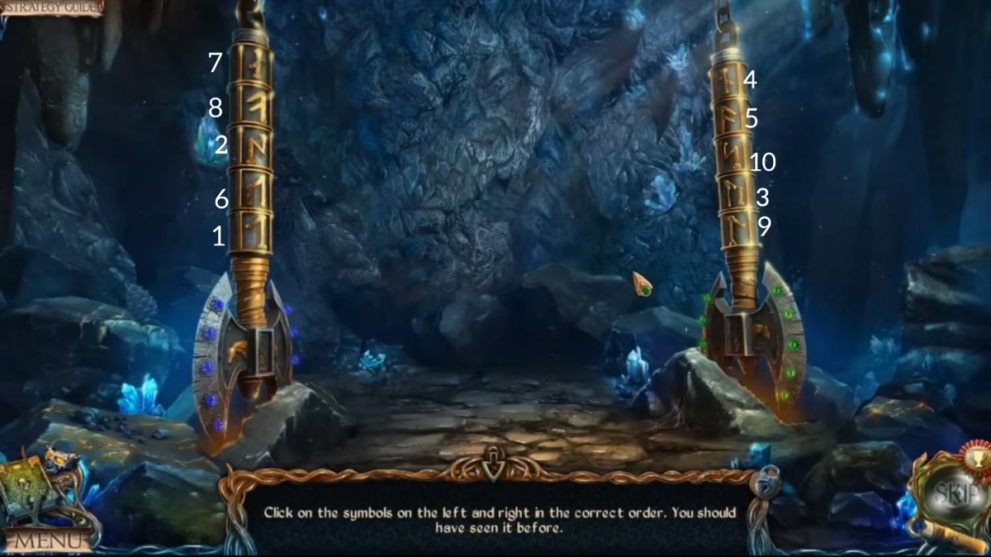
- Solve the puzzle by selecting the runes in order: 1-10.
Runes Puzzle Solution
- Read the note and take the octagon;
- Travel to Uri’s cottage;
- Move the cloth and place the octagons in the slots;
- Solve the puzzle.
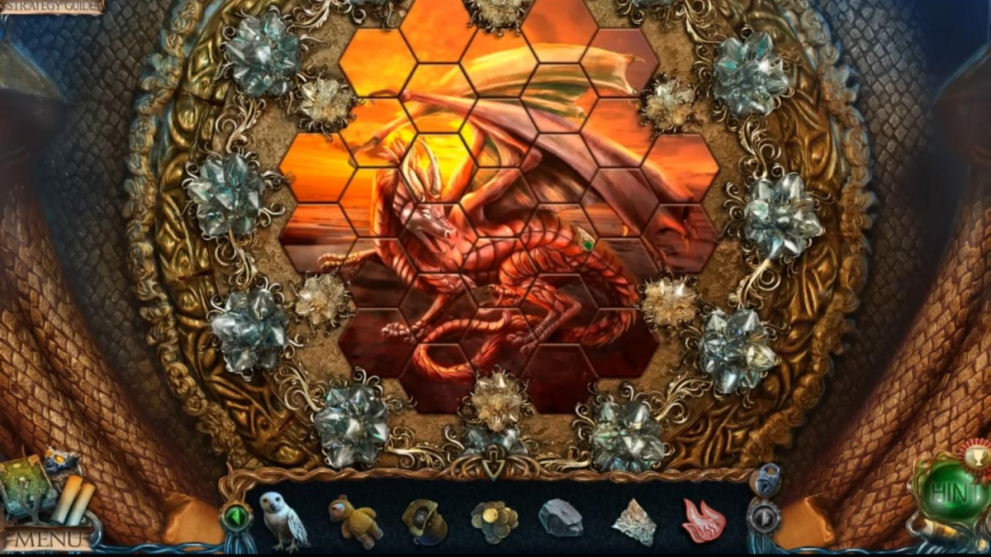
Dragon Puzzle Solution
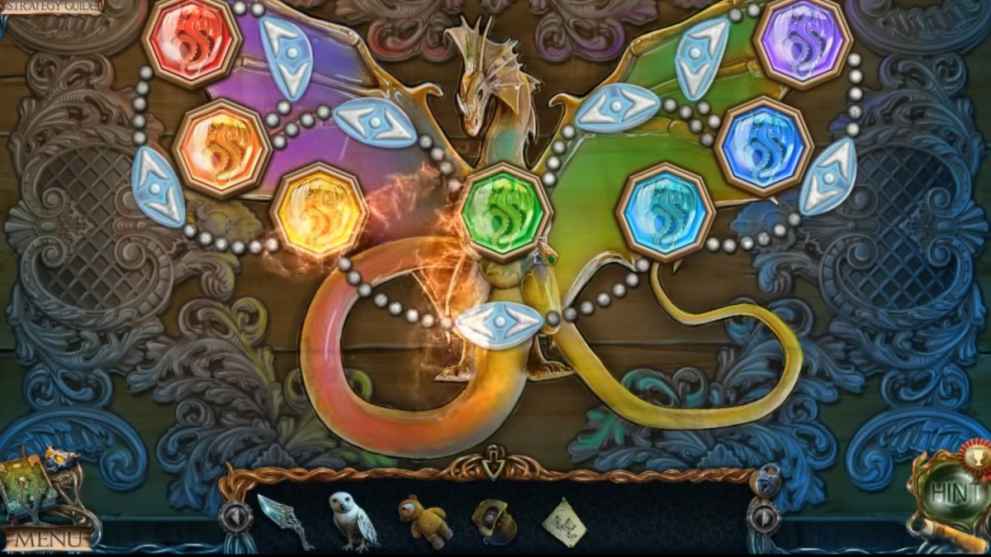
- Click the blue arrow pieces to move each octagon. If we number the pieces 1-7 from left to right the solution is 3, 2, 1, 2, 1, 4, 6, 7, 5, 7.
- Take the solvent and the continent figure;
- Travel to the Captain’s Cabin;
- Put the continent in the globe;
- Take the cross key;
- Travel to the library;
- Use the solvent on the book stain;
- Look at the diagram for a clue;
- Travel to the bank at the cliffs;
- Use the cross key on the lock;
- Take the magnet;
- Travel to the cottage on the water;
- Use the magnet to get the star medallion from the water;
- Travel to the lift;
- Look closer at the pedestal to see the puzzle.
Dragon Head Puzzle Solution
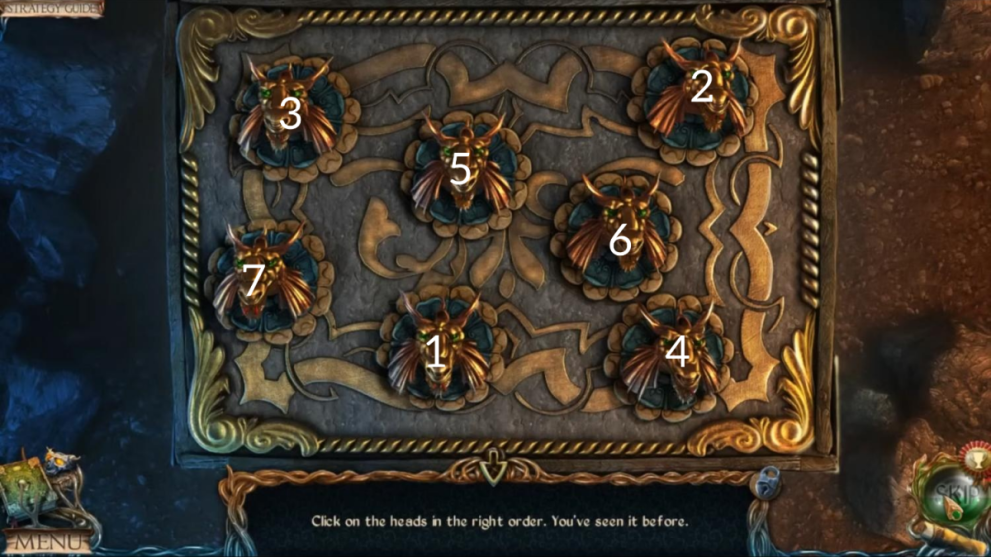
- Click on each head in order 1 to 7 as you see it in your journal;
- Go to the library;
- Place the star medallion in the slot and get the orb;
- Travel to the underground lake shore;
- Place the orb on the pedestal;
- Speak to the spirit;
- Take the cog;
- Travel to the lift;
- Place the cog on the panel;
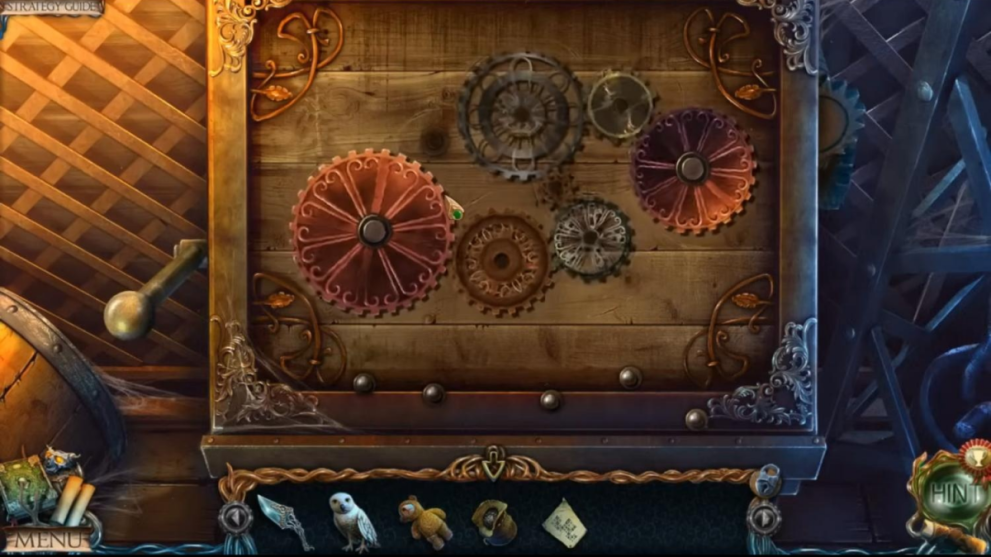
- Connect all the cogs to solve the puzzle.
Cog Puzzle Solution
Head through the door to complete chapter 5 of Lost Land: Dark Overlord!
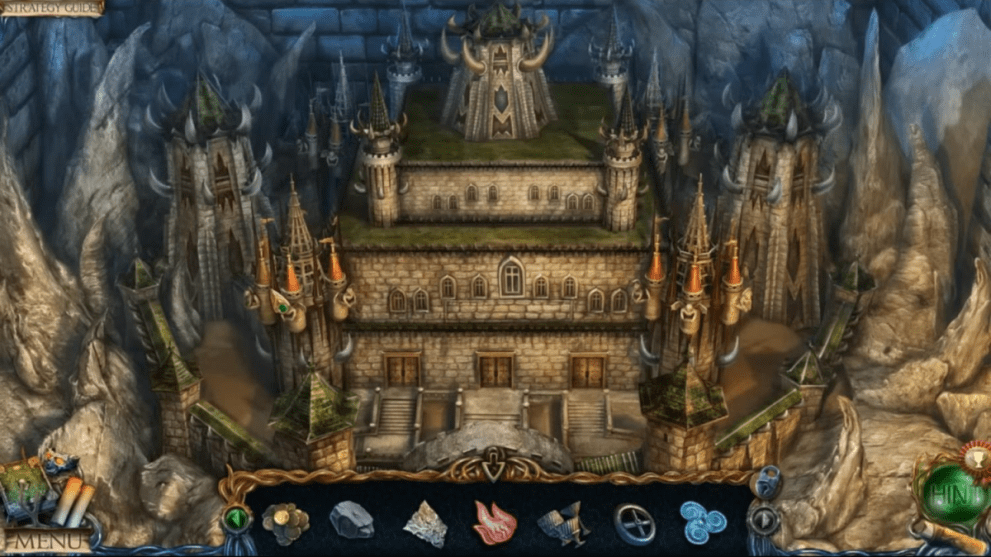
Chapter 6: Dark Lord’s Castle
- Take the bas-relief piece from the glowing pillar;
- Click on the castle to move forward;
- Pick up the shovel from the left of the path;
- Take the coins from the right of the path;
- Go back;
- Use the shovel to clear the snow;
- Take the hammer;
- Place the hammer on the statue’s hands;
- Take the statue head;
- Use the owl to get the valve;
- Move forward again;
- Enter the tent.
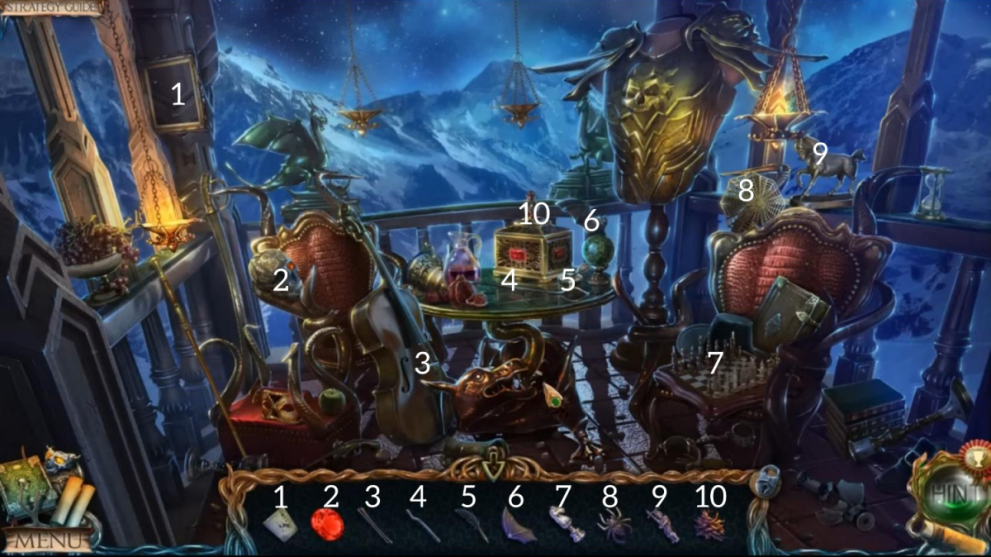
Hidden Object Puzzle 7
- Take the oven mitt;
- Travel to the caves;
- Place each statue head on the statues.
Three Statue Puzzle Solution
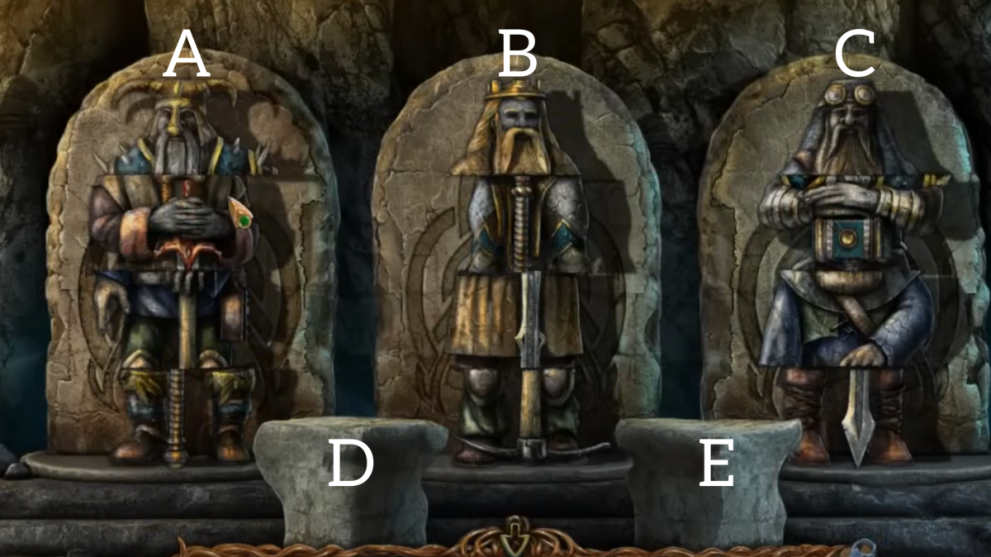
- Rearrange the statues by moving each piece and using the plinths between each statue:
- B-Dx3, A-Ex2, A-B, D-E, D-A, C-D, C-A, C-B, D-B, E-Cx2, D-C, E-A.
- Take the mosaic pieces;
- Travel to the demon statue;
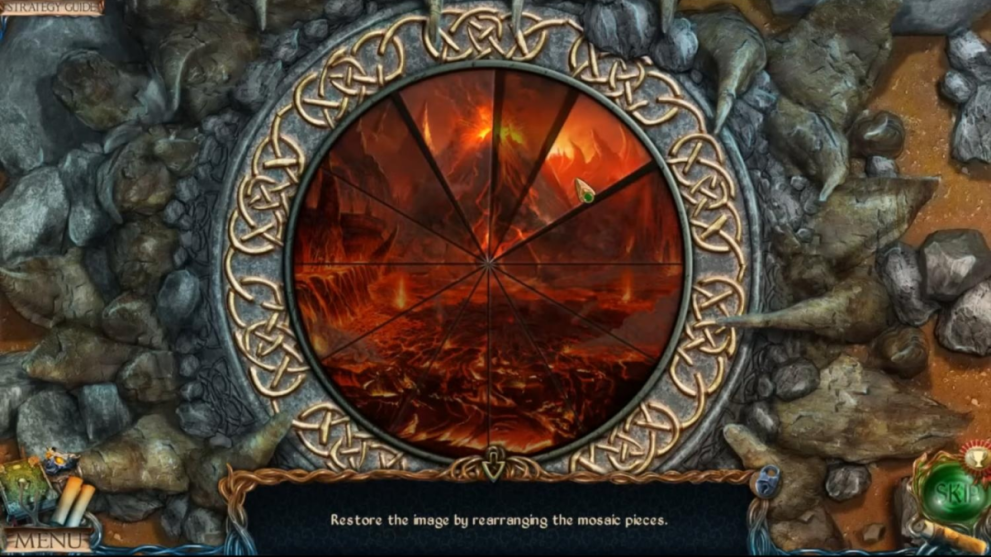
- Click on the mosaic;
- Add the pieces;
- Swap two pieces at a time to complete the puzzle.
Demon Mosaic Puzzle Solution
- Read the notes for a cue;
- Take the buttons;
- Travel to outside of the castle;
- Place the diagram and buttons on the door.
Castle Door Puzzle Solution
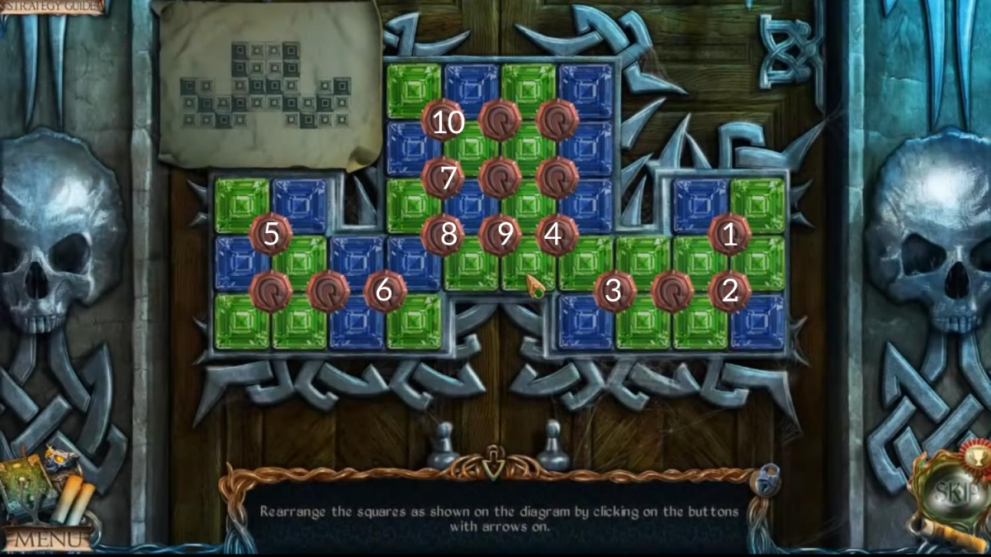
- Solve the puzzle but clicking the buttons to rearrange the squares: 1, 2(x2), 3(x3), 4, 5, 6, 7, 8(x2), 6, 9, 10(x2);
- Go forward;
- Click the area;
- Take the key;
- Use your owl to get the bas-relief piece from the right-side chandelier;
- Use the oven mitt to get the sword from the right-side fire sconce;
- Take the fire symbol from the left of the sconce;
- Open the curtain on the left and go through to the corridors;
- Use the swords on the shield decor;
- Take the bas-relief piece;
- Use the key to unlock the door further down the hall;
- Look at the weapons for a symbol clue;
- Exit to the dirigible;
- Use the sword on the ice in the fountain;
- Take the object and look at the clue;
- Travel to the corridors;
- Look at the door to the left.
Corridor Puzzle Solution
- Head upstairs;
- Talk to the alchemist;
- Use the dagger with the cheese to take a piece of cheese;
- Move the animal hide;
- Take the symbol;
- Open the door.
Hidden Object Puzzle 8
- Take the pincers;
- Put the object from the ice on the fire;
- use the pincers to take the object from the fire;
- Take the statuette;
- Put the statuette on the bedpost;
- Take the pieces;
- Read the note;
- Go back to the corridor;
- Place the piece of cheese by the hole;
- Get the rat;
- Go back;
- Place the pieces on the dragon mosaic.
Dragon Mosaic Puzzle Solution
- Click to swap mosaic pieces. They will go dark when they are in the right place;
- Take the propeller blade;
- Take the symbol;
- Travel to the viewing point;
- Take the coal;
- Pick up the blank piece of paper;
- Exit to the dirigible;
- Use the rat with the leopard;
- Take the air symbol;
- Pick up the valve;
- Click to remove the propeller and replace it with the propeller blade;
- Click the airship.
Airship Puzzle Solution
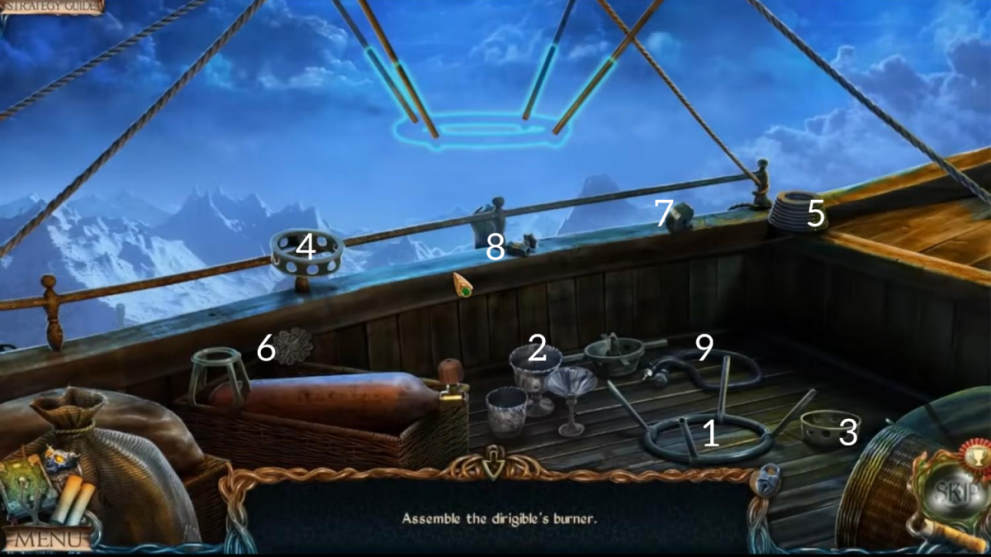
- Place the pieces in order 1-9 to fix the airship burner;
- Take the symbol and the cups;
- Travel to the corridors;
- Put the symbols in the slots on the door;
- Look closer at the alcove.
Alcove Puzzle Solution
- Put each castle piece back until it is complete;
- Take the earth symbol;
- Travel to the lift;
- Use the blank paper and the coal on the board;
- Take the dining set diagram;
- Travel to the Captain’s cabin;
- Put the cups and dining set diagram on the shelf.
Cup Puzzle Solution
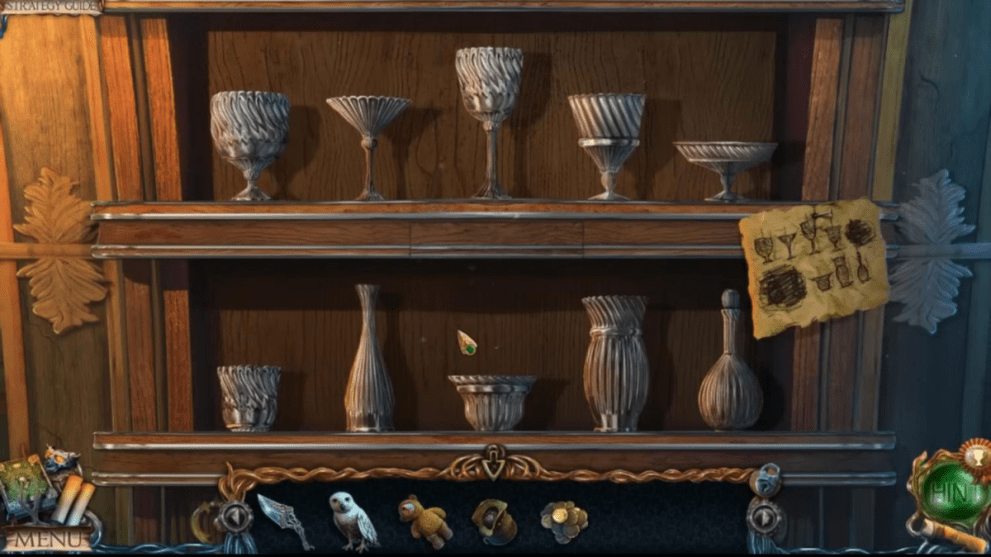
- Arrange the cups as seen above;
- Take the book;
- Travel to the library;
- Place the book on the shelf;
- Match the books to complete the image.
Flower Book Puzzle Solution
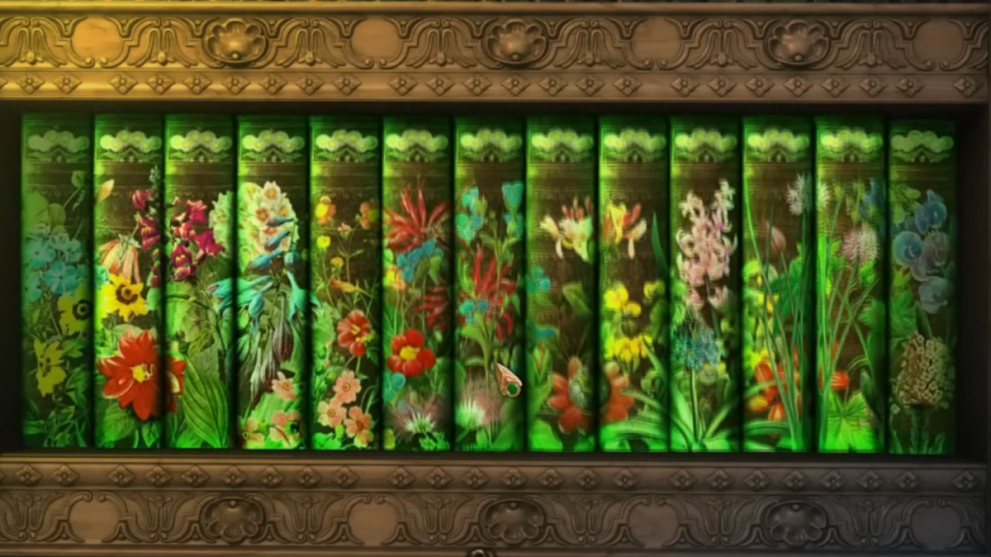
- Take the water symbol;
- Travel to the viewing point;
- Look through the telescope;
- Put the symbols in the matching slots;
- Take the needle;
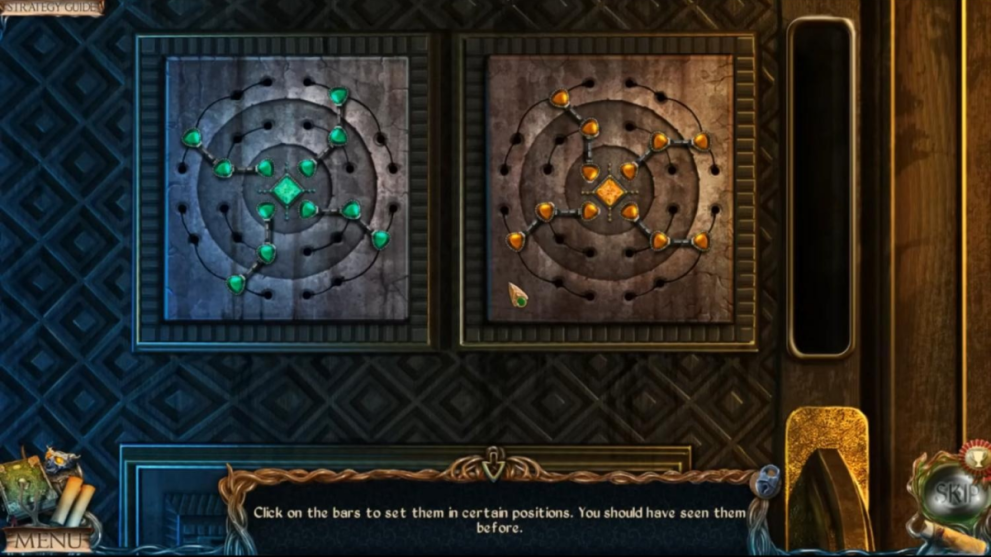
- Look at the diagram for a clue;
- Place the valves and rotate according to the clue on the diagram.
Valve Puzzle Solution
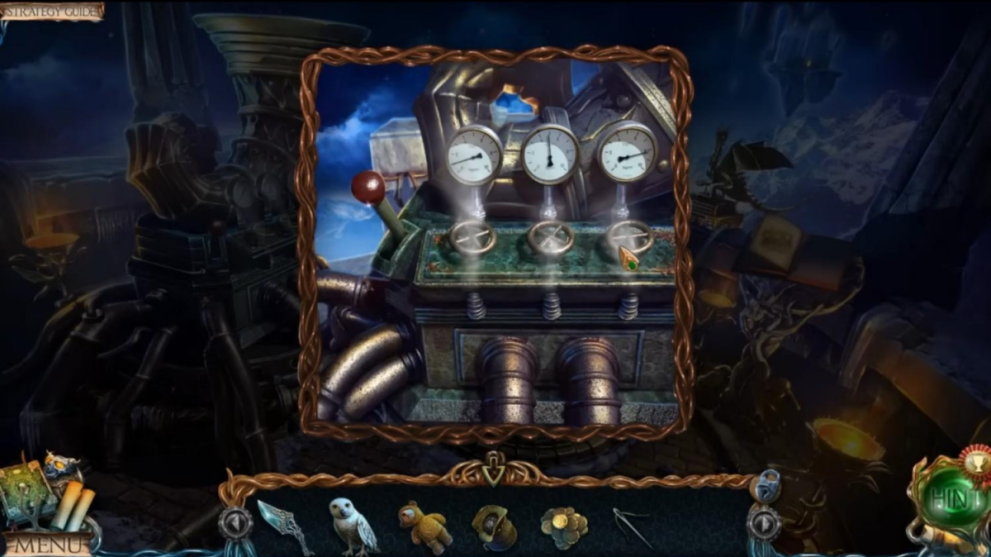
- Pull the lever;
- Exit to the dirigible;
- Use the needle to patch up the hole in the airship;
- Click on the airship;
- Turn the valve on the tank;
- Click the airship again.
That concludes this part of Lost Lands: Dark Overlord walkthrough! Keep reading for more tips and solutions.
Chapter 7: The Alchemist’s Tower
- Get the owl to retrieve the ramrod from the floating rock on the right;
- Look closer at the ground on the right;
- Take the cannon balls;
- Grab the mallet;
- Use the mallet on the wheel;
- Take the wheel;
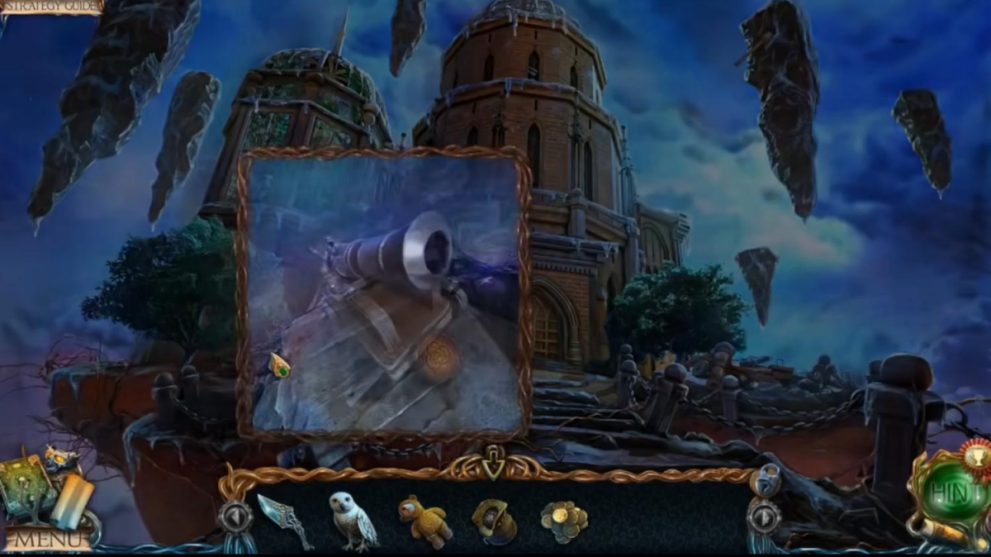
- Look closer at the cannon on the left;
- Take the rune;
- Place the gunpowder, cannonball, and ramrod in the cannon;
- Put the wheel on the axle of the cannon;
- Use the mallet on the wheel;
- Click the cannon twice to move;
- Go forward;
- Look at the table to the back;
- Read the note;
- Take the rune and the bas-relief piece;
- Go upstairs;
- Pick up a bas-relief piece and a rune;
- Travel to the viewing point;
- Put the runs in the slots;
- Look closer at the puzzle.
Pipe Puzzle Solution
- Connect the pipes;
- Click to turn the dragon’s head until it faces the owl;
- Take the glass owl;
- Travel to the path of the castle;
- Put the glass owl on the pillar;
- Select the runes and receive a clue;
- Travel to the tower hall;
- Look at the door more closely.
Door Runes Puzzle Solution
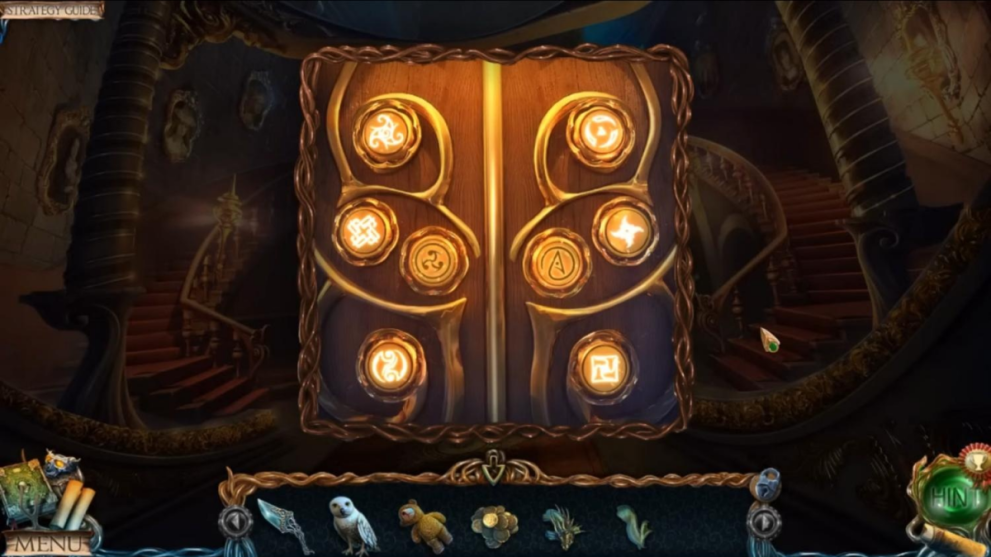
- Select the runes as seen above;
- Go forward;
- Talk with the Alchemist;
- Take the bas-relief piece from the floor ;
- Take the rails and the flask from the table to the right;
- Read the recipe on the fireplace behind;
- Click on the alcove.
Hidden Object Puzzle 9
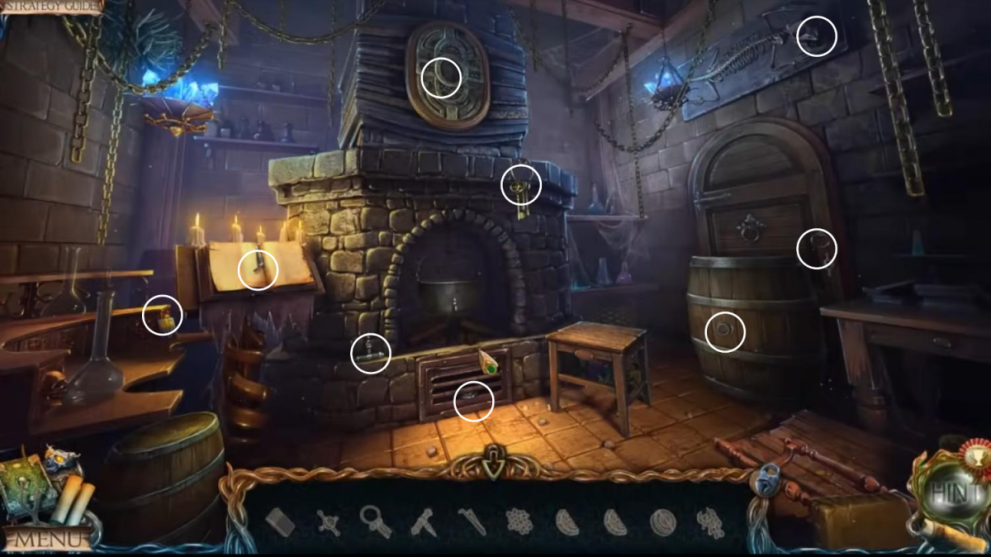
- Solve the hidden object puzzle:
- Use the tweezers to get the medallion piece from the grate;
- Use the corkscrew on the barrel;
- Move the barrel to get to the door;
- Open the door with the keys;
- Put the valve on the pot over the fire;
- Place the lead figurine in the pot over the fire;
- Use the matches to light the fire;
- Place the mold under the pot tap;
- Place both medallion pieces in the space above the mantle;
- Take the dried berries.
- Travel to the underground descent;
- Remove the cover and put the rails on the chest.
Chest Puzzle Solution
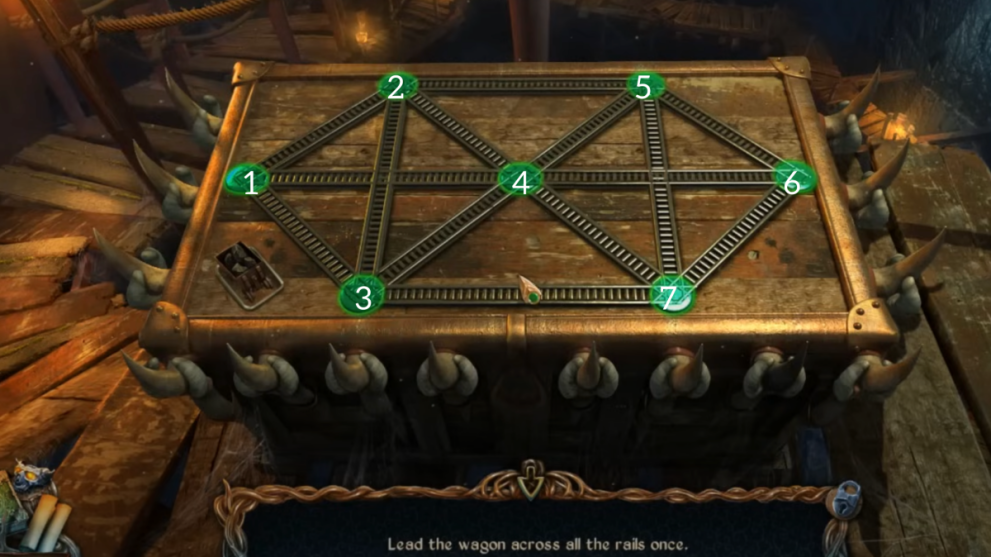
- Solve the chest puzzle; 1, 2, 3, 1, 4, 7, 3, 4, 5, 2, 4, 6, 7, 5, 6.
- Take the bas-relief piece and circle segment;
- Travel to the tower hall;
- Put the circle segment in the lock.
Circle Segment Puzzle Solution
- Match the pieces in the circle;
- Enter the greenhouse;
- Use the owl to get the sun figurine from the tree;
- Travel to the observatory;
- Put the sun figurine in the center of the circle;
- Take the tablet piece;
- Travel to the dwarf’s room;
- Put the tablet piece on the shield above the mantlepiece.
Dwarf Shield Puzzle Solution
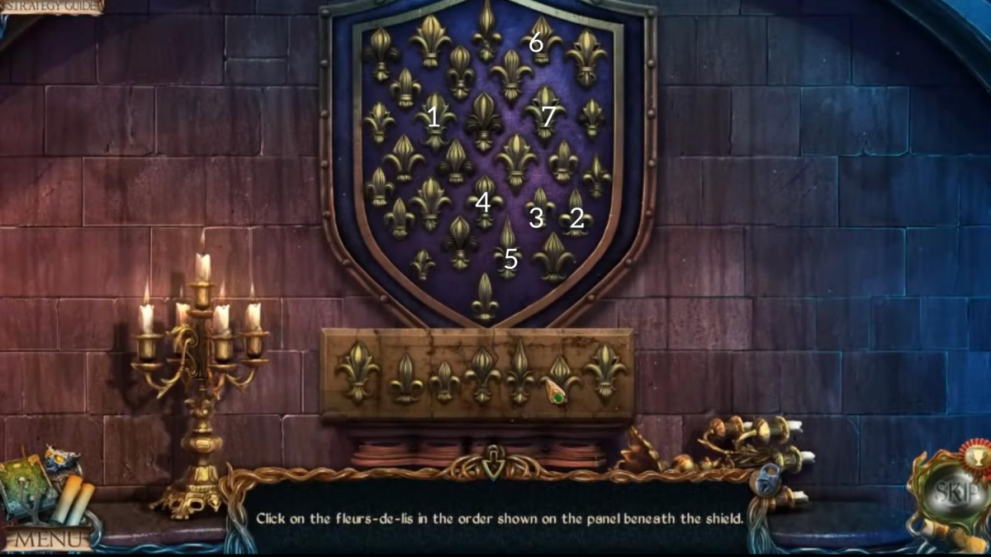
- Select the fleur-de-lis 1-7;
- Take the bas-relief piece and the glove;
- Travel to the greenhouse;
- Move leaves on the tree on the right and get the trowel;
- Use the trowel on the dirt to the back;
- Use the glove to take the mandrake root;
- Take the key;
- Travel to the alchemist’s lab;
- Use the key on the locked cupboard;
- Take the recipe;
- Grab the dropper and the pyramid;
- Travel to the observatory;
- Put the pyramid on the pedestal.
Planets Puzzle Solution
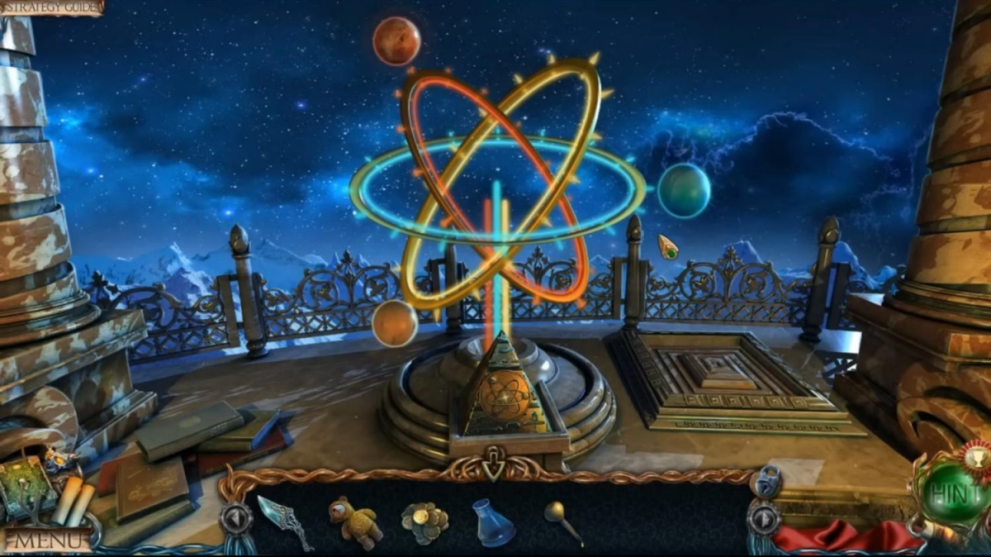
- Arrange the planets;
- Take the crown;
- Travel to the tower hall;
- Put the crown on the statue;
- Go to the indoor patio;
- Take the lens from among the flowers;
- Pick 7 rosebuds (not open roses);
- Use the flask on the water and get a flask of water;
- Move the oyster and use the dagger to get a pearl and mosaic piece;
- Take the bas-relief piece from near the oyster;
- Enter the gazebo.
Hidden Object Puzzle 10
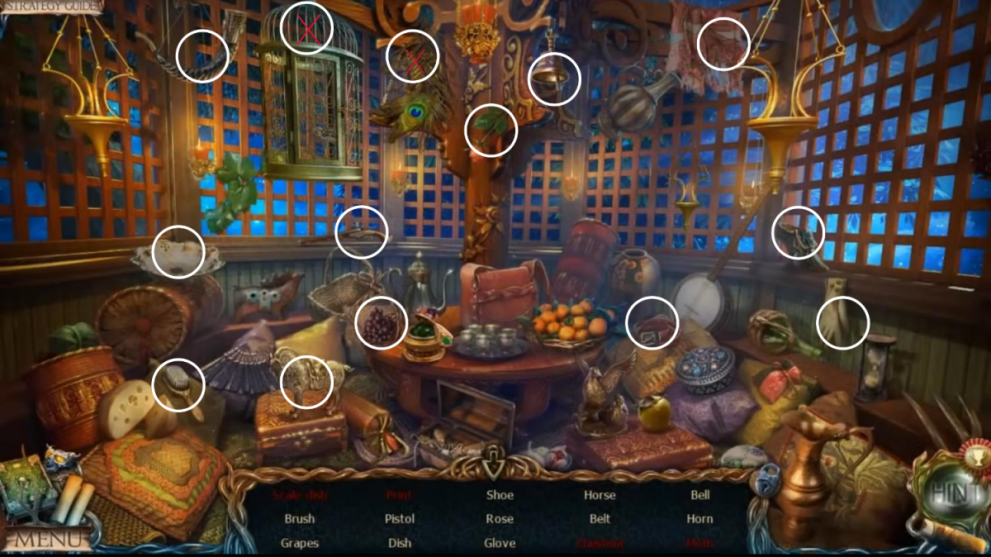
- Take the scale dish;
- Travel to the greenhouse;
- Use the dropper on the plant on the right;
- Take the pitcher of plant nectar;
- Use the dagger on the vines;
- Put the mosaic piece on the disk.
Greenhouse Puzzle Solution

- Arrange the discs by selecting in this order: 2, 1, 3, 4, 2, 2, 2;
- Take the bas-relief piece and flute;
- Use the flute on the snake;
- Take the copper powder and snake scales;
- Travel to the observatory;
- Put the coins on the scale;
- Move four coins from the left to the right on the scale;
- Put the lens on the top;
- Use the flask of water on the beam of light to get lunar tears;
- Travel to the throne room;
- Put all ten bas-relief pieces on the bas-relief to get dragon’s blood;
- Travel to the alchemist’s laboratory;
- Take the aconite from the lower left shelf;
- Look close at the mantle above the fire;
- Make the potion:
- Nightshade berries – beaker
- Mandrake root-board and use dagger
- Rosebuds and aconite – mortar and use pestle
- Pitcher plant nectar – beaker and use mortar
- Take life potion
- Travel to the underground lake shore.
Chapter 8: The Final Magic
- Give the life potion to the mountain spirit;
- Take the living stone;
- Travel to the alchemist’s laboratory;
- Go to the table;
- Put the recipe on the table;
- Put the dragon’s blood and copper powder in the bowl;
- Put the snake scales in the mortar and use the pestle to grind them up;
- Place the living stone and lunar teas in the bowl;
- Use the pestle on the bowl;
- Take the Antiphilosopher’s Powder;
- Go to the demon statue;
- Use the powder on the demon.
That draws this magical adventure to a close and you have completed Lost Lands: Dark Overlord! If you have loved this Lost Lands: Dark Overlord walkthrough why not check out Lost Lands 4, another magical journey by Five BN.


Updated: Apr 8, 2024 11:26 am