
Lost Lands 4 is a mysterious adventure game in which you must find hidden objects and solve puzzles. Some of these puzzles are tricky so if you need some clues or help we have the complete Lost Lands 4 walkthrough for you below!
At the House
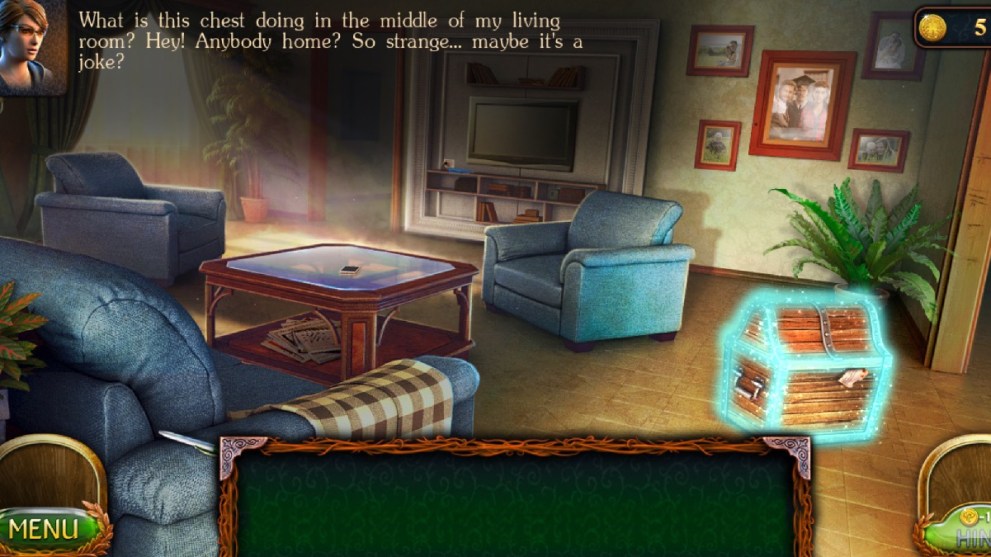
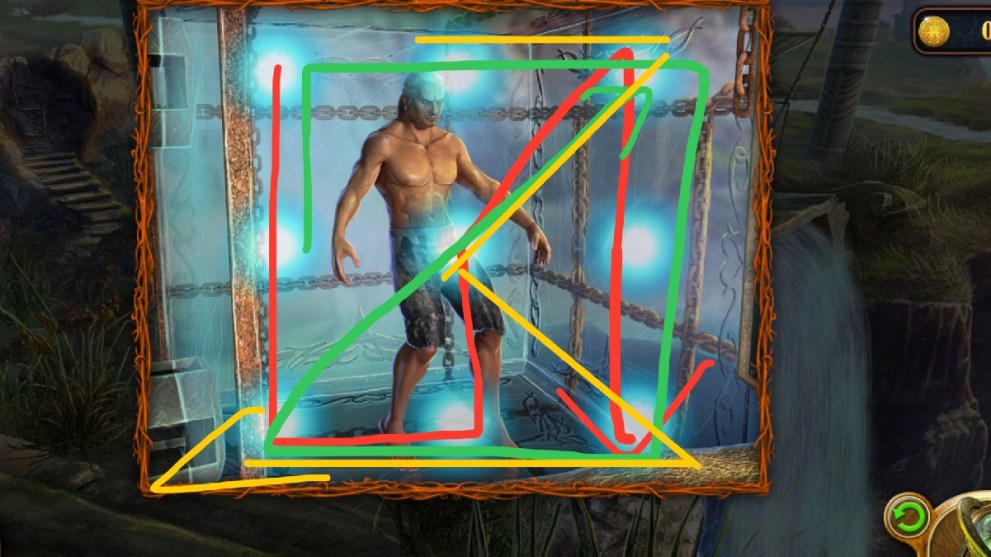
You come home to find a magical chest has appeared in your living room. How did it get there and what can you do to open it?
- Pick up the pen from the arm of the sofa;
- Pick up the cell phone from the table;
- Pick up the blue diary from the shelf under the TV;
- Place the cell phone on the shelf and tap it a couple of times to plug it in;
- Tap the family portrait;
- Use the pen on the tiny hole on the picture frame;
- Use the code 4815162342 to open the safe;
- Get the Magic Gloves from the safe;
- Open the chest and take the Scroll and Compass;
- Open the door and leave.
On the Ship
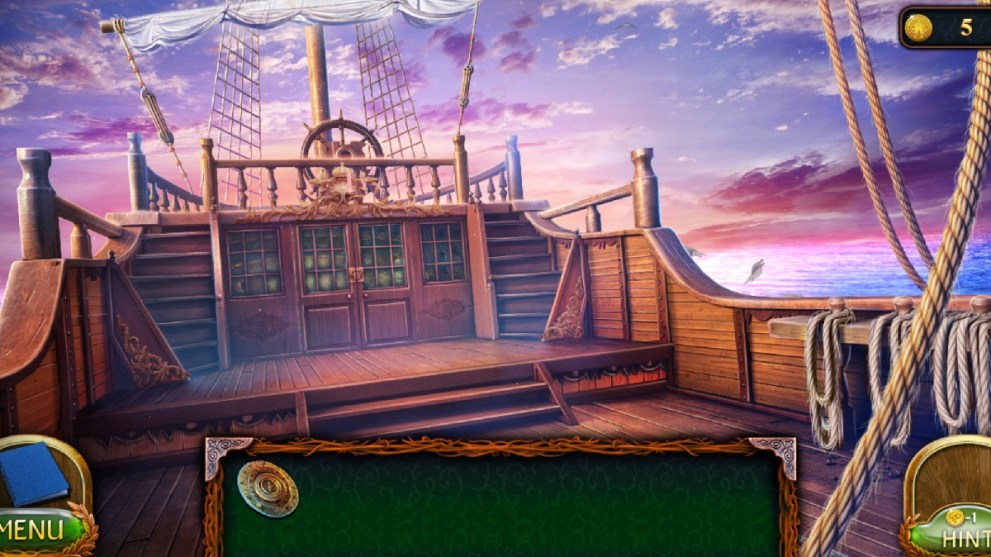
You are grabbed by a monstrous octopus and find yourself aboard a strange ship!
- Tap on the doors and walk through;
- Talk to Finuer;
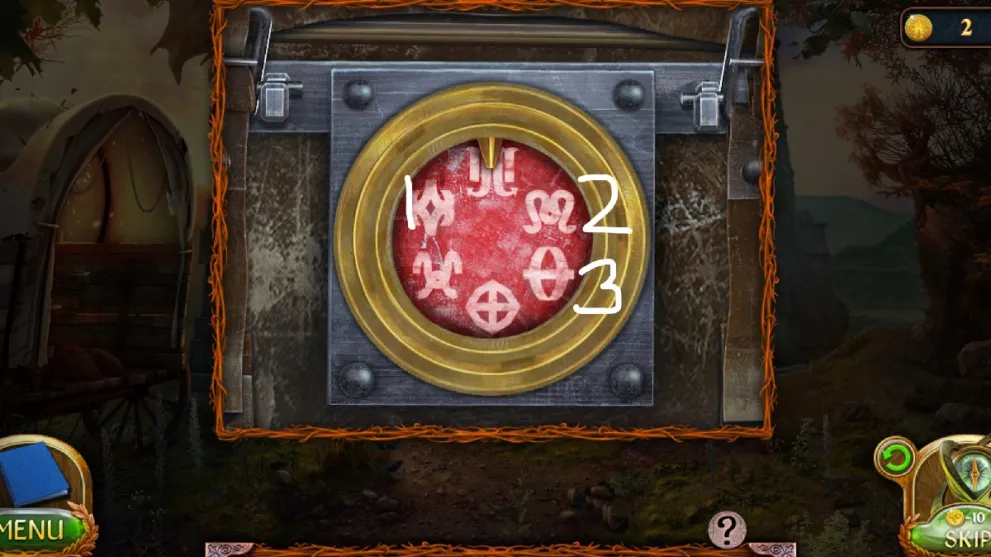
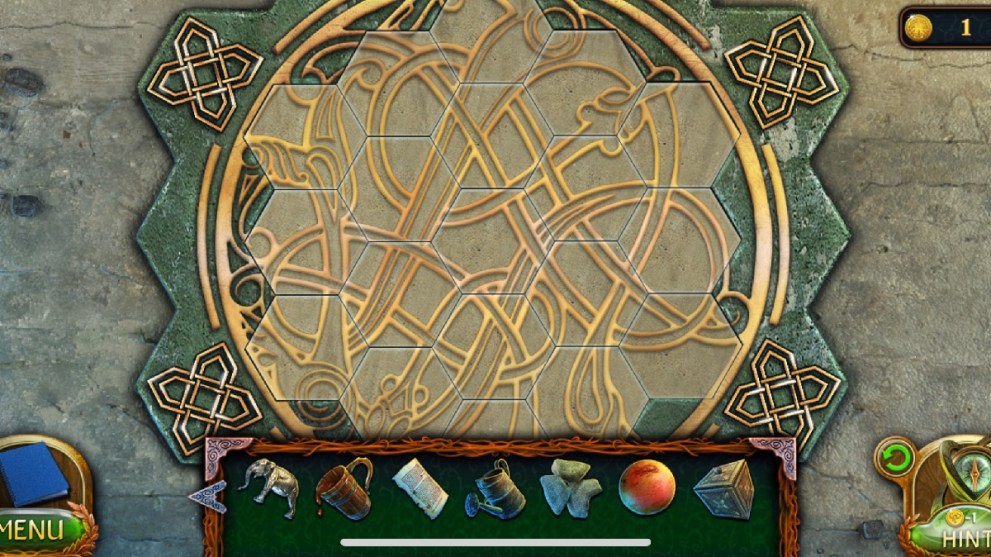
- Place the Compass in the circle;
- Match the symbols on the inner circle to the ones on the outer circle;
- This puzzle requires you to move pieces from the inner ring to the empty slots on the outer ring in order to rearrange the entire inner ring’s symbols. Go steady and be methodical working along each symbol one at a time.
The Underground Hut
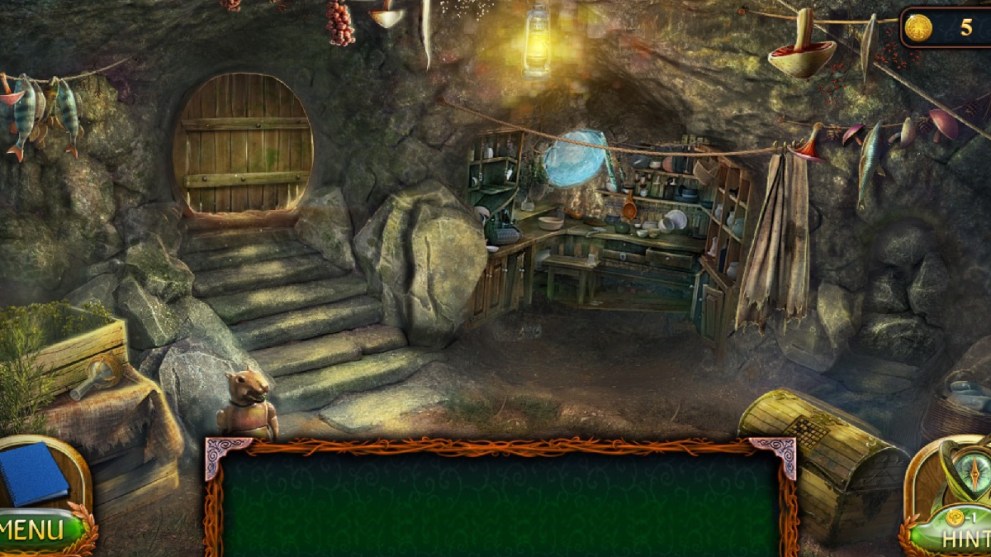
You wake up in a hammock by a sort of underground hut. Now you have to try to get out of this place.
- Tap the food hanging on the right to find a Hidden Morphing Object;
- Tap the curtain to pull it back;
- Find all the hidden objects;
- Use the oil can on the lock to get the key;
- Use the key on the drawer to open it;
- Find matches on the side;
- Break the bottle to get the chisel;
- Open the bottom left drawer to get the wax-covered handle;
- Use the matches on the candle;
- Melt the wax to get the handle;
- Use the knob to open the top left drawer;
- Pick up the Handle and the Weight;
- Use the handle to fix the knife;
- Use the weight and the chisel to knock the pin out of the window;
- Get the corkscrew;
- Use the corkscrew on the bottle;
- Use the bolt on the knife.
- Tap the bottle on the left to get the first Collection Item;
- Use the blunt knife on the crack in the door top open it;
- Go through the door.
Corko and the River

You haven’t finished with that room just yet but first you need to find some more things and speak to the stranger by the river.
- Pick up the bottle on the right as your next Collection Item;
- Tap a small object just next to it- another Morphing Object;
- Tap the tree on the left to find wood shavings and a Hidden Map Piece;
- Use the hammer on the wooden crate;
- Collect bent nails, fire starter, and a manuscript;
- Speak to Corko;
- Collect the skull collectible by the bridge;
- Collect tea leaves from the bush;
- Pick up the hammer;
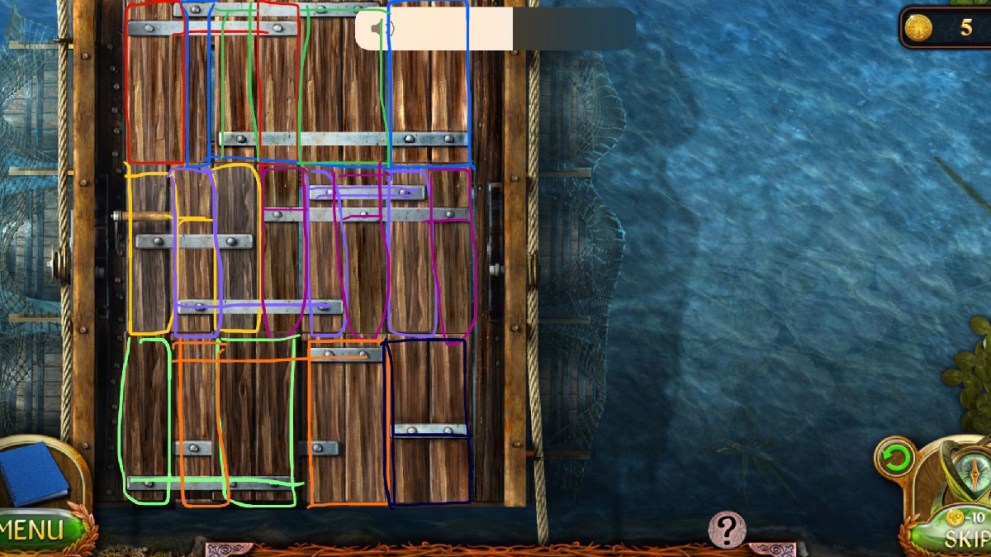
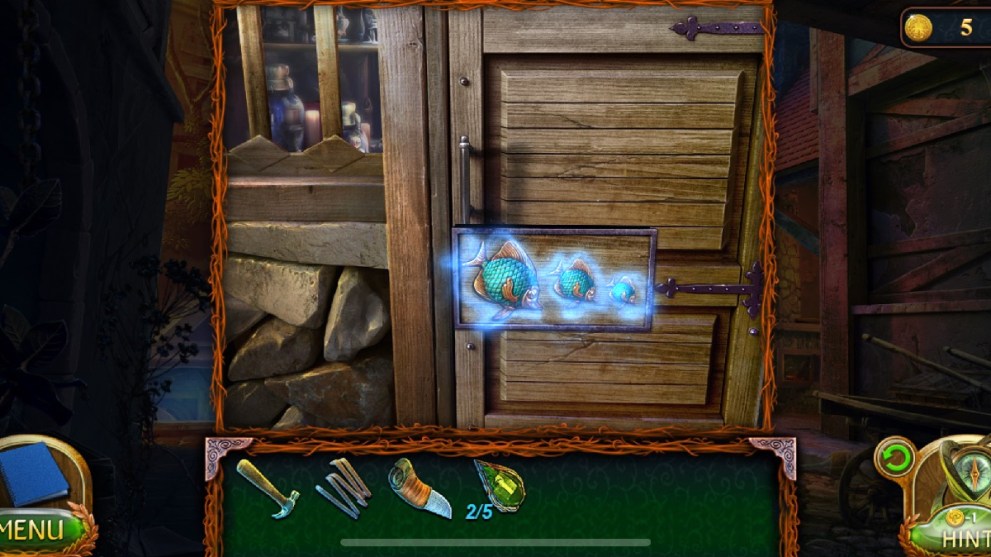
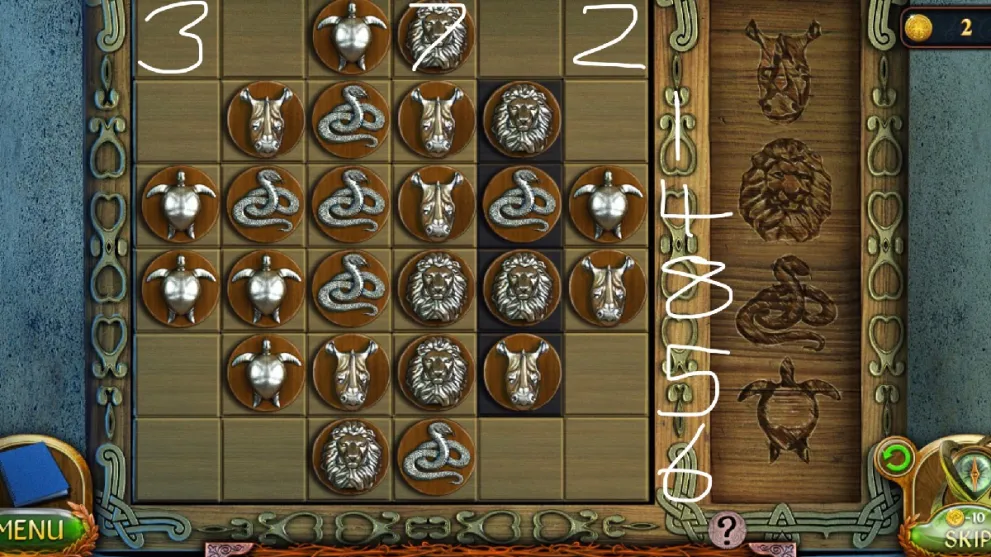
- Hammer the bent nails and give them to Corko;
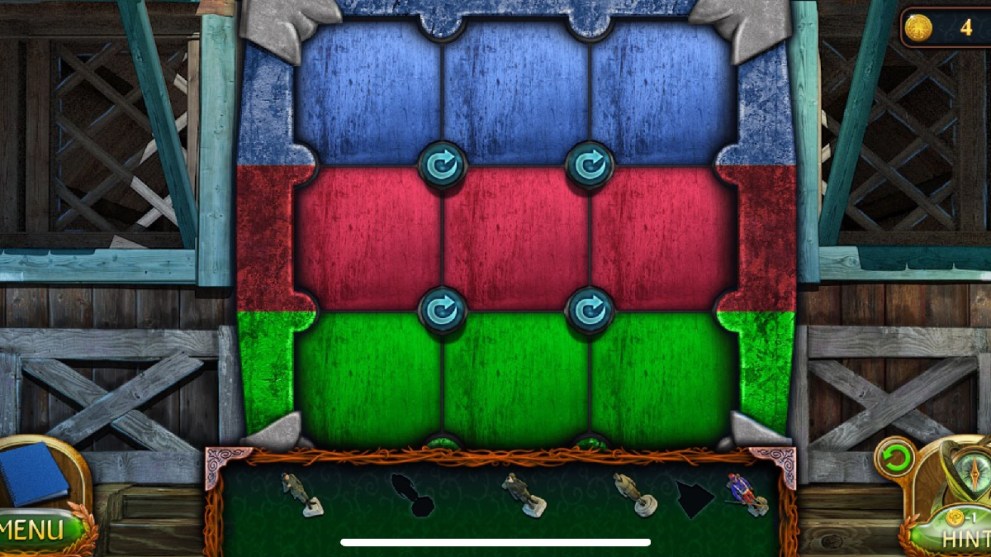
- Remake the ferry floor puzzle using the color code guide in the image below.
Across the Ferry
You end up in a new area with beautiful gardens and an ornate gate. Make sure to tap around the ground to find morphing objects hidden in the grass.
- Use the hammer on the signpost to reveal symbols;
- Find map pieces by the well;
- Tap the stone wall ahead to move forward;
- Tap the cellar to speak to the prisoner;
- Tap the tree above to find a wooden club and mysterious symbol;
- Tap the kitchen area on the right;
- Place tea leaves in the pan;
- Place wooden shavings in the grate of the fire;
- Go straight down to the beach;
- Find the morphing crab object on the sand;
- Pick up the bucket;
- Get the pry bar from the hull of the ship;
- Pick up kindling and map piece from below the hull;
- Tap the far end of the ship;
- Use the club to get the steering wheel;
- Return to the town;
- Use the pry bar to help the prisoner escape;
- Collect metal bars;
- Put kindling in the fire grate;
- Start a fire using the fire starter and knife;
- Put the dry tea in the cup;
- Go back to the garden;
- Put the steering wheel and bucket on the well to get water;
- Put the water in the kettle and place on the lid;
- Pour hot water into the teacup;
- Give the tea to the prisoner.
Into the Cellar

Now the prisoner is warm and free you can explore the cellar. Make sure you pick up the morphing object from the stairs as you go down.
- Pick up the crystal;
- Pick up the whetstone;
- Move the blanket and get the manuscript and shovel blade;
- Pick up the skull on the left;
- Use your knife on the whetstone to sharpen it;
- Try to combine the wooden club to the shovel to see it does not fit;
- Sharpen the wooden club using the knife so it will fit;
- Head to the beach;
- Use the shovel to dig in the sand and find a fish figurine;
- Pull the rope to get the gangplank up and board the ship.
You can now board the ship and look for more clues. Talk to the prisoner before you look around.
- Tap the spyglass to find another crystal;
- Look at the symbols beside the spyglass;
- Go back to town;
- Place the fish figure n the door by the kitchen area;
- Go inside and complete the hidden object puzzle;
- Pick up the candle;
- Use the candle to light the taper on the right;
- Tap the sack of nuts to get the figurine fragments and some nuts;
- Tap on the left to find a puzzle and a ruby;
- Tap the masks;
- Place the nuts in the slingshot;
- Place the ruby in the ornate head eye socket and receive the second fragment;
- Place the fragment in the puzzle;
- Slingshot a but at the crow and pick up what her drops;
- Tap the floorboards and use the chopsticks to find a clue;
- Rearrange the fragments according to the clue sheet;
- Get the mask and place it with the others;
- Rearrange the masks in the right order: Snake, Butterfly, Giraffe, Turtle, and grab the fragment.
The Ship and Cellar
Go on back to the shore and aboard the ship. You have the fragment to now place in the ship steering wheel.
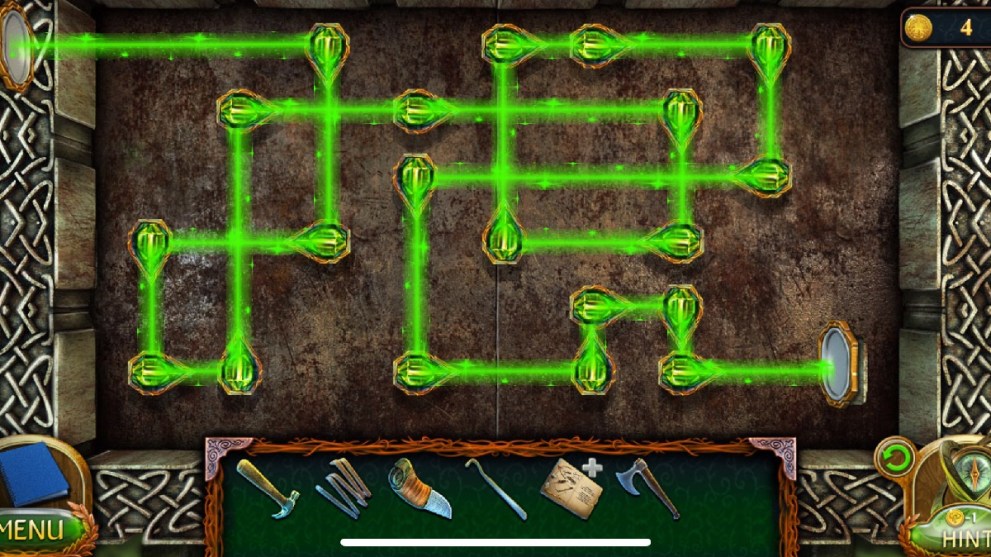
- Place the fragment and solve the puzzle;
- You need to click the crystals so the green light travels over the lines, but only once. If from the top clockwise we mark the crystals A to H so you can use the following solution to solve the puzzle: DFACFHBGDBEHCEGABCDEFGHA

- Take the hand and the key;
- Back to the cellar;
- Use the key on the window hatch;
- Go through and pick up the ladder;
- Place the ladder at the ceiling hatch;
- Take the lock pick and letter;
- Pick up the gear and the candle;
- Pull the sheet back from the bed and get the manuscript;
- Use the knife on the pillow to get the crystal;
- Find a morphing object and collection item on the bookcase;
- Pick up an axe from under the desk;
- Tap the clock and find a map piece inside;
- Go back to the kitchen and light the candle in the fire;
- Back in the cellar and to the loft hatch, use the candle to light the way and find a beaver tail;
- The ladder slats break and you have to find a way to fix them;
- Go to the ship and put the gear with the others so you can lower the net;
- Cut the net with your knife;
- Pick up the crystal.
- Go all the way back to the Beaverling’s Burrow where you first saw the mechanical beaver toy.
- Place the beaver tail on the mechanical beaver;
- Tap the tail to get the last crystal;
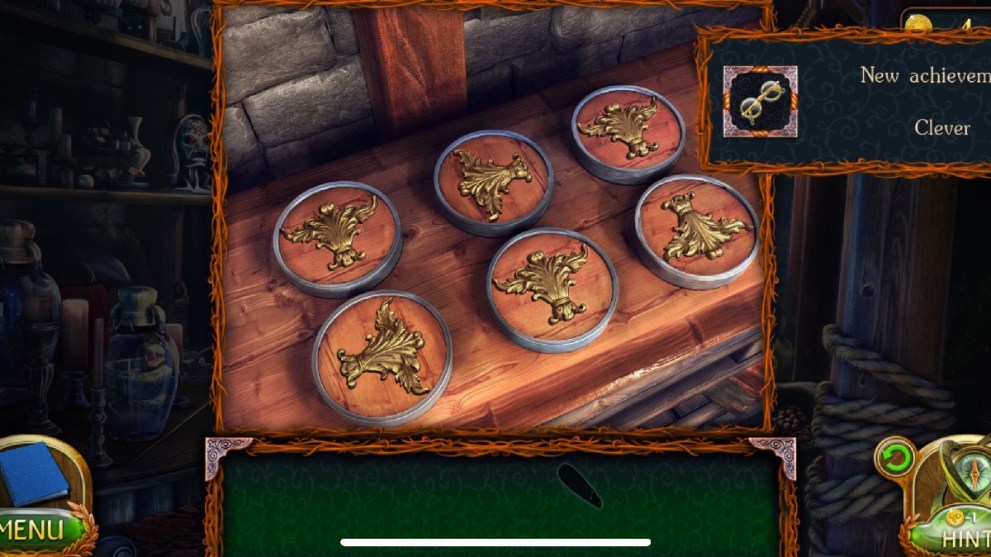
- Go back to the garden with the ornate gate;
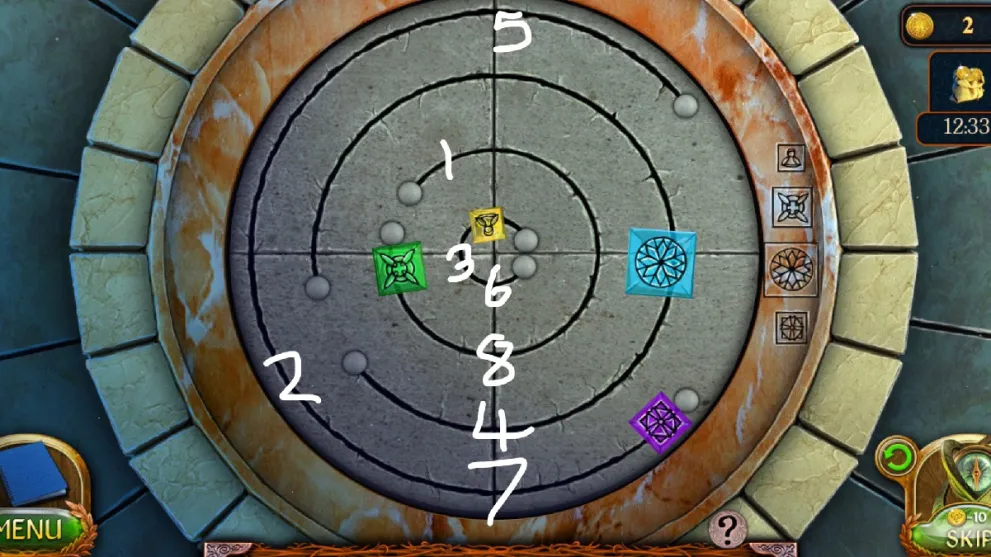
- Place the five crystals in the puzzle and solve the puzzle:
Through the Gate
In this new woodland area you can see a river and some trees… Use the axe on the tree on the right to find more clues.
- Find a morphing object mushroom at the base of the tree;
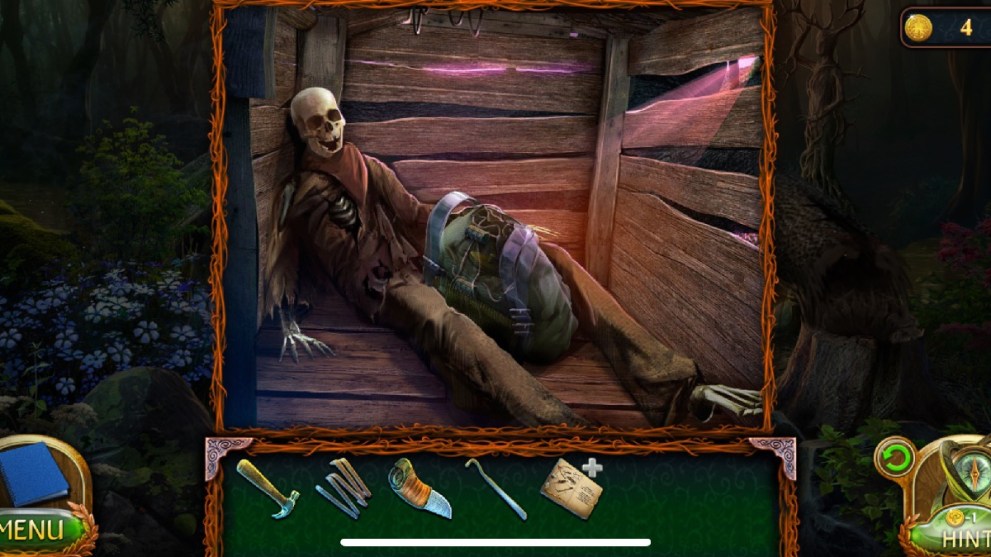
- Tap the tree house to find a skeleton and examine his bag;
- Change the symbols until the bag opens: square, triangle with three spikes, circle with two lines;
- Tap the twisted tree in the back to get another clock hand;
- Cross the tree to the other side;
- Use the knife to open the caravan;
- Complete the hidden object puzzle inside;
- Pick up the knife;
- Take the wooden soldier;
- Find a solider in the laundry basket under some sheets;
- Find the window and the fence and put them on the doll house to find more soldiers;
- Find a blue tile and place it in the mini puzzle;
- Solve the puzzle by tapping the arrows to move the pieces until the top row are blue, the second row are red and the bottom row are green.
- Place each soldier on the trunk in the spaces provided;
- Take the roof piece and place it on the church;
- Take the pendulum
- Go back through the cellar in the town to the Captain’s house;
- Place the pendulum and hand on the clock and tap to wind the clock;
- Take the note and the button;
- Go back to the castle through the woods.
The Earl’s Castle
Go to the castle door and find a puzzle waiting there for you. To get inside you must first solve this puzzle!
- Place the buttons in the spaces provided;
- Solve the puzzle by labelling the left button L and the right button R and solving by tapping in this order: L, R, R, R, L, L, R, R, R, L, R, R, L, L, R, R, L.
- Go inside;
- Speak to the earl;
- Pick up the rag;
- Find the stone tablet;
- Get the glass shard from under the rubble;
- Polish the glass shard with the rag;
- Use the glass as a mirror to see the lock and pick the lock with the lockpick;
- Leave the cell;
- Talk to the girl in the other cell;
- Find a manuscript on the floor and a collectible on the shelf;
- Pick up a log and a plank and use them to lever the cell door open;
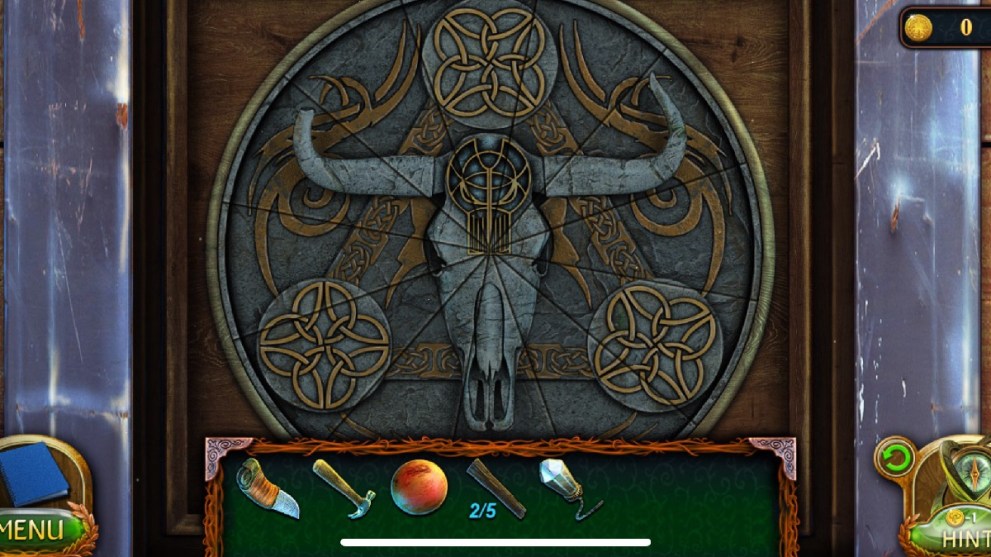
- Take the crystal shard and place the stone tablet in the hole;
- If the symbols are numbered 1 to 6 clockwise from the top then the solution is to tap 6 then 2 then 3.
- Go through the exit.
A Way to the Island
- Grab the spear on the left;
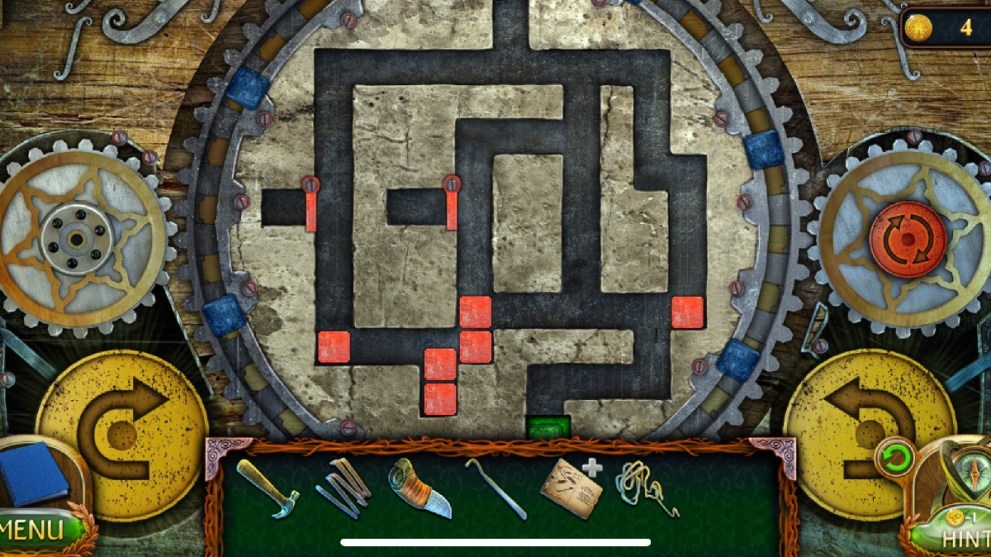
- Solve the puzzle to stop the blade from running:
- If we number the central pieces like the image below you can solve the puzzle using this solution: 5, 5, 5, 5, 1, 1, 6, 1, 6, 6, 6, 6, 6, 7, 6, 7, 6, 7, 6, 6, 7, 3, 3, 3, 3, 3, 6, 7, 7, 7, 7, 4, 4.

- Look at the runes in the stone angel’s book;
- Take the key;
- Pick up the hair from the goblin head;
- Head out to the next section;
- Pick up the knife from the top step;
- Get the collectible from the step below;
- Place the key in the archer and wind it up;
- Go back to the cells and use the primitive knife to slash open the target and pull out the arrow;
- Pull the arrow from the stone bird;
- Go back to the archer and place the arrow;
- Wind up the archer and see the island rise;
- Tap the tree and use the knife to retrieve a spike;
- Use the spear to get the kite;
- Use the knife to get the crystal stone free;
- Get the lever from the rope bridge on the left;
- Tap ahead to get to the next section;
- Find another crystal stone in the hole in the wall;
- Find a second lever at the fountain;
- Tap the bright area above on the right to open the next hidden object puzzle;
- Pick up the helmet;
- Find the broom on the open book;
- Find a blue stone and a circle with a picture in a trunk under some sheets;
- Find a green stone by the lion fountain;
- Pick up the cup and fill it with water;
- Put the helmet on the suit of armor and take the red stone;
- Place the circle with the picture on the larger circle at the back of the room;
- Use the broom to get rid of the webs;
- Place the stones in the empty slots;
- Take the tile and tiny pyramid;
- Pour the chalice of water on the open book;
- Place the code sheet in the middle of the floor mosaic;
- Place the tile on the floor mosaic and solve the puzzle;
- Press only the tiles shown on the sheet in red.

- Place the tiny pyramid on the the large pyramid;
- Take the energy sphere.
- Tap the stone steps and enter a new area;
- Find the 3rd lever in the stone face;
- Take the manuscript from below;
- Take a crystal stone from the statue at the back;
- Place the energy sphere in his hands;
- Take the hammer head;
- Take the two-pronged staff;
- Go to the right to a huge column;
- Use the staff to get the feather and final crystal stone from the nest;
- Find the final lever on the right;
- Go back to the area before last;
- Place the five stone crystals in the fallen chandelier;
- Place the levers in the wheel in the wall and take the manuscript hidden in the wall;
- Discover the broken floor and box where the chandelier had fallen;
- Take the symbol;
- Go back to the stone column;
- Place the symbol at its base and solve the puzzle;
- A, B, C, D, E, F, E, G, H, I, J, I, K
- Take the manuscript and the planet.

The Throne Room
Use your map via the compass symbol to go back to the Castle Hall and use the key the man gave you to unlock the tall door.
- Take the glass sphere;
- Head back to the coast and the ship;
- Place the glass sphere in one of the boxes in the sand and take the vial;
- Go back to the gardens and through the ornate door,
- Use the vial to pick up some of that seep pollen from the blue flowers;
- Use the knife to cut the flowers and pick up the fragment below;
- Go back to the Beaverling courtyard in the Outskirts;
- Cut the root from the flower;
- Use the sleepy flower on the dog and take the lard;
- Go into the Beaverling underground space;
- Speak to Corko and get the key;
- Place the fragment in the chest puzzle;
- Play the minigame so it makes a shape like the image below;

- Take the empty flask;
- Go out to the wolf and use the flask to collect blood;
- Use the key on the door nearby;
- Go inside and find a collectible in the roof;
- Tap the clasp and pull the lever;
- Rub lard on the rusted gear;
- Pick up the juicer;
- Tap the blades on the left;
- Take the tongs and tap the wrench to remove a blade;
- Go to the secret passage with the spinning blade;
- Use the tongs to loosen the blade;
- Back at the barn, place the new blade and use the wrench to fix it in;
- Tap the lever;
- Pull the 4-pronged handle and collect the wood.

- Go to the Necropolis via your map;
- Use the wood planks to fix the bridge;
- Take the saw and the arrow;
- Go to the Outskirts ferry;
- Cut the bamboo with the saw;
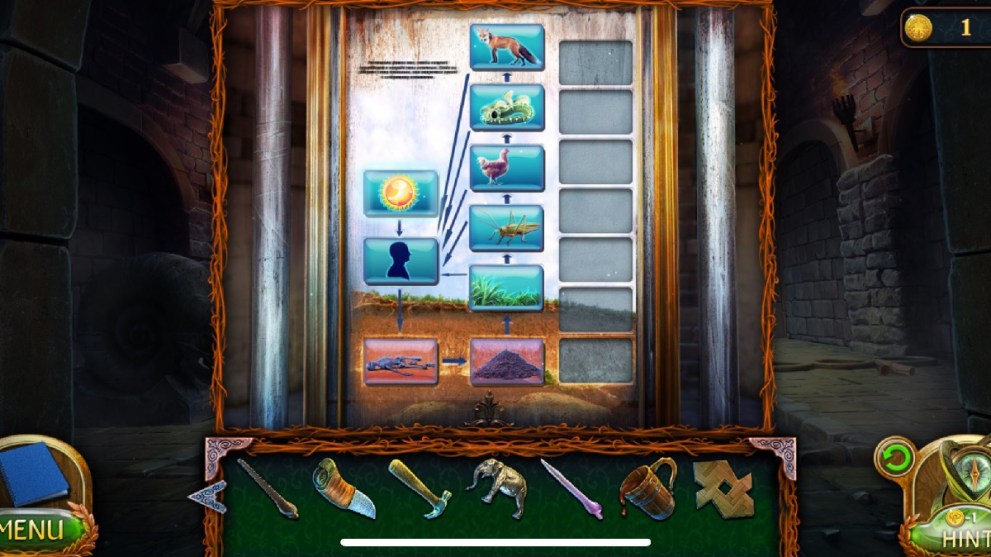
- Tap your recipe and place the goblin hair, thorn, feather, root, wolf blood, juicer and bamboo;
- Combine recipe in this order: Juicer + root, feather + thorn then add goblin hair to make a quill, dip quill in wolf blood and add it to the bamboo to create a sleeping dart.
- Go to the throne room in the castle and use the dart on the guard;
- Take his key;
- Use the key on the chest and get the manuscript, knife, rope, shackles, and hammer;
- Play the hidden object puzzle on the table;
- Pick up the mug and place it under the barrel;
- Move the apples to find the button;
- Pick up the wire;
- Take the fork and place the button;
- Move the chair and pull back the curtain;
- Find a button on top of the barrel;
- Use the wire to get the corkscrew;
- Use the corkscrew on the barrel cork;
- Collect the mug of beer;
- Place the buttons on the box;
- Use the beer to extinguish the sconce;
- Use the fork to move the brick;
- Get the note and the match;
- Use the match to light the candle;
- Heat the note on the candle;
- Solve the box puzzle;
- Place the symbol in the wall and get the flower figurine;
- Use the flower figurine to open the chest secret compartment and receive the elephant;
- Go to the pantheon in the Necropolis;
- Place the shackles on the stone column ahead and fasten with the hammer;
- Go up and take the tile and portal part;
- Go back to the castle hall;
- Place the tile in the floor circle;
- Solve the puzzle by moving each tile: green 1, purple 2, yellow 3, blue 4, purple 5, yellow 6, purple 7, green 8, as shown in the image below:
- Take the portal part and go to the portal at the Necropolis;
- Place the portal pieces and enter the portal.
At the Energy Reservoir
A new area is discovered! Here you can find a tree stump and a broken bridge, but what else?
- Use the hammer to get the hook from the tree;
- Put the rope on the hook;
- Use the rope ad hook to get the medallion;
- Tap the medallion to get a turtle figurine;
- Tap the bridge;
- Look at the symbols on the bridge;
- Find a collectible in the grass;
- Go back to the entrance to the Earl’s castle;
- Look at the puzzle on the horse;
- Select the symbols you saw on the bridge.
- Collect the apple then eat it to get the seeds and core;
- Go back to the first area of the castle on your map;
- Give the twisted tree the seeds;
- Take the snake figurine;
- Go to the Necropolis entrance;
- On the stone column place the snake and turtle;
- Play the minigame using this solution 1 right, 2 down, 3 up x 2, 4 left, 2 down, 5 left, 6 left, 7 down, 8 right as numbered in the image below:
- Take the stone plate and head to the coast with the ship at the Bay of Sorrows;
- Place the stone plate on a box in the sand;
- Take the jar with sand;
- Tap the jar twice to empty it;
- Collect the stone crown;
- Go to the cellar in the Bay of Sorrows town;
- Place the jar and the apple core with the rat to capture it;
- Take the sickle;
- Travel to Pangonia island;
- Start the puzzle on the left;
- Place the rat on the puzzle;
- Use the solution A, B, A, C, D, A, D, C, B.
- Take the stone book;
- Go to the castle hall;
- Place the stone crown, sickle, and book on the puzzle to the right;
- Take the skull;
- Head back 3 times to the crossroads with the ornate door;
- Place the skull on the post;
- Take the gaff and the manuscript from the top;
- Go to the energy tank at the Pangonian island;
- Use the gaff on the broken platform;
- Read the stone plaque;
- Find a manuscript by the boat;
- Go up to the building;
- Get the rake and collectible;
- Knock on the door;
- Take the iron cube;
- Go back to the boxes in the sand at the ship;
- Put the cube in the box and take the stone sword;
- Go back to the house on the Pangonian island;
- Sharpen the stone sword on the wheel;
- Head back to the road;
- Use the sword and then rake on the thorns;
- Take the hose and piece;
- Back up to the house and place the hose on the faucet;
- Play whack-a-mole;
- Go to the lighthouse at the Necropolis;
- Place the part in the hole on the floor.
Into the Lighthouse
Here you can enter the hole in the floor and play the hidden object puzzle before continuing on with the adventure.
- Lift the cloth and get the lens;
- Get the cog from the table;
- Get the crystal from the wall and place the cog inside;
- Pull the sheet from the wall and get the lever;
- Use the lever on the cogs;
- Take the key from the window;
- Use the key on the drawer;
- Get the paper and the wire cutters;
- Use the wire cutters on the cage;
- Take the pieces;
- Place the pieces on the puzzle board to the left;
- Make the puzzle as seen below:

- Take the storage cell;
- Place the storage cell and paper on the contraption on the table;
- Take the solution and go to the levers;
- Tap the levers until they look like the solution;
- Take the helmet.
- Go back to the cellar and put the nut on the rum barrel to get a mug of rum;
- Head back to the Pagonian island cliff and place the helmet on the grave;
- Go up to the house and speak to Sheeleesa;
- Take the crystal from the jar on the shelf;
- Tap around to find collectibles and manuscripts;
- Go back to the main sanctuary at Necropolis with the fountain;
- Place the crystal on the fountain;
- Go through the door on the right;
- Take the wooden cube;
- Solve the puzzle by connecting the objects with their opposites;

- Play the next minigame by placing the tiles in the right order as seen in the image below:
- Head to the coast again and place the cube in the last box;
- Take the figurine back to the town;
- Place it in the tree on the left to reveal another puzzle;
- Solve the puzzle as seen below and take the numbered tiles:

The Corridor of Trials
Head to the Corridor of Trials at Necropolis which you can find on your map!
- Place the numbered tablets on the door in the order 4, 2, 3;
- Go through the door;
- Take the key and manuscript from the plinth;
- Go back to the house at Pangonian island;
- Use the key on the drawer;
- Take the mountain gear and book page;
- Head directly back three times;
- Use the mountain gear and hammer to climb the cliff;
- Take the watering can;
- Use the hammer head (not hammer) on the skull;
- Retrieve the mammoth brain and the water symbol;
- Find a morphing object in the ground;
- Go back to the Pantheon at the Necropolis;
- Place the water symbol on the blue protective bubble;
- Place the sword, saw, and hammer head in the right places;
- Take the note and the tile;
- Head on to the tomb of the High Magician;
- Go to the first part of Pangonian Island;
- Get the small box, needles, and planet from under the rock on the right;
- At the tree stump, place the small box and open it;
- Use the needles on the tree to fill the box;
- Take the thermite casket;
- Go to the Pangonian Island cliff;
- Place the tile on the plinth puzzle (hint: the pieces go dark when they are in the right place);
- Get water with the watering can;
- Head to the Necropolis tomb and return the torn page to the book;
- Tap the green area and use the watering can;
- Select the clovers as shown below:

- Go to the Pantheon;
- Tap the stone face and arrange the items on top:
- Mammoth brain, run mug, termite box, clover.
- Combine them in this order: stone + mammoth brain, clover in the hole, tap mammoth brain dust, put thermite in the hole, put the stone in the hole, pour rum in the hole, tap the mixture with the stick.
- Find a morphing object by the ghost;
- Go back to the tomb and speak to the ghost of Fahira;
- Collect the rung and hand from the tomb;
- Go to the castle hall and use the hand on the door on the left;
- Go through the door;
- Pick up the second rung;
- Use the hammer on the chalk;
- Open the chest on the right and find a manuscript;
- Take the note, key and snake figurine;
- Use the key on the door at the back of the room;
- Go through the door.
Back to the Throne Room
Inside this room is another hidden object puzzle to complete before we can continue!
- Pick up the diagram on the desk;
- Find the scoop nearby;
- Pick up a key by some scales;
- Use the key on the small cupboard;
- Take the weight, cups, and liquid;
- Put the weight on the scales;
- Balance the scales using 4 x yellow beans, then 7 x green beans, and finally 16 brown beans.
- Close the box of beans and take it;
- Put flammable liquid in the glass lamp;
- Tap the wick on the right to get flame from the lamp;
- Place the cups on the desk;
- Put the container of stones on the contraption;
- Tap the lid to place it on the lamp;
- Tap the contraption to get pigment;
- Collect the colors;
- Place the pigment on the middle contraption and tap them so they fill the holes;
- Light the cauldron with the lit wick;
- Scoop the liquid glass;
- Place the scoop of glass in the hole in the pigment contraption and collect the glass;
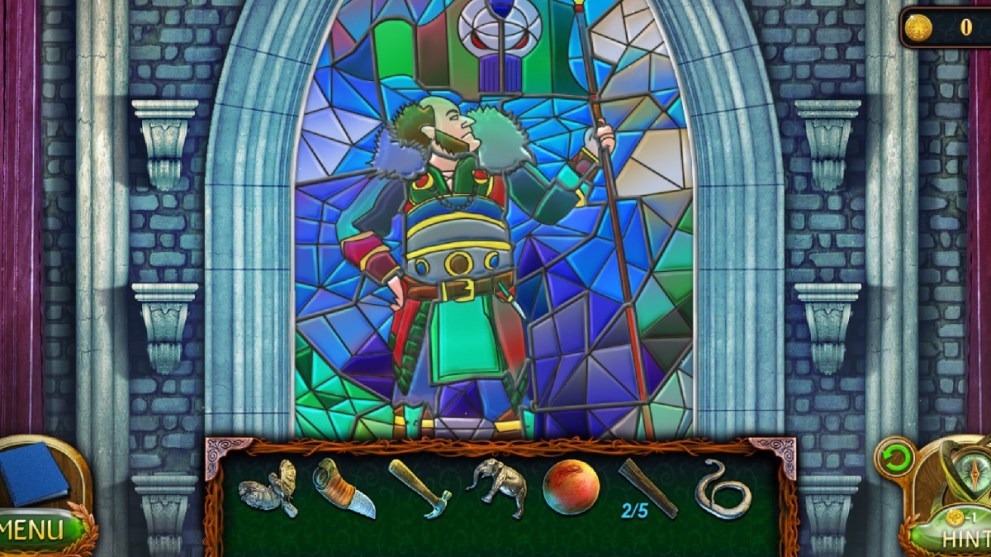
- Go to the throne room and arrange the stained glass in the window.
- Go through the Earl’s Castle secret passage (left area on the map);
- Tap the statue on the right and place the stone animals in the slots;
- Pick up the Oblivion stone and Prism of spells;
- Go back to the throne room with the stained glass window;
- Use the prism to look at the window glass and take note of the shapes highlighted;

- Go to the Archmage’s lab (top right of the castle map);
- Open the chest by tapping the pieces highlighted by the window puzzle (above);
- Assemble the pieces correctly (they go dark when in the right slot);
- Take the vial, note, and unusual key;
- Go to the sanctuary with the fountain;
- Use the vial on the water and receive water of death;
- Go to the energy tank;
- Place the unusual key on the column;
- Take the hand and the rung;
- Go ahead to the next section and use the water of death on the fountain;
- Go up to the house;
- Use the hand on the chest;
- Get the paper, rung, and skull pieces;
- Open the paper to get a wrench;
- Go to the lighthouse;
- Use the wrench to unscrew the lens and collect the glass.
Back to the Corridor of Trials
- Go to the Corridor of Trials in the Necropolis;
- Tap the skull and arrange the skull pieces;
- Get the map piece;
- Pick up the man figurine;

- Go back to the Archmage’s lab;
- Place the paper on the blackboard and trace the shape with the coal;
- Take the paper;
- Go to the secret passage near the Earl’s Castle;
- Tap the stone angel and use the tracing paper on the book;
- Go the Pangonian Island wall and place the man figurine in the space (top right);
- Take the oar;
- Go to the cliff;
- Put the oar in the boat;
- Get to the ship.
Obian’s Ship
- Board up the door;
- Take the key;
- Get the last run from the box;
- Unlock the box with the 4th key;
- Take the wire cutters;
- Open the floor door with the wire cutters;
- Take gloves and flint;
- Tap the cannon;
- Light the lamp with flint;
- Go back to the previous area;
- Use gloves to pick up weeds;
- Go back to the Captain’s house in the Bay of Sorrows;
- Fix the ladder with rungs and the hammer;
- Go to the Pangonian Island wall again and place the weeds on the fire;
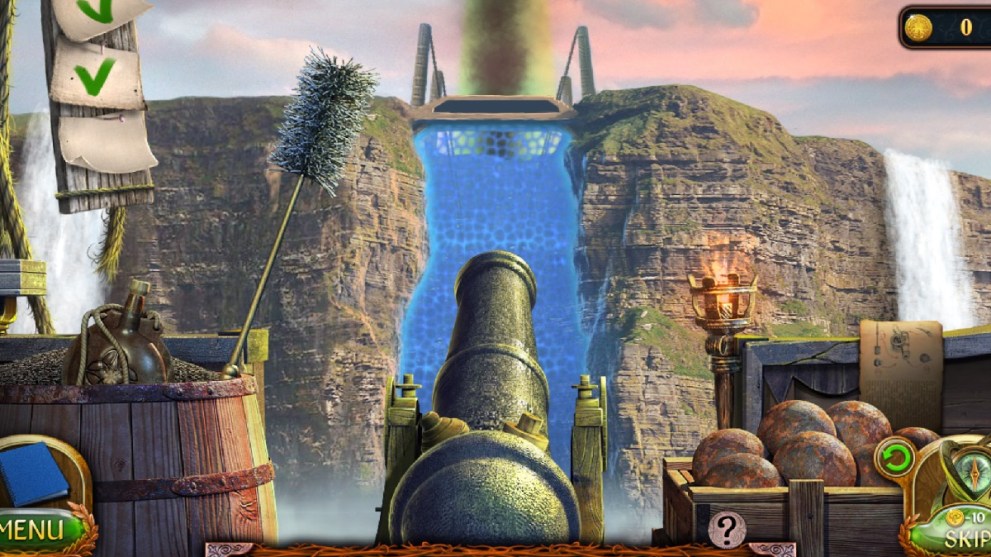
- Tap the cannon and put in the fuel, cannon ball, and brush;
- Fire at the green smoke in the distance three times;
- Head back to the Energy Tank at the Pangonian Island;
- Tap the cage and get the green tile;
- Place the green tile on the pillar puzzle;
- Solve the puzzle with the solution below using the numbered tiles in the image below;
- 3 left, 3 down, 1 left, 1 down, 1 right, 4 down, 4 left, 2 right, 2 up, 3 up.

- Tap the cage and use the Oblivion Stone and water vial;
- Draw the runes you found at the stone angel by tapping the lights;
- 1. Red; 2. Green; 3. Yellow.
Rescuing Nitielle
Speak to the Captain and the old man to find out that Obian has captured Nitielle and will kill her unless you rescue her first! Go to the Captain’s House at the Bay of sorrows first to find what you need.
- Tap the box on the right;
- Put in the key;
- Take the knob;
- Read the letter and take note of the clock etching;
- Tap the attic ladder;
- Place the knob on the attic door;
- Go up;
- Play the hidden object puzzle;
- Tap the bucket to get the puzzle pieces;
- Pull back the curtain to reveal the puzzle;
- Place the pieces to get the hook and the switch;
- Take the rope;
- Attach the hook to the staff with the rope to create a gaff;
- Use the gaff to pull the mannequin closer;
- Take the key;
- Unlock the cage door;
- Tap the window to get the other switch;
- Tap the grate in the wall and place the handle;
- Open to get the device part and handle;
- Place the device part and handle on the telescope;
- Look through the telescope to see the runes;
- Place both switches on the puzzle box;
- Turn the switches to match the runes;
- Take the box.
- Enter the time (2:10) on the clock;
- Take the key;
- Go to the ship on the Bay of Sorrows;
- Use the key to open the Captain’s Quarters;
- Tap the desk and move the glass;
- Take the key;
- Take the music schematics;
- Add the key to the small box in your inventory;
- Take the component and dog figurine;
- Open the chest and take the clothes and deer figurine;
- Tap the organ and play the notes on the schematic;
- Take the stone piece and the planet;
- Place the component on the globe and take the figurine;
- Head to the secret passage near the Earl’s Castle;
- Tap the stone figure on the left;
- Place the animal figurines and take the sword and half-moon.

- Go to the castle courtyard;
- Tap the water bath and place the lion stone piece inside;
- Go to the energy tank;
- Give the captain the sword and clothes;
- Go to the Pangonian house;
- Speak to Sheeleesa and get the brush;
- Go back to the grave with the helmet;
- Brush the gravestone;
- Go back to the house and speak to Sheeleesa again;
- Take the net;
- Go to the outskirts and the bridge;
- Tap the pond and throw the net;
- Get the fish and snowflake;
- Go to the coast and tap the rocks in the sea;
- Throw the fish for the gulls;
- Use the knife on the shell to remove it;
- Combine the knife and the shell to get the mollusk;
- Go to the Archmage’s lab;
- Place the snowflake and take the sting of frost.
- Go to the Lighthouse;
- Use the sting of frost on the shell;
- Place a shell in the ring;
- Go to the energy tank and give the mollusk to the old man to get the skull;
- Go to the corridor of trials and place the skull on the gate;
- Take the whale oil and turn on the lamp;
- Place the half moon;
- Take the pickaxe.

- Go to the wall at Pangonian Island an use the pickaxe to get clay;
- Press the broken glass pieces into the clay;
- Take it to the Earl’s Castle courtyard;
- Tap the water bath full of lava;
- Put the clay and glass in the lava;
- Tap using the sting of frost;
- Draw the runes like the image below:

- Use the hammer on the lens and pick it up;
- Go to the lighthouse;
- Place the new lens and tighten with the wrench attached;
- Go to the Pangonian House and tap the upstairs door;
- Use the whale oil and enter the code (below);
- Go through the door and play the hidden object puzzle;
- Pick up the spear;
- Tap the puzzle and grab the handle;
- Pull back the curtain and use the handle to open the cupboard;
- Take the sphere and puzzle piece;
- Go to the puzzle box;
- Place the piece and complete the puzzle;
- Take the key;
- Use the key on the locked box;
- Take the crowbar;
- Use the crowbar on the floorboard;
- Take the gear;
- Place the gear and sphere on the contraption at the wall;
- Use the spear to reach the gear at the top of the cupboard;
- Press the button on the wall contraption and get the magnet;
- Use the magnet to complete the puzzle (E1, F2, I5, G3, H4, G6, H7) and free the box;
- Use the unusual key and unlock the planet.

- Go to the portal and place the planets;
- Put the planets in order;
- Take the light;
- Go to the lighthouse;
- Place the light;
- Tap the lens;
- Line up the maze until the gems glow then move the lens with the arrows until the ship shows.
Congratulations, you have reached the end of the walkthrough of Lost Lands 4! For more walkthroughs check out our guides below.


Updated: Nov 24, 2023 04:00 am