
The core mechanic of Frostpunk 2 is its city building, and there are a plethora of Building Effects you can get based on where you construct certain Districts, Hubs, and more. As such, we thought it would be useful to compile them all in this handy guide.
How to Get All Building Bonuses and Debuffs in Frostpunk 2
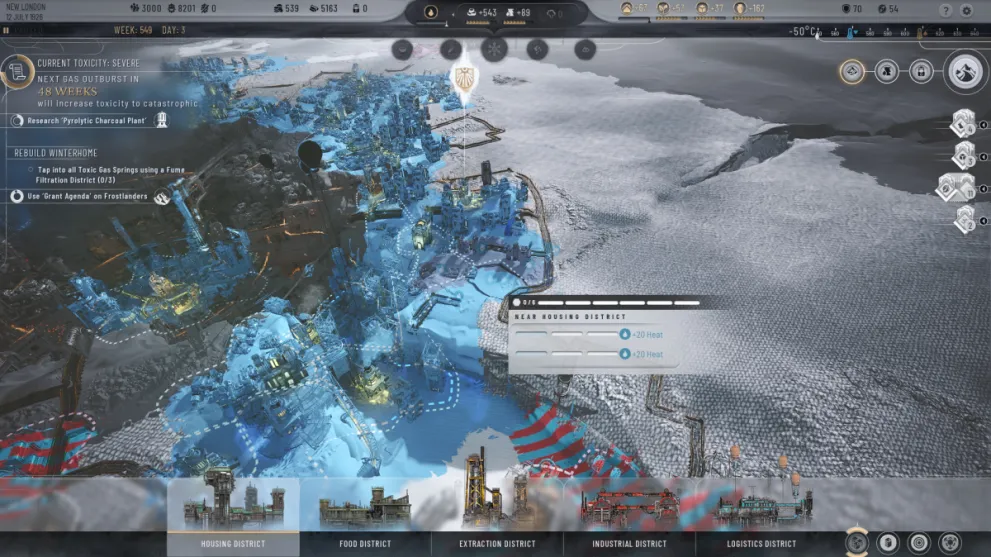
In general, Building Effects are Bonuses and Debuffs that occur when you create a district or building within range of another structure in Frostpunk 2. These can range from bonuses to Heat by virtue of people crowding together more to an increase in Disease due to the proximity of Extraction Districts puffing out pollution.
There are also specific effects that are only granted by Hubs. These special buildings can grant a variety of effects from Material output to Tension decreases, and the best ones need to be Researched via the Hub tree of ideas.
Regardless though, the effect is always triggered the same way. While building a new District or Hub, you need to make sure at least three tiles from the existing Districts are next to the new District or within range of the Hub’s effects, respectively. This triggers the buffs or debuffs, and leads to the special effects they cause to the wider populace.
Likewise, it’s always easy to see whether you get a Buff, Debuff, or a mix of the two from your Building effects. When you try to build a new District or Hub, the tiles next to another District will glow blue, red, or with a mix of blue and red stripes. The first denotes that you get all bonuses; the red shows that you only get debuffs; and the stripes show that you get a mix of buffs and debuffs from building something there.
Every Building Effect, Listed
We’ve listed all of the Building Effects we found down below so that you can keep track of what does what to which District.
| Building Effect | What it Does | How to Unlock |
|---|---|---|
| Heat Bonus (Flame Icon) | Up to 20 more Heat is produced by a newly built District per District it’s in range of thanks to their being built close to other structures, or due to there being a nearby Heating Hub. This reduces the effect of Cold on the population and reduces the amount of Fuel needed to keep everyone warm. | Build any District next to another District, or next to the Generator at the center of the city. Likewise, you can build a Heating Hub next to any District. |
| Shelter Bonus (House Icon) | More Shelter is provided to the population, reducing the need for Housing. | Build Housing Districts within Ice Crevices that protect them from the elements. |
| Disease Bonus (Needle Icon) | Increases Disease due to proximity of factories to food harvesting. | Build an Industrial District, Extraction District, or Logistics District next to a Housing District, or vice versa. |
| Squalor Bonus (Crumbling Square Icon) | Increases Squalor due to proximity of factories to housing. | Build an Industrial District, Extraction District, or Logistics District next to a Housing District, or vis versa. |
| Material Bonus (Square Icon) | Material demand in nearby Districts is decreased. Up to 40 Materials per District are added back into available pool. | Research and build a Maintenance Hub next to any Extraction, Industrial, or Food District. |
| Workforce Requirement Decrease | Reduces the Workforce needed to run a District. | Build a Stockpile Hub next to an appropriate District (Food Stockpile Hub next to a Food District, Materials Stockpile Hub next to an Extraction District, etc.). You can also build an Air Transport Hub next to any District with a Workforce requirement. |
| Efficiency Bonus (Gear Icon) | Districts create more Resource output due to more efficient methods of production. | Construct a Rail Hub next to any Extraction, Industrial, or Food District. |
| Crime Reduction (Handcuffs Icon) | Crime in neighboring Housing districts is decreased. | Build a Surveillance Hub next to a Housing District, or next to any district with Subsidized Housing. |
| Tension Reduction (Lightning Bolt Icon) | Tension is decreased in nearby Housing Districts. | Make a Fighting Hub next to a Housing District, or next to any district with Subsidized Housing. |
| Trust Bonus (Ribbon Icon) | Trust is increased in nearby Housing Districts. | Create a Communication Hub next to a Housing District, or next to any district with Subsidized Housing. |
| Disease Decrease | Decreases the Disease in any nearby Housing District. | Build an Emergency Medical Hub next to any Housing District, or next to any district with Subsidized Housing. |
| Heat Decrease | Lowers Heat output and increases Heat demand due to the building’s exposure to the wind. | Construct any District near the raised edges of the buildable area. |
Do You Need Building Effects? Explained
With all of this in mind, you might now want to know: Do you need Building Effects to win a Frostpunk 2 run, or can you get by without them?
Well, the answer is complicated. On one hand, it is always beneficial to have Building Effects when they’re positive. The bonuses they give you make the game much easier, and can help minimize how many resources you have to juggle. They make playthroughs on higher difficulties easier too, as the game isn’t shy about throwing problems your way.
On the other hand, you can get through the game even when you don’t build every possible District next to another structure. In fact, it can be useful to spread out your districts to avoid any possible negative effects, bonuses be damned.
Play it by ear, and if you need to adjust your strategy, don’t be afraid to do so. The Building Effects are helpful bonuses, but you don’t need to bend over backwards to make them work for you every time.
And with that, you know everything we have to share about Building Effects and how to use them in Frostpunk 2. There are plenty of other helpful guides we have to share though, and some of the best ones to go to next are on how to get Goods fast and whether you should Embrace or Defeat the Frost.


Updated: Sep 19, 2024 10:20 am