Part 1: Riverport University Experiment
There are 16 collectibles in Act 1, Part 1 of Quantum Break: 10 Documents, three Computers, and three Media.
- Riverport University Map – As soon as you get out of the cab, head to the map of the university ahead and then to your right. There’s a student sitting next to it.
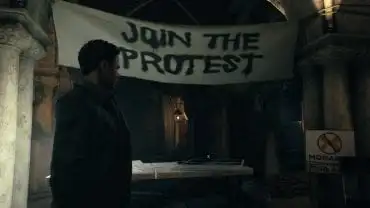
- Protest Flier – Continue past the map into the tunnel-like structure ahead. The flier will be on a table to your left.
- Stop Monarch Problems Poster – Once out of the tunnel, go to the lit up board directly across and slightly to your left.
- Sofia Amaral Seminar Poster – After getting the previous collectible, turn around and look to your right. You’ll see another lit up board with this poster on it.
- Bobby Radford Riverport Radio Show – Head back to Stop Monarch collectible and continue on towards the statue. There’s a chair with a radio on it.
- Amy’s Monarch Timeline – Head to the left of the statue and talk to the woman waiting, she’s Amy. Afterwards she’ll tell you to check out her timeline standing to the right of her.
- Return – In the tent right next to her is a video that you can watch. It’s a fun little easter egg, so enjoy.
- Paul Serene Focus Article – Continue towards your objective. Before going in, look to your left. The first poster by the door is Paul Serene’s article.
- Dr. Kim Memorial Article – The poster to the left of Paul Serene’s is Dr. Kim’s. Now you can head inside.
- RE: William Joyce Clearance – Once you walk in, there’s a desk directly ahead of you with a computer. Interact to read an email regarding William.
- Monarch Solutions Job Fair Poster – Follow Paul, but instead of entering the elevator right away, head to the left of it where you’ll find a poster. After collecting it, get on the elevator.
- Project Promenade Presentation – When you reach the next floor, there is a presentation set up. Interact to have Paul practice in front of you (this also unlocks the Marketing Spiel achievement).
- Photo of Jack and Paul – Proceed to the time machine room. The first office you enter will have the photo of you an Paul immediately to your right. It’s on a shelf.
- RE: Project Promenade Beta Test – After collecting the picture, use the computer on the desk.
- RE: Coming Home? – Continue to follow Paul, he’ll lead you pass the entrance to the time machine. On a table to the left of the entrance is the tablet you’ll need.
- Corridor Schematics – Right across from the tablet you just picked up is a board with the schematics.
Part 2: Campus Escape
The second part of Act 1 of Quantum Break is when things start to get real. You’ll finally begin to develop time abilities and you’ll confront your first Quantum Ripple. Part 2 happens to also be really light on collectibles so completing this one will be a breeze.
There are four collectibles: one Quantum Ripple and three Computers.
- Paul Serene Lab Clearance – After hiding with William behind the grates in the computer lab, check the computers on the round desks before continuing on.
- Equation Ripple – Continue on until you get into that huge firefight in the lab. After all of the enemies are dead, look for a board with an equation on it. Interact and William will fix it, granting you your first Quantum Ripple.
- FWD: Library Protest – Continue on until you have a firefight in a room with a lot of couches. There is an elevator in the middle that William will lead you to. Behind the elevator is a brown area with some more couches. Go there before joining Will and pick up the tablet on the couch to the right.
- University Operation – After exiting the elevator, walk directly to the huge, weird desk ahead and grab the final collectible.
Part 3: Library Chase
Library Chase is heavily focused on combat. William has been taken from you and you need to fight to get him back. Other than a simple traversal puzzle, there really isn’t much to see here. In fact, there is only one collectible in this part of Quantum Break. It’s a radio show that you may want to give a listen to.
- Bobby Radford Riverport Radio Show – Right before you do all of the climbing to get into the library, you’ll find a radio on a can. Interact to get the only collectible in this part.
Junction 1 – Hardline/PR
This is the very first point in Quantum Break where you’ll need to make a big decision. There are three collectibles in this part.
The collectibles found in Junction 1 are one Ripple and two documents.
- Statue Ripple – As soon as you take control of Paul, start walking forward. To your right, on a crate near the open truck (before passing your first soldiers), is a golden ram statue.
- William Joyce Dossier – On the other side of that same truck is a document sitting on some boxes.
- Jack Joyce Dossier – After grabbing the first document, you’ll find a map immediately after that you can examine if you want. Directly after that map is your final collectible.
Those are all of your Quantum Break collectibles for Act 1. For more on the game, including the review, guides, tips, tricks, and information, be sure to check out our wiki!


Published: Apr 6, 2016 03:12 pm