I have a confession — I’ve never been great at building homes in The Sims 4. I almost always play the pre-built starter houses. On the rare occasion that I construct one from scratch, it’s typically a disorganized, utilitarian rectangle with zero charm or personality.
So I finally decided to check out some of LilSimsie’s most popular building tutorials on YouTube to see if I could up my Build Mode game — and it worked! Here’s how to build better custom starter homes for your Sims, no expansions or CC required!
Step 1: Start With an Interesting Shell
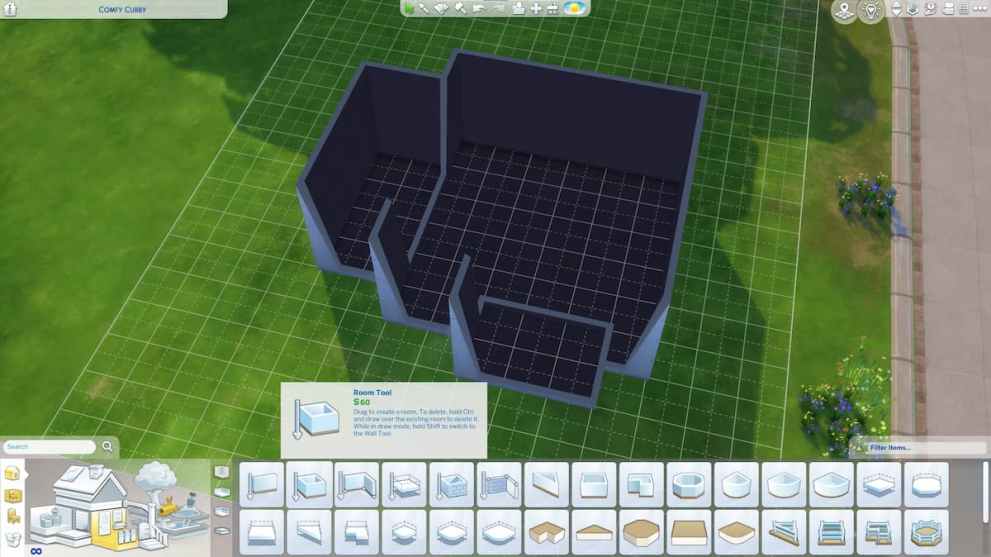
Start by building your shell, essentially your house’s outline. Unless you’re an architect, realtor, or interior designer, your first thought is probably to build a simple rectangular house. But most houses aren’t quite so… square. Make all your builds more interesting and realistic by adding a couple more rectangles to your rectangle.
Yes, it’s that simple. Use the Room Tool to make one medium-sized square room (roughly 6 x 6 tiles) near the center of your lot. Then draw two smaller rectangles on the outside of the main rectangle. Click inside the rooms to select and move them around until you like how your shell looks. And don’t worry too much about the interior walls – you can always move or remove them later.
PRO TIP: In Build Mode, you can press “U” on your keyboard to select the “move house” tool, then click on your shell to rotate or reposition it on the lot. Aim for the center of the lot, leaving a little more room in the back than the front for a backyard. Leave at least three tiles between the sides of the house and the edge of the lot in case you decide to add a fence later.
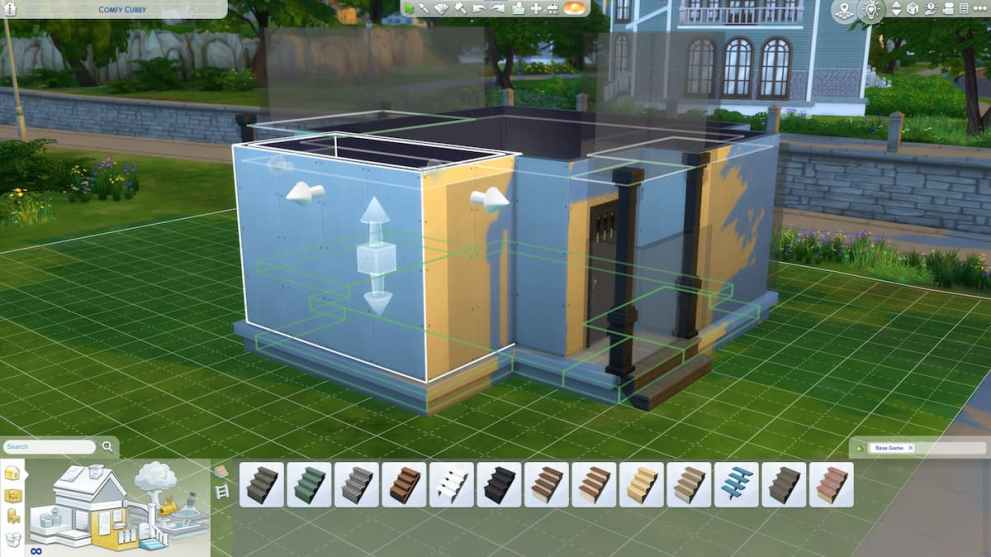
Step 2: Add a Cozy Covered Porch

Another easy way to add instant curb appeal to your starter home builds is to add a covered front and back porch. A porch is a room without a wall, which you can build using the Flat Square tool in Build Mode. Place one Flat Square in the front of your house, then use the arrows to adjust the size of the porch. Go up one floor and place another Flat Square directly over the first one.
PRO TIP: You can click on the first Flat Square to select it, then click “Copy” to duplicate it. That way, you don’t have to adjust it — you can just stack it on top of the first one!
Now is the time to add a front door and a couple of pillars to support your covered porch (no, you don’t need the pillars to keep your porch standing, but they do make it look more realistic). Repeat on the back of the house to create a covered back porch.
Step 3: Add a Foundation
I’ve been playing TS4 since it was first released, and it’s taken me all eight years to figure out how to add foundations to my builds. But this simple trick can add a delightful level of detail to your custom starter homes. (Plus, if you have the Seasons EP, you can decorate your home’s foundation to give it a festive feel.)
To raise your starter home’s foundation, click on any room to select it. Inside the room, you’ll see a cube with two arrows pointing up and down. Click and hold that cube and drag it up until your foundation is the height you like. I like relatively low foundations, especially on more modern builds, but the sky’s the limit (literally). Finally, add some stairs to the front and back porches so your Sims can get inside.
PRO TIP: You can save a bunch of Simoleans by using the Sledgehammer Tool (“K”) to delete the walls under the stairs. Depending on the height of your stairs, this can put §150 or more back into your household funds.
Step 4: Add Roof Details
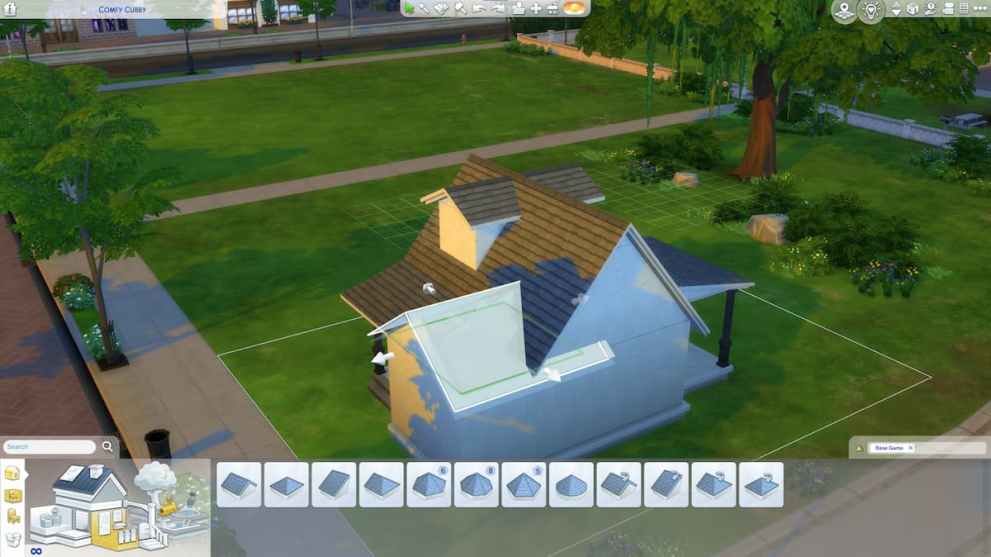
Roofing is a fun place to get creative and think outside the box with your Sims 4 starter homes. Using multiple roof pieces together in different configurations can make your basic starter home look like a much more expensive build. There’s lots of room for experimentation here, but a few tips will help you along the way.
First, start with a Gabled Roof over the largest rectangle of your shell. Rotate it so that the shingles face the front and back of the house. Next, add a Half Gabled Roof to the front and back porches. Use the top adjustment arrow to lower the pitch of the porch roofs, so they blend seamlessly with the main roof. Finally, add a Gabled or Hipped Roof section to each side rectangle, adjusting the ends to hide them inside the main roof, as shown above.
PRO TIP: You can add dormers to your roof by drawing a 2 x 1 room on the second story and dragging the ends so that it pokes through each side of the main roof. Add a Gabled Roof and lower its pitch until its peak is slightly lower than the main roof.
At this point, things might start to look a little wonky. A well-designed roof can add tons of visual interest to your starter home builds, but getting it right can take quite a bit of fiddling. For example, I made the front porch and front section of the house one tile wider, adjusting the roof and placement of the front door to fit.
Adjust the house’s shell and roof pieces until things look how you want. Add Roof Trim to each roof segment to give it a finished look.
Step 5: Finishing Touches
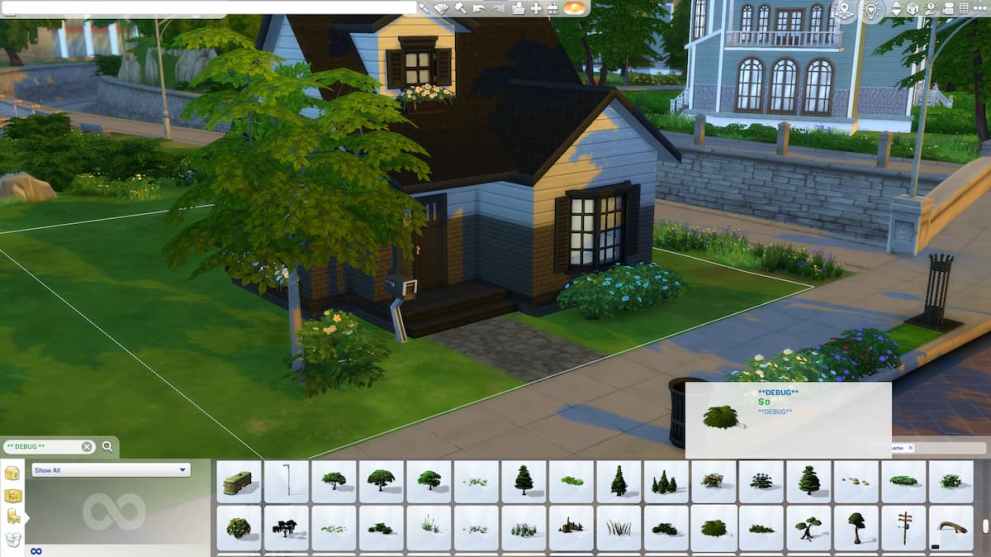
Now all that’s left is to make the outside of your Sim’s starter home look move-in ready with some curb appeal. Start by adding some windows, but be careful not to go overboard. Add one to each of your dormers (if you built any) and one or two windows to any large wall expanses. I like to put a big bay window on the front of the house for some added visual interest. Add flower boxes for an extra boost of color.
PRO TIP: Remove the floor from the room you used to build your dormers to let more natural light into your Sims’ new home.
Add a custom chimney by adding a 2 x 1 room to the side of your house. Go up to the second floor and add another 2 x 1 room on top of the first one. Finally, on the third floor, add a third 2 x 1 room, this time using the Slightly Higher Than Standard Half Wall (1.5), and add whatever trim you like. Delete the floor inside each of the 2 x 1 rooms, then add brick room paint to the outside and inside of the chimney.
Add some siding to the rest of the house, making sure to get it under the roof overhangs, too. Put a bit of flooring on the front and back porches, use terrain paint (which is free) to draw a pathway from the front porch to the sidewalk, and place a mailbox (also free).
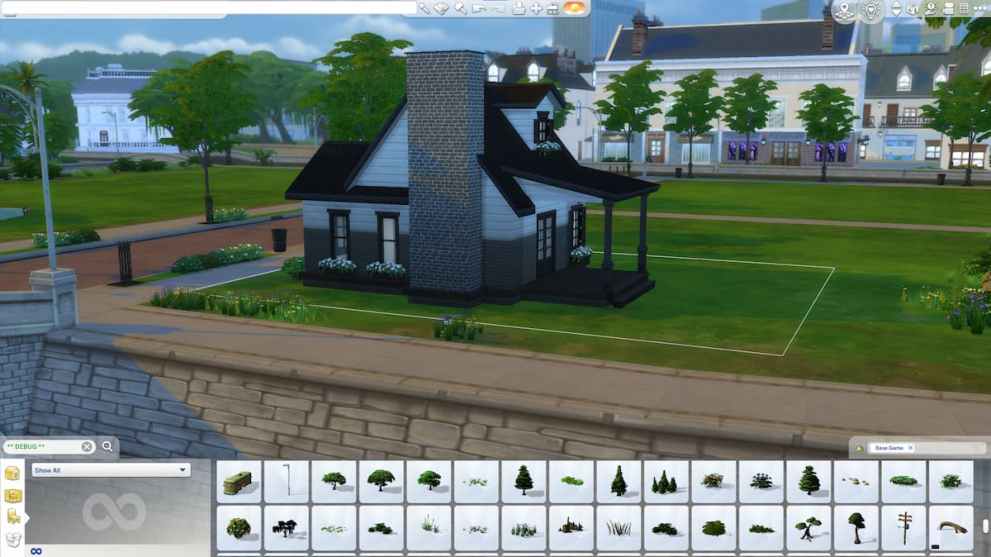
PRO TIP: Landscaping is expensive, but there are lots of free hidden landscaping objects in the Debug menu. To find them, open your cheats menu and type:
bb.showliveeditobjects
Then, in the Build Mode search bar, search for:
**DEBUG**
Scroll until you see the first group of landscaping objects, then keep scrolling until you get to the second group. You’ll notice that most of the landscaping objects in this section have the name **DEBUG**, and all of them are free. These are the objects that the developers used to decorate the non-playable parts of the game world, and now you can use them to add lots of free landscaping to your starter homes.
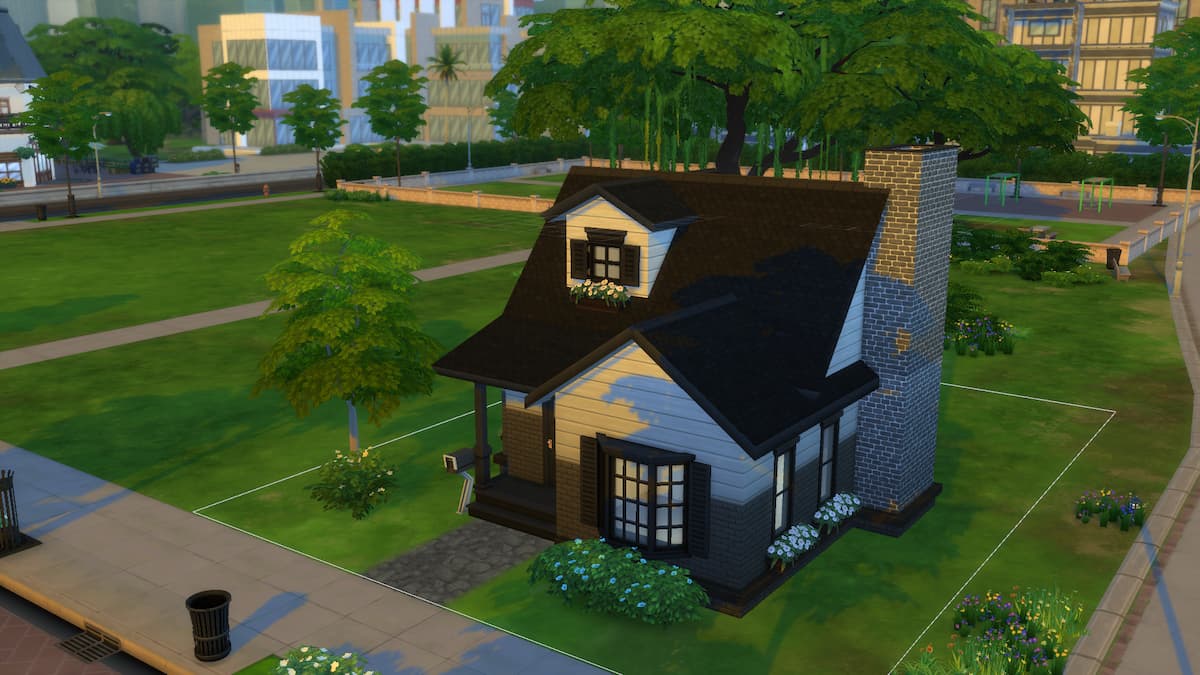
And there you have it — a fully custom starter home for your next Sim family. Now that you’ve got an idea of how to build a better house in Sims 4, try it out yourself, and let us know what you think in the comments!


Updated: Jan 26, 2023 05:32 pm