
There is no doubt that superheroes are nothing without villains to oppose them, and in Marvel’s Spider-Man 2, both Peter Parker and Mile Morales will come face to face with the daunting Kraven; a force of nature that is hell-bent on hunting down all worthy prey. That can only mean trouble for New York, but thankfully the heroes will be trying their best to win the war to save the city. On that front, this guide to all Hunter Blinds and Bases Locations in Spider-Man 2 will help players get a leg up on their opponents.
What are Hunter Blinds and Bases in Marvel’s Spider-Man 2?
With Kraven beginning his great hunt, this means that the Hunter faction is making their presence felt throughout the Big Apple. Aside from the usual crimes on the streets, these criminals are also busy monitoring New York and plotting their next big move.
As such, it is vital that players put a stop to their plans as soon as possible. This will require the discovery of their first base of operations before more hidden Blinds are revealed, which will eventually lead to the discovery of large bases that need to be dismantled. Luckily, the first Hunter Blind is found in Chinatown as part of the story.
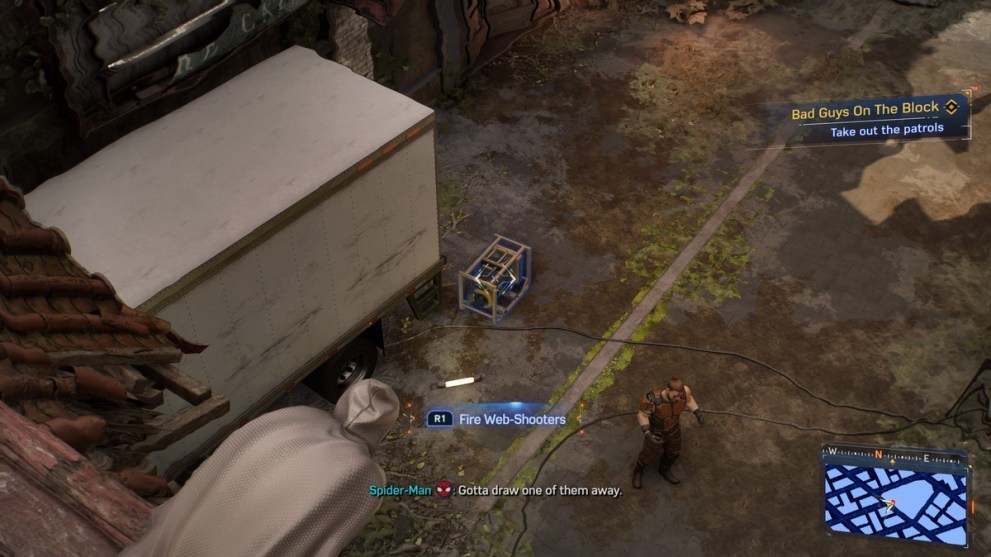
The sequence will teach players how to utilize distractions in the world to lure enemies away, as well as touch on several types of stealth takedowns that will come in handy when dealing with Hunter Blinds and Bases. On top of all this, the powerful Web Line tool is introduced to Marvel’s Spider-Man 2 and becomes an integral part of the title’s stealth gameplay.

It allows players to create a line whenever possible that can be used to navigate large spaces and used for stealth takedowns, which will come in handy for the next two areas during the sequence. Remember to use R3 to highlight enemies and take them out when they are deemed to be safe so as not to alert the others.
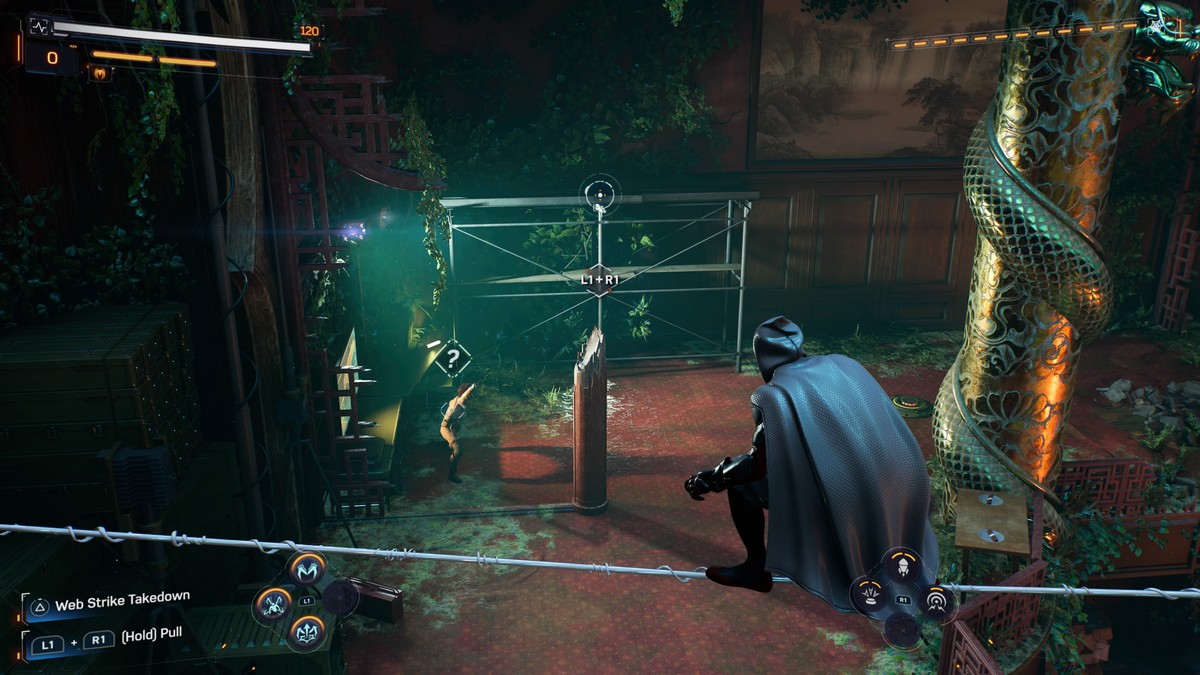
Also, watch out for the flying drones, which should always be the first priority target. Getting rid of them means players are safe from detection at higher elevations, and make it easier to get to the rest of the targets in an area. A quick Web Strike using Triangle will make short work of these pesky things. After taking down all enemies and winning the fight against robotic dogs, download the data and prepare to take down even more Blinds and Bases.
By now, players will be familiar with how such Blinds and Bases work. There are enemies milling about, and you can either choose to go the stealth route or let your fists do the talking. Be sure to always get a high vantage point when arriving, scan the area, and start taking down those foes that are on their own. Get rid of any flying drones, and make full use of the Web Line.
And don’t worry if not all of the Hunter Blinds and Bases appear at first. More will reveal themselves as the story progresses further.
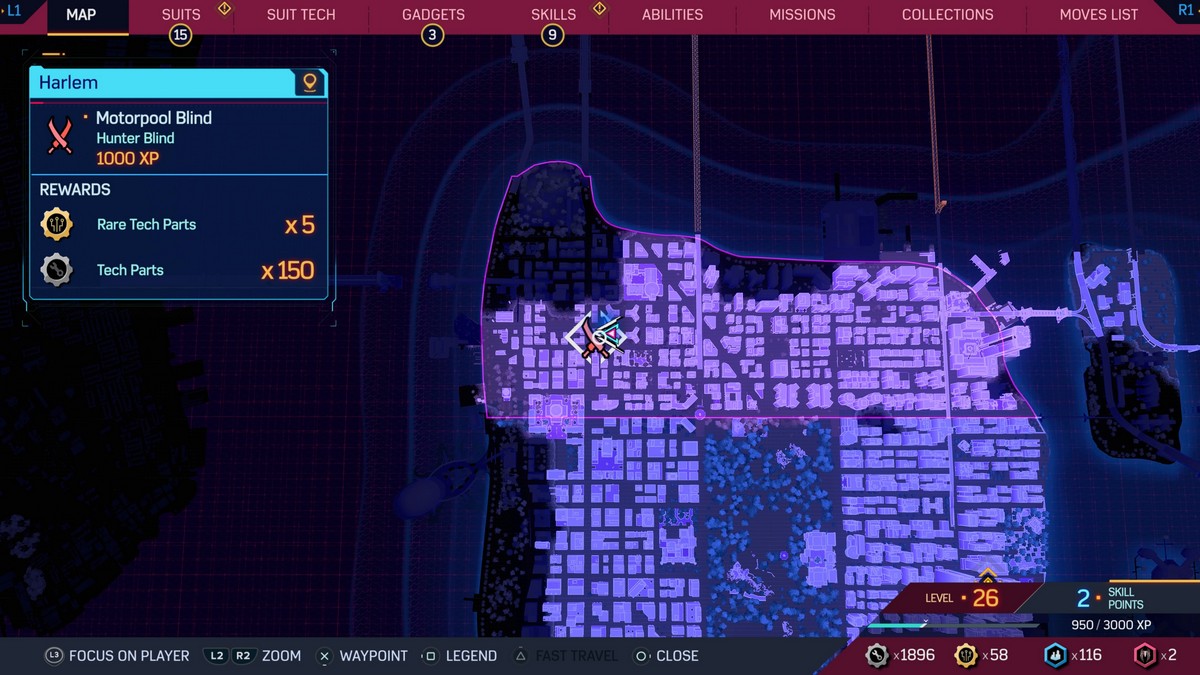
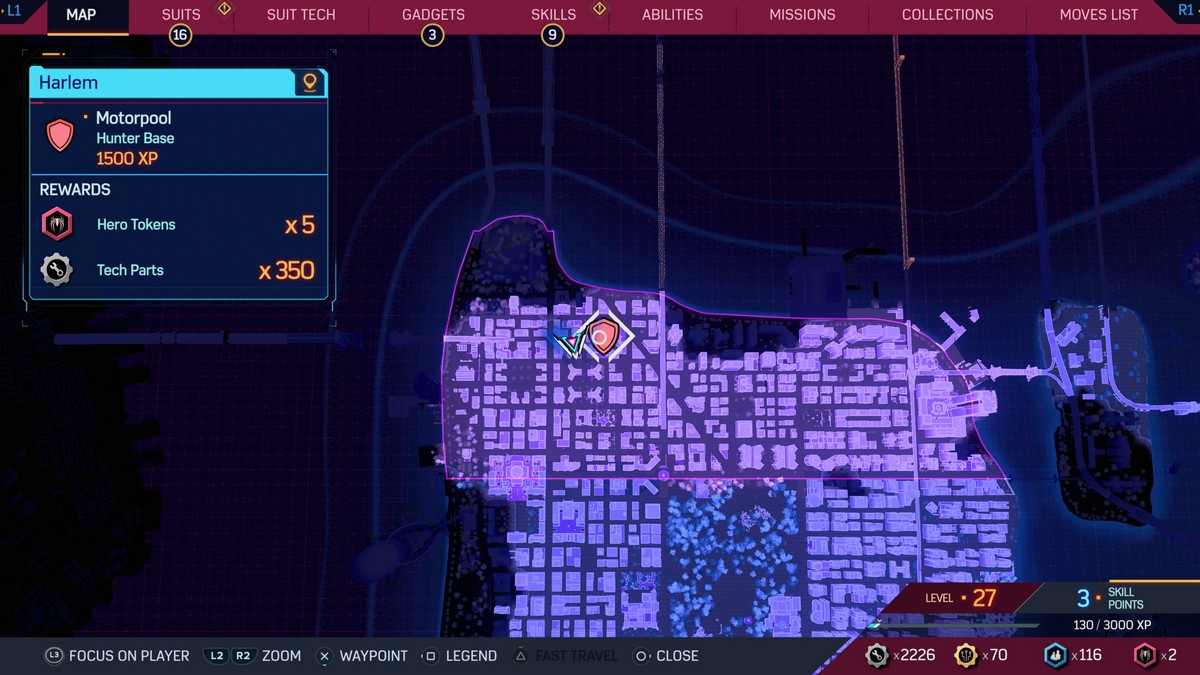
Harlem – Motorpool Hunter Blind #1
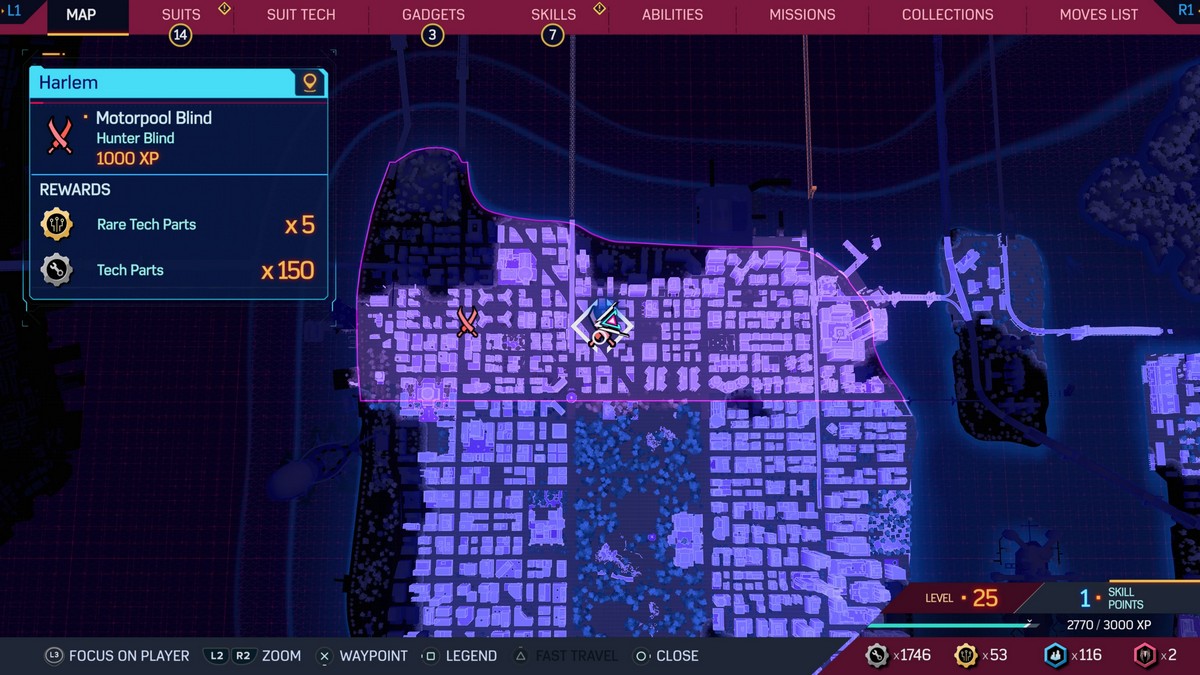
In this Blind, there are several enemies on top of rooftops overlooking the others, so make them your priority before descending onto the lower level. Use the signal poles to your advantage, making Web Lines across them to reach otherwise inaccessible enemies. Once everyone is down, approach the drone for some valuable data.
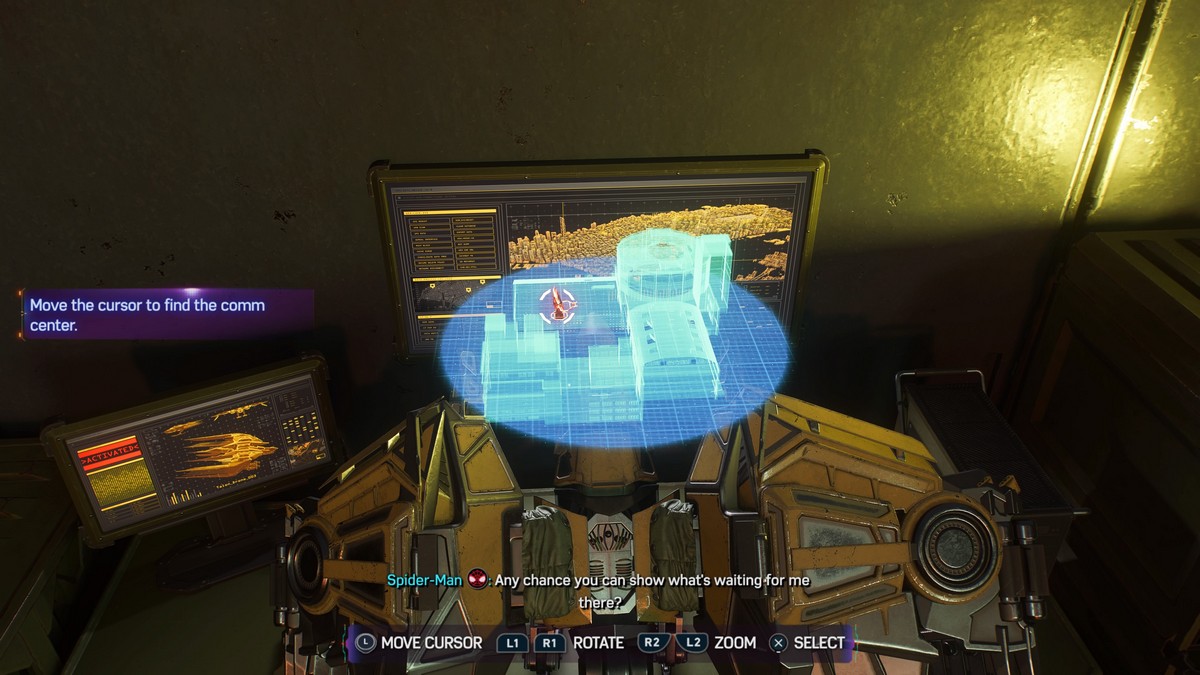
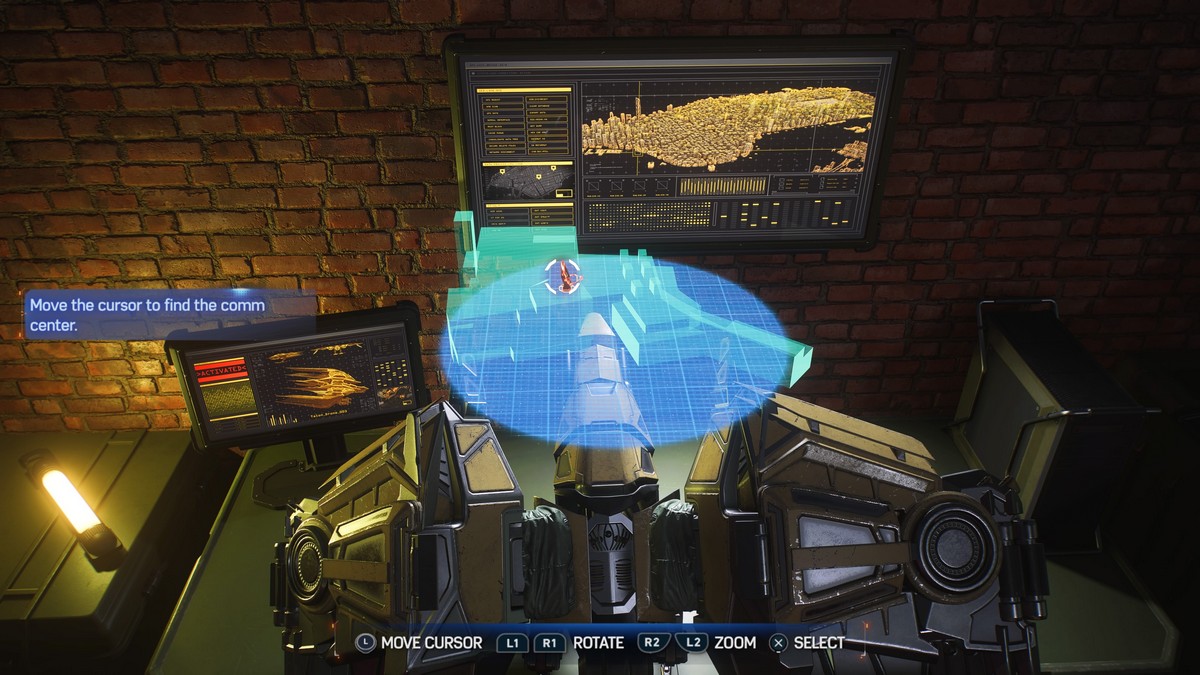
Use the cursor to move around the virtual blueprint. The objective is to find weak points in the Hunter base and then press the X button when they’re highlighted red. In this case, it is the communications center, so highlight the above area and confirm its location.
Harlem – Motorpool Hunter Blind #2
This Hunter Blind is a nice open area that is ripe for stealth, and you can also choose to go in loud to hone your combat skills. The use of gadgets will come in handy too; especially the Web Grabber, as it can draw in the clusters of enemies and pummel them with nearby debris. In any case, rid the area of the enemies and proceed to the drone to download the data.
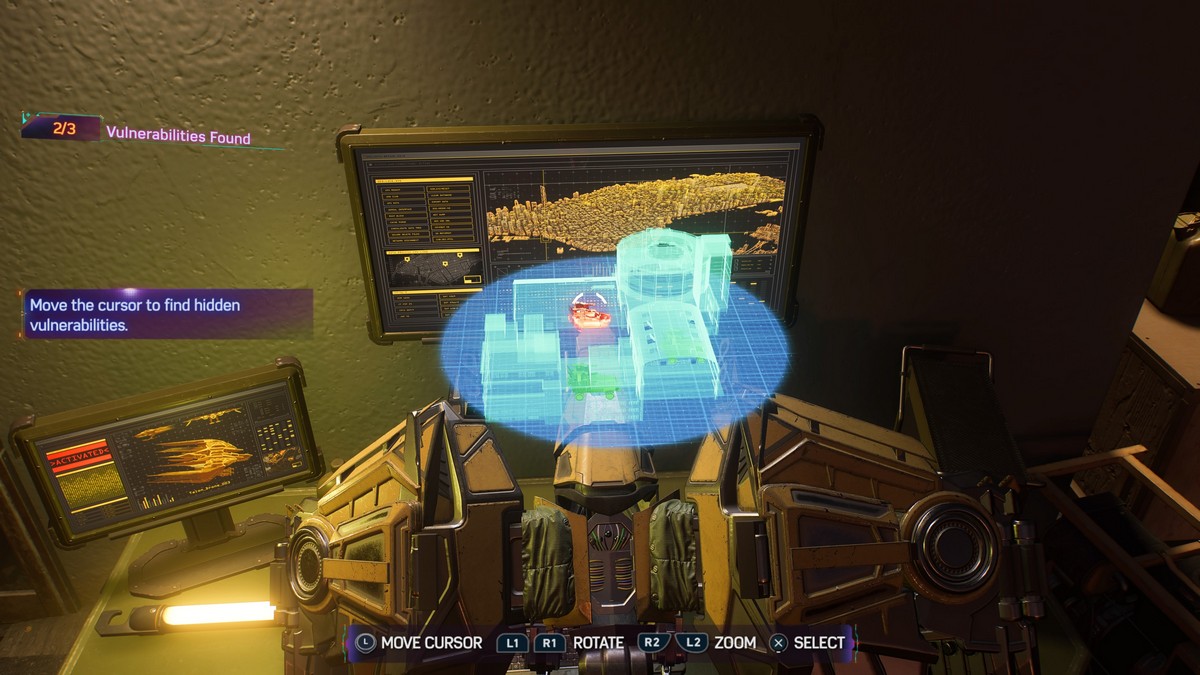
This time around, it’s about finding three vehicles that are found in the base. All three are shown in the image above to help you save time.
Harlem – Motorpool Hunter Blind #3
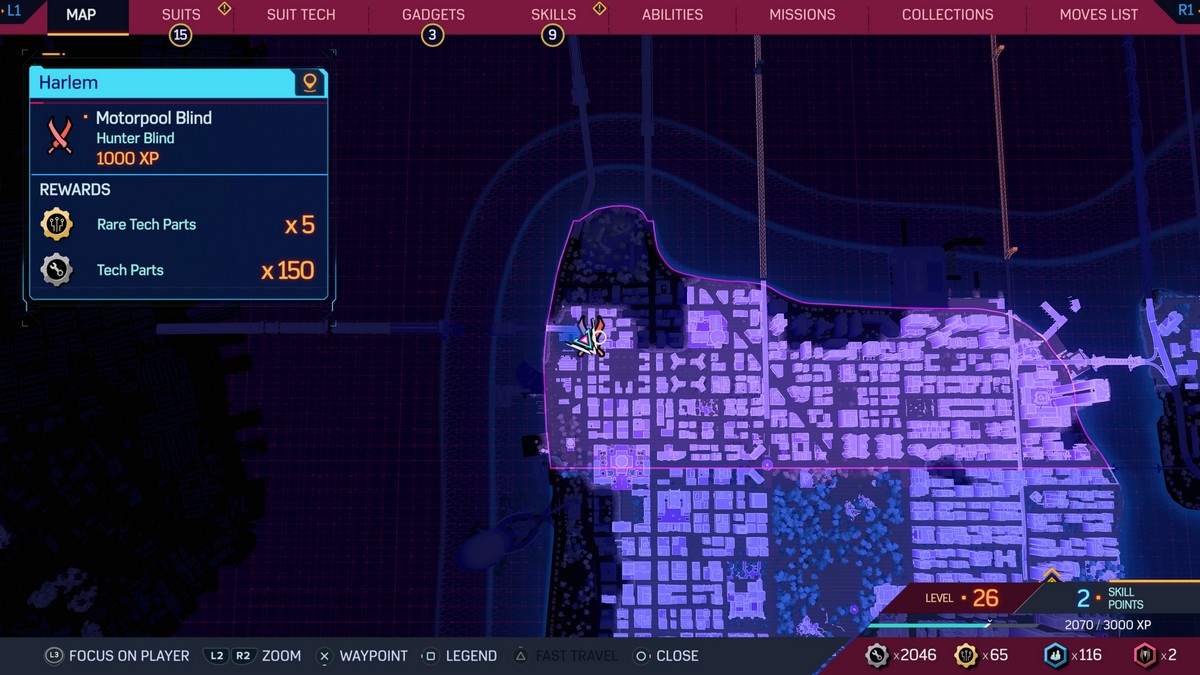
Head to the western part of the region to uncover this particular Hunter Blind, which features a giant billboard that will be very useful in scoping out all the threats. Get rid of the marksmen enemies with the lasers, and take care of the rest of the foolish Hunters.
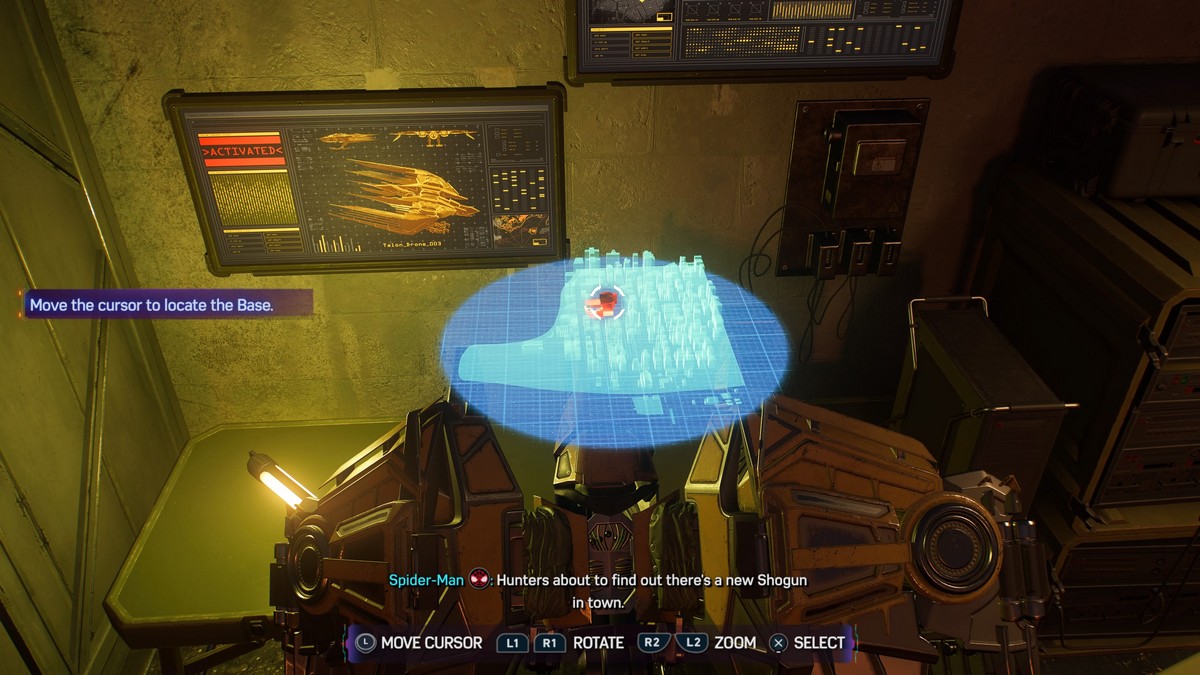
At the drone, the location of the Motorpool Hunter Base will finally be within grasp. Move the cursor just slightly north of the center of the map to locate the base of operations.
Harlem – Motorpool Hunter Base
Now, head over to the newly discovered shield icon on the map to find the Harlem Motorpool Hunter Base in Spider-Man 2. Thanks to your efforts in clearing out the Hunter Blinds, there are two sub-objectives that can be achieved to reduce the effectiveness of the Hunters.
Use R3 to spot the comms center as well as the three vehicles that are currently being charged. By sabotaging the former, this will prevent enemies from calling in reinforcements. Dealing with the latter. meanwhile, will prevent the car’s turrets from being usable if you are discovered. Messing with the comm center just requires players to interact with it using Triangle, while the vehicles can be eliminated by yanking out the batteries.
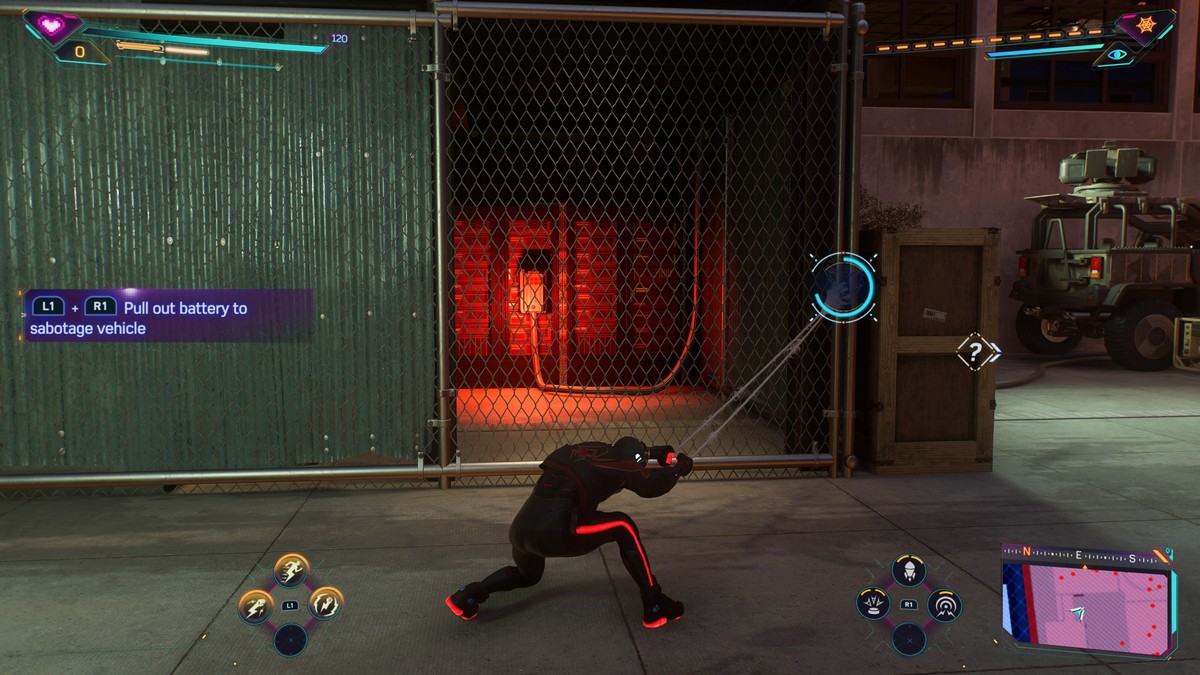
Note that the turrets will start firing once the battery is tampered with, drawing enemies to the general vicinity. We recommend getting up high to avoid detection and continue dismantling the base with a lower level of danger. Alternatively, you can ignore them if you are great at stealth and picking off every single enemy, so that there’s no need for open combat.
Work your way from the top level to the bottom levels, and the base will be cleared in no time. You can then finish this task up by checking the data left behind.
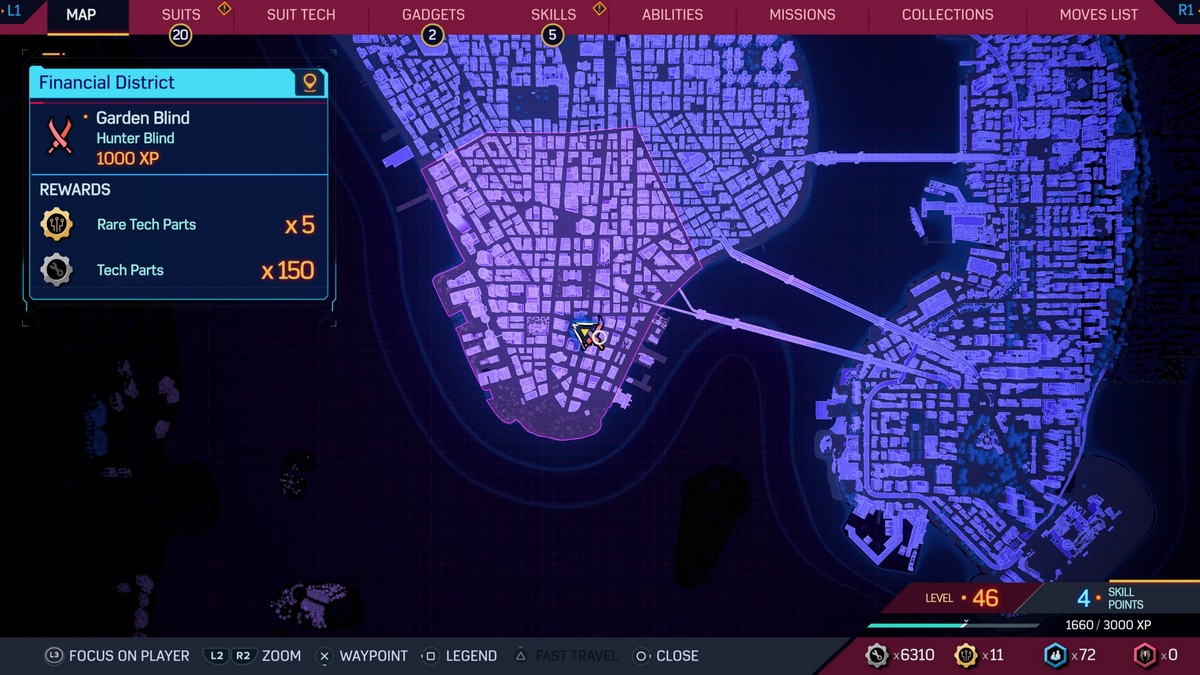
Financial District – Garden Hunter Blind #1
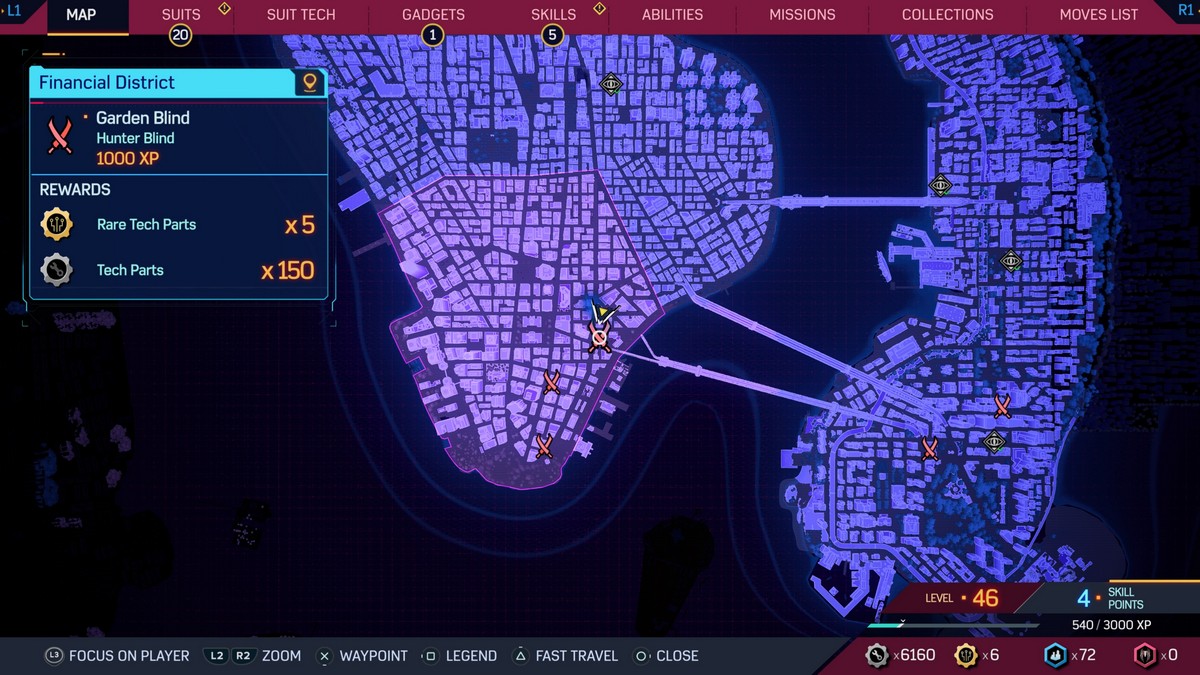
By now, it should be simple enough for a seasoned player to identify the threats that need to be taken care of first. Eliminate those drones and marksmen before toying with paired-up targets and separating them for takedowns whenever possible.
At the drone, it will bring up the map of the base in this region. Locate the communications center just slightly to the left of the central part of the blueprint before moving on.
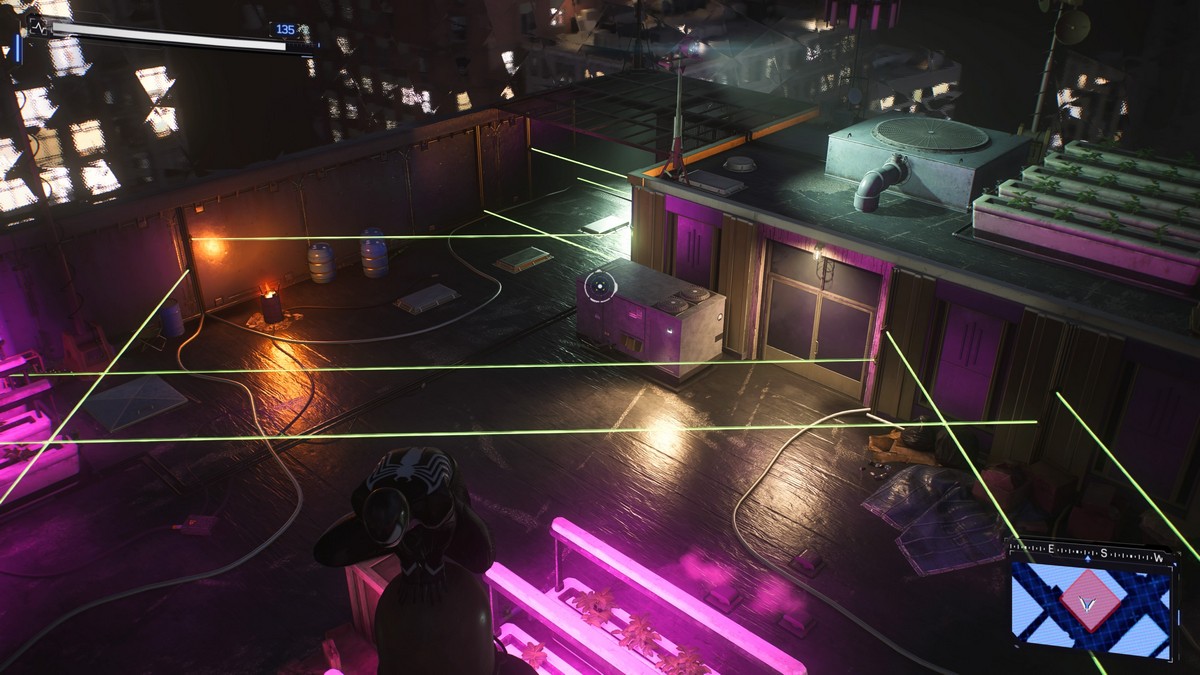
Financial District – Garden Hunter Blind #2
Head further south to find the second Hunter Blind on the rooftops. This particular one is unique in that it features more traps than patrolling enemies. Track the traps’ power source by using the scanner, and get to the power boxes to deactivate the lasers that are preventing you from getting to the data. They can be turned off by getting close enough to them and pressing the Triangle button.
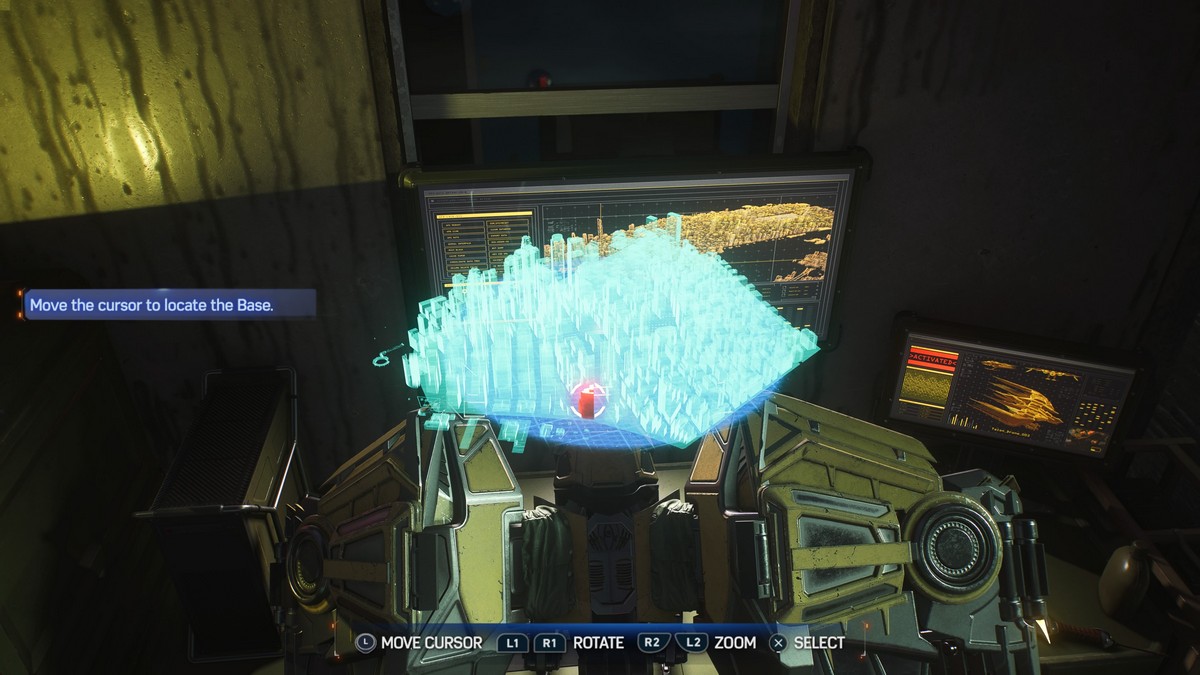
Back at the drone, the aim is to locate two gas pipes that can be used to your advantage later on in the base. They are quite close to each other around the center of the base map, so don’t get too carried away when trying to locate them in the blueprint.

Financial District – Garden Hunter Blind #3
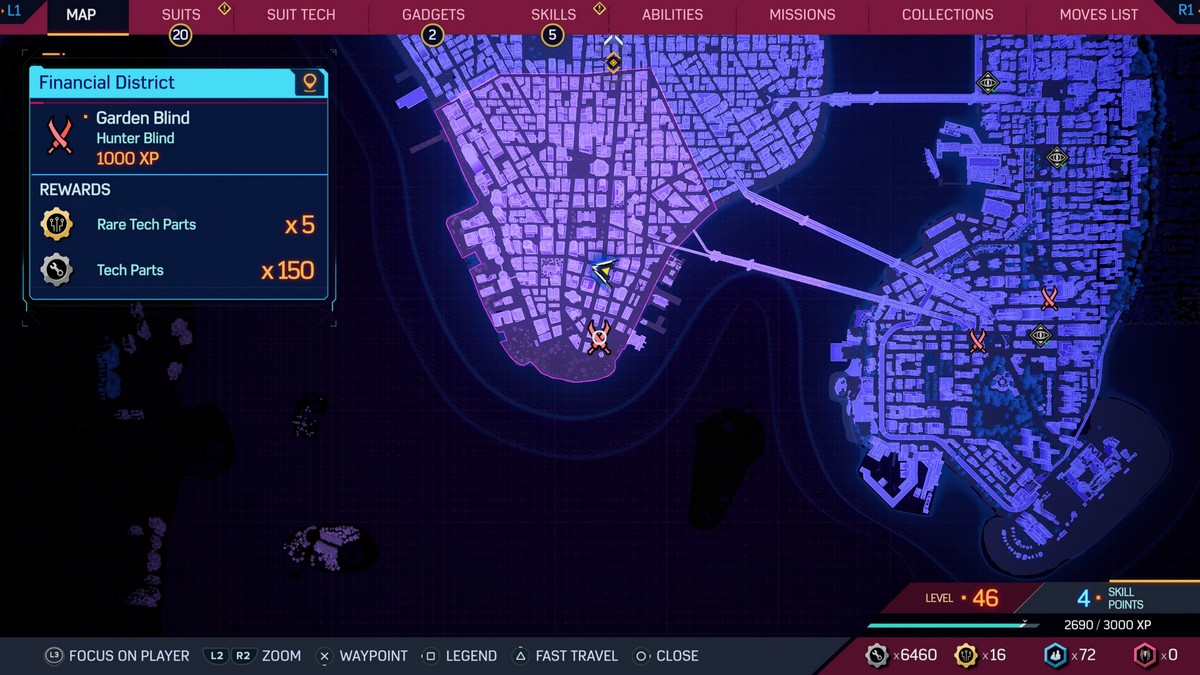
The third and final Hunter Blind in this area is more in line with the usual framework. Prepare yourself for more enemies than usual patrolling this particular Blind though, as your previous efforts have put them on high alert. The Web Line is invaluable when moving across the space and can hold as many enemies as you can take down, so make use of that.
Finally, the time to reveal the Garden Hunter Base is here, and the location in question is by the water on the bottom edge of the map. Move the cursor over and confirm your next destination.
Financial District – Garden Hunter Base
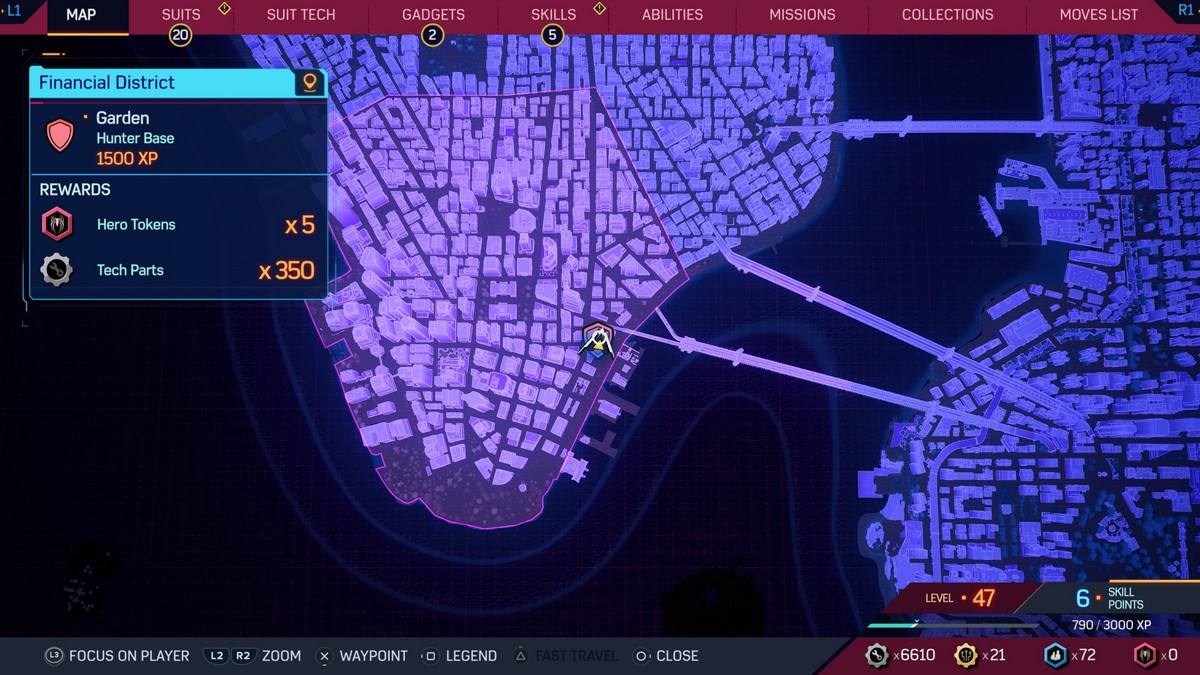
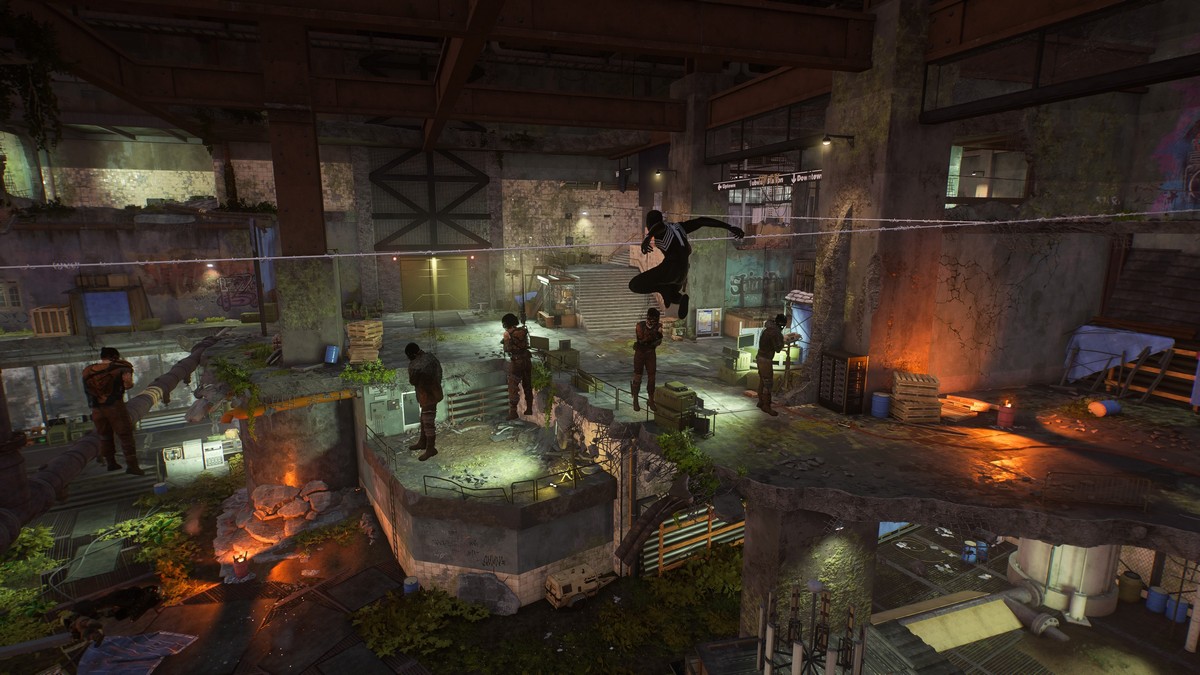
Swing over to the east side of the Financial District to find the Garden Hunter Base. This is a more challenging base as there are lower ceilings and more opportunities for the enemy to discover you, so always make sure you are aware of what lies ahead. Look out for the green lasers and take those Hunters down first, and then start working your way deeper into the base.
The sub-objectives are to sabotage the comms center as well as destroy the toxic plants that are being grown here. The former is easy enough: Just locate the machinery in a side room and interact with it the same way you did at the previous base.
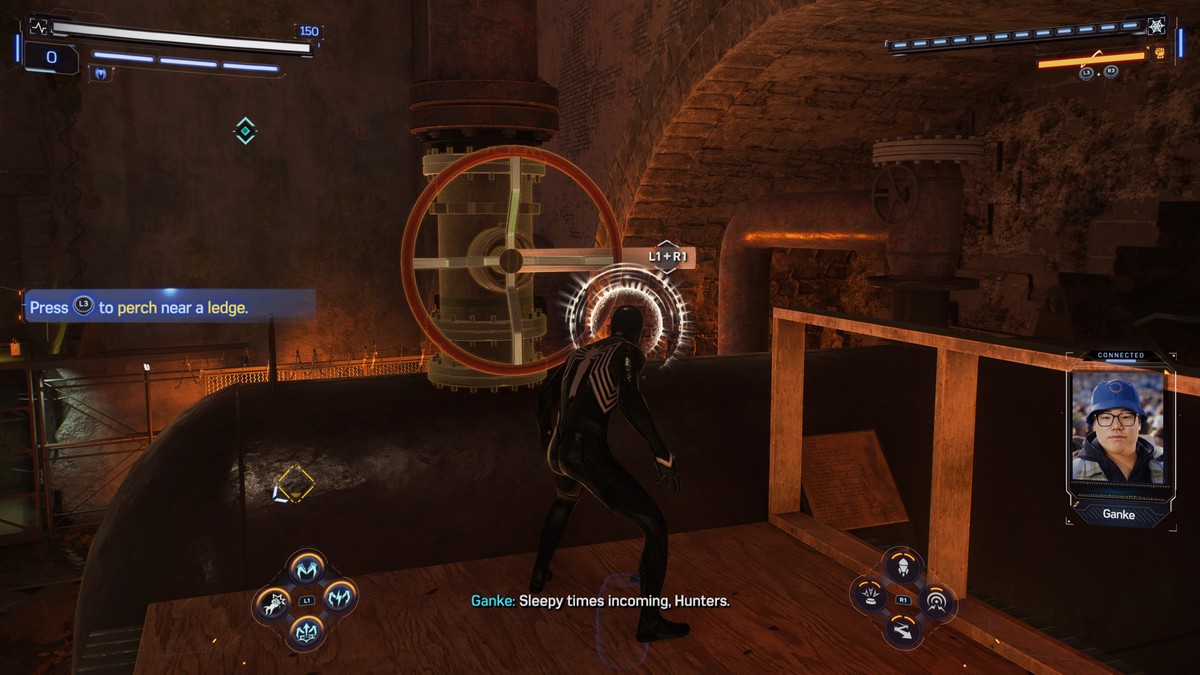
As for the plants, eliminate any enemies patrolling near the two pipes with the giant valves next to them. One is in the back of the first area on a platform, with the other being in the center of the base. Use L1+R1 to turn those valves to complete the task.
Complete the sweep of the area and get to the laptop to get some new info on Kraven’s brood and finish the cleanup of this particular Hunter Base in the Financial District.
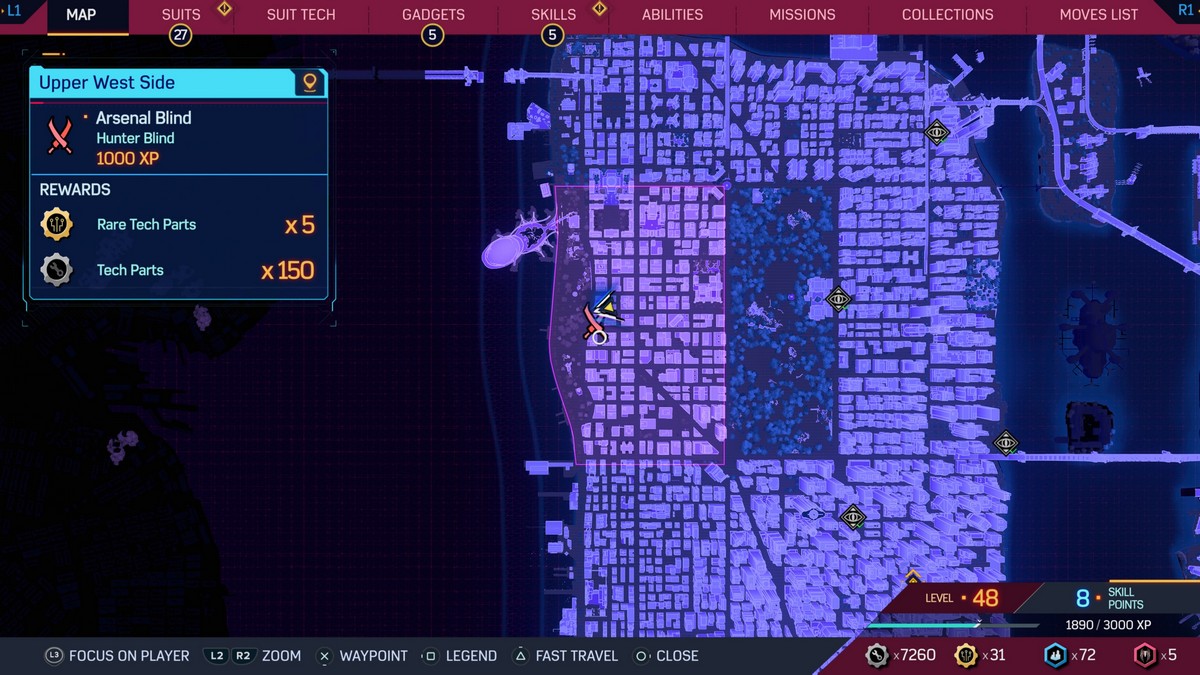
Upper West Side – Arsenal Hunter Blind #1

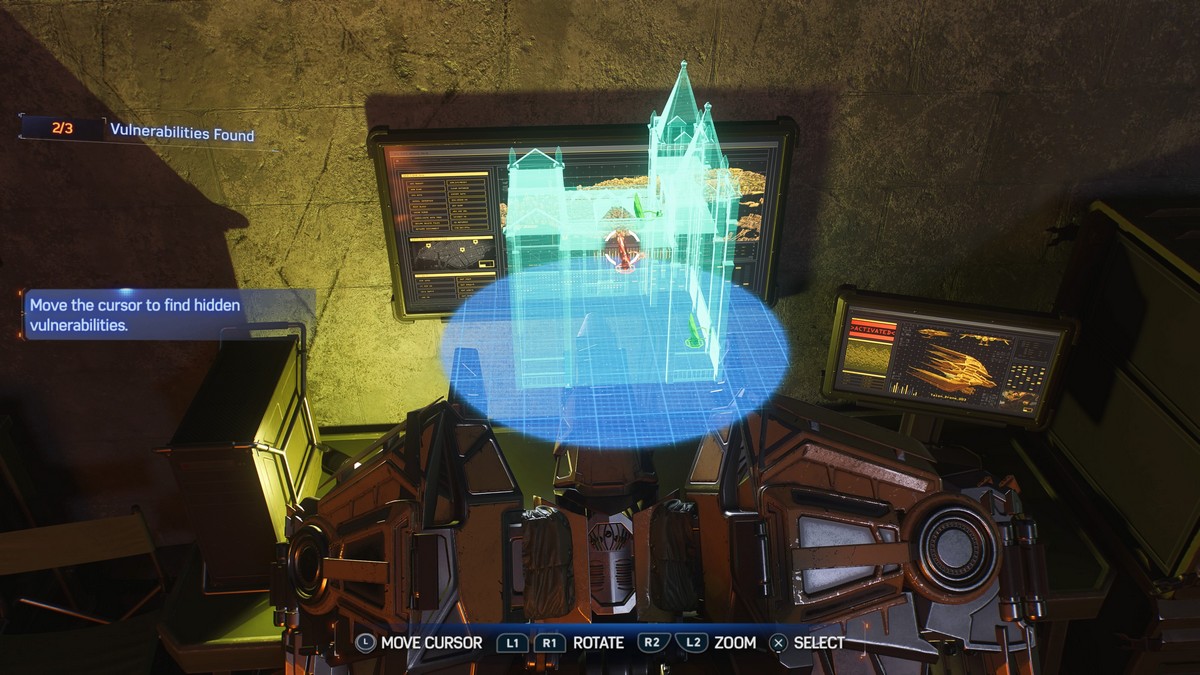
At this stage of the game, you should have plenty of Skills, Suit Tech, and Gadgets unlocked and upgraded. This should make for a more fun combat experience compared to the stealth sequences, so it is advisable to just jump straight into combat to speed up the process. Either way, take out everything in sight in order to get to the drone in the Blind.

The blueprint will show off a tall building that looks like a Victorian establishment. Locate the comms center near the pointed roof.
Upper West Side – Arsenal Hunter Blind #2
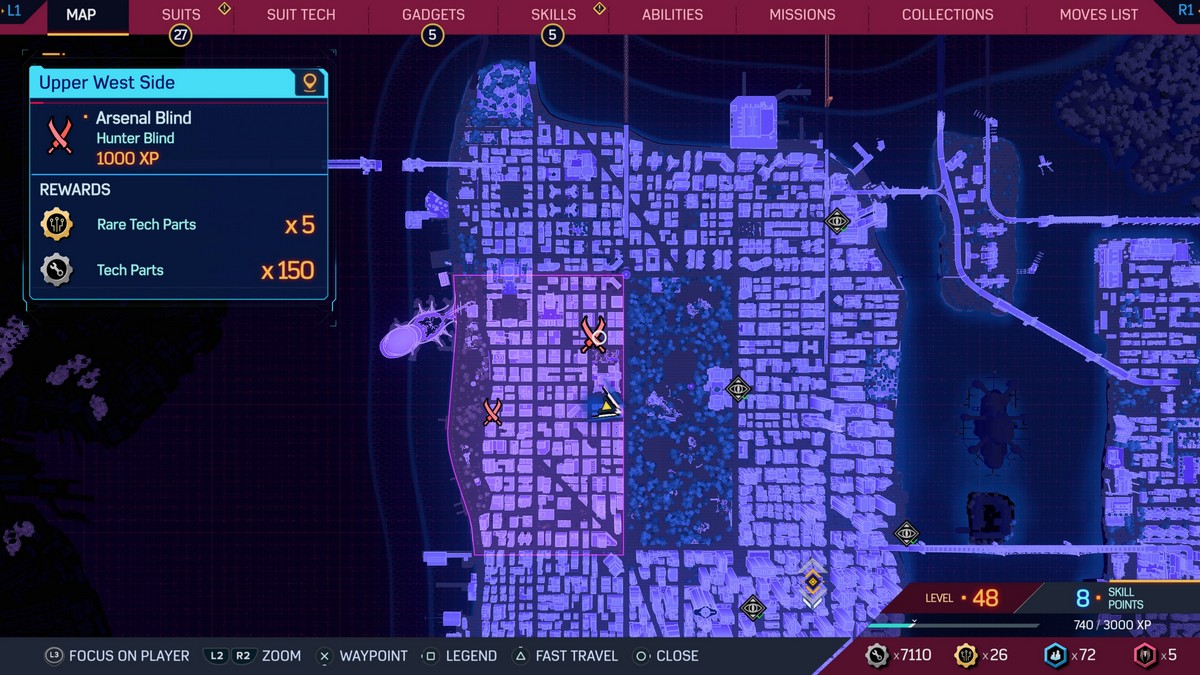
Head north from the previous Blind to locate the next one in Upper West Side. The drill remains the same: Use Web Strikes to take out those solo enemies like marksmen and drones quickly before using the elevation to scan the surroundings. Use distractions as much as possible, and it should take you only a little bit of time to clear this area.
This time around, the job is to locate three laser traps in the base. They are quite evenly spaced out from each other, but are all on the right half of the base as shown above.
Upper West Side – Arsenal Hunter Blind #3
It’s time to finally get the location of the Hunter Base in this affluent area. Now that the two previous Blinds have been dealt with, the enemies are on high alert as they await the arrival of Spider-Man. Use this to your advantage by making noisy distractions and separating the groups. We also highly recommend getting the upgrade for dual takedowns using the Web Line, as it’ll make the process so much easier.
At the drone, navigate over to the western side of the region to locate the Arsenal Hunter Base near the waterfront.
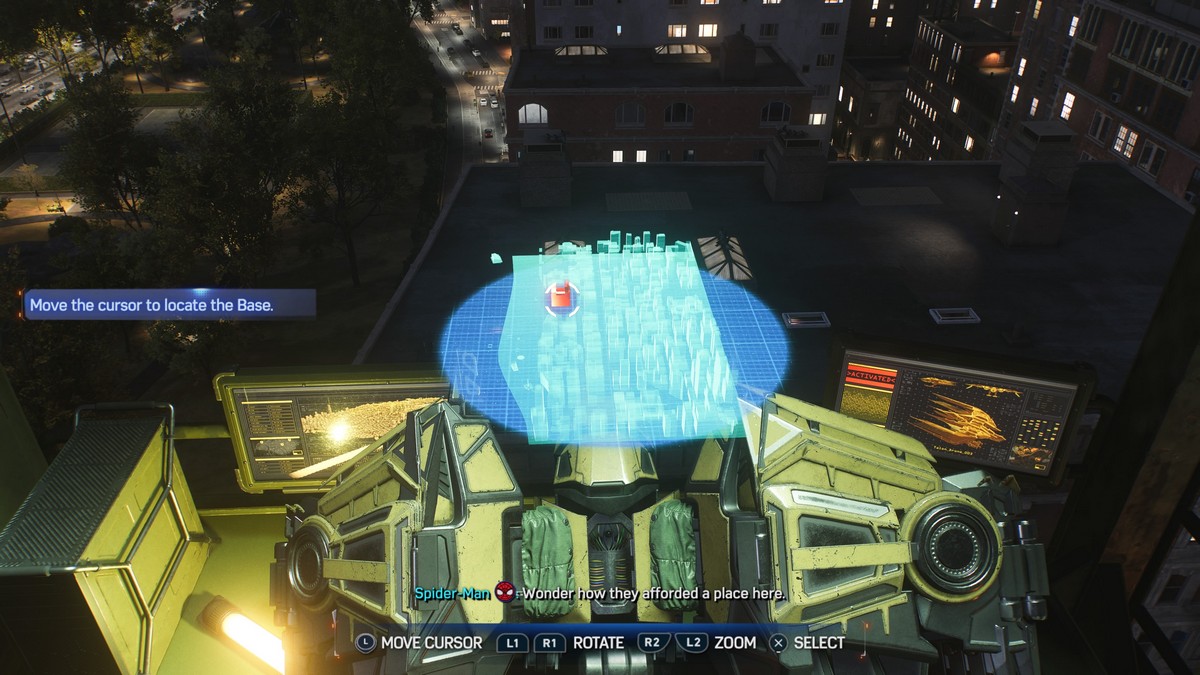
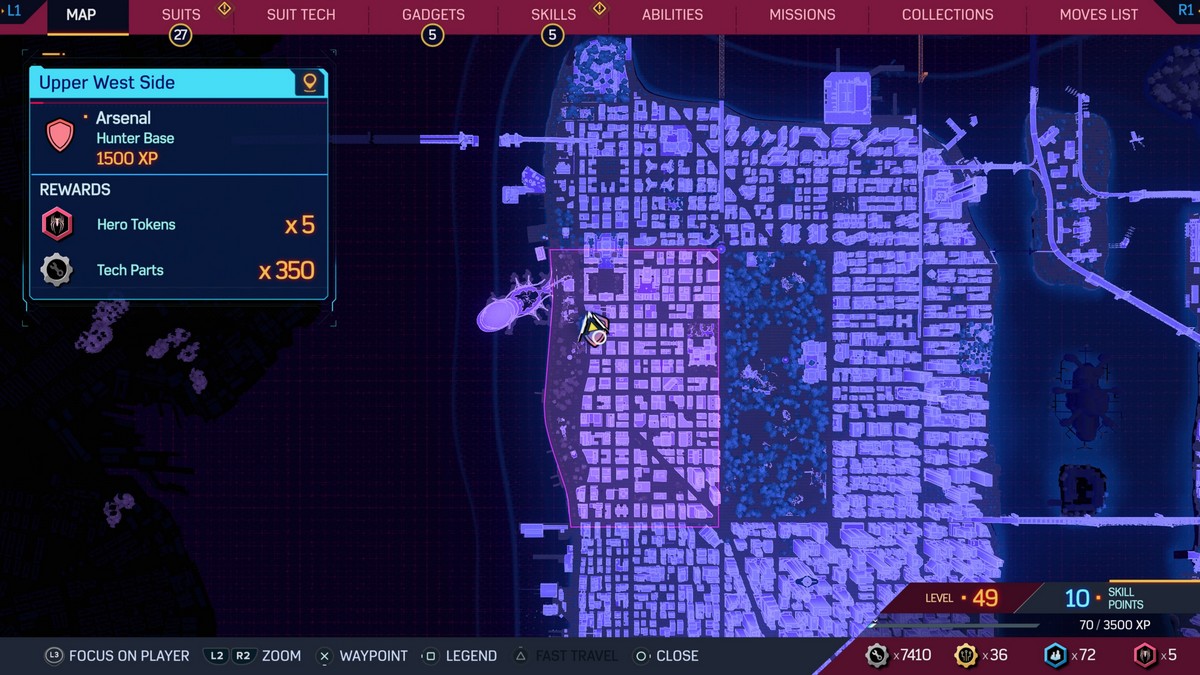
Upper West Side – Arsenal Hunter Base
The arsenal of the Hunters is going up in smoke, and you are going to be responsible for that. This particular Hunter Base has more levels within, so be sure to make use of the radar to track enemies that are in the area. Go down level by level, getting rid of ranged foes guarding the area first before proceeding with the rest.
To get rid of the Hunter Lasers that can prevent you from going further down, use R3 to scan the area and follow the power lines to the batteries. Yank them out to disable those traps and allow for safe passage. As for the comms center, it is sitting in a corner of a room on the second level near one of the batteries, so prepare to kill two birds with one stone.
After that, you can rely on stealth or straight combat to deal with all of the area’s enemies. Remember to use your radar to keep track of all the remaining foes, as they’ll be pretty evenly dispersed among the base’s different levels.
With the Hunter Base cleared, break open the wooden doors to get to the computer station for even more data on Kraven and his family.
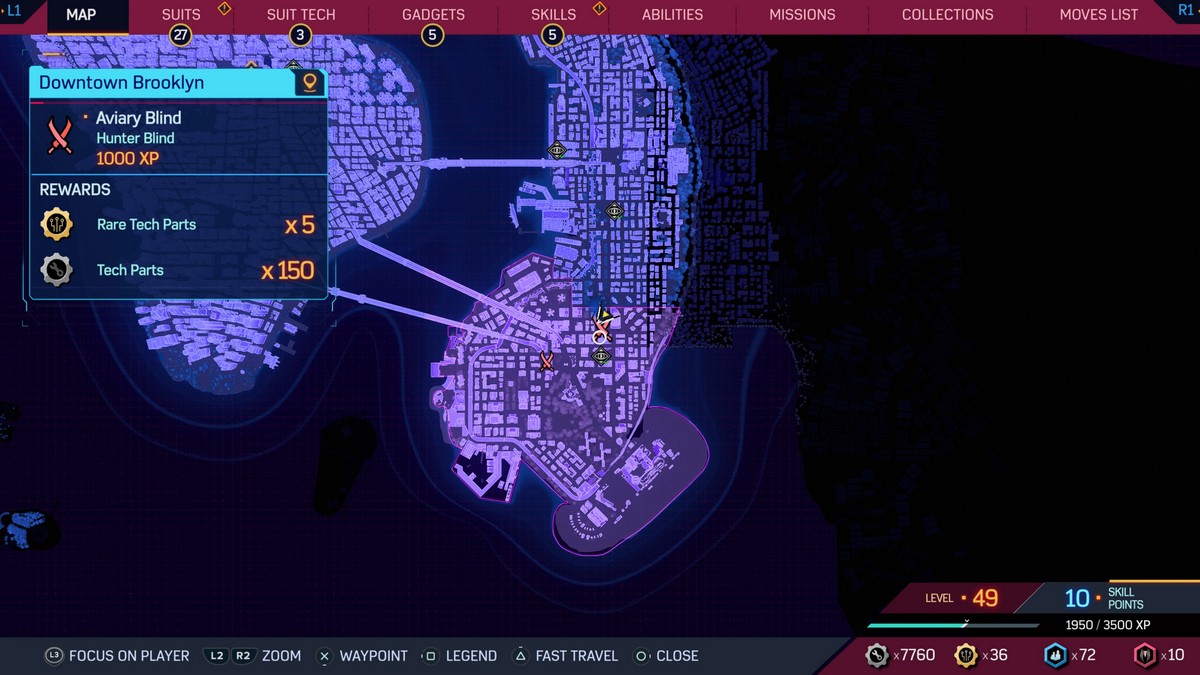
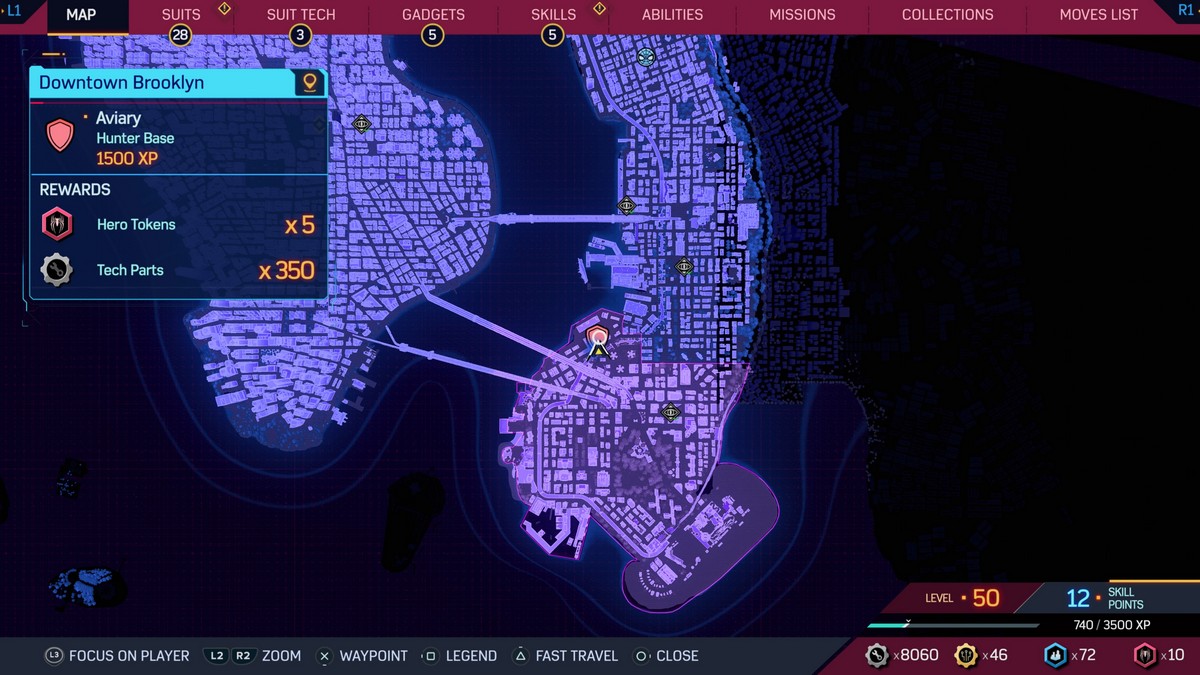
Downtown Brooklyn – Aviary Hunter Blind #1
After so many instances of those nasty Talon Drones giving you hell, it’s finally time for some payback.
Go to this Aviary Hunter Blind near the northern end of Downtown Brooklyn and check out the enemies guarding the area. As is to be expected, you’ll need to take care of the Talon Drones flying around and then watch out for marksmen with their green lasers. Deal with these enemies, and then knock out the rest of the Hunters to get to the drone.
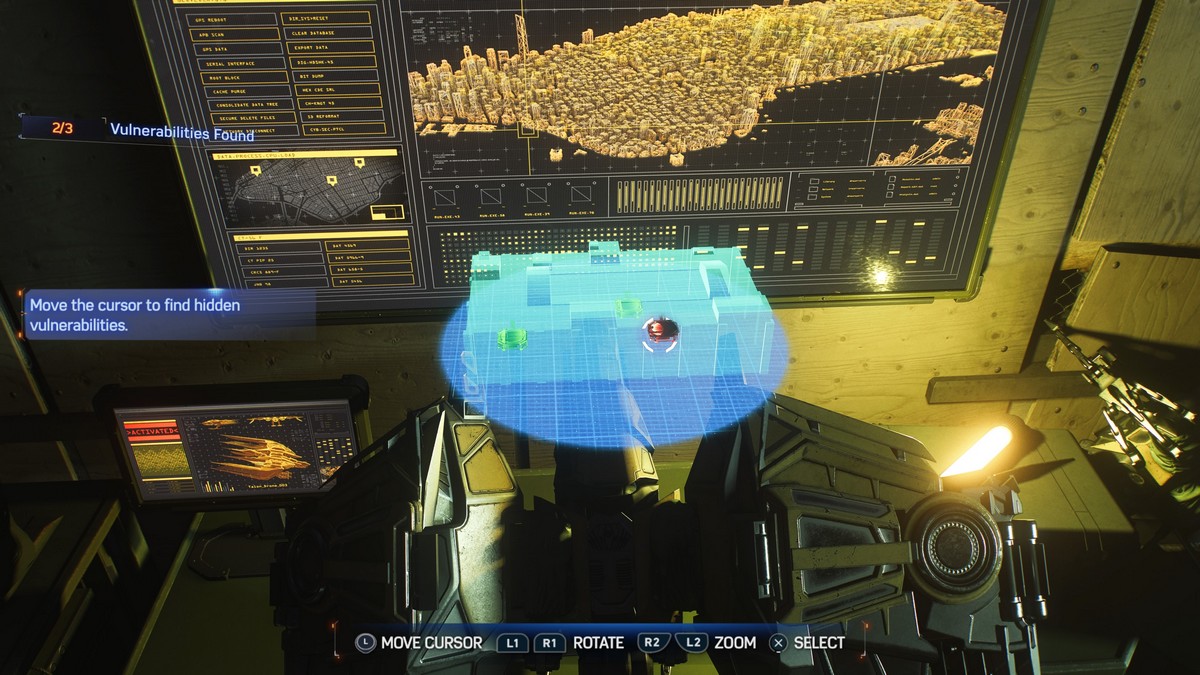
For this round, it will require the detection of three Talon Drone Chargers within the base. One is near the center of the building, while the other is by the bottom left corner. Use the above image to locate them quickly and efficiently.
Downtown Brooklyn – Aviary Hunter Blind #2
Next, head west to find the second and final Hunter Blind for this set of enemy territories. Similar to the first area, there are drones patrolling the skies, so find the right time to get rid of them without arousing suspicions. Move onto to the stationary enemies, and then take on those that are patrolling either alone or in groups. From there, you can head over to the inactive drone.
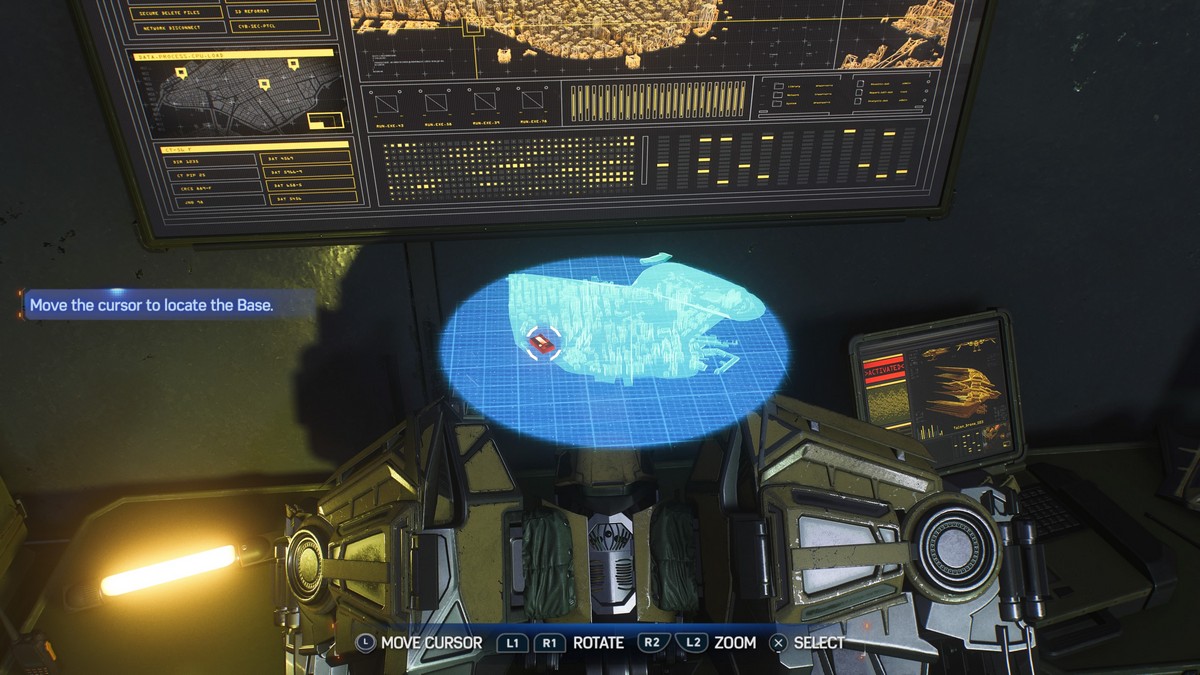
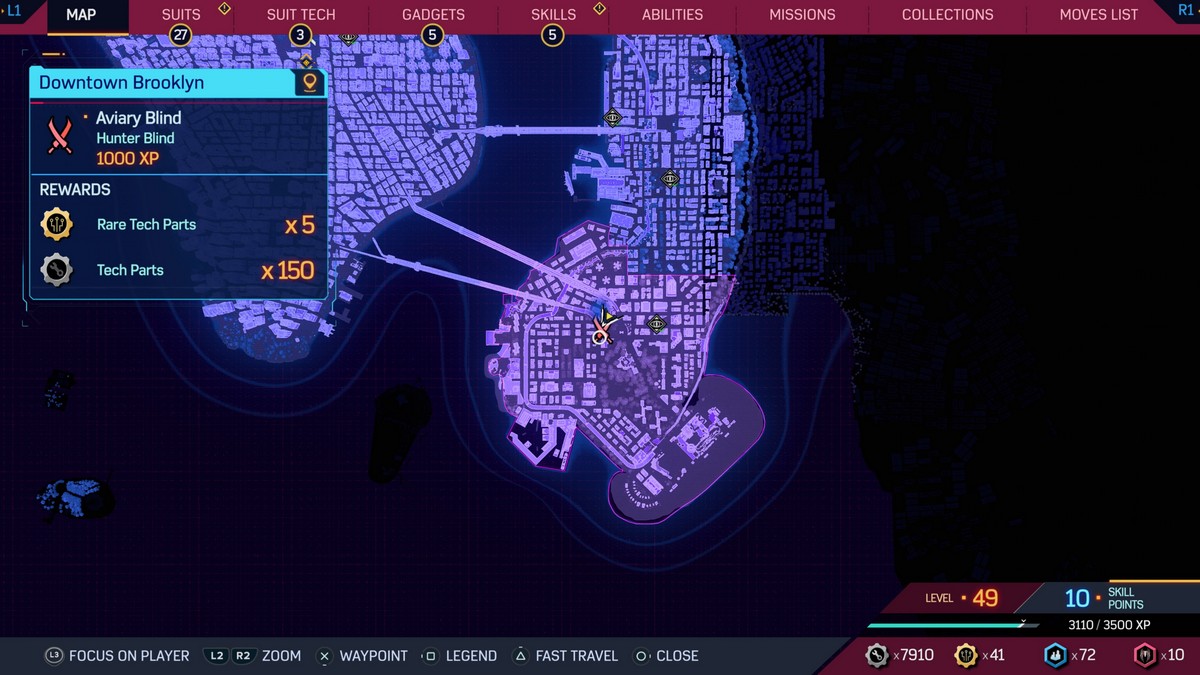
To find the Hunter Base via the map layout, look near the water once again and scan around the left side of the Downtown Brooklyn map to locate the base’s red silhouette.
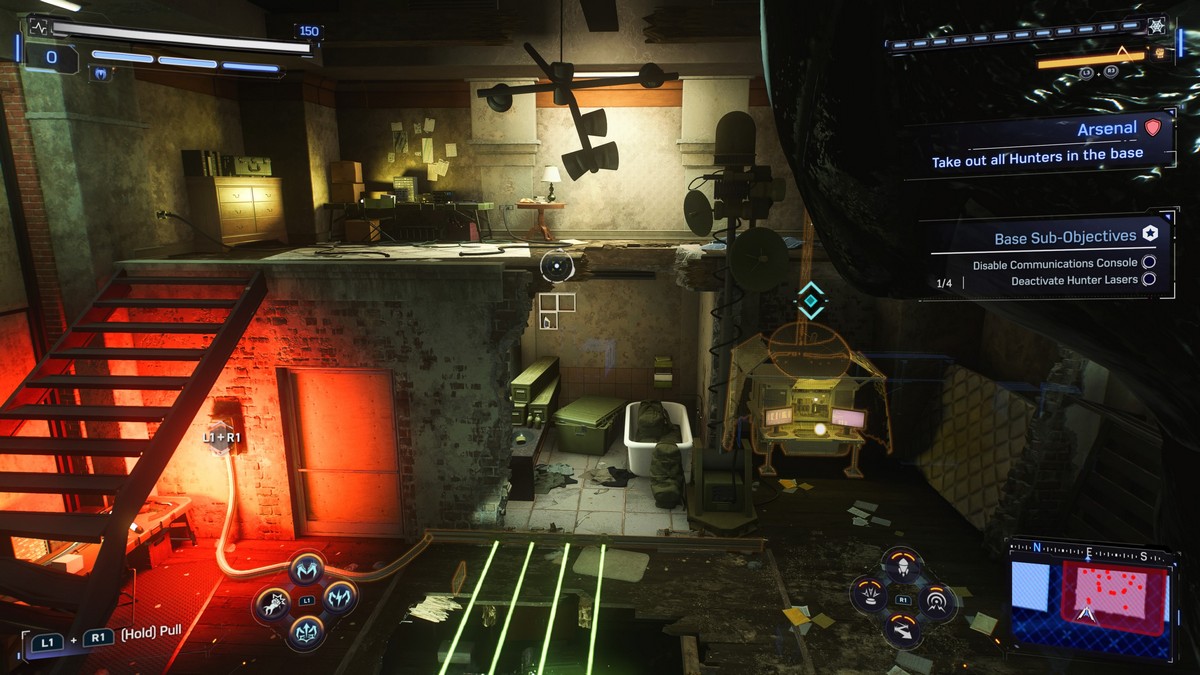
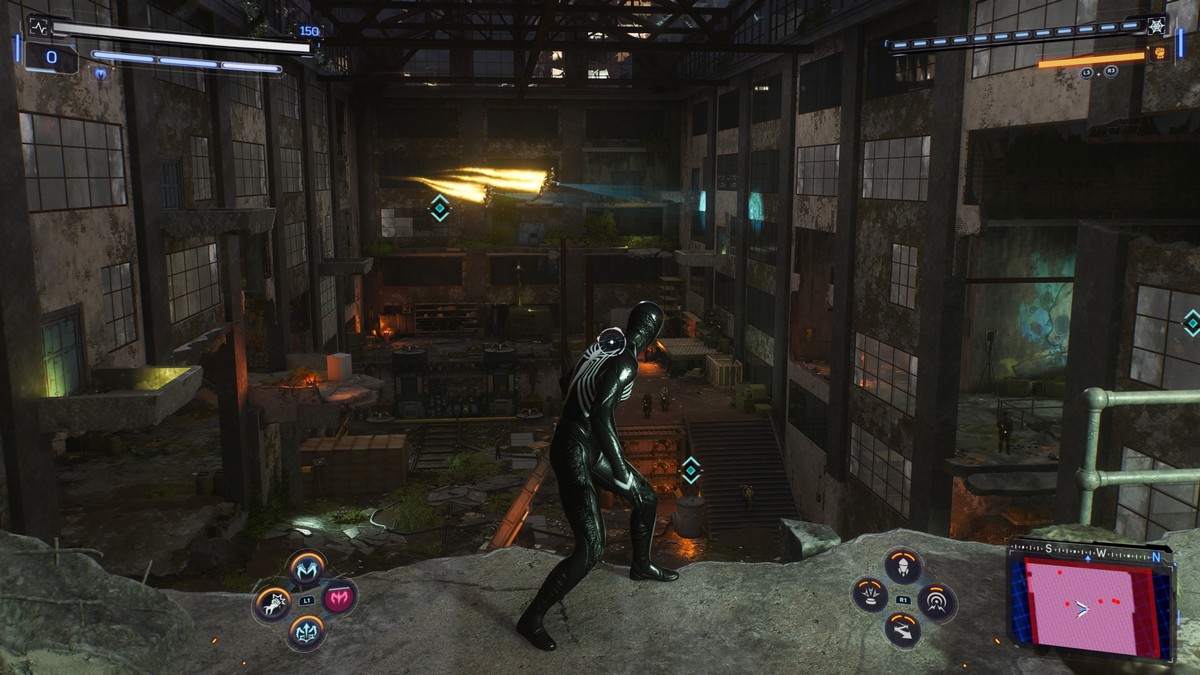
Downtown Brooklyn – Aviary Hunter Base
A giant warehouse of a base, the glass windows of this building are hiding a massive complex down below. Take down the patrolling enemies outside, and get inside the base using either the broken windows or an exposed vent. There are Talon Drones in the area, so wait for the pair to leave each other before eliminating them from the fight.
As players continue to make progress in the base, it is also a good time to take note of the sub-objectives for the Aviary Hunter Base. The disabling of the comms center is now a familiar task, but for the Talon Drone Chargers, all three require a little more work. Essentially, players will have to connect generators to power pylons using their web. This will involve making several connections before a charger is destroyed.
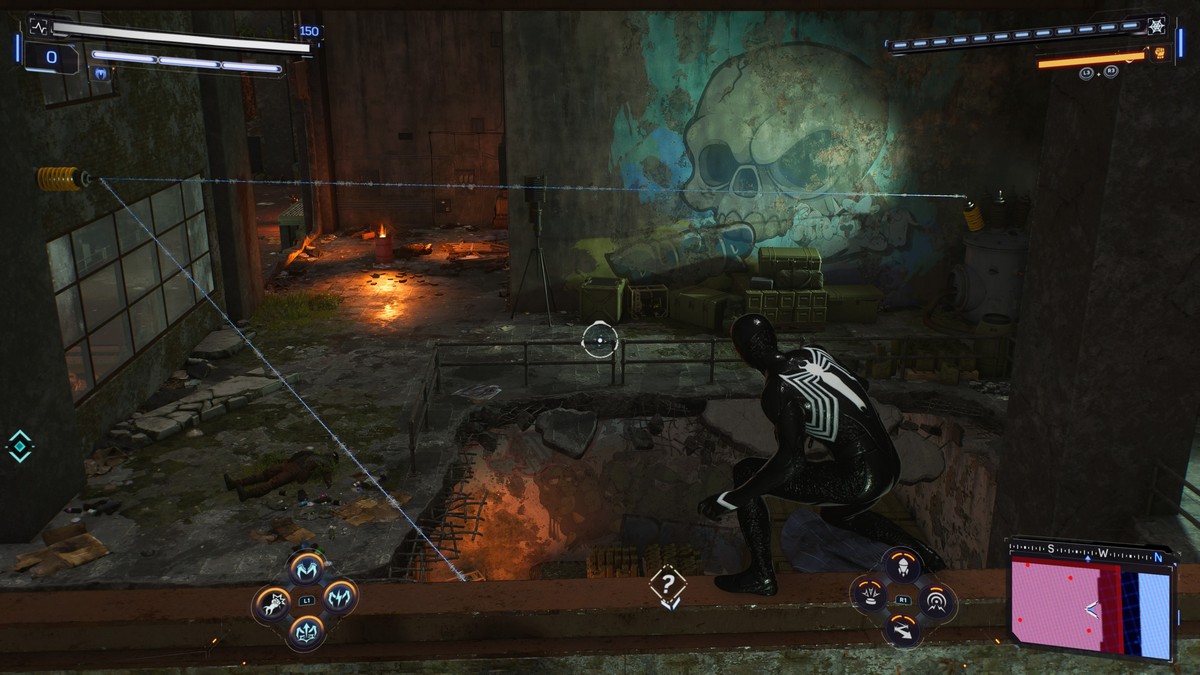
There are three sets to get through, so start from the generators to any nearby pylons and proceed from there. Once everything is taken care of, go through the wooden doors and finish up this side activity once and for all.
Rewards for Clearing Hunter Blinds and Bases in Spider-Man 2

Each of the Blinds cleared will net players both rare and normal tech parts, as well as plenty of XP that will go a long way in helping to reach the level cap. Also, full completion will reward Peter Parker with The Last Hunt Suit and Miles Morales with the Most Dangerous Game Suit.
That’s all the important information you need to know about regarding all the Hunter Blinds and Bases Locations in Spider-Man 2. For more help with the game, be sure to check out our related content below.


Updated: Oct 19, 2023 07:13 pm