3D Printed Arcade Switch Dock

I can’t be the only one who’s a bit annoyed with how the Nintendo Switch’s charge port is on the bottom of the console, making it impossible to charge the console in kickstand mode. If you know someone like me, they’ll love this 3D printed Arcade Switch Dock.
Now, as the name implies, you’ll need a 3D printer or to know someone who has one, to pull this off. I’d highly recommend doing a quick Google search to see if there are any makerspaces in your immediate area. Those places are everywhere, and most will allow you to use their machines for a small fee. This project isn’t incredibly long (it will only take you a weekend or two), so you won’t need to sign away weeks of your life to a makerspace if you don’t want to.
The difficulty and price of this project will fluctuate depending on whether you want to just build the arcade dock, or build the arcade dock with a charging port. I can’t recommend the charging port option enough. I love keeping this arcade on my desk at work and having a way to play my Switch in front of my jealous coworkers in style. And with the charging port, the console is always ready to go when I am.
Raspberry PiBoy

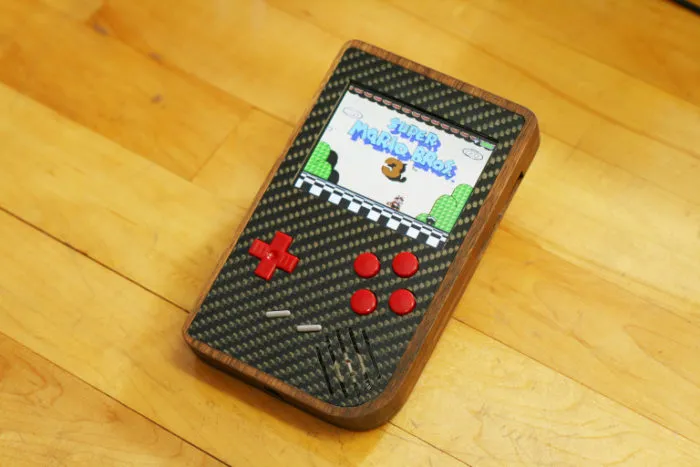
Michael Castor’s Raspberry PiBoy uses a Super “All-in-One” (AIO) board created by Giles Burgess (aka Kite). Kite’s Super AIO board requires very little technical know-how to use, because it already has all of the work done for you. Most Raspberry Pi-based Gameboy systems use AIO boards to simplify the build, but normally even they require a bit of creative wiring. Not Kite’s board.
Kite goes above and beyond, crafting a board that provides an LCD screen, onboard ATMEGA 32U4 (for button inputs), microSD slot, onboard battery charger, audio amplifier, volume control, external USB port, and status LEDs. The ports on the board line up perfectly with a Gameboy shell, but if you want to go above and beyond, and make your own Gameboy, check out Castor’s Walnut and Carbon Fiber shell.
You will need a 3D printer and a CNC machine to get the job done, but the end result is worth it. Provided you already have these machines, the entire build shouldn’t cost you more than $150. Not too shabby for what is, quite possibly, the most stylish Gameboy I have ever seen.
Edible Adam Slug
BioShock’s Adam Slugs are apparently quite delicious. For the game’s 10th anniversary, Jason Babler created a tutorial for molding a life-sized gummy Adam slug. The final product looks disgusting (as it should, I suppose), but it does taste good!
The mold for the slug is made with clay, ball bearings, and food-safe silicon. The gummy worm itself is created with corn syrup, water, and baking gelatin. The whole process only takes a few hours and shouldn’t cost you all that much. It’s well worth it if there’s a BioShock fan in your life.
Mario Mystery Block that Turns On Your Computer
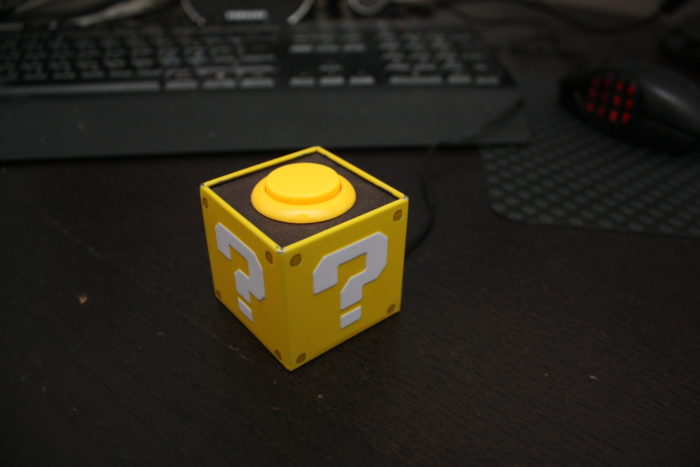
This project is an oldie, but it’s still a goodie. Make and give this block to a friend or family member who uses a computer tower, and it’ll give them an easy way to power the tower on. Truthfully, if you’re tech-savvy enough, you could take this design and customize it to power on pretty much anything, but I like this project’s original purpose.
The build does require a bit of soldering, so you’ll need to acquire the tools to do the job. However, Gabriel Olofsson, the creator of the project, admits that the soldering’s primary purpose is to just make sure the cube won’t break when someone inevitably smashes the button. It’s easy enough to do, even if you don’t have any soldering experience.
If anyone can figure out a way to make the box in a way where you can hang it from the ceiling, and get it to make a coin sound when you punch the bottom to power on the computer tower, please let me know. Because that’s the only thing keeping this project from being absolutely perfect.
MintyPi 2.0
This project is probably the most difficult of these five to create, but it’s also the cutest of the batch. The mintyPi project has undergone several iterations, and the mintyPi 2.0 is the most recent model.
All you’ll need is a Raspberry Pi, a way to 3D print some tiny parts, and an empty Altoids can. However, if you want to make this project infinitely more simple, or you’re just inpatient, you can go to the creator and order the pieces for the mintyPi 2.0. You’ll still have to put it all together yourself, but this process removes the hardest part of the build.
I’ve surprised numerous friends with the mintyPi 2.0. If you can convincingly wrap the completed handheld in plastic, most people will just think you’re giving them one tin of Altoids as a present. Watching their eyes light up when they actually open the tin is a wonderful feeling. Just make sure that they open it in front of you. You don’t want them to accidentally throw the Altoids away and have to root through a trash can to get your electronics back.