How to Join The Enclave in Fallout 76
Here’s everything you possibly need to know to join The Enclave in Fallout 76.
In previous Fallout games, the Enclave has been an ever-present nuisance in the lives of the wastelanders and they make their return in Fallout 76 as well. Or rather their beginning, since this game is set before the events of previous Fallout games.
Either way, in Fallout 76 you may find that you want to join these government preservationists instead of waging war against them, and we’ve got you covered.
The Abandoned Waste Dump
In order to join Enclave, the first step you need to take is to find the bunker where they are located. Fortunately, the entrance to the bunker is accessed by going through a cave at the Abandoned Waste Dump, located in the far east in the Mire region of Fallout 76.

Upon entering the cave area, you should automatically get the quest Investigate the Bunker. In order to do this, you’ll need to reach the bunker doors at the far end of the cave.
While this normally wouldn’t be much of a challenge, you will encounter two Deathclaw nests along the way, with both Deathclaws being around level 20. Make sure you’re stocked up on healing items and your best weapons, because as any Fallout 76 player knows, Deathclaws are named that for a reason.
They will tear you to pieces if you aren’t smart about taking them down. Luckily, you can cheese them pretty easily here.
Heading to the doors in the back will give you the Bunker Buster quest, which is the main questline for getting into the Enclave’s hiding spot in Fallout 76.
Bunker Buster
In order to progress this quest, you’ll need to find the Bypass Holotape. This is inconveniently located in one of the Deathclaw nests. If you haven’t fought them yet, you’ll most likely have to do it now.
Once you grab the tape, head back to the control panel and play it from your inventory, which will allow you to be able to interact with the control panel to open the elevator doors. Hop in and you’ll take a small trip to the bunker below.
The Laser Grid
Once you arrive at the bottom floor, walk forward a bit and you should see a laser grid and a hand scanner to your right. By interacting with the hand scanner, you will activate the next part of the quest, prompting you to find a way around the laser grid.
Head back towards the elevator through another doorway and up some stairs, which will bring you to a walkway above the laser grid. Here, you can learn more details about the bunker’s history by accessing a nearby computer named Judy’s Terminal.
Moving further over the grid, you’ll find a control center with a defunct terminal and a desk. Make sure you search the desk to find the Security System Manual Reset note, which will unlock a set of optional objectives to get the terminal working.
If you have a level 3 hacking skill, you can bypass this and simply hack the terminal, but for anyone that may be more technologically challenged, you’ll need to go through all three steps to get it repaired.
Once you complete all three objectives (or hack the terminal), the lights will flicker in the facility, and you’ll be able to interact with the hand scanner to shut off the lasers.
Enter the Secure Room
Heading towards the newly accessible area, you’ll find a secure room where Senator Sam Blackwell spent his tragic last days. In this room, you’ll find a keypad you can interact with, but to learn the code you’ll need to access the nearby terminal.
There, you’ll find the date of Judy’s death, which is the code for the keypad (021584).
This unlocks a secret compartment behind a painting in the room, which gives you a holotape named Welcome To Whitesprings and a Congressional Access Card. With that, the Bunker Buster quest is complete!
But you aren’t finished yet – did you think the Enclave would make it that easy? This is the same group that created a veritable complex at Raven Rock, after all. Upon listening to the holotape, you’ll be instructed to head to Whitesprings Bunker, starting the questline ‘One of Us.’
One of Us
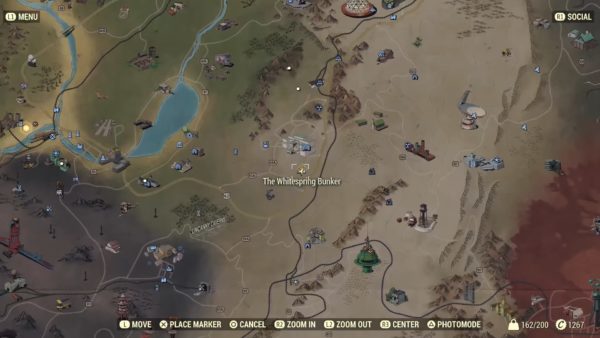
Upon finding the Whitesprings Bunker, you’ll need to use the Congressional Access Card to enter it by interacting with a card reader near the main door. An intercom voice will speak to you before opening the nearby Vault door for you to enter.
Heading into the bunker, you’ll need to go take a photo of yourself for the electronic stranger by pressing the camera button. The nearby dispenser will give you an underarmor suit, and then you’ll be off to meet the mysterious owner of the place.
Heading downstairs, you’ll see a small robotic interface named MODUS that you’ll need to interact with to progress the quest.
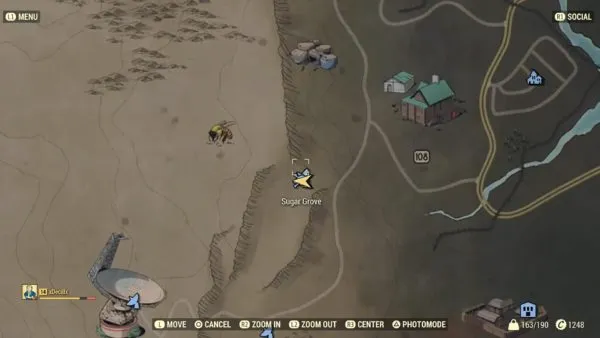
After a hefty monologue, MODUS will send you off to take a questionnaire (which you can avoid by talking to another MODUS terminal), and then access a dispenser nearby to get a System Access holotape to carry out a quest at the nearby Sugar Grove for your new AI benefactor.
The Assaultron Invader
Before you can load the System Access tape, you’ll need to defeat the Assaultron Invader that has taken up residence at Sugar Grove. It’s a tough level 36 enemy that has some potent laser firepower that can make quick work of you if you aren’t careful. Equip any energy resistance armor you can and prepare for a tough fight.
Once the mechanical menace is slain, head to the terminal at the bottom of the stairs and load the System Access holotape to collect the lost data for MODUS from an Archival Dispenser near the front entrance.
That’s it for this area, so fast travel back to Whitesprings to report back to MODUS.
The Uplink Module
When you arrive at the bunker, head to the Collector machine to give MODUS his data. However, MODUS isn’t done getting you to do his dirty work.
Activate the nearby Dispenser and prepare to make a journey to the National Radio Astronomy Research Center to deploy an Uplink Module.
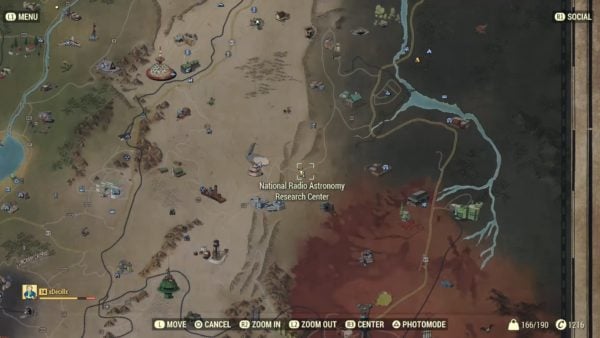
Once inside the research center, immediately head to your left to find a staircase that takes you all the way upstairs.to the rooftop. There, you’ll find a Connection Platform you can interact with to deploy the Uplink Module, which will make MODUS very happy.
So happy, in fact, that he will deploy a care package for you to loot before heading back to the bunker. Collect the awesome Orbital Strike Beacon and your other rewards before heading back to the Whitespring Bunker for some much deserved praise from MODUS.
Joining the Enclave (Finally)
Upon speaking with MODUS one last time, he will officially grant you access to the rest of the bunker and name you as a member of their Enclave. You’ll finish the quest One of Us, get the Bunker Buster rocket launcher, and can now take missions from the Enclave periodically.
If you want to pursue even more missions for the Enclave, you can head to the nearby Camp McClintock to access more quests.
It’s a long journey, but the Enclave is one of the most exclusive factions in the wasteland of West Virginia, and you’re now one of them! Congratulations!
That’s all there is to joining Enclave in Fallout 76. If you need any other tips, tricks, or walkthroughs during your exploration of Appalachia, be sure to check out our Fallout 76 wiki. Here are some guides you’ll find there:


Updated: Nov 16, 2018 03:34 pm