Once you’ve completed the first part of the Lend Lease mission in Escape From Tarkov, the second part can be picked up from Peacekeeper. It isn’t as much of a treasure hunt as the first part was, but can still tedious as you’ll you’ll need to track down two Virtex Programmable Processors and a single Military COFDM Wireless Signal Transmitter. To that end, here’s everything you need to know in order to complete Lend Lease Part 2 in Escape From Tarkov.
Escape From Tarkov Lend Lease Part 2 Item Locations
Outside of outright buying the components in Escape From Tarkov, both can be found relatively easily on Labs and can even spawn fairly close to one another. Starting with the two Virtex Programmable Processors, we’ve got a map for your reference down below:
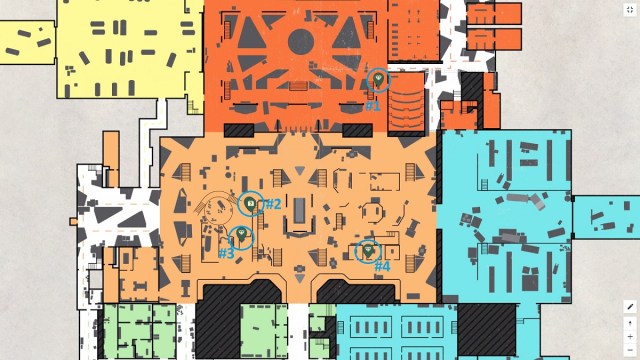
- Location #1: Look between two server racks lying on a table, just outside the projector room.
- Location #2: Look behind a series of white pipes. You can find another Virtex atop some boxes. It’s also possible that a COFDM spawns here instead.
- Location #3: Just before entering the area with the dome, check the tops of boxes.
- Location #4: Go inside the middle room featuring orange robotic arms. To your left is another Virtex, atop a white pedestal.
Now, onto the Military COFDM Wireless Signal Transmitters. There are a total of five locations in the Lab, but you only need one to actually spawn. Here’s a map for reference:
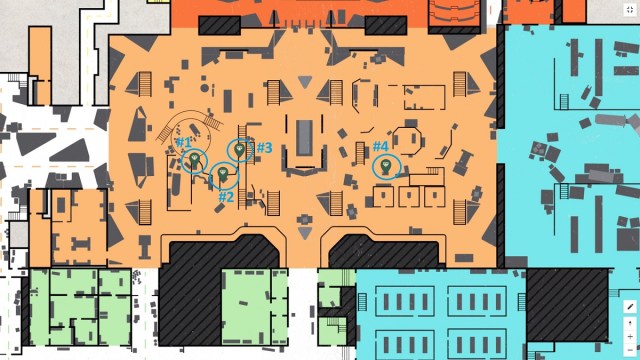
- Location #1: Look behind a series of white pipes. You can find a COFDM atop small boxes. It’s also possible for this to be a Virtex instead.
- Location #2: Just before entering the area with the dome, check the tops of boxes.
- Location #3: For this one, go to the nearby PC block and look for the COFDM on top.
- Location #4: Another COFDM can spawn here, on the table.
- Location #5: The last COFDM can spawn in Security Room #2, lying on the server racks. Requires a Violet Keycard.
With all three items, you can turn in the quest and close the book on this section of the Lend Lease.
That’s everything there is to know about how to complete Lend Lease Part 2 in Escape From Tarkov. For more related content, check out what the best maps for beginners are or handy ways to fix slow downloads in Escape From Tarkov.